Bar Cabinet
Materials:
- 1 – 6′ piece of 1/4″ x 1 1/2″ craft board in your desired finish
- 1 – 8′ piece of 1/2″ x 2 1/2″ craft board in your desired finish
- 1 – 1×2 piece @ 8′ long
- 12 – 1×3 pieces @ 8′ long
- 1 – 1×4 piece @ 6′ long
- 2 – 1×6 pieces @ 6′ long
- 2 – 2×2 pieces @ 8′ long
- 1 – 1/2 sheet of 3/4″ plywood
- 1 – scrap of 1/4″ plywood at least 15 1/2″ x 17 1/4″
- 1 – set of euro inset hinges
- 1 – set of 14″ bottom mount drawer slides
- 1 – piece of 1/4″ thick glass cut to 15 1/4″ x 15 1/4″
- 1 1/4″ screws
- 2″ screws
- 1 1/4″ pocket hole screws
- 2 1/2″ pocket hole screws
- 5/8″ Finishing nails
- 1 1/4″ Finishing nails
- 2″ finishing nails
Cut List:
- 2 – 1 1/2″ Project Board pieces @ 18 1/4″ – Back side of door
- 2 – 1 1/2″ Project Board pieces @ 15 1/4″ – Back top and bottom of door
- 4 – 2 1/2″ Project Board Pieces @ 18 1/4″ (Measured at the long side of your mitered cut. Sides should be mitered at a 45 degree angle.)- Door Sides
- 1 – 1×2 @ 18 1/2″ – Drawer Divider
- 1 – 1×2 @ 15″ – Drawer Slide Mount
- 26 – 1×3 @ 25″ – Plank Casing
- 6 – 1×3 @ 35″ – Plank Top
- 2 – 1×4 @ 17 1/4″ – Drawer Front/Back
- 2 – 1×4 @ 14″ – Drawer Sides
- 1 – 1×6 @ 18 1/4″ – Drawer Front
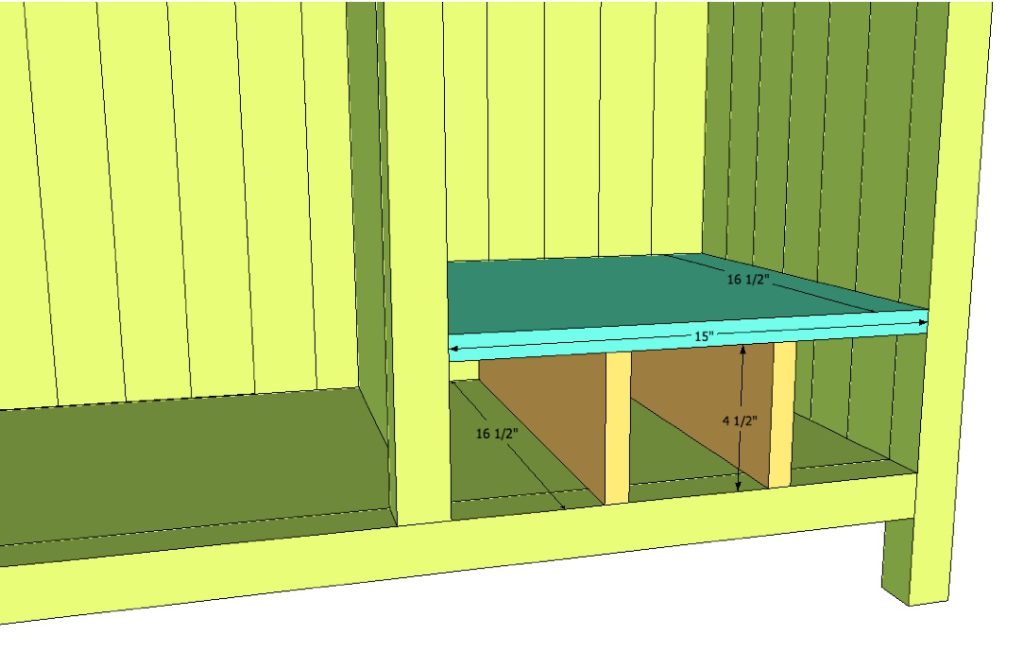
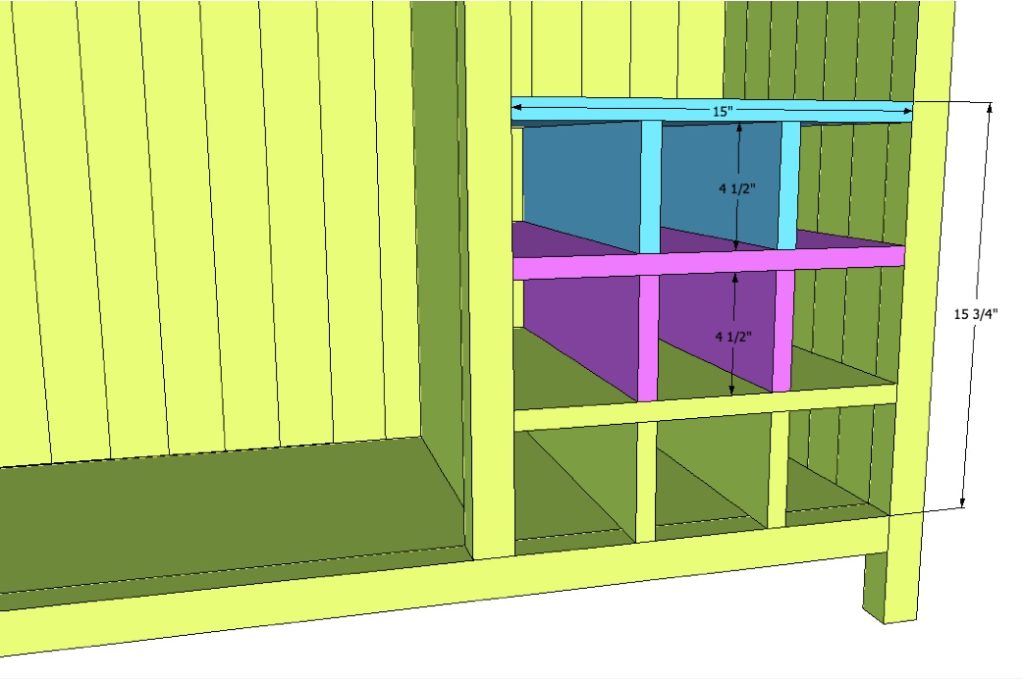
- 6 – 1×6 @ 16 1/2″ (ripped to 4 1/2″ wide. From now on will be mentioned as 1x5s) – Wine Dividers
- 4 – 2×2 @ 35″ – Front and Back Top/Bottom
- 4 – 2×2 @ 15″ – Side Top/Bottom
- 2 – 2×2 @ 25″ – Center Divider
- 4 – 2×2 @ 31″ – Legs
- 1 – 1/4″ Plywood @ 17 1/4″ x 15 1/2″ – Drawer Bottom
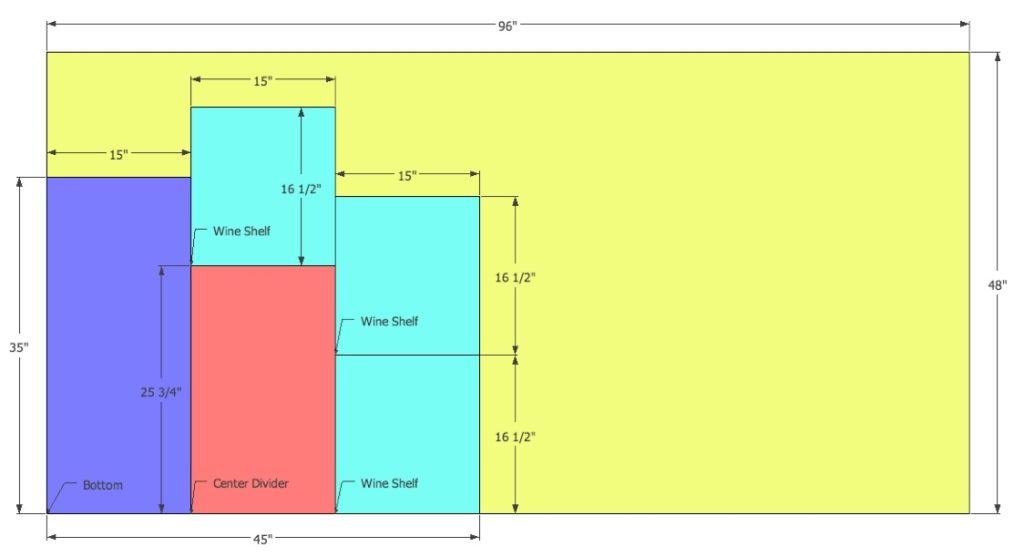
- 1 – 3/4″ Plywood @ 35″ x 15″ – Bottom
- 1 – 3/4″ Plywood @ 25 3/4″ x 15″ – Center Divider
- 3 – 3/4″ Plywood @ 16 1/2″ x 15″ – Wine Shelves
Step 1:
Cut Plywood as shown above
Step 2:
To create your side, first attach your 1×3 plank boards together to create a flat panel. (Make sure to use wood glue!) In making this panel, it helps to ensure that all of the “bend” is eliminated from your board to have a straight side. Once that has been completed, Kreg Jig your panel to the top and bottom 1x2s flush to the back, leaving a 3/4″ gap on the front. (One trick to doing this is to put a scrap 1x board or 3/4″ thick piece of plywood underneath your 1×3 planks when Kreg Jigging it into the 2×2. That should remove the guesswork and give you the perfect 3/4″ overhang when you’re finished screwing the panel together.) (PS – is Kreg Jigging a word? If not, it totally should be.)
Step 3:
Attach your legs either by using your Kreg Jig or countersinking 3″ screws through the sides into the top/bottom 2x2s that are attached to your panel. The top of the 2×2 should be flush with the top of your panel. Repeat steps 2-3 to create your other side.
Step 4:
Just like you created your sides in step 2, Kreg Jig your 1×3 planks together for the back and then attach them to your 2×2 top and bottom back. Once your panel has been assembled, attach it to the back legs of each of your sides.
Step 5:
Attach your 2×2 front top/bottom boards using your Kreg Jig or by countersinking them into the side 2x2s using 3″ screws and wood glue. The top 2×2 should be flush with the top of the cabinet and the bottom piece should leave a 3″ gap between the 2×2 and the ground. It should be even with the surrounding bottom 2x2s.
Step 6:
Attach your plywood bottom into the casing using your Kreg Jig and wood glue. The top of the plywood should be flush with the top of the front 2×2. Also, make sure that your bottom is level before putting in the final screws!
Step 7:
Slide your 2×2 center divider into place using the dimensions shown above. Secure using your Kreg Jig and wood glue.
Step 8:
Slide your plywood center divider into place in between the back and your 2×2 center divider. When positioning, make sure that the right side (what will be your wine holder side) of the plywood is flush with the outside of the 2×2. You will have a 3/4″ gap on the left side of the plywood between that and the outside edge of your 2×2. The measurements shown above represent the plywood’s location in relation to the sides of the casing.
Step 9:
There are a few options for installing the wine holder side of the bar cabinet (Each of the three gaps for the wine bottles should be 4 1/2″ wide):
- If you have a right angle drill that can fit into small spaces, you can use your Kreg Jig and attach your 1×5 wine dividers first to the bottom of the cabinet. Once they’re in place, attach the plywood top of the wine divider to top of the 1x5s and secure in place with your right angle drill from the inside using your Kreg Jig.
- If you don’t have a right angle drill, you can attach the 1x5s to the base as described in option 1, but then attach the plywood top by countersinking it from the top into the dividers using 1 1/4″ screws.
- Another option is to attach the 1x5s to the plywood first, and then slide the entire piece into the console and secure using your Kreg Jig and wood glue.
Step 10:
Repeat step 9 twice more to get the full wine rack.
Step 11:
For the top, first attach all of your 1x3s planks together like you did for the sides. To make this step easier, place the top plank section on the ground (top facing downward) and lay the console on top of it fitting the planks into the top opening. This way, when you screw it together using your Kreg Jig, you know that your top is even and level.
Step 12:
Attach your drawer divider as shown above using your Kreg Jig. Make sure that you leave 5 3/4″ above your 1×2 to allow for your drawer.
Step 13:
Since the plywood center divider isn’t flush with the left outside edge of the bar, we need to install a “drawer slide support” to build this out as a platform for your drawer slide. Your 1×2 should fit directly above your drawer divider. Attach with 1 1/4″ screws and wood glue.
Step 14:
Assemble the four sides of your drawer first as shown above with your Kreg Jig. Once you have your boards assembled, add the plywood bottom using finishing nails and wood glue. (Since you are using bottom mount drawer slides, that will further secure the bottom of the drawer.) Add your drawer slides as per the manufacturer’s instructions, leaving a 3/4″ gap between the front of the drawer and the end of your console to allow for the drawer front to fit into place.
Step 15:
Once your drawer slides are installed and the inside of your drawer is inserted into the drawer slot, place your drawer front over the opening leaving a 1/8″ gap on all sides. When you are satisfied with its placement, use finishing nails to secure the front to the inside of the drawer. (This step is even easier if you turn the console onto its back.)
Step 16:
Glue your door sides together as shown above, making sure that your corners have been mitered at a 45 degree angle.
Step 17:
On top of your door sides, secure the back sides of the door to the front using 5/8″ finishing nails and wood glue. At this step, you may want to paint/stain your door before you add the glass.
Step 18:
Glue your glass or plexiglass into the inset using liquid nails or another strong adhesive. You can also secure from the back using mirror clips for additional hold.
Step 19:
Install the door according to the manufacturer’s instructions on your hinges. This is an inset door and there should be 1/8″ available on each side once installed to allow for easy opening (and closing!).
The original plan can be found at http://www.oldpaintdesign.com


