Wet Bar

Entertain your friends in style with this beautiful oak bar. The top is 6 ft. long and 24” deep. The overall height about 42”. The classic design features solid oak armrest molding, solid brass foot rail, a convenient work shelf in the rear, three drawers, and two sliding wine racks. The cabinet is made of ¾” oak veneered plywood. The trim and drawer fronts, from ¾” solid oak. The extensive use of pocket holes makes the assembly of this project easy and intuitive. If you have never used pocket holes in your woodworking projects, you’ll wonder how you ever got by without them. Pocket hole joints are extremely strong and there is no measuring. You simply drill the pocket holes in one of the work pieces to be joined, (the exact location is not critical), clamp the pieces together and insert the screws. Since the screws remain in the joint, they serve as both a dowel and a permanent clamp.
- (2) Sheets of Pine plywood
- (1) Sheet 3/4″ Oak Veneer Plywood
- (1) Sheet 1/2″ Oak Veneer Plywood
- (1) Sheet 1/4″ Hardboard
- (4) 5 1/2″ x 8′ x 3/4″ Oak boards
- (1) 6 1/2″ x 8′ x 3/4″ Oak boards
- (1) 4′ length of Oak Armrest moulding
- (1) 6′ Length of Oak Armrest moulding
- (1) 6′ length of 2″ dia. polished brass foot rail
- (1) 4′ length of 2″ dia polished brass foot rail
- (5) Polished brass floor brackets
- (2) 2″ dia polished brass elbows
- (2) 2″ dia. polished brass end caps
- (5) 14″ drawer slide sets
- (3) drawer handles
- 1 1/4″ Pocket hole screws
- 1″ Flathead wood screws
- 1″ Finishing nails
- 1 1/2″ Finishing nails
- (7) Small Angle brackets
Cut List:
3/4″ Plywood
- (2) 6 1/2″ x 41 1/8″ – Left/Right Front Panels
- (1) 41″ x 41 1/8″ – Center Front Panel
- (2) 14″ x 41 1/8″ – Cabinet Sides
- (2) 14″ x 23 1/2″ – Vertical Dividers
- (2) 14″ x 52 1/2″ – Top Work Shelf/ Bottom
- (1) 5″ x 52 1/2″ – Kick Panel
- (1) 16″ x 14″ – Small Shelf
- (15) 14″ x 2″ – Cleats
- (2) 19″ x 2″ – Front Cleats
3/4″ Oak Boards
- (2) 2″ x 55 1/2″ – Top/Bottom Trim (front)
- (2) 2 1/2″ x 36″ – Fluted Trim (Front)
- (4) 1 1/2″ x 36″ – Corner Trim
- (2) 3/4″ x 36″ – Side Corner Trim (Front)
- (4) 2″ x 16 1/4″ – Top/Bottom Trim (Side)
- (2) 1″ x 26″ – Decorative Frame (Top/Bottom)
- (2) 1″ x 18″ – Decorative Frame (Sides)
- (1) 2″ x 51″ – Bottom Horizontal Trim (Back)
- (1) 3 1/4″ x 51″ – Top Horizontal Trim (Back)
- (2) 1 1/2″ x 21″ – Vertical Divider Trim (Back)
- (2) 1 1/2″ x 40″ – Vertical Corner Trim (Back)
- (2) 1 1/2″ x 14 1/2″ – Drawer Divider Trim (Back)

Drill pocket holes on the front sides of the center panel as shown above. These
pocket holes are used to attach the three front panels together. The pocket holes will
be covered with the trim later.


Cut two side panels 14″ wide and 41 1/2″ high from 3/4 inch oak veneered plywood. Cut two vertical divider panels 14″ wide and 23 1/2″ high from the same material.

Cut two pieces of 3/4″ oak veneered plywood 52 1/2″ wide by 14″ deep. One is for the cabinet bottom and the other for the main work shelf.

Cut the Kick Panel 52 1/2″ long by 5″ wide from 3/4″ oak plywood. Cut the notches and drill pocket holes as shown. The location of the pocket holes is not critical.

Cut the small shelf 16″ wide by 14″ deep from 3/4″ oak veneered plywood.

Cut fifteen cleats 14″ long by 2″ wide from 3/4″ oak veneered plywood. Seven of these cleats require pocket holes. All fifteen cleats require three 3/16″ diameter holes for mounting screws. The screw holes need to be countersunk. The pocket holes should be about 1 1/2″ from each end and one in the center. The screw holes 1/2″ from the pocket holes as pictured.
The reason only seven require pocket holes is that five of these cleats will be used only for drawer slide mounts for the three drawers and do not require pocket holes. This will be illustrated in the assembly instructions

Cut two cleats 19″ long by 2″ wide from 3/4″ oak veneered plywood. Drill pocket holes and mounting screw holes as for the 14″ cleats. These are for securing the workshelf and bottom to the cabinet front.


Cut two pieces of 3/4″ oak 36″ long by 2 1/2″ wide for the fluted front trim. These pieces will cover the joint and pocket holes that are used to join the three front panels together. The flutes are not necessary but if you have a router table, I think they are worth the extra trouble. Use your router with a 1/2″ core box bit to cut the flutes. The center flutes should be about 4″ from each end and the edge flutes should be about 4 3/4″ from each end. I recommend using some scrap wood to practice making the flutes. You will need to use your router table and fence for this if you have one.
Tip: make pencil marks on your router table fence on each side of the router bit, one 4″
from the center of the bit and the other 4 3/4″. Then, you can use these marks to determine the start and stop point of the work piece.

For the corner trim, you’ll need four pieces of 3/4″ oak 36″ long by 1 1/2″ wide. For the front corner trim, you’ll also need two pieces of 3/4″ oak 36″ long by 3/4″ wide. For the Top and Bottom Side trim, you’ll need four pieces of 3/4″ oak 16 1/4″ by 2″. One end of the top and bottom trim requires a 45 degree miter cut because it must mate with the front top and bottom trim.

Cut two pieces of molding 26″ long for the frame top. Cut two pieces of molding 18″ long
for the frame sides. All corners must have 45 degree miters. I made the molding from 3/4″ by 1″ wide oak and used a round over bit and ogee bit to give it the shape shown above. If you don’t want to go with the above shape, you could simply round over both sides, use a beading bit, or any other design you choose.

The top and bottom horizontal trim may need to be slightly longer if your plywood is less
than 3/4″ thick. The vertical divider trim needs to be exactly twice the thickness of the
plywood. So, if your plywood is less than 3/4″ thick, the width of these pieces will be a
little less than 1 1/2″. The pocket holes pictured on some of the pieces above are optional but you may want to use them to assemble the trim before attaching it to the cabinet.
Assembly:

- Attach the top horizontal trim piece 10″ from the top of the side trim pieces with pocket hole screws as shown.
- Attach the vertical divider trim to the top horizontal trim as shown.
- Attach the bottom horizontal trim to the vertical side trim and vertical divider trim as shown.
- Attach the drawer divider trim as shown.
Cut List:
- (1) 6′ Oak Arm rest Moulding
- (2) 2′ Oak Arm rest Moulding
- (1) 3/4″ x 63 1/2″ x 19″ Oak Plywood – Countertop
- (1) 3/4″ x 1 1/2″ x 40 1/2″ Oak – Countertop trim
- (2) 3/4″ x 1 1/2″ x 8″ Oak – Countertop trim
- (2) 3/4″ x 1 1/2″ x 15 1/8″ – Countertop trim
- (4) 5/8″ x 4 3/4″ x 2″ Pine Plywood – Countertop risers
- (3) 5/8″ x 4 1/4″ x 2″ Pine Plywood – Countertop risers
- (2) 5/8″ x 10 3/4″ x 2″ Pine Plywood – Countertop risers
- (2) 5/8″ 25″ x 2″ Pine Plywood – Countertop risers
- (2) 1/2″ x 7 3/4″ x 22″ Oak Plywood – End Soffit
- (1) 1/2″ x 54″ x 7 1/4″ Oak Plywood – Center Soffit

The illustration above shows how to cut the 45° angles with your miter saw. The 1 3/8″ by 3/4″ and the 3 5/8″ by 3/4″ spacer strips hold the molding in the same position it will be installed on the bar top. This is an easy way to make a compound miter cut.
Note: The length and width of the Bar Top depend on the exact inside dimensions of the
assembled armrest molding. I recommend you assemble the armrest molding first, then
measure the inside opening to determine the exact length and width of the Bar Top.

The cuts for the center opening must be perfectly straight and smooth so the trim can fit
flush. I recommend cutting the opening so 1/16″ to 1/8″ of material still needs to be
removed and using your router to true the edges to the exact dimensions. Attach three perfectly straight pieces of 3/4″ thick wood along the edges of the cutout to serve as router guides as shown below. Be sure to attach these strips to the bottom side so you don’t have screw holes showing on the top. Use a straight router bit with a bearing on the end and a 1″ cutting depth. Turn the workpiece over and carefully run the router along the edge guides with the bit bearing following the edge guides. After truing up the edges with your router, the inside corners will need to be carefully trimed with a file.


Countertop trim pieces are all cut from 1 1/2″ by 3/4″ solid oak.

All the risers are 5/8″ thick and 2″ wide. Since armrest dimensions may vary, the lengths given in the drawings above should be considered guidelines only. Wait until you’re ready to assemble the Bar Top before cutting the risers. Then you can tell exactly how long they need to be.

The soffit pieces are used as trim between the armrest molding and the cabinet panels. These pieces also serve to support the outer edges of the molding. The soffit is made from 1/2″ plywood. The dimensions given in the drawings above should be considered guidelines only. As with the risers, wait until you’re ready to assemble the Bar Top before cutting the soffit. Then you can tell exactly what the dimensions should be.
Cut List:
- (2) 1/2″ x 12 1/2″ x 3″ Oak Plywood – Top Drawer Box Front & Back
- (2) 1/2″ x 12 1/2″ x 4″ Oak Plywood – Middle Drawer Box Front & Back
- (2) 1/2″ x 12 1/2″ x 8″ Oak Plywood – Lower Drawer Box Front & Back
- (2) 1/2″ x 14″ x 3″ Oak Plywood – Top Drawer Box sides
- (2) 1/2″ x 14″ x 4″ Oak Plywood – Middle Drawer Box sides
- (2) 1/2″ x 14″ x 8″ Oak Plywood – Lower Drawer Box sides
- (3) 1/4″ x 13 1/2″ x 13″ Hardboard – Drawer Bottoms
- (1) 3/4″ x 15 1/2″ x 5″ Oak – Top Drawer Front
- (1) 3/4″ x 15 1/2″ x 6″ Oak – Middle Drawer Front
- (1) 3/4″ x 15 1/2″ x 10″ Oak – Lower Drawer Front
- (5) 14″ Drawer Slides
- (2) 3/4″ x 18″ x 14″ Oak Plywood – Wine Rack Bottom
- (2) 3/4″ x 18 3/4″ x 2 3/4″ Oak – Wine Rack front
- (2) 3/4″ x 18″ x 1 1/4″ Oak – Wine Rack Back
- (6) 3/4″ x 12 1/2″ x 3″ Oak – Wine Rack center Divider
- (4) 3/4″ x 12 1/2″ x 1 1/2″ – Wine Rack Side

If your plywood is exactly 1/2″ thick, the above dimensions will produce a finished drawer width of 13 1/2″. This leaves 1/2″ on each side for the drawer slides. If your plywood is not exactly 1/2″ thick, you will need to adjust the length of fronts and backs accordingly so your finished drawer box width is 13 1/2″. The drawer box sides should still be 14″. You’ll need to cut a slot just slightly more than 1/4″ deep along the the bottom of each of the drawer box sides, fronts, and backs. This slot should be 3/8″ from the bottom and slightly wider than the thickness of the bottom material.

Drawer fronts are made from 3/4″ solid oak
Cut the Drawer Fronts from 3/4″ solid oak. You’ll probably need to glue up some narrower
pieces for the bottom drawer front. The cutout diagrams show a 6″ and 4″ section for making the lower Drawer Front. The fronts will be attached to the boxes and are wider and taller than the boxes so they will overlap the rear cabinet trim. After cutting the fronts to the correct dimensions, you’ll want to put a decorative edge along the edges with your router. I used an ogee bit on the prototype but it’s all a matter of taste. You’ll need three drawer bottoms. These are all the same size. You can use 1/4″ thick hardboard or 1/4″ thick plywood as you prefer.

Cut the wine rack bases 18″ wide by 14″ deep from 3/4″ oak veneered plywood. Drill three
pocket holes along the front edge of the top surface as shown. One in the center and one on each side about one inch from the edges. You’ll need one base for each wine rack you add to your bar. Cut the dividers from 3/4″ solid oak as shown above. You’ll need three dividers and two sides per wine rack.

Cut the wine rack fronts 18 3/4″ wide by 2 3/4″ high from 3/4″ solid oak. Cut the half circle cutouts as shown above.

If you will be adding drawers to your bar, attach the drawer slides to cleats as shown. Three must have the roller on the right and three must have the roller on the left. The lowest part of the drawer slide must be flush with the bottom of the cleat. The roller section must protrude past the end of the cleats by 3/4″ (the thickness of the trim).

Attach three cleats with drawer slides to the left side as shown above. Attach two cleats with drawer slides to left divider panel as shown above. Note: The bottom cleat and drawer slide for the left divider is attached to the bottom with pocket holes later. It will then provide a way to attach the left divider to the bottom.

If you will be including wine racks, in your bar, attach the drawer slides to the divider panels as shown. Note: the drawer slides for the wine racks do NOT protrude 3/4″ past the edge of the divider panels. This is because the wine rack fronts will be flush with the opening while the drawer fronts will be on the outside of the opening.

Attach the cleats to the top surface of the bottom plate as shown. Pocket holes sides should be placed 16″ from the ends with pocket hole sides facing each other as shown. (These cleats are used for mounting the vertical panels to the bottom surface.) Attach two cleats to the ends of the bottom surface with pocket hole screws. These cleats are flush to the edges of the bottom.

Attach the vertical dividers to the cleats as shown. Attach the front cleat between the panels as shown with pocket hole screws.

Turn the assembly upside down and attach the kick panel as shown with pocket hole screws. Note: the pocket hole screws are on the back side of kick panel.

Now, attach the four cleats to the bottom side of the work shelf with pocket hole screws as shown. The end cleats have pocket holes facing out. The middle cleats have the pocket holes facing each other. The pocket hole side of the middle cleats are placed 16″ from the ends of the workshelf.


Assemble the three front pieces as shown and secure with pocket hole screws. These screws will be covered with trim later.

Attach the front to the cabinet assembly. Use finishing nails to attach the front to the sides (these nails will be covered with trim later.) From the back side, use 1 1/8″ screws through the two front cleats to attach the front to the bottom and the workshelf.


Install the Foot Rail Brackets as shown. Your hardware may be different, so be sure to take your own measurements. Position one bracket so the foot sets flat on the floor and measure the distance of the mounting holes from the floor. This should be about 5 1/2″. The rest of the brackets must all be the same height.
The rear edge of the side brackets should be two inches from the rear vertical trim. The front brackets should be centered side to side between the trim.

Place a piece of tubing in the front supports as shown and measure the distance “X”. (The rear of the cabinet trim to the edge of the tubing.) This should be about nineteen or twenty inches. This will be the length of the tubing for the sides.

Insert a piece of tubing in each side support as shown. Have someone help you hold them so they are parallel to the cabinet and the floor. Measure the distance “Y”. This is the length of the front tubing.

Assemble the rails as shown to the left. The end caps go into the rear of the side rail sections. I recommend completely assembling the rail with the screws provided in the kit and tighten all the screws enough so they make visible marks on the brass rail sections. Then, disassemble the rail and drill 3/16″ holes in the rail where the screw marks are so the screws will all fit flush with the bracket surfaces, elbow collar surfaces, and at the end caps. Since the end caps are inserted into the ends of the rail sections, their screw heads will be on the outside of the rail section.


These photos show a couple of ways to attach the molding corners.
You can join the corners with pocket holes as shown in Figure 1. You’ll need a small pocket hole jig for this. Note: Be sure to place the pocket holes so the screws don’t come through the top surface of the molding. Shorter screws may be necessary. Apply glue and secure with pocket hole screws. You can secure the joints with finishing nails by temporarily securing the corners using some scrap plywood with pocket hole screws as shown in Figure 2. Drill two pocket holes on each of two sides of the plywood. Glue some 100 grit sandpaper to the surface of the scrap plywood where it contacts the lip of the molding (This makes it grip tighter.) Apply glue to the molding joint then secure the molding with the scrap plywood to hold the joint firmly together. Turn the assembly over and secure with two finishing nails as shown (Be sure to pre-drill the nail holes so you don’t split the wood). Countersink the nails so you can fill with putty later. Then you can remove the scrap plywood. The soffit which will be added later will serve to re-enforce the corner joints.

The pocket holes along the back and cutout are for mounting the trim. The ones that are not marked may be placed in approximately the position shown.

Attach the top trim with glue and pocket hole screws as shown above. To ensure the top surfaces of both the Trim and Top are flush, clamp both pieces to a flat surface before inserting pocket hole screws.

This illustration shows how to clamp a piece of trim to plywood. One clamp holds the trim piece flush to a flat surface and the other clamp holds the plywood flat to the same surface. In this case, the plywood represents the bar top. To keep the pieces flush along the whole piece, you’ll want to move the clamps close to each pocket hole as you insert the screws. This will ensure the trim is flush with the top surface.

Apply some glue and arrange the risers on the underside of the top as shown. Attach with either 1 1/8″ flathead screws or 1″ finishing nails.
Note: Even though 1 1/8″ screws won’t penetrate the plywood, they may cause unsightly bumps on the top surface. To avoid this, pre-drill the screw holes in the plywood with a bit slightly larger than the inner diameter of the threaded section of the screws.

The above illustration shows now the armrest molding, countertop, risers and soffit fit together.

Attach the assembled top to the molding assembly with pocket hole screws as shown. Do not glue the top to the molding.

Attach the end soffit pieces to the molding with 1″ flat head screws. Attach the end soffit pieces to the risers with 1 1/8″ pan head screws.

Attach the center soffit pieces to the outside edge of the molding with 1″ pan head screws. Attach the center soffit pieces to the risers with 1 1/8″ pan head screws.
This should leave an opening that is 54″ between the end pieces of soffit and 14 3/4″ between the center soffit and the rear trim. This is the size of the outside dimensions of the cabinet top and this opening must fit over the cabinet top.

This drawing shows an upsidedown view of how the cabinet and top are attached. Use two corner brackets on each end and three in the middle. You don’t want to actually turn the bar upside down to attach the top, it may damage it. Spacing of the corner brackets is not critical. The cabinet trim is not shown for clarity.
Note: You should predrill the bracket screw holes in the top and use screws that go no more that 1/2″ into the wood. Otherwise, the bracket screws may cause unsightly bumps on the top surface of the Bar Top.

Apply a little glue to the mating surfaces and assemble the drawer boxes.
Assemble the front, back, and right side with 1″ long finishing nails as shown in Step 1. Insert the bottom as shown in Step 2. Attach the left side as shown in Step 3.

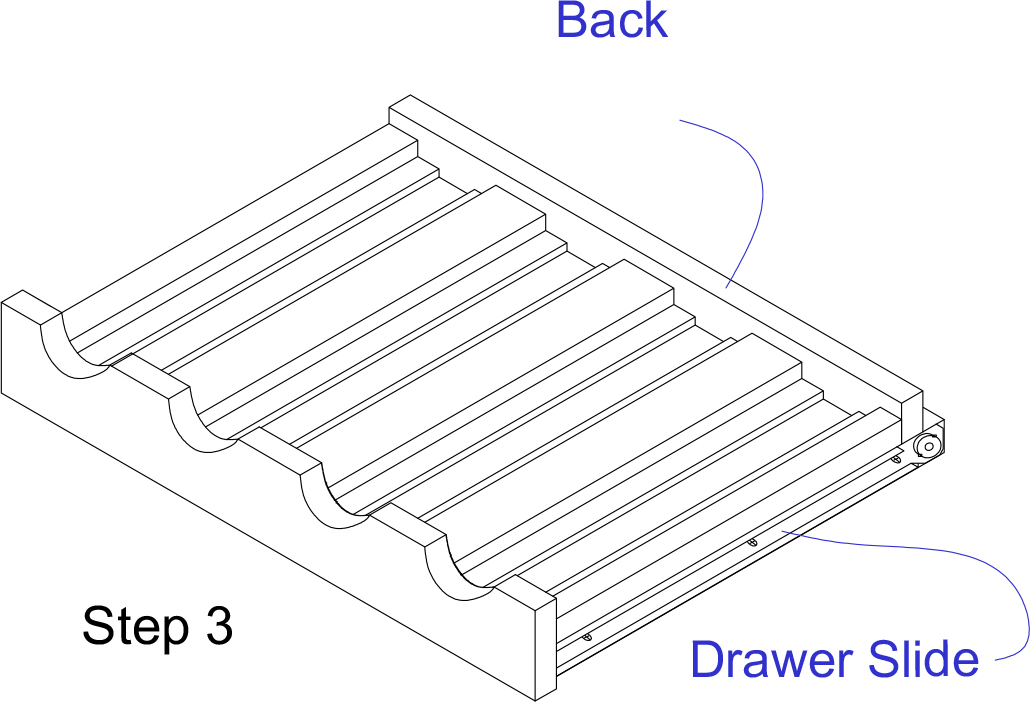
Support the drawer boxes with 1/2″ thick strips of wood and attach the drawer fronts with 1 1/8″ screws as shown in Step 4. This is necessary because the bottom of the front must be 1/2″ below the bottom of the box so it will overlap the rear cabinet trim when installed. Next, attach the drawer slides as shown in Step 5.

Apply a little glue to the mating surfaces and assemble the wine racks as shown.
Mount the front to the base with pocket hole screws. The base and front are flush on the bottom and the base is centered between the edges of the front.
Two edge dividers are mounted flush with sides of the base. The center one is centered and the other two are 4 1/2″ from the edge of the base to the center of the dividers.
Attach the back to the base with finishing nails or screws as you prefer. Attach the drawer slides as shown with the screws that were provided with the drawer slides.
This completes the assembly of your home bar. Be sure to countersink and fill all finishing nails holes before applying the finish.


These layout diagrams show how to cut the parts from two pieces of 3/4″ oak plywood. Note: Since the Center Front Panel and Small Shelf are almost square, they have an indicator arrow and dimension line to ensure you have the grain oriented properly. The other parts are more obvious since they are not as close to being square. You can cut the small shelf a little larger than it’s listed size with a jig saw and true it up with a table saw since it will still have one straight edge.

Cutout diagrams for the soffit and drawer box parts from 1/2″ oak plywood. Cutout diagrams for risers are not given as they may be made from scrap wood.

The drawer bottoms are made from 1/4″ hardboard.
The original plan can be found at http://www.bobsplans.com
![]() [email_link]
[email_link]