Outdoor Bar

- (2) Sheets 1/2”Plywood
- (2) 4 x 4 x 96” Boards
- (6) 2 x 4 x 96” Boards
- (5) 1 x 6 x 96” Boards
- Carpenter’s Wood Glue
- 1” & 1 ¼” Brad Nails
- 1” & 2 ½” Pocket Hole Screws
- 2 ½” Wood Screws
Plywood:
- (1) Top @ 21 x 50”
- (1) Front Panel @ 41 x 42
4×4’s:
- (4) Legs @ 41”
2×4’s:
- (4) Long Frames @ 42
- (4) Short Side Frames @ 13”
- (8) Supports @ 15 ¼”
- (2) Long Middle Supports @ 34”
- (4) Shelf Braces @ 19 ¼”
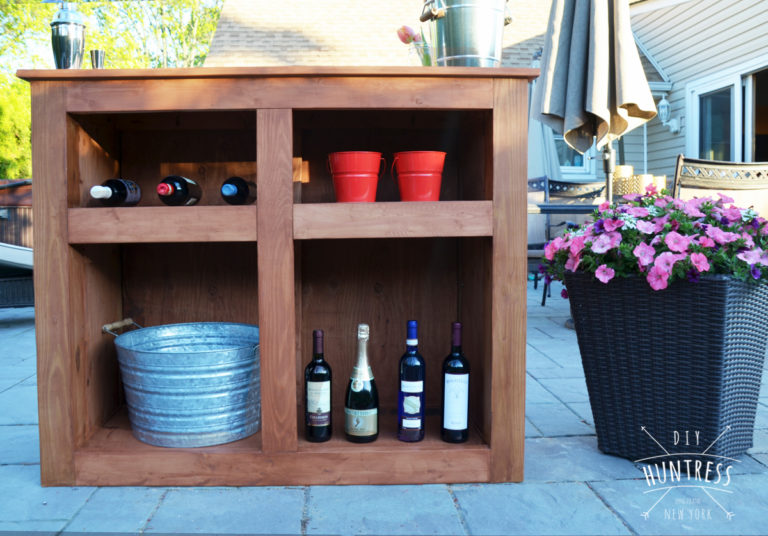
- (2) Side Panels @ 13 x 34”
- (2) Shelves @ 15 ¼ x 42”
1×6’s, Cut one 1×6 into ½” trim:
- (2) ½ x ¾ “ top trim @ 21”
- (2) ½ x ¾ “ top trim @ 51”
- (2) ½ x ¾ “ front trim @ 40 ½”
- (2) ½ x ¾ “ front trim @ 41”

Build frames by first attaching your short side frames to the legs of the bar with 2 ½” pocket hole screws and wood glue. Next, attach your long frame pieces using the same method of joinery.
IMPORTANT: make sure to include pocket holes in all top frame pieces that are facing up for attaching the top panel later!

Add the side panels with pocket hole screws and wood glue.

Attach the long supports/large frame pieces with 2 ½” pocket hole screws and wood glue.

Attach your shelving braces with 2 ½” pocket hole screws and wood glue.

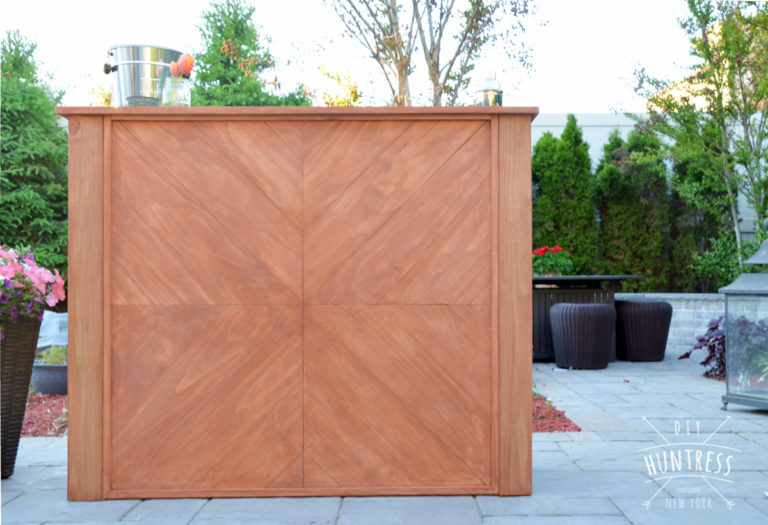
Prep your front panel for artwork! Use a pencil and a straight edge to split your front panel into four equal sections. This will help with lining up your pieces in the next step.

Begin attaching 1×6 pieces. This is done by cutting one end of a 1×6 board at a 45 degree angle and lining it up with the middle intersection you made with your pencil. You can either mark the cut that overhangs at the end here (and trim your pieces as you go), or you can cut your pieces a little long and trim the entire panel down later. Work in one section at a time to avoid mistakes! Use a nail gun and glue to hold your boards down.

Once your panel is complete and the sides are flush, attach it to the front of the bar by screwing and gluing it onto the frames from the inside. This will hide the wood screws on the inside of the bar.

Begin adding your supports to help hold the weight of the shelves and the top (top supports not shown in image below). Attach these to the frames with 2 ½” pocket hole screws and wood glue.
IMPORTANT: In order to make your shelving panels lay flush with the shelving frames, you will have to install your shelf supports ½” (or the equivalent width of your plywood) below the top of your frame pieces. In other words, leave a ½” gap at the top of your supports for the shelf to drop in later.

Drop your shelving panels into place and secure them to the supports with 1” brad nails and wood glue.

Install your top panel with 1 ½” pocket hole screws and wood glue from the bottom frame.

Attach ½ x ¾” trim pieces cut from your 1×6’s to the front panel (@ 41”and 42” — to hide any imperfect gaps – this is optional!) and the top (@ 23” and 51” — to hide the plywood edging).


Sand and then stain and seal your bar with outdoor/waterproofing sealer or stain!


The original plan can be found at http://diyhuntress.com
![]() [email_link]
[email_link]