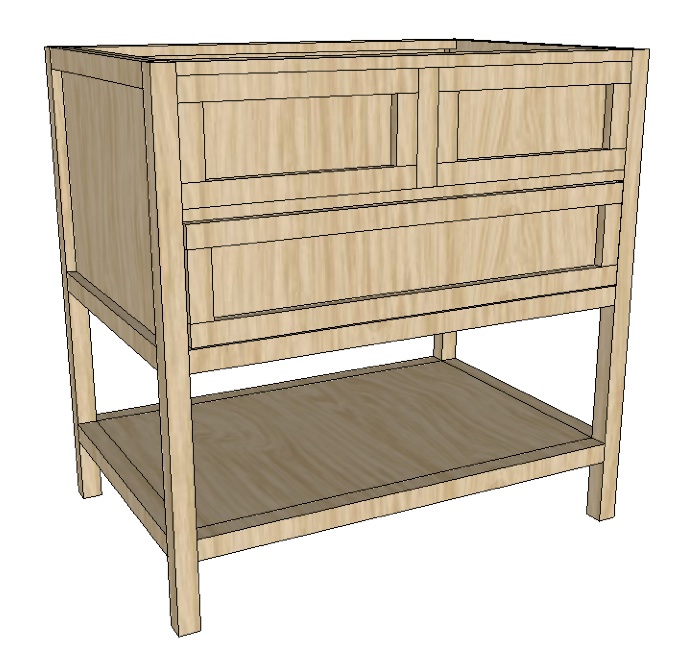
Simple Sink Console

Wood:
- 4 – 1×2 @ 8 feet long
- 1 – 1×3 @ 6 feet long
- 1 – 1×6 @ 6 feet long
- 1 – 1×8 @ 10 feet long (NOTE: It is very important that your 1×8 is 7 1/4″ wide. If it is not, purchase a 1×10 and rip it down to 7 3/4″.)
- 2 – 2×2 @ 8 feet long
- 1 – 2×2 @ 10 feet long
- 1 – scrap of 1/4″ plywood at least 32″ x 12″
- 1 – 1/2 sheet of 3/4″ plywood
Hardware and Supplies:
- 3 – Knobs or Drawer Pulls
- 1 – set of 12″ Bottom Mount Drawer Slides
- 1 1/4″ Pocket Hole Screws
- 2 1/2″ Pocket Hole Screws
- 1 1/4″ Regular Wood Screws
- 1 1/4″ Finishing Nails
- Wood Glue
- Wood Filler
- Medium Grit Sandpaper
- Primer or Wood Conditioner
- Paint or Stain
Boards:
- 6 – 1×2 @ 4 1/2″ – Drawer Trim (short)
- 1 – 1×2 @ 7 1/2″ – False Drawer Trim (center)
- 4 – 1×2 @ 15 3/4″ – False Drawer Trim (long)
- 2 – 1×2 @ 32 3/4″ – Drawer Trim (long)
- 1 – 1×2 @ 33″ – Front Trim
- 4 – 1×2 @ 21 1/2″ – Side Trim
- 2 – 1×3 @ 33″ – Vanity Top Trim
- 1 – 1×6 @ 32″ – Drawer Back
- 2 – 1×6 @ 11 1/4″ – Drawer Sides
- 1 – 1×8 @ 32 3/4″ – Drawer Front
- 1 – 1×8 @ 33″ – False Drawer Front
- 1 – 1×8 @ 33″ – Back Support
- 2 – 2×2 @ 33″ – Bottom Shelf Trim (long)
- 2 – 2×2 @ 21 1/2″ – Bottom Shelf Trim (short)
- 4 – 2×2 @ 35 3/4″ – Legs
- 1 – 2×2 @ 33″ – Bottom Drawer Divider
Plywood:
- 1 – 1/4″ Plywood scrap @ 32″ x 12″ – Drawer Bottom
- 1 – 3/4″ Plywood @ 33″ x 21 1/2″ – Bottom Shelf
- 2 – 3/4″ Plywood @ 21 1/2″ x 18 1/4″ – Sides
Make sure to re-measure and check for square after every step. Sometimes when building your measurements can be off very slightly, and it’s important that your numbers are exact. (Especially when working with doors and drawers!) Measure your available space before building this plan to make sure that it will fit. Please read through the entire plan before getting started.
Plywood Cuts:
Here is a basic cutting diagram for your 3/4″ plywood. When you purchase your plywood, have them cut the piece lengthwise at 21 1/2″. That way, when you get it home, you only have to make one cut per piece. (Plus, if you’re like me with our Matrix hatchback, this way it will actually fit in your car!)
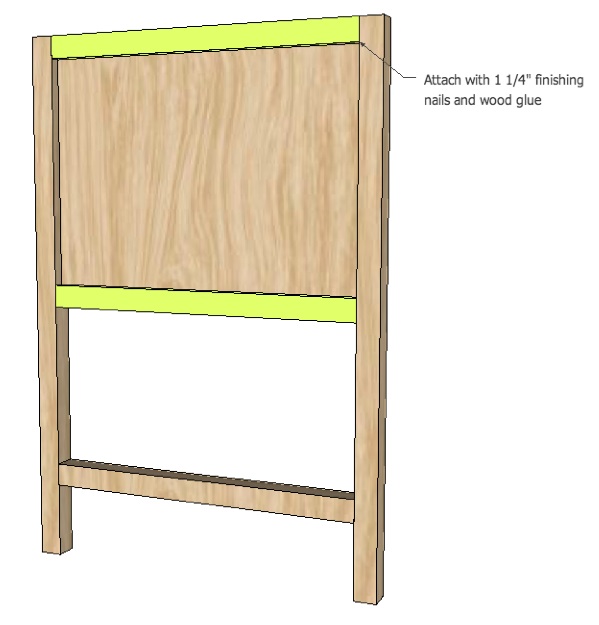
Assemble the side of the vanity as shown above. Make sure that there is a 3/4″ gap between the front of your plywood and the edge of the 2×2. Also, make sure that your pocket holes go on the inside of what will be the cabinet, I just marked them on the outside so that you could better see where they go.

Add trim to the top and bottom edge. Repeat steps 1 and 2 for the second side.
Here’s the fun part where it starts to look like something. Attach the shelf, back support, and one of the pieces of the vanity top trim as shown above.
Add 2×2 bottom shelf trim using the pocket holes that you pre-drilled in the previous step. (It will be easier if you flip the whole piece over while completing this step.) The top of the 2×2 should be flush with the top of your plywood.
Flip your sink console so that you are now working on the front side. Make sure to drill your pocket hole screws on the INSIDE to hide them. Leave a 3/4″ gap on the front of your false drawer front to allow for trim in the later steps.
Add your second piece of top trim above your false drawer front. The front of the 1×3 should be flush with the edges of your 2×2 legs.
When adding the bottom drawer divider, it is important that your measurements are exact. Before adding this piece, double check the width of your 1×8 drawer front to once again confirm it is 7 1/2″ wide. Some of them come as 7 1/4″, which is why I notated in the shopping list to make sure your board is wide enough.
A trick to making sure your board is exactly 7 3/4″ from the bottom of your 1×2 is to cut a scrap piece of wood to 7 3/4″ and use it as a “spacer” while screwing in your bottom drawer divider.
Build your drawer interior as shown above.
Install your drawer slides and insert your drawer. When installing your slides the interior of the drawer should sit right behind your 2×2 bottom drawer divider, leaving room for your drawer front and trim. To install your drawer front, center it into the space, leaving a 1/8″ gap all the way around it, and secure it with finishing nails. Once it’s tight enough to pull out, remove the drawer and further secure it using the pocket hole screws that you pre-drilled in the previous step.
Add all of your drawer trim. Once you have finished your piece, add your knobs/drawer pulls.
Finish your project as desired. Make sure to sand it down with medium grit sand paper and fill in all your holes with wood filler before tackling that paint or stain.
The original plan can be found at http://www.oldpaintdesign.com/2012/05/28/simple-sink-console/


