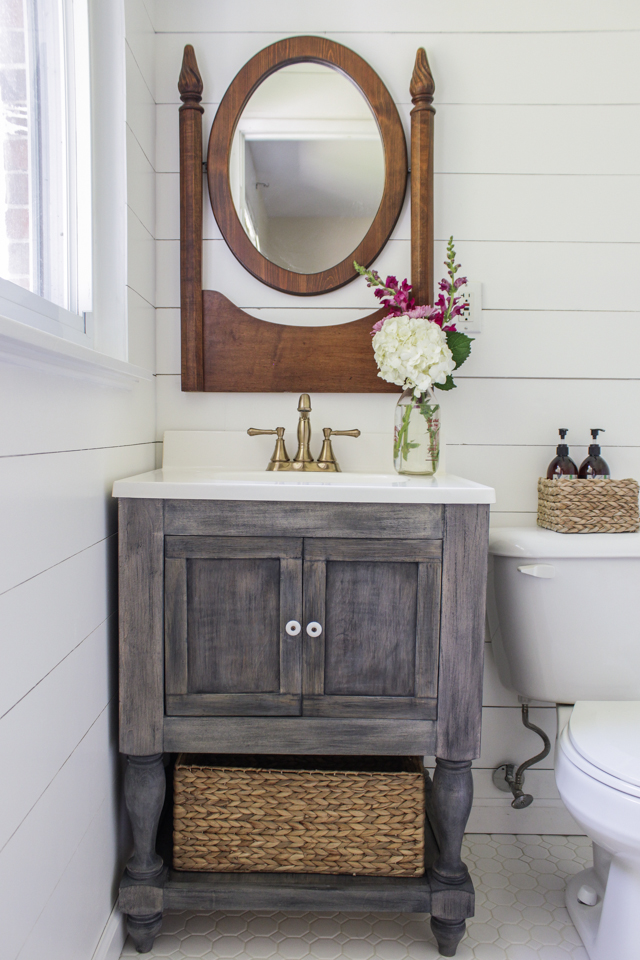
Bathroom Vanity
- (1) – 8′ length of 1×3 poplar
- (4) – 35.5″ x 3″ Marshall Island Legs by Osborne Wood in Soft Maple
- (1) – 12′ length of 1×2 poplar
- 3/4″ ply, 4′ x 8′ sheet Purebond birch plywood
- 1/2″ plywood, 2′ x 4′ sheet Purebond birch plywood
- 220 grit sandpaper
- 1 1/4″ pocket hole screws
- 1″ pocket hole screws
- 1 1/4″ nails
- 4 euro style inset hinges
- 2 knobs
- Stain and top coat of choice
- (4) – 35.5″ Marshall Island Legs @ 32 3/8″ (3 1/8″ off the top)
- (2) – 3/4″ plywood @ 12 1/2″ x 17 1/8″ (sides)
- (1) – 3/4″ plywood @ 18 1/2″ x 10″ (back)
- (2) – 3/4″ plywood @ 16 1/2″ x 21″ + notches cut out of each corner – 1 1/4″ x 2″
- (2) – 1/2″ plywood @ 6 1/8″ x 9 3/8″
- (2) – 1×2 @ 12 1/2″ (sides of bottom shelf frame)
- (2) – 1×2 @ 18 1/2″ (front and back shelf frame)
- (4) – 1×2 @ 9 1/8″ (cabinet door frame – top)
- (4) – 1×2 @ 9 3/8″ (cabinet door frame – sides)
- (2) – 1×3 @ 18 1/2″ (front frame)
- (4) – 1×3 @ 12 1/2″ (side trim)

Drill 3/4″ pocket holes on sides of 3/4″ plywood (the long sides of the 17 1/8″ x 12 1/2″ pieces) and 1x2s. Attach to 3/4″ plywood to legs, so the top is flush and there is a 1 1/2″ space from the inner corner of the legs to the plywood, using 1 1/4″ pocket hole screws. This will leave a 3/4″ ‘inset’ on the ‘outside’, which will allow the trim to be attached and flush at a later step. Attach the 1×2 to the bottom of legs, with the same inset.
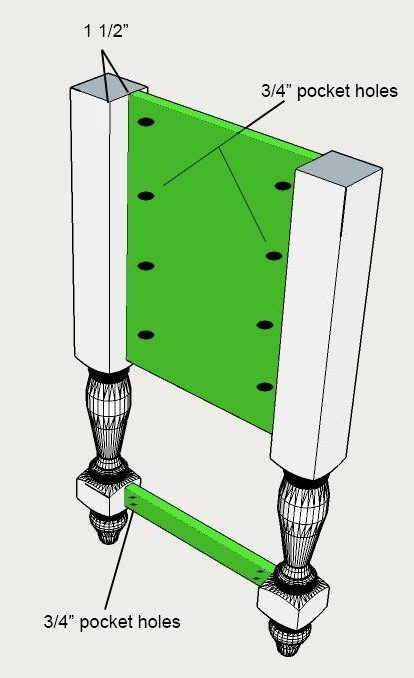
Drill 2, 3/4″ pocket holes on either end of the 1x2s for the front and back of the bottom shelf frame. Drill holes of the same size for the 1x3s of the front cabinet door frame, and the back 3/4″ plywood piece. Attach with 1 1/4″ pocket hole screws.

Repeat process for the other side.
Notch out the base of the cabinet and the bottom shelf using the above guideline. Note that you will likely have to dry fit a few times and make minor adjustments so the shelf will fit before making 3/4″ pocket holes and attaching with wood glue and 1 1/4″ pocket hole screws. Allow a small inset (1/16″ or less) from the top of the shelf (3/4″ ply) to the edge of the frame (1×2) of the bottom shelf, so that when you attach the screws, it doesn’t go through all the way. Small gaps can be filled with wood filler and sanded smooth.
To build the shaker-style doors, simply drill 2, 1/2″ pocket holes along all four sides of the 1/2 plywood. Then drill 3/4″ pocket holes into the 9 3/8″ long 1x2s. Using 1″ pocket hole screws, attach into the plywood to the 1x2s on either side, allowing a 1/4″ inset on the front. The back should be flush.

Turn the vanity upside down when attaching the shelves and attach the cabinet base one first, then the lower shelf.

Attach the top pieces of the doors, first screwing in the side 1x2s to the top and bottom 1x2s with 1 1/4″ pocket hole screws. Then screw the plywood into the top and bottom 1x2s.

Hang the doors in the opening of the vanity, allowing 1/16″ gap on the top bottom and either side where the hinges will attach. Attach the euro style inset hinge by marking, pre-drilling, and screwing into place on both the legs and the doors. Doors should be touching each other so they can stay closed.

Mark, pre-drill, and attach knobs.
Attach side trim pieces (to both sides of the vanity) so both the bottom and top are flush, using 1 1/4″ nails and a nail gun.

Fill nail holes and gaps with wood filler, let dry, and sand entire vanity smooth with 22o grit sandpaper.
Paint or stain with desired color and apply a durable top coat that is water-resistent, like an oil-based poly.
The original plan can be found at http://www.shadesofblueinteriors.com
![]() [email_link]
[email_link]