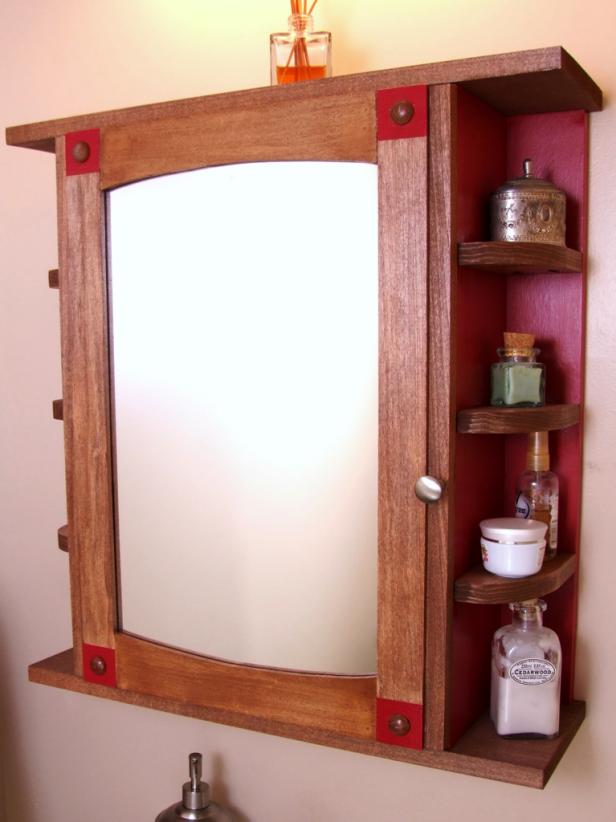
Bathroom Medicine Cabinet
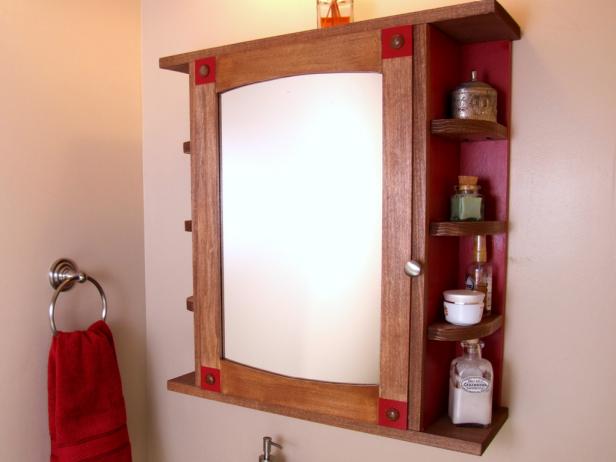
Need more than just a mirror in a small or half bath? This project will give you a mirror and a good bit of storage. It’s perfect over a pedestal sink or vanity. The finished dimensions are 25 1/2″ tall x 24″ wide x 7 1/4″ deep.
This project uses pocket-hole joinery in a couple of steps. If you’re not familiar with it, take a look at the basics.

- main shelf (1) – 3/4 x 5-1/2 x 15-1/2
- sides – (2) – 3/4 x 5-1/2 x 24
- back (1) – 3/4 x 23 x 24
- top (1) – 3/4 x 7-1/4 x 24
- bottom (1) – 3/4 x 7-1/4 x 24
- face frame rails (2) – 3/4 x 1-1/2 x 14
- face frame stiles (2) – 3/4 x 1-1/2 x 24
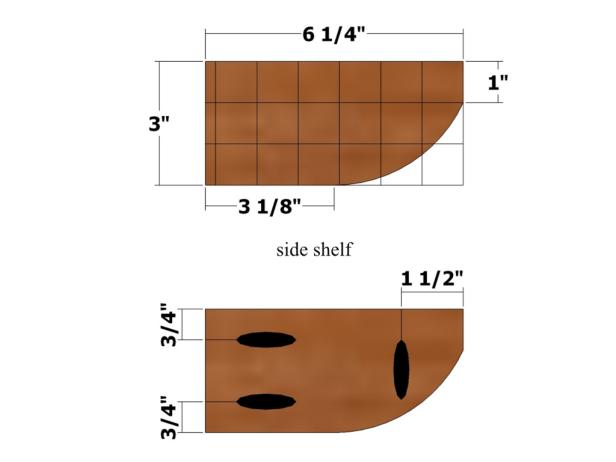
- side shelves (6) – 3/4 x 3 x 6-1/4
- door rails (2) – 3/4 x 1-1/2 x 12-1/2
- door stiles (2) – 3/4 x 2-1/4 x 23-1/2
- door rail trim (2) – 1/4 x 2-1/2 x 12
- door stile trim (2) – 1/4 x 1-3/4 x 23-1/2
- mirror (1) – 1/8 x 12-3/8 x 20- 3/8
- mirror backer (1) – 1/4 x 12-7/16 x 20-7/16
- backer stiles (2) – 3/4 x 1/2 x 20-7/16
- backer rails (2) – 3/4 x 1/2 x 11-7/16
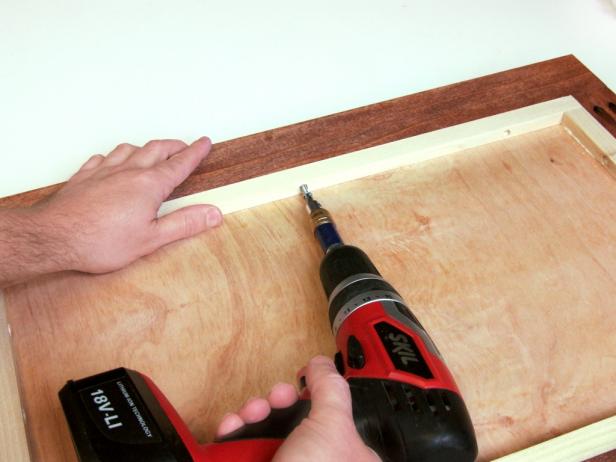
Position the main shelf 11 1/4 inches from the ends of the sides and attach using glue and #17 x 1-1/2-inch wire brads.

Position the side assembly centered on the 23-inch side of the back, and mark on the back face of the back the positions of the sides and main shelf. Apply glue to the edges of the side assembly, and tack in place using 1-1/2-inch brads. For each side and the main shelf, drill countersink holes for 1-5/8-inch screws and drive the screws through the back and into the parts as shown.

Use wood filler to fill the edges and ends of the back. Prime and paint the main shelf, sides and back, except for the top and bottom ends of the sides and the back. Painting the back is optional.
Position the top centered on the end of the assembly nearest the main shelf and flush with the back edge of the back and attach using glue and 1-1/2-inch brads as shown.

Position the bottom centered on the other end of the assembly and flush with the back edge of the back and attach using glue and 1-1/2-inch brads.
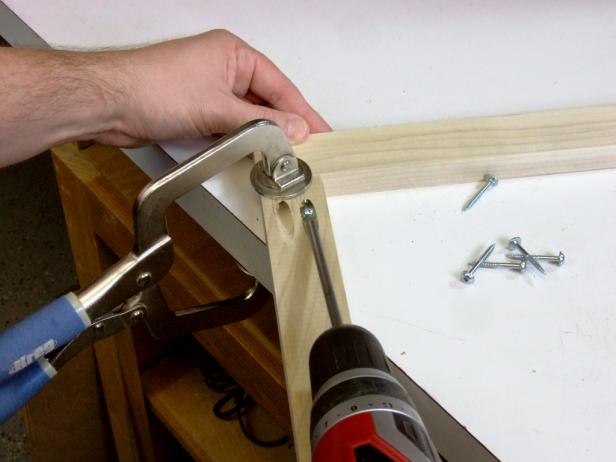
Drill two pocket holes in each end of the face frame rails. Position the face frame rails flush with the ends of the face frame stiles and attach using glue and 1-1/4-inch pocket-hole screws as shown.
Position the face frame assembly flush with the edges of the sides and attach to the sides using glue and 1-1/2-inch brads. Drive brads through the top and bottom and into the face frame assembly as shown.

Prime and paint the face frame assembly.
Use the layout below as a guide to measure, mark and cut the side shelves to shape. Drill pocket holes where indicated. Be sure to drill pocket holes as shown in three side shelves, and drill pocket holes as a mirror image to these in the remaining three side shelves.
Position one side shelf 5-9/16 inches from the top and attach to the back and sides using glue and 1-1/4-inch pocket-hole screws as shown.

Position a second shelf 6 7/16 inches from the bottom and attach to the back and sides using glue and 1-1/4-inch pocket-hole screws.
Position a third shelf centered between the first two shelves and attach to the back and sides using glue and 1-1/4-inch pocket-hole screws.
Apply stain to the top, bottom and side shelves. Apply painter’s tape to the painted areas adjacent to these parts before staining.
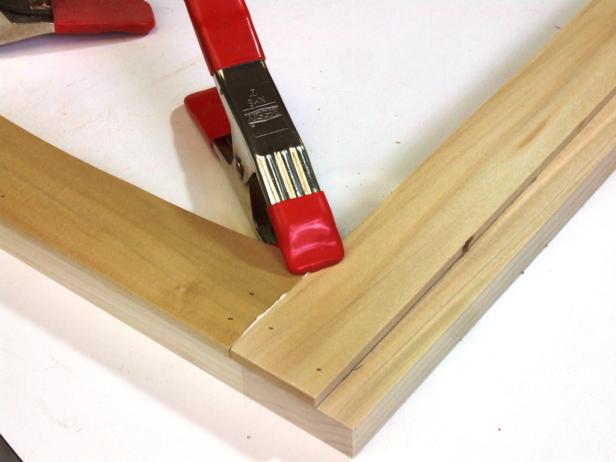
Drill two pocket holes in each end of the door rails. Position the door rails flush with the ends of the door stiles and attach using glue and 1-1/4-inch pocket-hole screws as shown.

Position the door stile trim 3/4 inches from the outer edges and flush with the ends of the door assembly and attach using glue and #18 x 5/8-inch wire brads.
Measure the distance between the door stile trim and adjust the length of the door rail trim if necessary. Use the pattern below as a guide to measure, mark and cut the door rail trim.

Position the door rail trim flush with the outer edges of the door rails (with the curved area facing in) and attach using glue and 5/8-inch brads. Be sure to apply glue to the ends of the door rail trim and clamp the part in place with the door stile trim until the glue sets as shown.
Mark a 1-3/4-inch x 1-3/4-inch square at the ends of the door stile trim parts. Drill a 3/4-inch hole in the center of each square using a Forstner bit as shown.

Use painter’s tape to mark off each square area, and prime and paint as shown.

Apply glue to the hole and insert a 3/4-inch furniture button. Allow the glue to set.
Apply stain to the remainder of the door, including the inside lip of the door rail trim and door stile trim.
Cut the mirror to the size indicated using a glass cutter, or have it cut to the size at a home improvement center. Cut the mirror backer to fit the opening in the door. Drill three pilot holes for 1-inch screws on the 1/2-inch side of the backer stiles and backer rails as shown.

Position the 3/4-inch side of the backer stiles (with the pilot holes facing inward) flush with the ends and edge of the mirror backer and attach using glue and 5/8-inch brads. Position the 3/4-inch side of the backer rails (with the pilot holes facing inward) flush with the ends of the mirror backer and backer stiles and attach using glue and 5/8-inch brads. Place the mirror inside the opening in the door. Place a sheet of newspaper or tissue paper on the mirror back.
Place the mirror backer assembly on top of the mirror and attach the backer stiles and backer rails to the inside of the door stiles and rails using 1-inch screws only, as shown.
Stain and apply polyurethane to the mirror backer assembly.
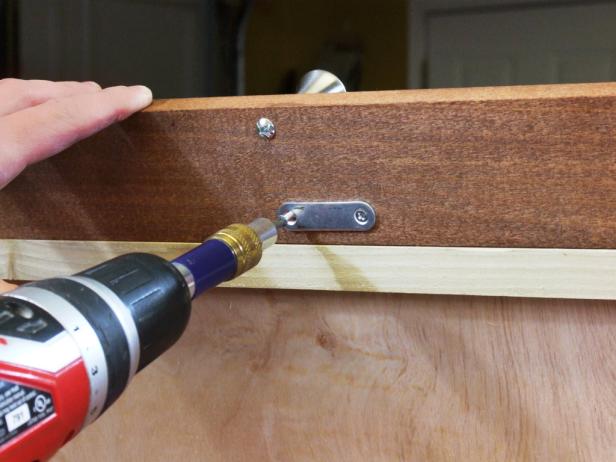
Attach the door centered on the opening using two hinges. Attach a pull on the door stile. Attach a magnetic catch to the inside of the cabinet and the door. Attach the magnetic part to the inside of the cabinet and the plate to the back of the door as shown. Attach two keyhole hangers to the back. Hang on screws appropriate for your wall type.
The original plan can be found at https://www.diynetwork.com
![]() [email_link]
[email_link]