Category: M
Medicine Cabinet

To install a recessed medicine cabinet you need to cut a hole in the wall, remove the drywall and some studs and prepare the studs with additional 2×4’s to make a secure space to mount the cabinet. This Old House has a good article to help you prepare your wall for the medicine cabinet. One important note, you shouldn’t install a recessed medicine cabinet (of this size) in a load bearing wall.
The hole in the wall for this medicine cabinet should be 47 1/4″ wide x 31 1/2″ tall. An easy tool to use to cut the drywall nicely is an oscillating or job plus tool with the semi-circle blade.

- 6 – Inset Cabinet Door Hinges
- 3 Latches
- 1 sheet Beadboard or 1/4″ plywood
- Mirror – 3 cut to 11 1/2″ x 27 1/2″
- 7 – 1″ x 4″ x 8′ boards (actual 3/4″ x 3 1/2″)
- wood glue
- 1 1/2″ screws
- 1 1/4″ pocket screws or brad nails
- sand paper
- wood filler
- primer/paint/stain
- 24 or more Shelf Support Pegs
- (4) 3/4″ x 3 1/2″ x 30″ – 1×4 Lumber – Cabinet Dividers
- (2) 3/4″ x 3 1/2″ x 47 1/4″ – 1×4 Lumber – Cabinet Base/top
- (1) 1/4″ x 47 1/4″ x 31 1/2″ – plywood – Back
- (4) 3/4″ x 1 1/2″ x 30″ – 1×4 Lumber – Face frame divider
- (2) 3/4″ x 1 1/2″ x 48″ – 1×4 Lumber – Face frame top/bottom
- (12) 3/4″ x 3 1/4″ x 14 1/2″ – 1×4 Lumber – Shelves
- (6) 3/4″ x 1 1/2″ x 39 7/8″ – 1×4 Lumber – Door Stiles
- (6) 3/4″ x 1 1/2″ x 11 9/16″ – 1×4 Lumber – Door Rails
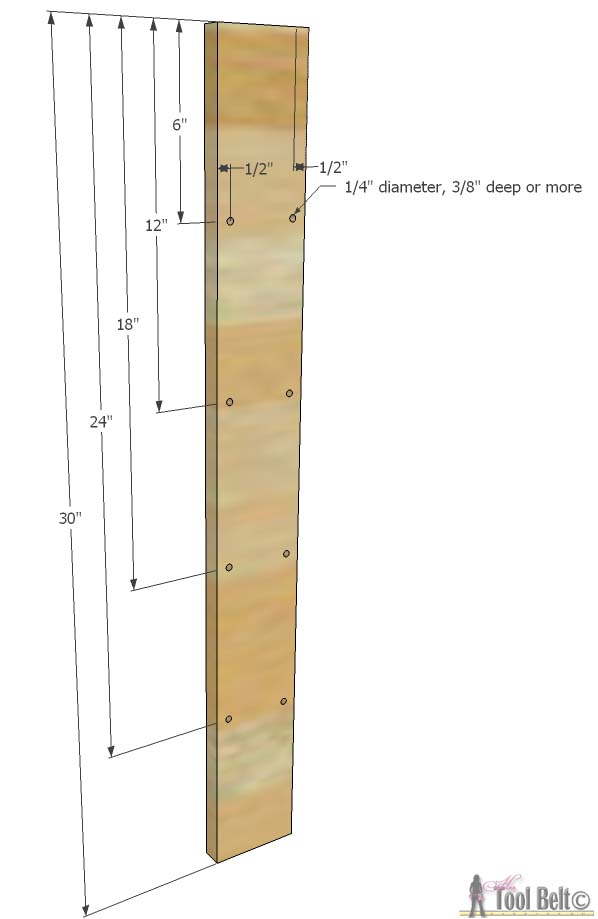
Cut 4 pieces of 1×4 that are 30″ long and 2 pieces that are 47 1/4″. Drill holes for the shelf pegs in the boards. The holes need to be 1/4″ diameter and 3/8″ deep or more. Drill as many holes as you’d like depending on how you want your shelves spaced and if you want to move them around.
If you have a Kreg Jig, you may want to drill pocket holes to attach the cabinet to the face frame now (see step 2). Mark the spacing of the center of the vertical dividers on the 47 1/4″ pieces. Drill pilot holes (2x at each joint) and secure together with wood glue and 1 1/2″ screws.

Cut the bead board or 1/4″ plywood to 47 1/4″ x 31 1/2″, cut 1/2″ or longer brad nails to attach it to the back of the cabinet.

Cut 4 pieces of wood that are 1 1/2″ x 30″ and 2 that are 1 1/2″ x 48″. Drill pocket holes (affiliate link) on the back side of the 30″ pieces. Mark the attachment spacing on the 48″ pieces according to the sketch below. Use wood glue and 1 1/4″ pocket screws to secure the face frame together. (If you don’t use a pocket hole jig, you can assemble the face frame with dowels, biscuits or tenons. Or even use glue and brad nails to attach each piece to the cabinet.)

Line up the face frame to the cabinet. The inside top and bottom should be flush with the cabinet and the dividers should have a 3/8″ offset on each side.

Drill pocket holes in the cabinet outer sides to attach the face frame. Use wood glue and 1 1/4″ pocket screws to attach the face frame to the cabinet. (If you don’t have a pocket hole jig, you can use brad nails to attach the face frame to the cabinet).

Cut shelves for the cabinet. Make as many as you want, I estimated about 12 that are 3/4″ x 3 1/4″ x 14 1/2″. Use shelf support pegs and dry-fit the shelves in the cabinet, trim as needed.
It’s time for the doors! These doors are simple shaker style with a mirror as the panel, they are fairly easy to make as cabinet doors go, you just need a table saw. Cut 6 pieces of wood that are 1 1/2″ x 29 7/8″ and 6 that are 1 1/2″ x 11 9/16″. Starting with the 11 9/16″ pieces, we need to make a tongue on each end.

On each side cut a dado 1/4″ wide and 3/8″ deep, leaving a tongue 1/4″ x 3/8″. Repeat for each end. Then cut a groove down the center of one side that is 3/8″ deep and 1/4″ wide. You can do this by making multiple passes on the table saw with the blade set at 3/8″ high.

Cut the same 3/8″ deep x 1/4″ wide groove on one side of each 29 7/8″ board. Make sure the tongue will fit snug (but not too tight) in the groove of the 29 7/8″ pieces.

Cut the mirror pieces to 27 1/2″ x 11 1/2″, dry fit the mirror into the groove. Depending on the thickness of your mirror, you may need to add thin hardboard to the back for support.
Assemble a door rail and 2 stiles, slide the mirror in place and put the top stile on. When making cabinet doors, you only glue the rail and stile joint (tongue and groove), not the panel. Once assembled with wood glue, clamp (making sure the door is flat and square) until the glue is dry.
Inset cabinet doors need a little gap around the door to open and close, this door should have a 1/16″ gap around the door. There are quite a few inset cabinet hinges that you can choose from, some show, some don’t, depends on your style. Install the hinges, 2 per door about 2 – 3 inches from the top and bottom (account for the 1/16″ gap). Make sure they fit well into the face frame opening, you may have to trim the door edges and that’s fine.
Next fill any holes or gaps with filler. Let the filler dry then sand the cabinet and doors, make sure to get any excess glue and filler smooth. End sanding your project with 120 -150 grit sand paper. Remove excess dust. If painting, prime the doors and allow to dry. If staining, use wood pre-conditioner and stain as you like.
Once the primer is dry, apply the paint and let dry. If you’d like, apply a top coat. If you used light colored paint use polycrylic. Allow to dry sufficiently.
Install the cabinet in the wall, securing it in place with 1 1/2″ or longer screws into the studs. Attach door latches if desired.
Enjoy your medicine cabinet!
The original plan can be found at https://www.hertoolbelt.com
![]() [email_link]
[email_link]
Medicine Cabinet
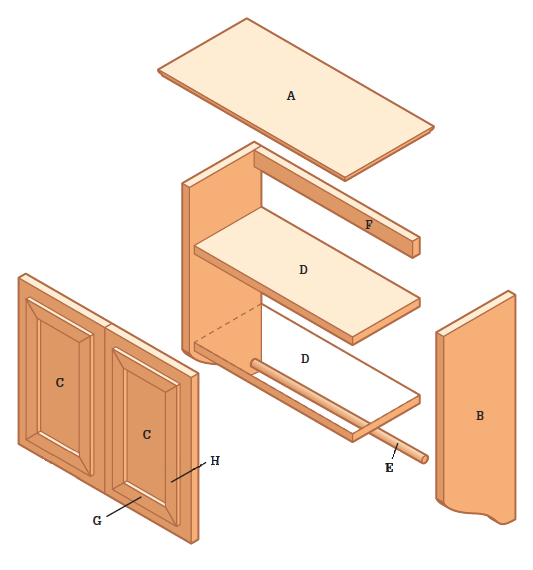
Cabinetry and casework are fundamental to making built-ins and bookcases. This small wall-hung cabinet is a useful item for bathroom or kitchen, and it is a great project for a beginning carpenter to develop some basic cabinetry skills. It is also extremely inexpensive to make.
The entire case, including the top, can be built from an 8-ft.- long piece of 1 × 10 wood (you’ll need a little extra material for the shelving and the towel rod). The mitered frames applied to the fronts of the door give the look and feel of a raised panel door, without any of the fuss. We built the version of the cabinet you see here out of No. 2 and better pine and then gave it an orangey maple finish. You can choose any lumber you like for this, even sheet stock such as mdF, and apply a clear or a painted finish. For a traditional look, choose a white enamel paint. Be sure and apply several thin coats of polyurethane varnish, especially if the cabinet will be installed in a wet area like a bathroom.

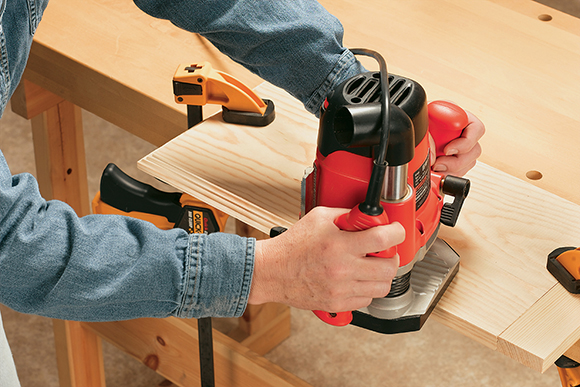
Step 1: Cut the Top Board to 19 1/2″
Shape a decorative profile into the top using a router and piloted ogee bit. Do not remove more than 3/4″ of material along the bottom edges.
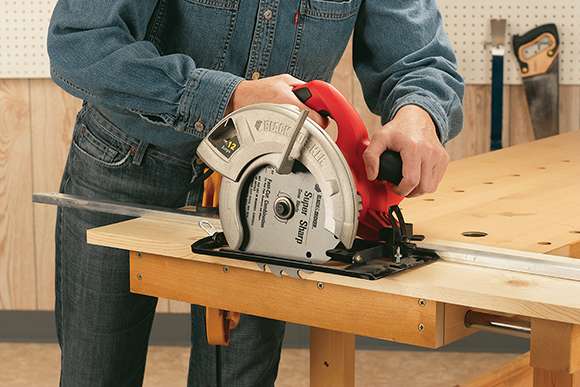
Step 2: Cut the stock for both doors to length
Sand them smooth. The final width of the material should be 9″. Once the stock is prepared, cut the doors to length.
Step 3: Photocopy the Pattern + Make a Hardboard Template Guide
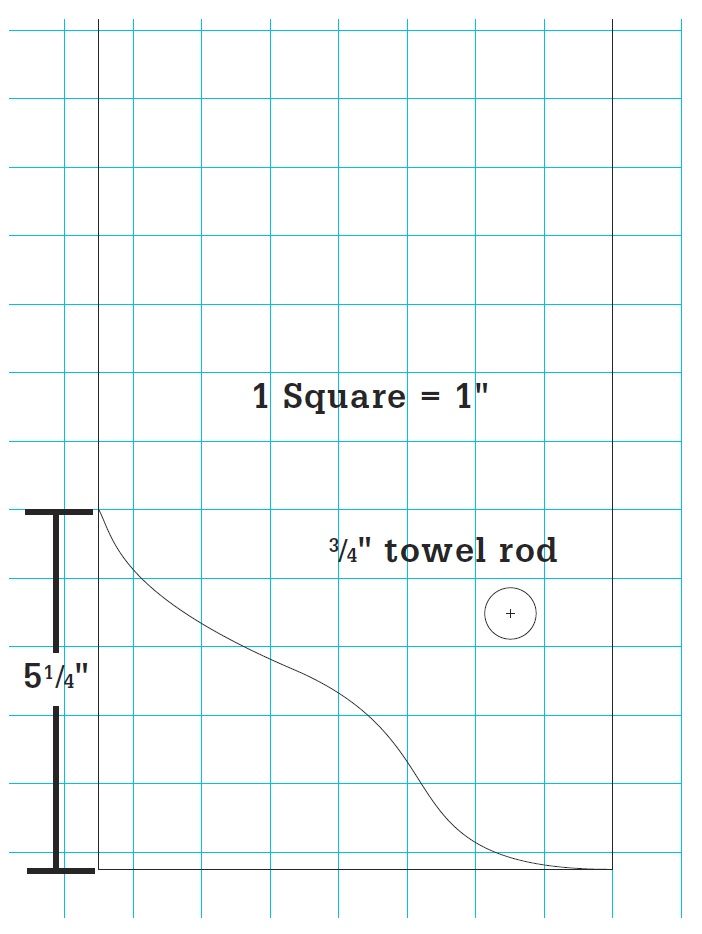
Click to Enlargen
Cut the stock for the cabinet sides to width (7½”) or select a piece of 1 × 8 stock and simply sand the edges. Photocopy the pattern and use it to make a hardboard template guide to trace the profile onto the bottom of one cabinet side.

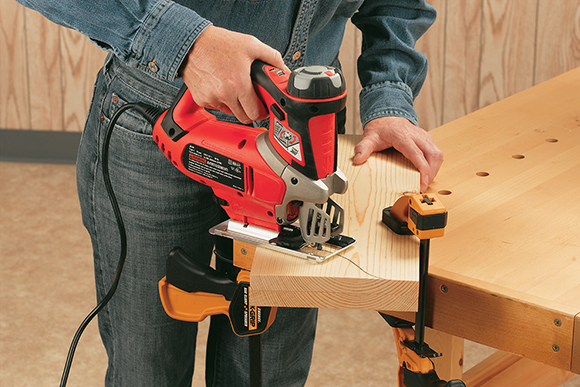
Step 4: Cut Out the Profile Using a Jigsaw
Clamp the two sides together so the ends and edges all are flush. Then, cut out the profile in both pieces at once using a jigsaw.
Step 5: Locate the Center point for Drilling the Dowel Hole
Locate the center point for drilling the ¾”-dia. dowel hole for the towel rod. Drill the hole with a ¾” spade bit, making sure to slip a backer board underneath the bottom board to prevent tearout when the bit exits the work piece

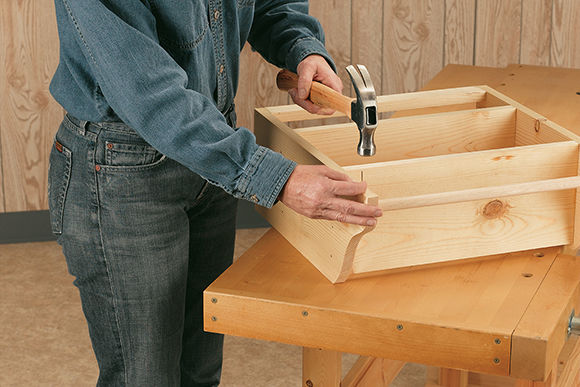
Step 6: Apply Wood Glues to the Ends of All Three Parts
Lay the side boards on a flat surface, lying parallel and on their back edges. Cut the 1 × 2 cleat and the 7″-wide shelves to length (16½”). Then, apply wood glue to the ends of all three parts and clamp them between the cabinet sides.

Step 7: Reinforce the Glued Joints
Before the glue sets (about 15 minutes) drive three 6d finish nails through the cabinet sides and into each shelf end. Drive a pair of nails into the wall cleat.

Step 8: Insert the Towel Rod Into the Holes in the Cabinet Sides
Glue the ends of the towel rod into the holes in the cabinet sides and then pin it in place with a finish nail driven through the back edge of each side.
Step 9: Miter the Corners of Molding
Miter the corners of screen retainer molding and nail and glue decorative frames to the door fronts.

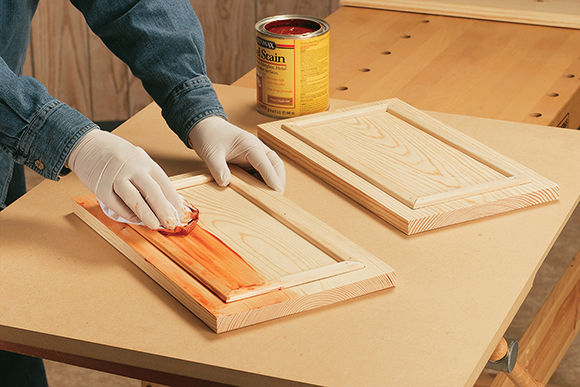
Step 10: Apply finish or Paint to the cabinet doors
Apply your finish or paint the cabinet before you hang the doors and install the cabinet top.
Step 11: Hang the cabinet doors
Use care to position the doors so the outside edges are flush with the outer faces of the cabinets sides. The tops should be about 1/8″ below the top edges of the cabinet sides. Hang the cabinet doors with 1½” brushed chrome or nickel butt hinges

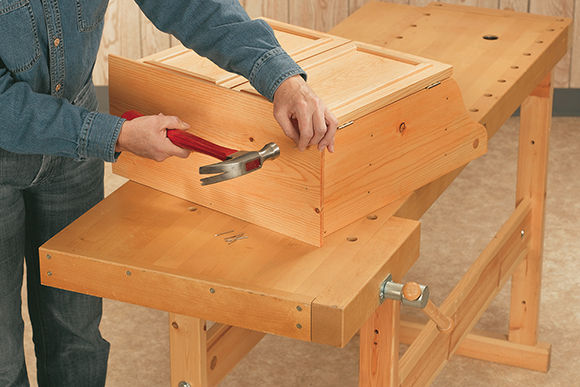
Step 12: Attach the finished cabinet top
Attach the top by driving a few finish nails through it and into the top edges of the cabinet sides, as well as into the top edges of the wall cleat.
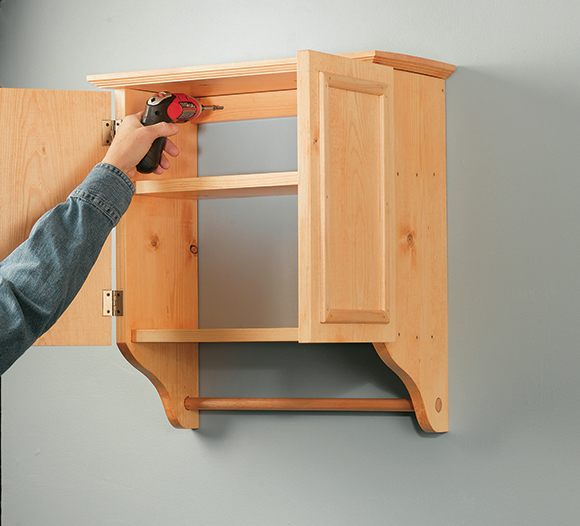
Step 13: Hang the cabinet
Locate wall studs in the installation area. Where possible, position the cabinet so it hits two studs. Attach the cabinet with wood screws driven through the wall cleat and into the studs.
The original plan can be found at https://www.blackanddecker.com
![]() [email_link]
[email_link]
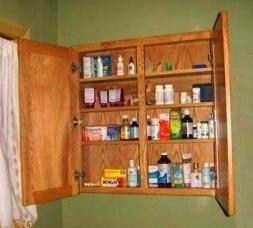
Medicine Cabinet
Materials:
- 1/4″ x 4′ x 8′ Oak (or other hardwood) Plywood: One Piece for the Back and Door Panels
- 3/4″ x 6″ x 8′ Solid Oak Material: Three pieces
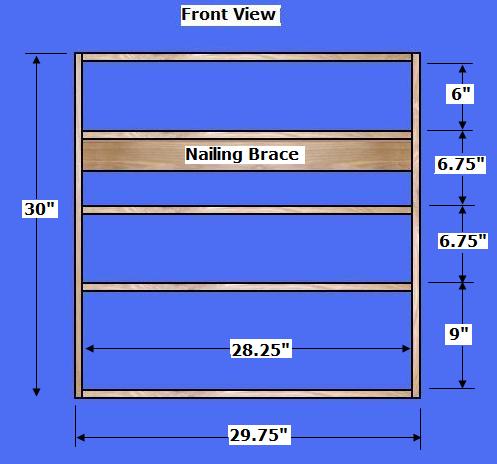

Step 1: Cut and Assemble the Cabinet Box Pieces – Determine the desired size of the Medicine Cabinet
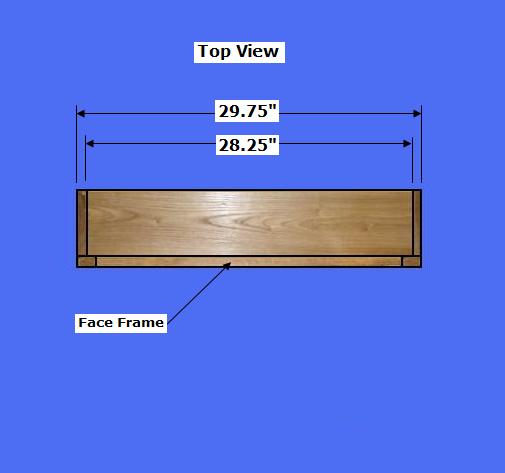
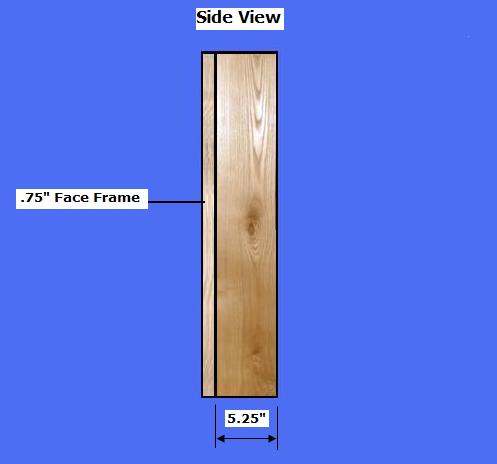
- Select the 3/4″x 6″ Oak Material; Cut two pieces @ 5.25″ x 30″; for the Sides
- Select the 3/4″x 6″ Oak Material; Cut two pieces @ 5.25″ x 28.25″; for the Top and Bottom Panels
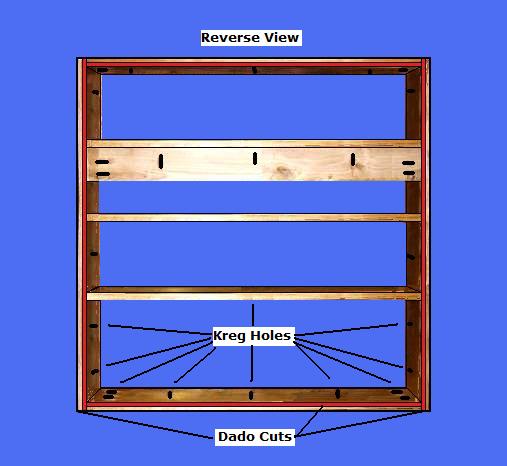
- Select the Sides, Top, and Bottom Panels; Dado the back/inside edges 1/4″ Deep x 3/8″ to receive the Back Panel
- Select the 3/4″x 6″ Oak Material; Cut three pieces @ 5″ x 28.25″; for the Shelves
- Select the 3/4″x 6″ Oak Material; Cut one piece @ 3″ x 28.25″; for the Nailing Brace
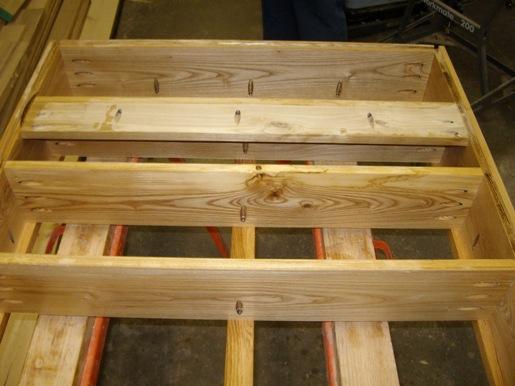
- Using the Kreg System, drill holes on all surfaces indicated above, sand all surfaces, and complete the Box Assembly
Step 2: Cut and Assemble the Face Frame and Back Panel – Select the 3/4″ Oak Material and 1/4″ Plywood
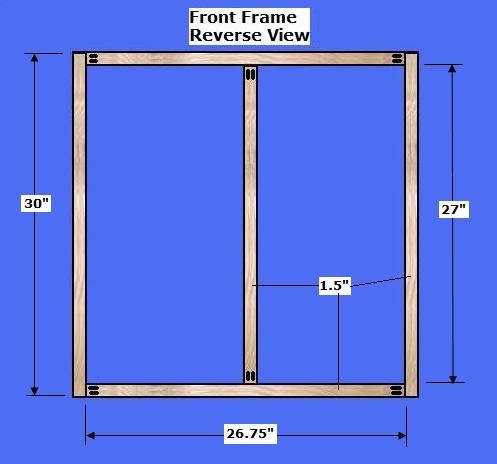
- Select the 3/4″ Oak Material; Cut two pieces @ 1.5″ x 30″ for the Right/Left sides; Cut two pieces @ 1.5″ x 26.75″ for the Top and Bottom Rails; Cut one piece @ 27″ for the Center Board
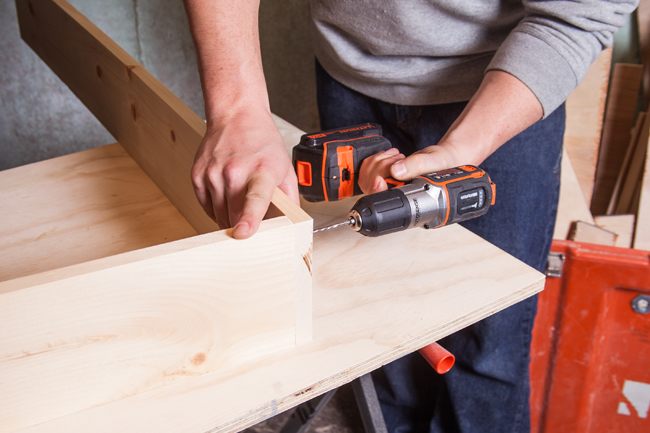
- Select the five Face Frame pieces; Dry-fit the pieces on a flat surface with the reverse side up; Pre-drill two Kregg holes in each end of the pieces and sand, as shown above.
- Use the Kreg Pocket Hole Jig system; drill the holes at the edges of the Frame Pieces, as shown above.
- Select the five Face Frame pieces; Connect the pieces with the Kreg Screws
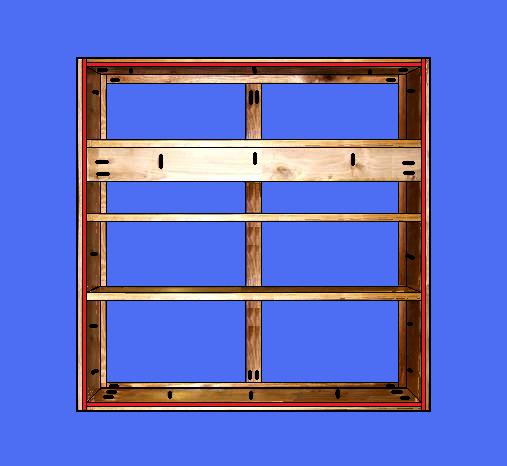
- Select the Face Frame Assembly; Connect the Frame Assembly to the Cabinet Box front edge with Kreg Screws through the pre-drilled Kreg holes on the pieces of the Cabinet Box
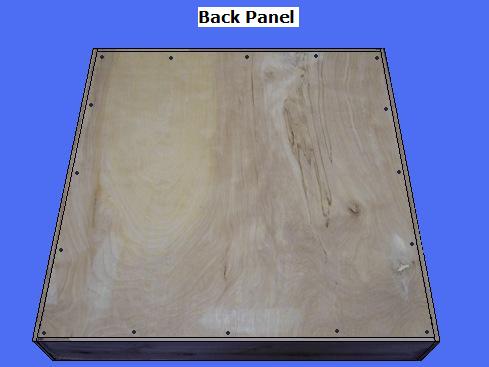
- Select the 1/4″ Oak Plywood; Cut one piece @ 29″ x 29.25″ for the Back Panel; Connect the Back Panel to the reverse side of the cabinet with 1″ screws or brads

Step 3: Make and Attach the Cabinet Doors – Select the 3/4″ Solid Oak Material and Plywood
- Select the 3/4″ Oak Material; Cut four pieces @ 1.5″ x 29.5″ (45 degree corners) for the sides; Cut four pieces @ 1.5″ x 13.75″ (45 degree corners) for the top/bottom door rails
- Select the Oak Material door pieces; Select a router bit design of choice and router both edges of the exterior sides
- Select the Oak Material door pieces; Using a 1/4″ Dado blade, make a 3/8″ deep cut, centered on the interior edges of all eight pieces to receive the Door Panel, as shown above
- Select the Oak Plywood; Cut two pieces @ 27.25″ x 11.5″ for the Door Panels
- Select the Door Pieces; Dry-fit the pieces; Sand all pieces; Assemble the Doors with Glue and tack the corners
- Select the Door Assemblies; Apply hinges of choice, and attach to the Cabinet Face Frame

Step 4: Finish the Medicine Cabinet – Select the Finishing Materials
- Use Wood Filler for all holes
- Complete all sanding
- Apply a minimum of three coats of poly
The original plan can be found at http://www.woodworkingcorner.com
![]() [email_link]
[email_link]
Bathroom Medicine Cabinet

Make full use of your bathroom space by building a sleek storage cabinet that also doubles as a full-length mirror. This bathroom mirror storage cabinet is 5 ½” deep on the inside, 24” wide and 60” tall, with adjustable shelving to easily fit products of any height. You can tackle this project in one afternoon.
- (4) 1 x 6 Pine Boards, 8’ Long
- (3) 1 x 4 Pine Boards, 8’ Long
- 1/4 x 24 x 96” Fir Plywood
- (28) 1 1/2” Bugle-Head Screws
- (32) 1” Bugle-Head Screws
- (8) 3” Bugle-Head Screws
- (8) 1 1/2” Pocket-Hole Screws
- (80) 5/8” Hinge Screws (typically included with packaged hinge)
- 1 1/2 x 60” Brass Piano Hinge
- (20) 3/8” Shelf Pegs
- 120-Grit Sandpaper
- 180-Grit Sandpaper
- 3/8” Drill Bit
- 1/8” Drill Bit
- Pocket Hole Jig + Piloting Bit
- Single-Strength Mirror (approx. 17 x 53”)
- Mirror Adhesive
- Masking Tape
- Wood Glue
- Clamps
1×6 Boards:
- (2) pieces, 60” long for the sides
- (2) pieces, 22 1/2” long for the top and bottom
- (5) pieces, 22 3/8” long for the shelves
1×4 Boards:
- (2) pieces, 60” long for the sides of the door
- (2) pieces, 17” long for the top and bottom of the door
- (2) pieces, 22 1/2” long for the top and bottom back rails
Place the two 60” 1 x 6 side pieces on-edge, parallel to each other. Apply wood glue to the ends of the two 22 1/2” 1 x 6 pieces, and place them flush between the sides at the top and bottom to form a rectangular frame. Use a drill and a 1/8” drill bit to drill three evenly spaced, 3/8” pilot holes from each end of the side pieces. Drive 1 1/2” screws through the sides and into the end pieces to assemble the cabinet box.
TIP: Depending on what type of screw you’re using, pilot holes should be just slightly smaller than the screw. The idea is to allow the hole to be big enough for the screw to pass through without splitting the wood, but at the same time, small enough so that the threads grip firmly.

Apply wood glue to the back of the 22 1/2” 1 x 4 back rail, and place it inside the cabinet box frame, flush at the back and the top of the frame. Drill pilot holes through the sides and top of the box to penetrate into the back rail. Attach the back rail using eight 1 1/2” screws. Install the second back rail in the same position on the bottom of the box.

Use a 3/8” drill bit to drill two vertical rows of holes on the inside faces of the box sides, 1” from the front and back edges. Space each pair of holes 2” apart vertically, and drill the holes 1/2” deep.
TIP: Place a piece of masking tape ½” above the drill bit. This will help indicate the depth of the holes.

Build the door facedown. Use a pocket-hole jig, piloting bit and drill two pocket holes in both ends of the two 17” pieces of 1 x 4. Apply wood glue to the ends of the 17” pieces, and place them flush between the two 60” pieces of 1 x 4. Add clamps to the joint and then screw the door frame together with 1 1/2” pocket hole screws, using the screwdriver. Measure the overall width and length of the door frame. Cut a piece of 1/4” fir plywood to the frame’s dimensions. Apply glue and screw the plywood to the back of the door, with 1” screws spaced 6” apart.
TIPS:
- Pocket holes are angular holes that allow you to join two flat pieces of wood together at 90°. Pocket holes are made with a small jig that positions the bit to penetrate through the end of one piece into the side of a corresponding piece.
- It’s helpful to clamp the joints of the door together while joining them with screws. Add additional clamps to keep the door flat.

Measure the recess inside the door frame and subtract 3/16” from the width and length. Order a single-strength mirror to the measured dimensions.

Use 120-grit sandpaper to sand the cabinet box, shelves and door. Round over all the corners and edges. Apply the stain or paint and allow it to dry as directed. Seal the stained wood with two coats of aerosol lacquer, hand-sanding in between coats with 180-grit sandpaper.
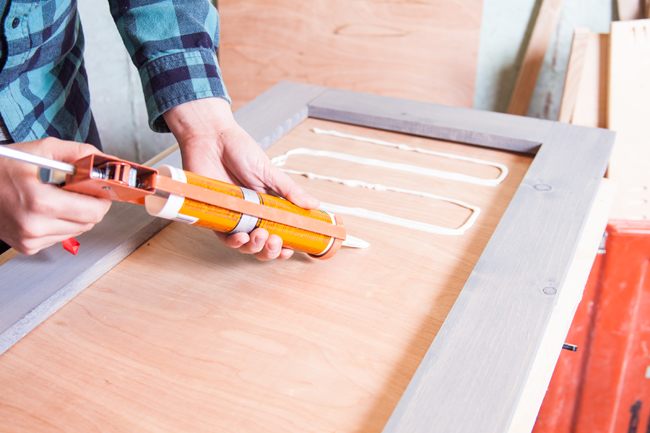
Place the door face up on a flat surface. Apply mirror adhesive liberally to the plywood. Set the mirror into the opening. Place books or other similar items on the mirror to aid adhesion. Allow the adhesive to dry as directed.
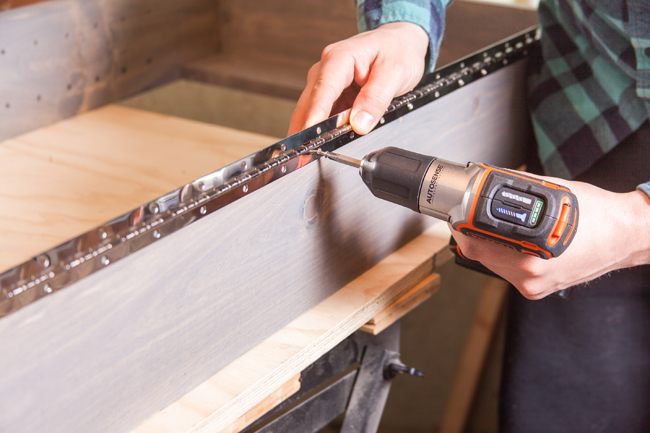
Use a 1 ½” x 60” piano hinge to the side of the cabinet box, using 5/8” screws. Place the door on the cabinet and screw the other half of the hinge to the side of the door.
Locate at least two wall studs in the desired location for the cabinet. Fit the cabinet on the wall. Make sure the cabinet is level. Anchor the cabinet to the wall through the top and bottom back rails with 3” screws driven into the wall studs.

Place 3/8” shelf pegs in corresponding shelf-peg holes. Insert the shelves in the cabinet, resting them on top of the pegs. You can store toiletries, beauty products, folded towels and other small bathroom items on the shelves.
The original plan can be found at https://www.blackanddecker.com
![]() [email_link]
[email_link]
Bathroom Medicine Cabinet
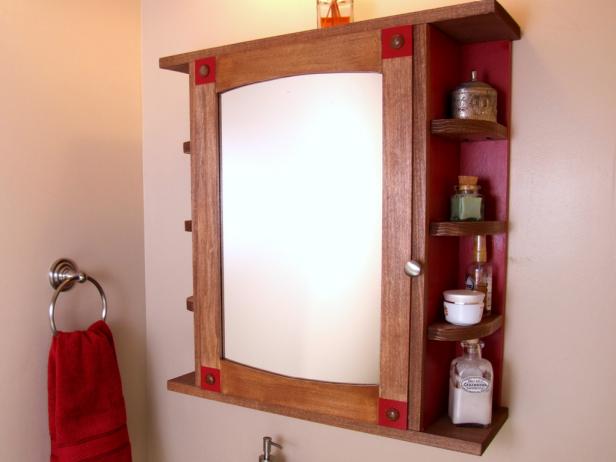
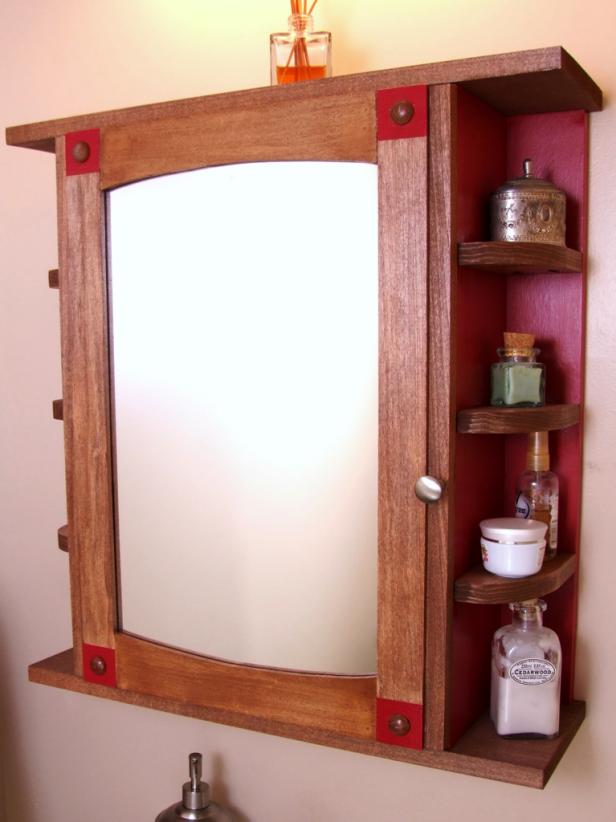
Need more than just a mirror in a small or half bath? This project will give you a mirror and a good bit of storage. It’s perfect over a pedestal sink or vanity. The finished dimensions are 25 1/2″ tall x 24″ wide x 7 1/4″ deep.
This project uses pocket-hole joinery in a couple of steps. If you’re not familiar with it, take a look at the basics.

- main shelf (1) – 3/4 x 5-1/2 x 15-1/2
- sides – (2) – 3/4 x 5-1/2 x 24
- back (1) – 3/4 x 23 x 24
- top (1) – 3/4 x 7-1/4 x 24
- bottom (1) – 3/4 x 7-1/4 x 24
- face frame rails (2) – 3/4 x 1-1/2 x 14
- face frame stiles (2) – 3/4 x 1-1/2 x 24
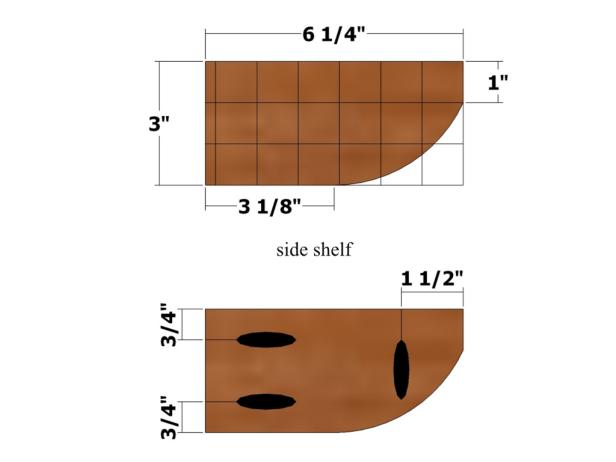
- side shelves (6) – 3/4 x 3 x 6-1/4
- door rails (2) – 3/4 x 1-1/2 x 12-1/2
- door stiles (2) – 3/4 x 2-1/4 x 23-1/2
- door rail trim (2) – 1/4 x 2-1/2 x 12
- door stile trim (2) – 1/4 x 1-3/4 x 23-1/2
- mirror (1) – 1/8 x 12-3/8 x 20- 3/8
- mirror backer (1) – 1/4 x 12-7/16 x 20-7/16
- backer stiles (2) – 3/4 x 1/2 x 20-7/16
- backer rails (2) – 3/4 x 1/2 x 11-7/16
Position the main shelf 11 1/4 inches from the ends of the sides and attach using glue and #17 x 1-1/2-inch wire brads.

Position the side assembly centered on the 23-inch side of the back, and mark on the back face of the back the positions of the sides and main shelf. Apply glue to the edges of the side assembly, and tack in place using 1-1/2-inch brads. For each side and the main shelf, drill countersink holes for 1-5/8-inch screws and drive the screws through the back and into the parts as shown.

Use wood filler to fill the edges and ends of the back. Prime and paint the main shelf, sides and back, except for the top and bottom ends of the sides and the back. Painting the back is optional.
Position the top centered on the end of the assembly nearest the main shelf and flush with the back edge of the back and attach using glue and 1-1/2-inch brads as shown.

Position the bottom centered on the other end of the assembly and flush with the back edge of the back and attach using glue and 1-1/2-inch brads.
Drill two pocket holes in each end of the face frame rails. Position the face frame rails flush with the ends of the face frame stiles and attach using glue and 1-1/4-inch pocket-hole screws as shown.
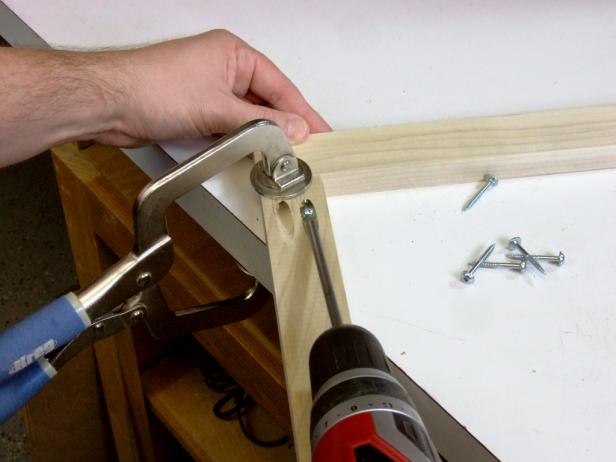
Position the face frame assembly flush with the edges of the sides and attach to the sides using glue and 1-1/2-inch brads. Drive brads through the top and bottom and into the face frame assembly as shown.

Prime and paint the face frame assembly.
Use the layout below as a guide to measure, mark and cut the side shelves to shape. Drill pocket holes where indicated. Be sure to drill pocket holes as shown in three side shelves, and drill pocket holes as a mirror image to these in the remaining three side shelves.
Position one side shelf 5-9/16 inches from the top and attach to the back and sides using glue and 1-1/4-inch pocket-hole screws as shown.

Position a second shelf 6 7/16 inches from the bottom and attach to the back and sides using glue and 1-1/4-inch pocket-hole screws.
Position a third shelf centered between the first two shelves and attach to the back and sides using glue and 1-1/4-inch pocket-hole screws.
Apply stain to the top, bottom and side shelves. Apply painter’s tape to the painted areas adjacent to these parts before staining.
Drill two pocket holes in each end of the door rails. Position the door rails flush with the ends of the door stiles and attach using glue and 1-1/4-inch pocket-hole screws as shown.

Position the door stile trim 3/4 inches from the outer edges and flush with the ends of the door assembly and attach using glue and #18 x 5/8-inch wire brads.
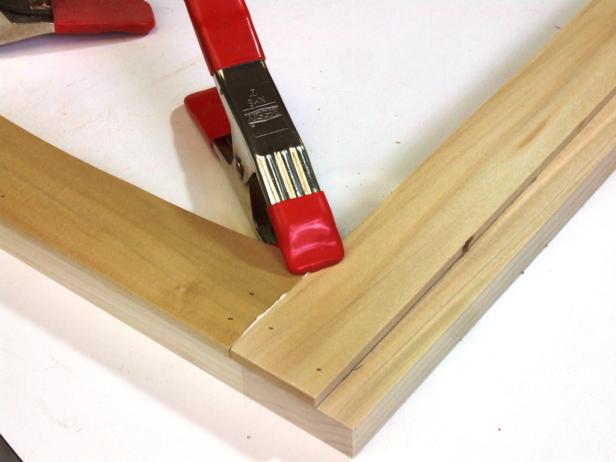
Measure the distance between the door stile trim and adjust the length of the door rail trim if necessary. Use the pattern below as a guide to measure, mark and cut the door rail trim.

Position the door rail trim flush with the outer edges of the door rails (with the curved area facing in) and attach using glue and 5/8-inch brads. Be sure to apply glue to the ends of the door rail trim and clamp the part in place with the door stile trim until the glue sets as shown.
Mark a 1-3/4-inch x 1-3/4-inch square at the ends of the door stile trim parts. Drill a 3/4-inch hole in the center of each square using a Forstner bit as shown.

Use painter’s tape to mark off each square area, and prime and paint as shown.

Apply glue to the hole and insert a 3/4-inch furniture button. Allow the glue to set.
Apply stain to the remainder of the door, including the inside lip of the door rail trim and door stile trim.
Cut the mirror to the size indicated using a glass cutter, or have it cut to the size at a home improvement center. Cut the mirror backer to fit the opening in the door. Drill three pilot holes for 1-inch screws on the 1/2-inch side of the backer stiles and backer rails as shown.

Position the 3/4-inch side of the backer stiles (with the pilot holes facing inward) flush with the ends and edge of the mirror backer and attach using glue and 5/8-inch brads. Position the 3/4-inch side of the backer rails (with the pilot holes facing inward) flush with the ends of the mirror backer and backer stiles and attach using glue and 5/8-inch brads. Place the mirror inside the opening in the door. Place a sheet of newspaper or tissue paper on the mirror back.
Place the mirror backer assembly on top of the mirror and attach the backer stiles and backer rails to the inside of the door stiles and rails using 1-inch screws only, as shown.
Stain and apply polyurethane to the mirror backer assembly.
Attach the door centered on the opening using two hinges. Attach a pull on the door stile. Attach a magnetic catch to the inside of the cabinet and the door. Attach the magnetic part to the inside of the cabinet and the plate to the back of the door as shown. Attach two keyhole hangers to the back. Hang on screws appropriate for your wall type.
The original plan can be found at https://www.diynetwork.com
![]() [email_link]
[email_link]
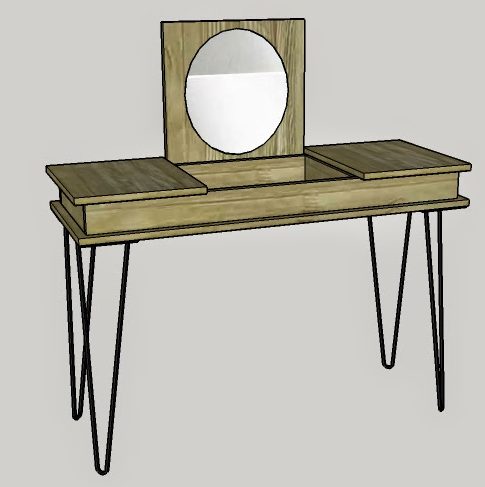
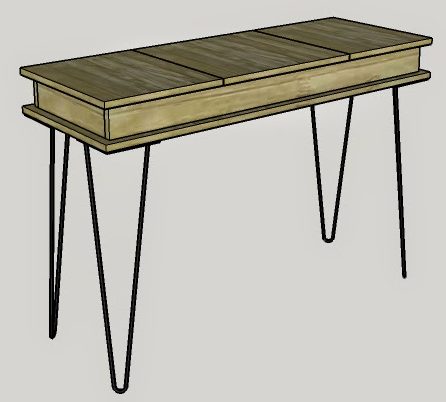
Hairpin Make-up Vanity
Materials List:
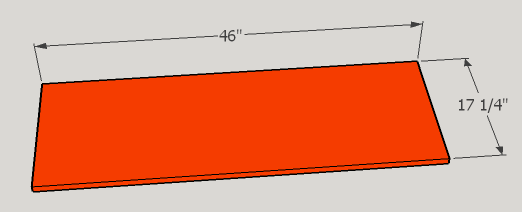
- (2) 1 x 18 x 48″
- (2) 1 x 4 x 96″
- (6) *full overlay cup hinges
- (4) 26″ steel hairpin legs OR (2) 10′ pieces of 3/8″ steel rod and (4) 3/16 thick steel plates
Cut List:
- (2) 1 x 18 @ 46″
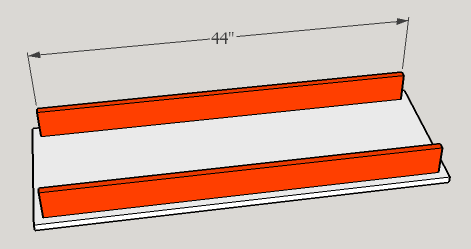
- (2) 1 x 4 @ 44″
- (4) 1 x 4 @ 13 3/4″
Instructions:
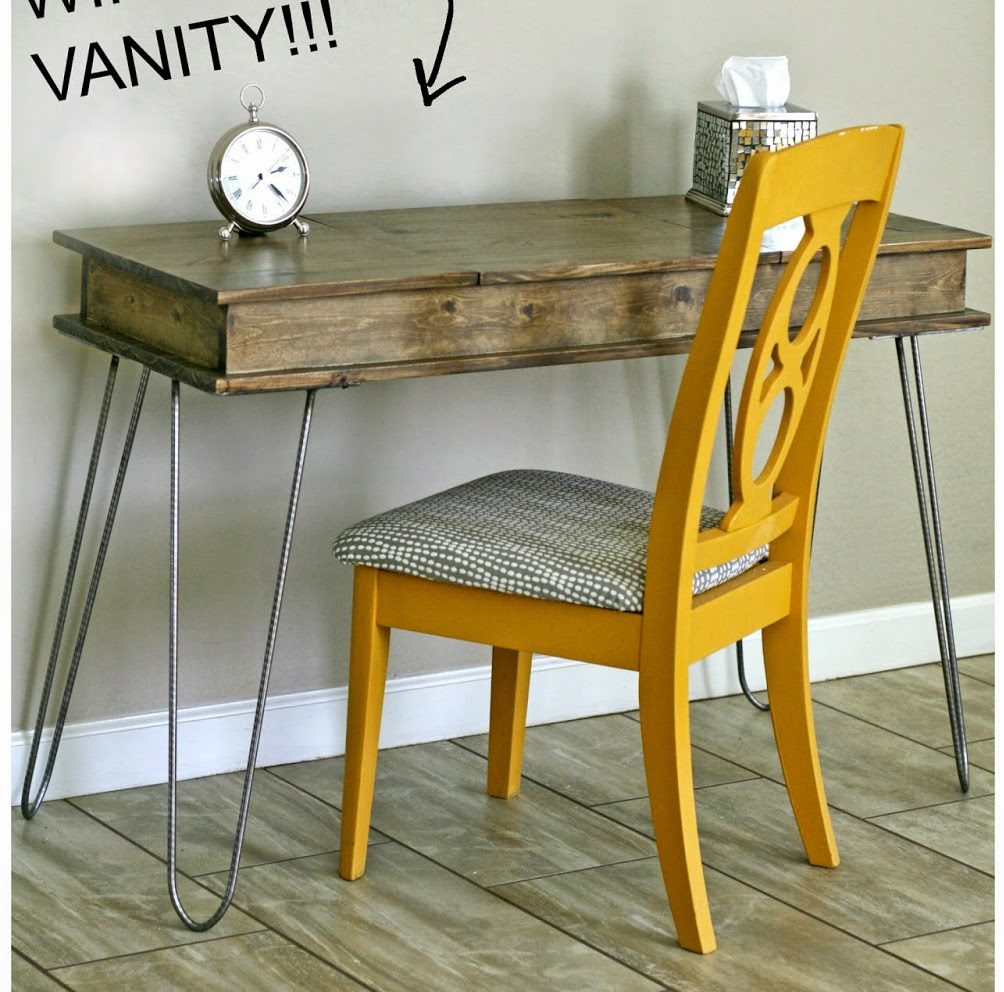
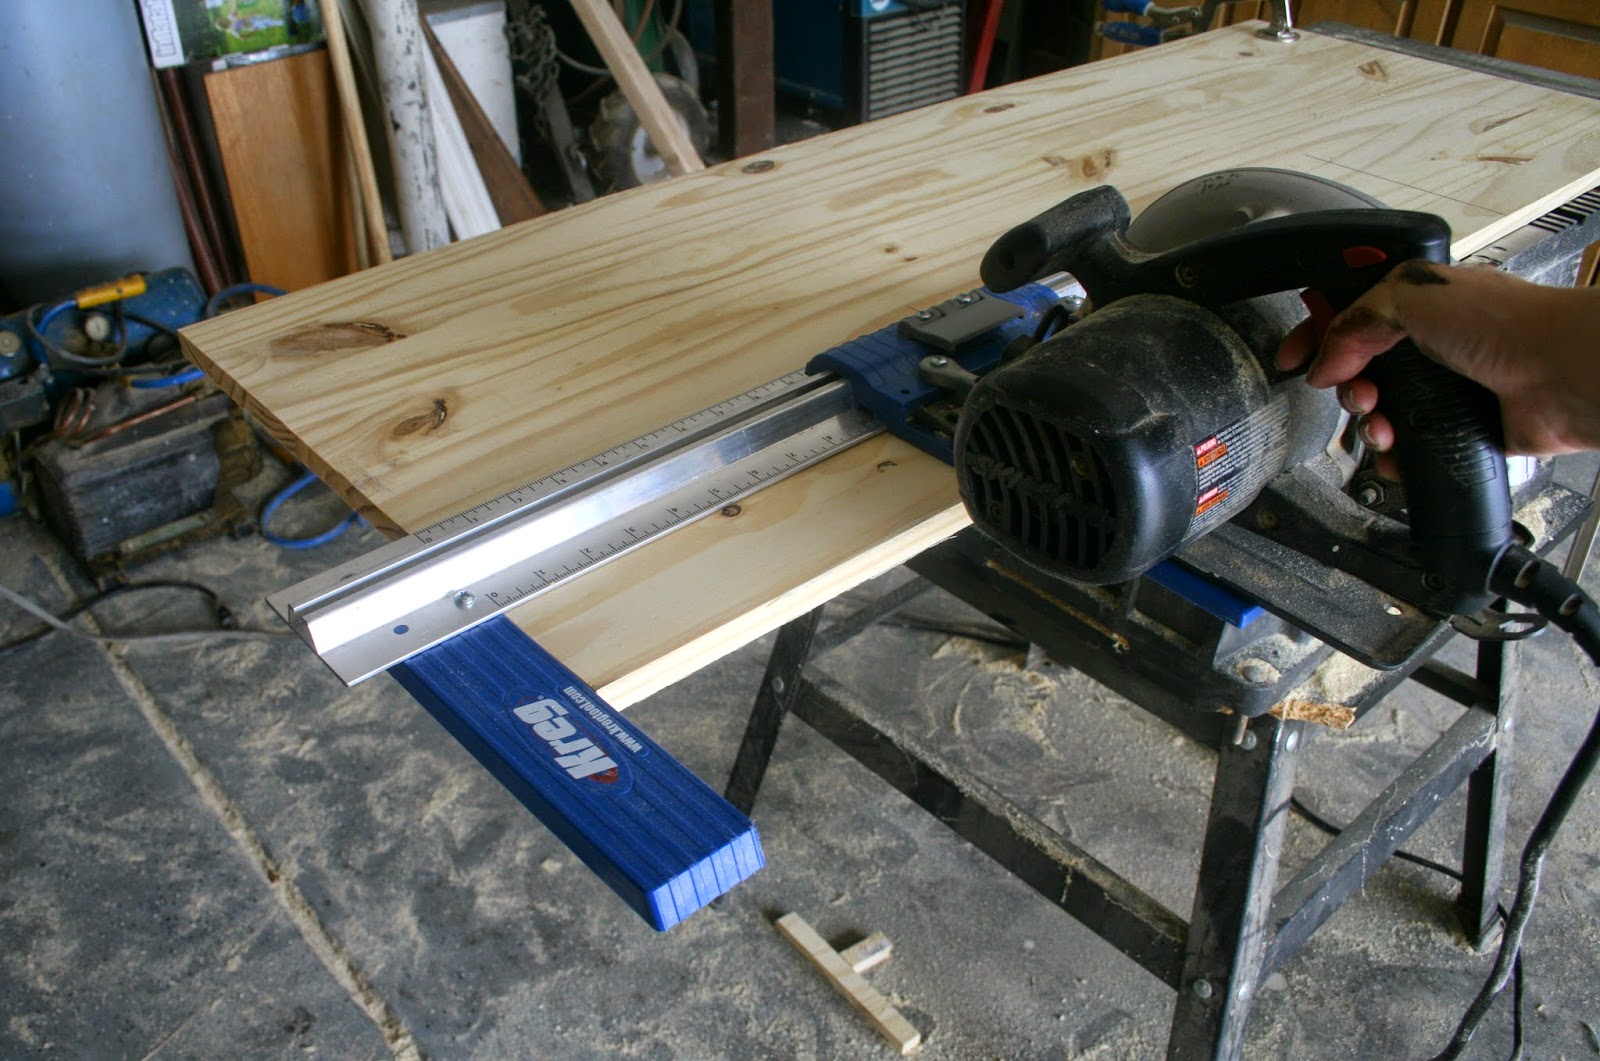
Start with your 1 x 18 boards. Of course 18″ is the “nominal” width; they should actually measure 17 1/4″ wide. Cut both boards down to 46″ in length using a either a table saw or a circular saw attached to a cutting guide, like the Kreg Rip-Cut™.
Next, cut the 1 x 4’s to length. On each 13 3/4″ piece, drill 3, evenly spaced pocket holes on the same side on each end.

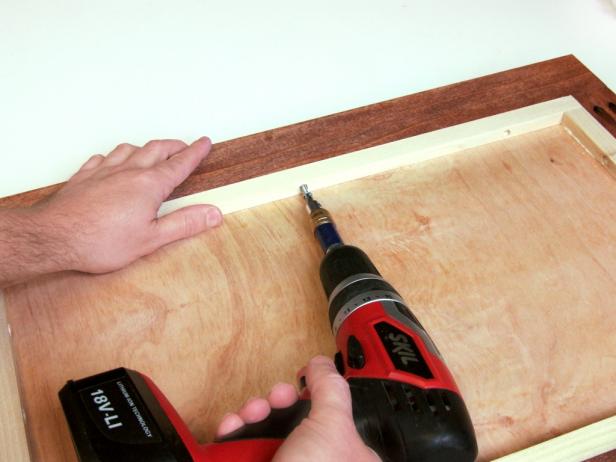
Take your first 1 x 18, and draw a line 1″ from all 4 sides. Line up the 44″ 1 x 4’s along the line and attach them via 2 1/2″ wood screws from the bottom, making sure to pre-drill and countersink.
Now, attach one of the shorter 1 x 4’s, parallel and flush with the ends of the longer boards, using 1 1/4″ pocket hole screws.

Measure 11 7/8″ from the inside of each end board and make a mark. Line up the outer edge of another 13 3/4″ 1 x 4, check for square, and connect with 1 1/4″ pocket hole screws. Repeat the process, measuring from the inside of the other end board. When you are done, you should have two, 11 1/8″ wide sections and one, 17 1/4″ section.

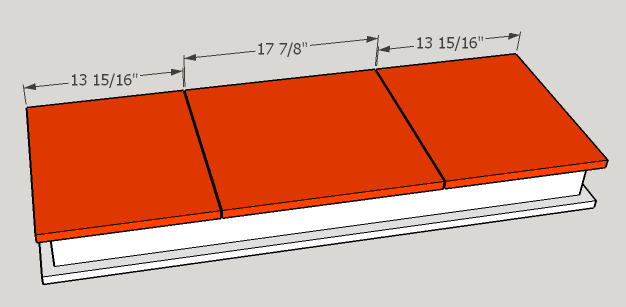
Now, you need to cut the doors. Take the second 1 x 18 board, and measure 14″ from either end and draw a line. Those lines are where you need to make your cuts. You can do it with a table saw.
The saw blade will remove 1/8″ of material, so when you have made both cuts, you will be left with two 13 15/16″ sections of board and one 17 7/8″ section of board. Don’t panic if your doors aren’t the exact same measurement as mine. As long as you’re close and the two outside doors are the same, you’ll be fine.
At this point, I recommend applying the finish to the vanity box, and both sides of the doors. It will much harder to paint or stain with the doors attached. I gave my wood a cool, medium stain with a couple coats of a dark toner, and sealed everything with 3 coats of lacquer.
To attach the doors, you will need a pair of full overlay cup hinges for each door. I know they sound scary, but they really aren’t too bad! I’m always scared to drill two huge holes into the underside of my door, but the little guide that comes with the drill bit kit makes it easy to line everything up.

Time to address the legs. I made four, 26″ DIY hairpin legs out of pre-cut 3/16″, 8″ steel triangles. I picked up the steel from a local metal supplier and the materials for all four legs only cost me around $24. Google “metal supply” in your area and I guarantee you’ll find a local distributor who is open to the public.
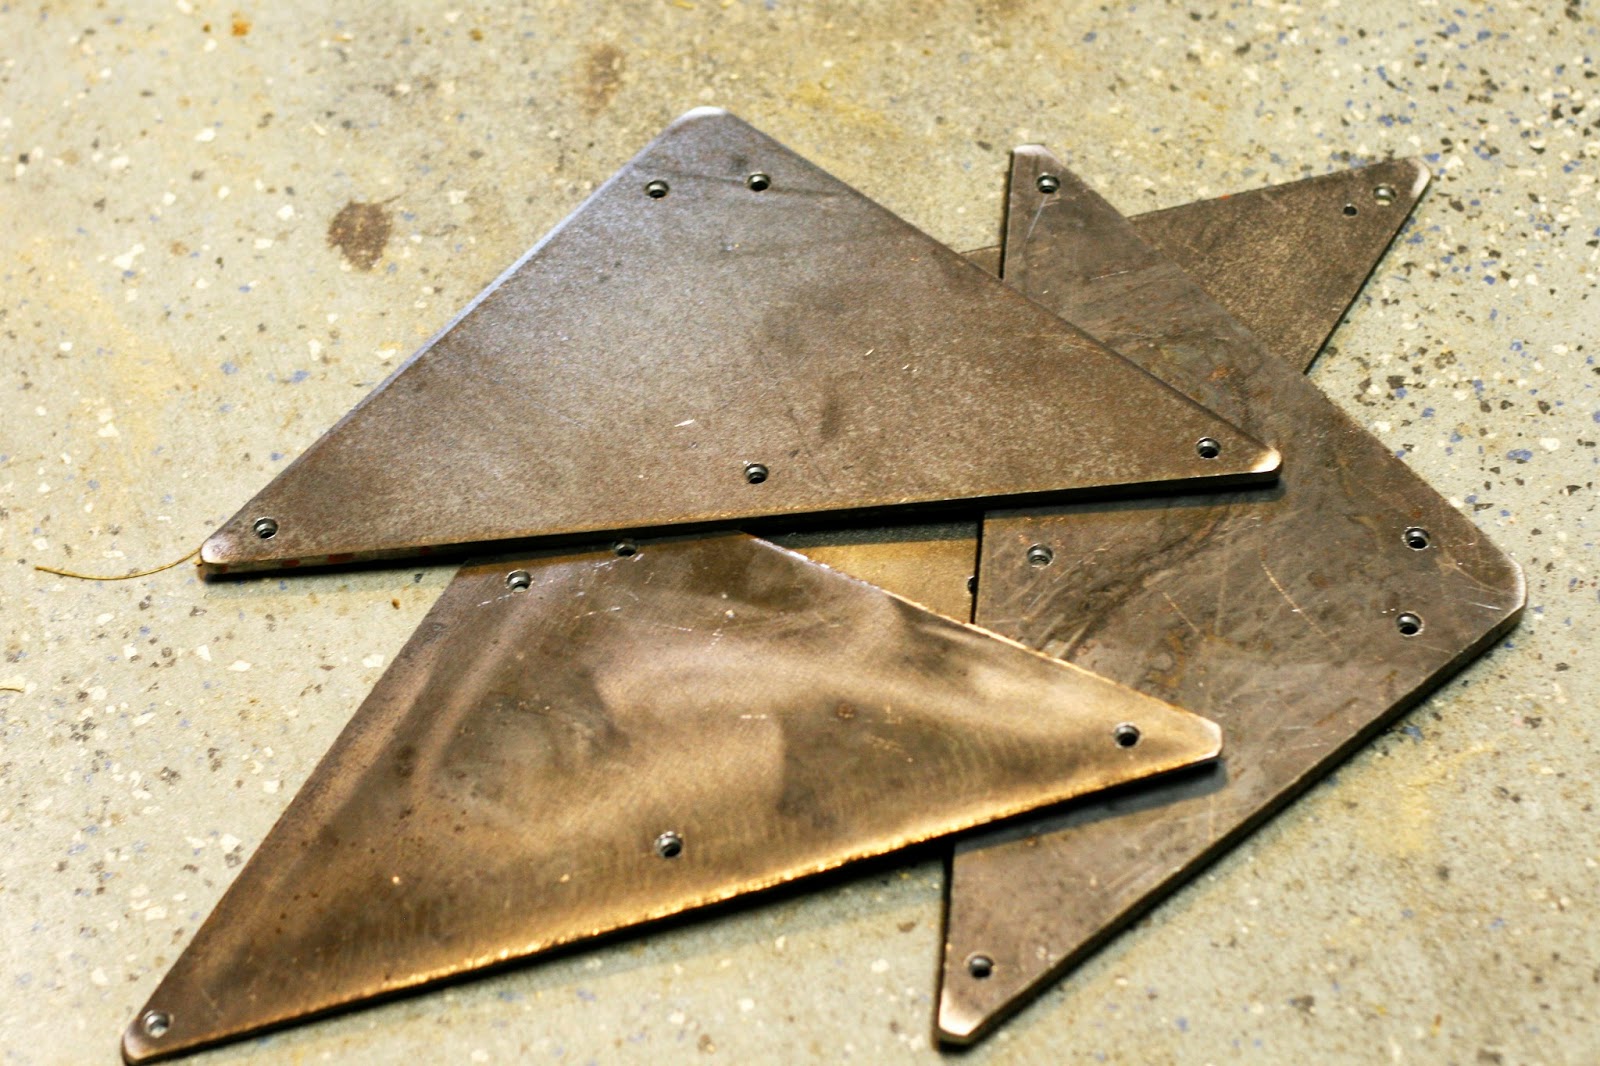
If you’re not feeling like creating DIY hairpin legs, you can definitely buy them. I found a website that sells 26″ height legs with pretty quick turnaround (here).
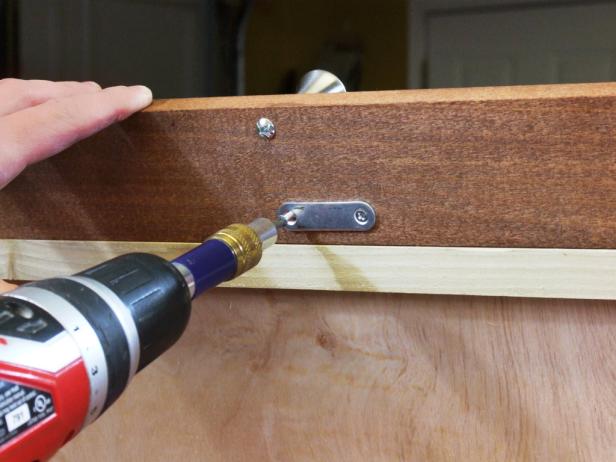
To attach the legs, flip the vanity over. Line up each leg, 1/8″ from the edge of the wood, and attach with 5/8″ #8 wood screws.

Now you can flip it right side up. Open the middle door and attach a mirror to the underside. I actually used an inexpensive, dollar store mirror left over from another project.
And, you’re done!
I’m really happy with how it turned out!
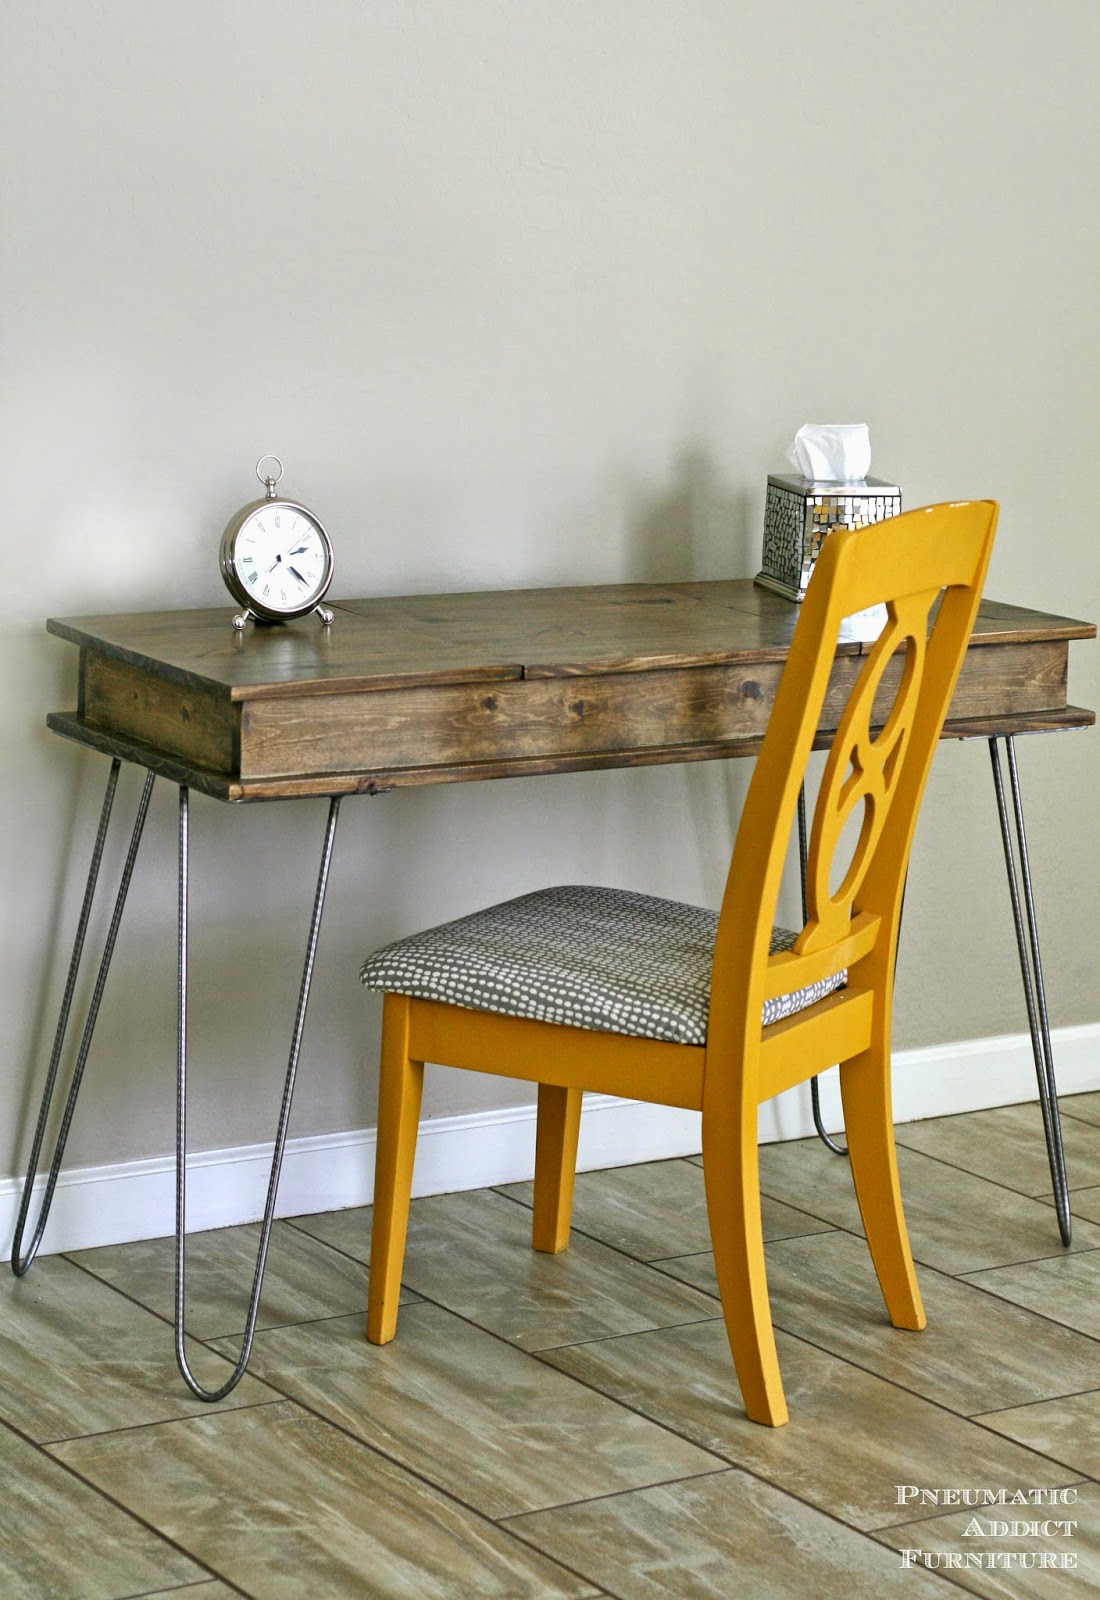


The original plan can be found at http://www.pneumaticaddict.com
![]() [email_link]
[email_link]
Make-up Vanities & Desks
Apothecary Medicine Cabinet

Build a simple, yet stylish, medicine cabinet to add more storage to your bathroom! This medicine cabinet has 3 apothecary-styled drawers to help contain anything from q-tips to combs!


- 1 – 1 x 6 x 8′
- 1 – 1 x 6 x 4′
- 1 – 1 x 4 x 2′ (you only need 16 1/2″)
- 1 – 1 x 3 x 4 (or furring strip, if cheaper)
- 1 – 2 x 4 sheet of 1/4″ ply
- 1 – 2 x 4 sheet of 1/2″ ply (or scraps! Use scraps for this, if you have any!)
- 3 Drawer Pulls
- 1 Cabinet Pull
- 1 set of small hinges – butt hinges will work perfectly
- 1 – 12″ x 12″ mirror (you can also use glass or plywood)
- 1-1/4″ Pocket Hole Screws
- 1-1/4″ Brad Nails
- 2 – 1 x 6 @ 24″ (sides)
- 3 – 1 x 6 @ 16 1/2″ (top, bottom & shelf)
- 2 – 1 x 6 @ 5″ (dividers)
- 1 – 1 x 4 @ 16 1/2″ (inside shelf)
- 6 – 1/2″ ply @ 4 3/4″ x 4 1/2″ (drawer fronts and backs)
- 6 – 1/2″ ply @ 4 1/2 x 4 1/2″ (drawer sides)
- 3 – 1/4″ ply @ 5 1/2″ x 4 3/4″ (drawer bottoms)
- 1 – 1/4″ ply @ 18″ x 24″ (back)
- 2 – 1 x 3 @ 11 1/4″ (door rail)
- 2 – 1 x 3 @ 16 1/2″ (door stiles)
- 1 – 1 x 3 @ 16 1/2 (support cleat)

Build a box using your side pieces and your top and bottom pieces. Make sure that the top and bottom boards are on the inside of the side boards.

Measure 5″ from the bottom inside of the box, and screw your shelf in with 1 1/4″ pocket hole screws.

Attach your support cleat to the back using 1 1/4″ pocket holes set for 3/4″ stock. It’s best to put your pocket holes at the back of the piece.

Add your drawer dividers. I found it easiest to just use glue and 1 1/4″ finish nails. Otherwise, predrill through the middle shelf and bottom of the cabinet, and use 1 1/4″ screws and glue. You cannot use pocket holes for these.

Figure out where you want your inside shelf. I preferred to have mine 5 1/2″ down so that I had an area for my smaller items, and one for my taller items. But this is entirely up to you, and what you plan to store! Attach shelf to the cabinet using 1 1/4″ pocket holes set for 3/4″ stock.

Build your drawers, make sure your 4 1/2″ boards are sandwiched between the 4 3/4″ boards. Use glue and 1 1/4″ finishing nails.

Attach your drawer bottoms using glue and 1 1/4″ finish nails

Build your door as shown. Use 1 1/4″ pocket holes set for 3/4″ stock.

Attach the back, using glue and 1 1/4″ finish nails.

Insert your mirror or glass into the door using mirror clips. If you plan on using wood, attach with only glue, and let dry.
Attach the door with the hinges, add some hardware, and put your drawers in place.
To hang, locate studs and screw through the support cleat into the studs using 2 – 3″ screws. If no studs are available, use the appropriate wall anchors.
Fill any Screw, Nail or Pocket Holes, Sand and Finish as Desired.
The original plan can be found at http://www.thedesignconfidential.com/2012/03/free-diy-furniture-plans-build-3-drawer-medicine-cabinet/
![]() [email_link]
[email_link]