Bar Cabinet


Materials:

  • 1 – 1×2 at 4’
  • 2 – 1×3 at 8’
  • 10 – 1×4 at 8’
  • 1 sheet of ½” plywood
  • 1 half sheet of ¾” plywood
  • 1 sheet of ¾” plywood
  • 1″ Pocket Hole Screws
  • 1-1/4″ Pocket Hole Screws
  • 1-1/4″ Wood Screws
  • 1-1/4″ Brad Nails
  • Edge banding
  • 1 set of 22” drawer slides (side mount with 1/2″ clearance)
  • 1 set of Hinges
  • 2 Drawer/Cabinet Pull

Cut List:

  • 4 – 1×4 at 41-1/4” – Side Legs
  • 6 – 1×4 at 16” – Side Frames
  • 4 – 1/2” plywood at 13-3/8” x 16” – Side Panels
  • 3 – 1×4 at 35-1/2” – Front Frame
  • 2 – 1×4 at 41-1/4” – Front Legs
  • 2 – 1/2” plywood at 13-3/8” x 35-1/2” – Front Panels
  • 2 – 1×4 at 37” – Back Stretchers
  • 2 – 1×4 at 37-3/4” – Back Legs
  • 1 – ¾” plywood at 22-1/4” x 42-1/2” – Bottom Shelf
  • 1 – 1×3 at 26-3/4” – Cabinet Divider
  • 1 – ¾” plywood at 22-1/4” x 29-3/8” – Divider
  • 1 – ¾” plywood at 20-1/2” x 22-1/4” – Shelf
  • 1 – ¾” plywood at 21-1/4” x 22-1/4” – Shelf
  • 1 – 1×2 at 17-3/4” – Drawer Stretcher
  • 1 – 1×2 at 22-1/4” – Drawer Slide Spacer
  • 1 – ¾” plywood at 22-1/4” x 42-1/2” – Countertop
  • 2 – 1×4 at 22-1/4” – Inner Top Spacers
  • 1 – 1×4 at 37” – Inner Top Spacer
  • 2 – 1×4 at 6-3/4” – Top Frame Back
  • 3 – 1×4 at 3-1/4” – Top Frame Spacers
  • 2 – 1×4 at 26-1/4” – Top Frame Sides
  • 1 – 1×4 at 50-1/2” – Top Frame Front
  • 1 – ¾” plywood at 27-3/4” x 50-1/2” – Top
  • 1 – ¾” plywood at 15-1/4” x 20-1/2” Drawer Bottom
  • 2 – 1×4 at 20-1/2” – Drawer Box Sides
  • 2 – 1×4 at 16-3/4” – Drawer Box Front & Back
  • 1 – ¾” plywood at 5-1/2” x 17-1/2” – Drawer Front
  • 2 – 1×3 at 11-1/2” – Door Rails
  • 2 – 1×3 at 26-1/2” – Door Stiles
  • 1 – ½” plywood at 11-1/2” x 21-1/2” – Door Panel

Step 1:


Edge banding will be applied to the exposed edges of the plywood prior to assembly.

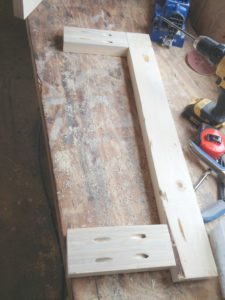
Cut the pieces for the legs, side frames, and side panels. Set the Kreg jig for ¾” material and drill pocket holes in each end of the frame pieces. Secure to the legs using glue and 1-1/4” pocket hole screws.

Set the Kreg jig for ½” material and drill pocket holes in all four edges of the panels. Secure to the legs and the frame pieces using glue and 1” pocket hole screws.

Step 2:


Cut the pieces for the legs, front frame, and panels. Set the Kreg jig for ¾” material and drill pocket holes in each end of the frame pieces, as well as one long edge of each leg. Secure to the legs using glue and 1-1/4” pocket hole screws.

Set the Kreg jig for ½” material and drill pocket holes in all four edges of the panels. Secure to the legs and the frame pieces using glue and 1” pocket hole screws.

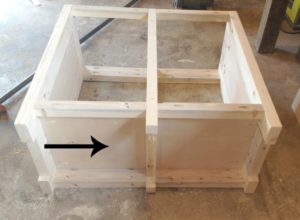
Secure the entire front assembly to the sides using glue and 1-1/4” pocket hole screws.

Step 3:

Cut the pieces for the back legs and frame pieces. Set the Kreg jig for ¾” material and drill pocket holes in each end of the frame pieces. Secure to the legs using glue and 1-1/4” pocket hole screws.

Secure the back frame to the side legs using glue and 1-1/4” brad nails.

Step 4:


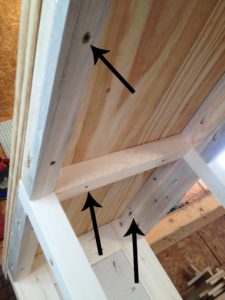
Cut the piece for the bottom shelf and drill pocket holes in all four edges. Secure to the lower frame pieces using glue and 1-1/4” pocket hole screws from the under side.

Cut the piece for the cabinet divider and drill pocket holes in each end. Secure to the back frame pieces using glue and 1-1/4” pocket hole screws.

Cut the piece for the divider and drill pocket holes in all four edges. Secure to the bottom, front frame, and cabinet divider using glue and 1-1/4” pocket hole screws. The back face of the divider (without pocket holes) will be flush with the back edge of the cabinet divider.

Step 5:

Cut the pieces for the shelves and drill pocket holes in the side and back edges. Position in each side of the cabinet and secure using glue and 1-1/4” pocket hole screws.

Step 6:


Cut the piece for the drawer divider and drill pocket holes in each end. Secure to the back leg and cabinet divider as shown using glue and 1-1/4” pocket hole screws.

Cut the piece for the drawer slide spacer and drill pocket holes in each end. Secure to the back leg and the front leg as shown using glue and 1-1/4” pocket hole screws. The bottom of the spacer will line up with the top of the drawer divider.

Step 7:

Cut the piece for the countertop and drill pocket holes in all four edges. Secure to the cabinet using glue and 1-1/4” brad nails through the legs and panels into the countertop. The top face of the countertop will be flush with the top face of the back frame. Add a few 1-1/4” pocket hole screws through the divider into the underside of the countertop.

Cut the pieces for the inner top frame and drill pocket holes at one end as well as one long edge. Secure to the front panel and countertop as shown using glue and 1-1/4” pocket hole screws.

Cut the piece for the inner frame sides and drill pocket holes in each end as well as one long edge. Secure to the sides and countertop using glue and 1-1/4” pocket hole screws.

Step 8:

Cut the pieces for the top frame back. Secure to the side frame and inner top frame using glue and 1-1/4” brad nails.

Cut the piece for the top frame spacers and drill pocket holes in one end. Secure to the front frame using glue and 1-1/4” pocket hole screws.

Cut the pieces for the top frame sides and drill pocket holes in one end. Secure to the back frame pieces using glue and 1-1/4” pocket hole screws.

Cut the piece for the top frame front. Position as shown then secure to the sides and spacers using glue and 1-1/4” brad nails.

Step 9:

Cut the piece for the top. Secure to the top frame using glue and 1-1/4” brad nails.

Step 10:

Cut the pieces for the drawer box. Drill pocket holes in all four edges of the bottom as well as each end of the sides. Assemble the drawer box as shown using glue and 1-1/4” pocket hole screws. Install the drawer slides according to the manufacturer’s installation instructions, locating them ¾” back from the front edge of the sides. Cut the pieces for the drawer front. Mark the position for the drawer pulls and drill the holes. Shim the drawer front in the opening – there will be a 1/8” gap around all sides – then drive screws through the holes for the drawer pulls into the drawer box. Open the drawer, and secure the drawer front using countersunk 1-1/4” screws from the inside. Remove the screws from the holes for the drawer pull then finish drilling the holes. Install the drawer pull.

Step 11:

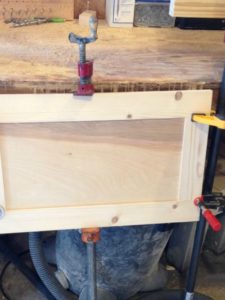
Cut the pieces for the door. Drill pocket holes in each end of the rails then assemble the frame using glue and 1-1/4” pocket hole screws.

Cut the piece for the center panel. Set the Kreg jig for ½” material and drill pocket holes in all four edges. Secure the panel in the frame using glue and 1” pocket hole screws. The back face of the panel will be flush with the back face of the frame.

Install the hinges on the door, then install the door in the cabinet. Install the cabinet pull.

Step 12:

Fill any Screw, Nail or Pocket Holes, Sand and Finish as Desired

The original plan can be found out http://www.thedesignconfidential.com

[email_link]

Bar Cabinet

Materials:

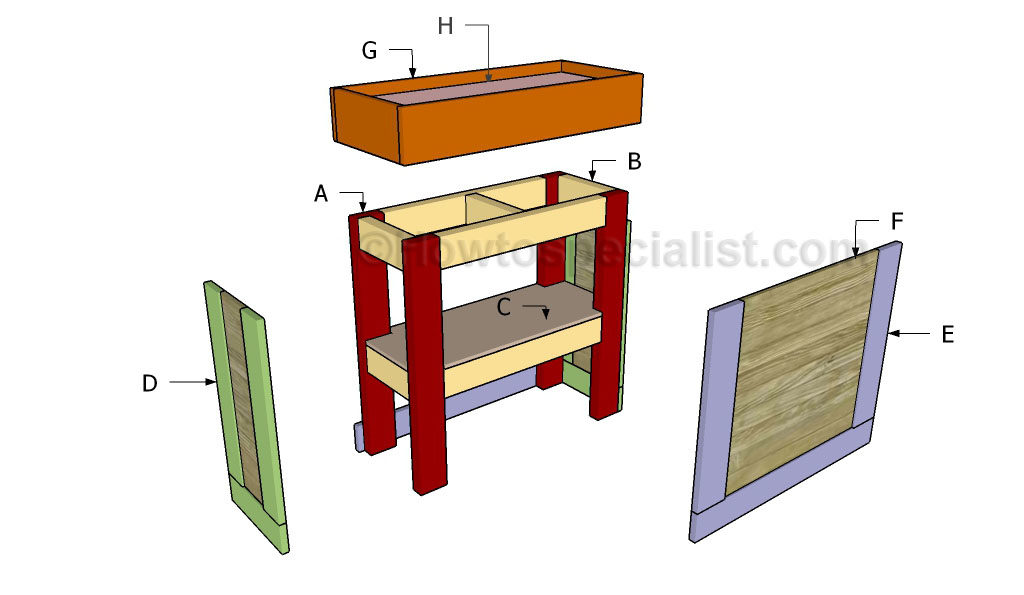
  • A – Base – 7 pieces of 1×3 Lumber – 2 pieces @ 56” long, 5 pieces @ 17 ¼” long
  • B – Base – 1 piece of ¾” plywood – 56” x 18 ¾”
  • C – Trims – 4 pieces of 1×4 Lumber – 2 pieces @ 57 ½” long, 2 pieces @ 10 ¼” long
  • D – Sides – 4 pieces of ¾” plywood – 16” x 34 ½” long
  • E – Face – 1 piece of ¾” plywood – 54” x 34 ½” long
  • F – Shelves – 4 pieces of ¾” plywood – 2 pieces @ 16” x 16”, 2 pieces @ 16” x 19”
  • G – Trim – 1 piece of 1×3 Lumber – 54” long
  • G – Trim – 11 pieces of 1×2 Lumber – 4 pieces @ 32” long, 4 pieces @ 14 ½” long, 3 pieces @ 19” long
  • H – Countertop – 2 pieces of ¾” plywood 56” x 18 ¾”
  • H – Countertop – 4 pieces of 1×2 Lumber – 2 pieces @ 57 ½” long, 2 pieces @ 20 ¼” long

Building the base

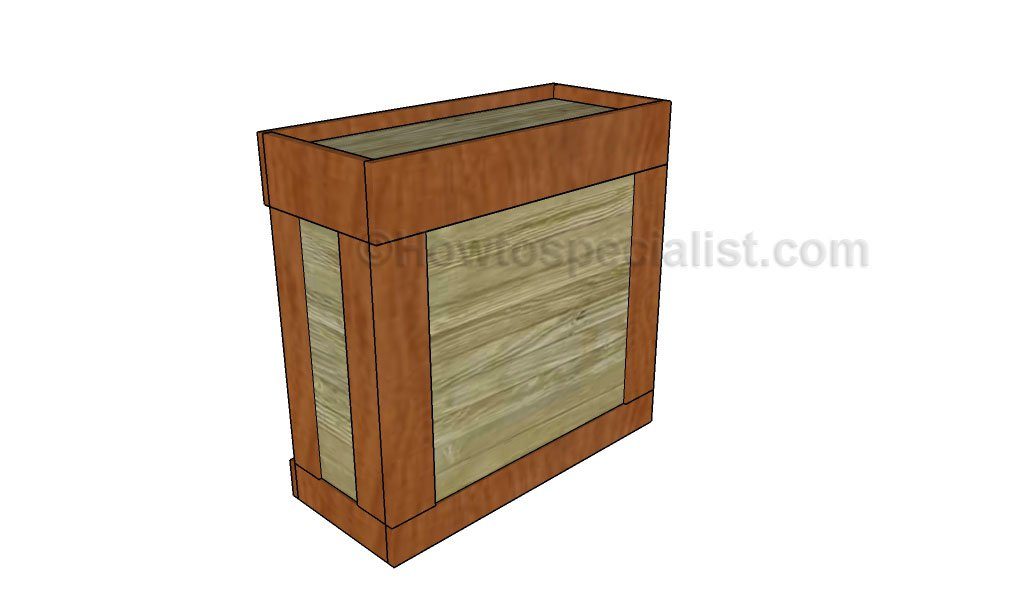
The first step of the woodworking project is to build the base of the diy bar. As you can easily notice in the plans, we recommend you to build the frame out of 1×3 lumber and the top out of 3/4″ plywood. Drill pilot holes along the edges of the plywood sheet and insert the 1 1/4″ screws into the frame. Add waterproof glue to the joints in order to enhance the rigidity of the structure. Check if the corners are square.

Attaching the frame

Continue the project by attaching the frame of the wooden bar. Drill pocket holes at both ends of the plywood components and secure them to the base with 1 1/4″ screws. Drill pocket holes at both ends of the top supports and secure them to the components with 1 1/4 screws. Makes sure the corners are right-angled and place a spirit level to check if they are horizontal.

Fitting the front face

Continue the project by attaching the plywood piece to the front of the bar. Drill pilot holes along the edges of the side components and insert the 1 1/4″ screws into the face of the bar. Add glue to enhance the rigidity of the structure.

Fitting the shelves

In order to add storage space to the bar, we recommend you to fit the 3/4″ plywood shelves to the dimensions described in the article and to drill pocket holes along the edges.

Top Tip: Align the components at both ends and secure them to the frame with 1 1/4″ screws. Add waterproof glue to the joints in order to enhance the rigidity of the structure. Make sure the shelves are horizontal.

Fitting the bottom trims

Add trims to the base of the bar, in order to enhance the look of the woodworking project. Cut both ends of the trims at 45 degrees and lock them together with finishing nails and waterproof glue.

Fitting the bar trims

Cut the top trim out of 1×3 lumber, while the rest of the trims should be made out of 1×2 lumber. It is essential to lock all the trims together after drilling pocket holes and inserting the 1 1/4″ screws.

Top Tip: Afterwards, attach the trims to the frame of the bar and secure them into place with waterproof glue and finishing nails. Smooth the trims with sandpaper, if you want to get a professional result.

Fitting the countertop

Building the countertop of the diy bar is a straight-forward process, as you need to glue two pieces of 3/4″ plywood together. Use several clamps to hold the pieces of plywood together.

Top Tip: Center the tabletop to the frame of the wooden bar and lock it into place by using several galvanized screws. Add glue to enhance the rigidity of the frame and leave it to dry out for several hours.

Fitting the trims

Add 1×2 trims to the exterior of the countertop in order to enhance the look of the diy bar. Cut both ends of the trims at 45 degrees and lock them to the countertop with finishing nails and waterproof glue. Leave no gaps between the components.

One of the last steps of the woodworking project is to take care of the finishing touches. Therefore, fill the pilot holes with wood putty and smooth the surface with 120-grit sandpaper.

Top Tip: If you want to enhance the look of the woodworking project and to protect the bar from decay, we recommend you to cover the components with paint or stain. Place the bench in a proper location and move it whenever necessary.

The original plan can be found at http://myoutdoorplans.com

[email_link]

Backyard Bar

Materials:

  • A – Legs – 4 pieces of 2×4 Lumber – 42” long
  • A – Legs – 4 pieces of 2×6 Lumber – 42” long
  • B – Frame – 15 pieces of 2×4 Lumber – 9 pieces @ 15” long, 6 pieces @ 42” long.
  • C – Shelves – 26 pieces of 1×4 – 18” long
  • D – Panels – 23 pieces of 1×6 Lumber – 14 pieces @ 11” long, 9 pieces @ 40” long
  • E – Countertop – 4 pieces of 2×6 Lumber – 48” long
  • E – Countertop – 4 pieces of 2×4 Lumber – 2 pieces @ 48” long, 2 pieces @ 29” long

Building the frame

The first step of the woodworking project is to build the frames of the bar. As you can easily notice in the image, we recommend you to use 2×4 lumber and to cut the components at the right size before locking them together.

Top Tip: Check if the corners are right-angled and drill pilot holes before inserting the screws, in order to prevent the wood from splitting. Align everything properly.

Building the legs

Build the legs for the bar using 2×4 or 2×6 lumber. Make decorative cuts to the bottom of the legs, as shown in the diagram.

Attaching the legs

Continue the woodworking project by attaching the legs to the three frames. In order to get a professional result, we recommend you to cut the ends of the legs in a decorative manner, by using a nice circular saw. Use 2×4 lumber to build the side legs and lock them into place with galvanized screws. Plumb the legs and check if the frames are perfectly horizontal before inserting the screws.

Attaching the legs

Next, you need to attach the legs to the front and back faces of the bar. Cut the components at the right size and lock them to the structure with 2 1/2″ screws, from the inside. Leave no gaps between the adjacent legs before inserting the screws into place. Add waterproof glue to enhance the rigidity of the joints and remove the excess with a damp cloth. Work with attention, otherwise the end result won’t match your expectations.

Attaching the slats to the shelves

Attach the 1×4 slats to the frames in order to build the shelves. Work with attention and pre-drill holes through the slats before locking them to the frames with 1 1/4″. Place the slats equally-spaced, in order to get a professional result.

Attaching slats to back face

Attach the 1×6 trims to the exterior of the wooden bar starting with the back face. Drill pocket holes at both ends of the slats and secure them to the legs with 1 1/4″ screws. Add waterproof glue to the joints and make sure the edges are flush. Alternatively, use 1 1/4″ nails and glue to lock the trims to the frame.

Attaching slats to sides

Fit the 1×6 slats between the side legs and lock them into place with galvanized screws. Add waterproof glue to the joints in order to enhance the rigidity of the structure.

Top Tip: Place the slats equally-spaced, leaving between them about 1/4″. Align the slats with great care and smooth the cut edges with sandpaper before fitting them into place.

Fitting slats to front

Continue by installing the slats to the front face of the bar, as shown in the image. Align the slats at both ends and secure them to the legs with galvanized screws.

Building the countertop

Building the countertop is a straight-forward process, but you need to tackle it with great care. Align the slats with great care on a level surface and lock them together with galvanized screws. Drill pocket holes along the edges of the slats before inserting the 2 1/2″ screws and add waterproof glue to the joints, in order to create a rigid structure. Make the end slats curved, in order to add value to the wooden bar.

Attaching the countertop

Center the bar to the tabletop, making sure there are no gaps between the components. Drill pocket holes through the frame and insert 2 1/2″ screws into the countertop, to create a rigid structure.

One of the last steps of the woodworking project is to take care of the finishing touches. Therefore, fill the pilot holes with wood putty and smooth the surface with 120-grit sandpaper.

Top Tip: If you want to enhance the look of the woodworking project and to protect the bar from decay, we recommend you to cover the components with paint or stain. Place the bar in a proper location and move it whenever necessary.

The original plan can be found at http://myoutdoorplans.com/furniture/free-bar-plans/

[email_link]

Basement Bar

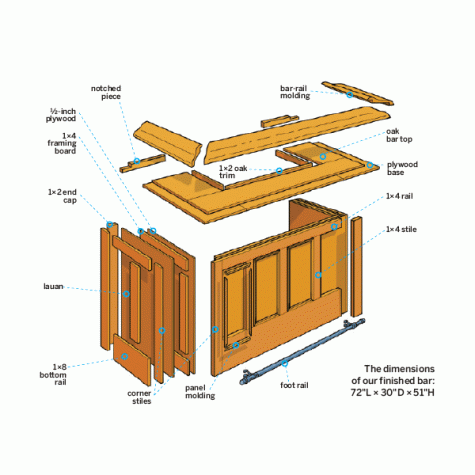
If the notion of building a bar conjures fond and fuzzy memories of hammering 2x4s into some makeshift cup stand back in college, terrific. But that experience won’t help you much here. This is a real piece of furniture, as you can see from the trimmed panels, sturdy oak bar-rail molding, and stainless-steel foot rail. Follow along as This Old House senior technical editor Mark Powers and colleague Douglas Adams build this handsome rec-room centerpiece. And if you want to break out the toga when it’s finished, well, that’s entirely your call.

Paint: Valspar’s Royal Garnet.
Stain: Minwax’s Jacobean.
Bar-rail molding: Bar-rail profile #375; Dykes Lumber.
Foot-rail assembly: Brushed stainless-steel foot-rail tubing, brackets, and caps; KegWorks.

Step 1: Overview

Cut list:

½-inch plywood: 1 @ 60 by 42 inches
½-inch plywood: 2 @ 24 by 42 inches

Lauan sheathing: 1 @ 60 by 42 inches
Lauan sheathing: 2 @ 24 by 42 inches

1×2 framing: 11 @ 37 inches
1×2 framing: 4 @ 24 inches
1×2 framing: 2 @ 60 inches
1×4 nailing block: 2 @ 6 inches

1×4 stile: 5 @ 31¼ inches
1×4 corner stile: 4 @ 42 inches
1×4 corner stile: 2 @ 42 inches (Rip ¾ inch off the board’s width.)
1×2 stile: 2 @ 42 inches

1×4 rail: 1 @ 54½ inches
1×4 rail: Scribe 2 to size.
1×8 rail: 1 @ 54½ inches
1×8 rail: Scribe 2 to size.

Panel molding: Miter 32 to size.

1×2 shelf supports: 1 @ 54 inches
1×2 shelf supports: 2 @ 6 inches

¾-inch plywood bar-top substrate: Cut 2 to size.

1×12 bar top: Cut 1 to size.
1×12 bar top: Cut 2 to size.

Bar-rail molding: Miter 3 to size.

Step 2: Lay Out the Three Sides
Using a circular saw, cut the ½-inch plywood to size for the bar’s front and side panels. With a miter saw, cut the 14 framing boards to length; use them to line the panels’ perimeter, and arrange three more, equally spaced between the side boards, as shown. And if you plan to install brackets for a foot rail, add 6-inch nailing blocks to what will be the lower corners of the front panel. Apply construction adhesive to the back of each 14, and nail them in place using a pneumatic nail gun and 1-inch nails. Mark the location of the vertical boards on the edges of the horizontal boards so that you can pinpoint them once they’re covered.

Step 3: Cut and Attach the Sheathing


Place the lauan finish-face down, and cut it to size with a circular saw. Apply construction adhesive to the framing and affix the lauan. If your pneumatic gun accepts staples, use it to fasten the sheet along the framing with ½-inch staples; if it doesn’t, turn down the air pressure, use ⅝-inch nails, and tilt the gun slightly so that you don’t shoot straight through the lauan.

Step 4: Place the Corner Stiles

Using a miter saw, cut the 14 stiles and rails to length. For the front corner stiles, shift a 1×4 to overhang the panel edge by ¾ inch, using a block to set the space, as shown. Mark the inside edge of the stile on the panel. Do the same at the back edges of the side panels.

Step 5: Miter and Insert the Molding

Lay pieces of molding one by one inside the recessed panels created by the stiles and rails, and mark their length. Using a miter saw, cut the ends at a 45-degree angle, then nail each one in place with 1¼-inch nails. Hold off on the pieces alongside the corner rail for now.

Tip: For a tight fit, miter one side of a long piece of panel molding, hold it in place, and use the panel’s corner to mark a precise cutline for the opposite miter.

Step 6: Attach the Stiles and Rails to the Front Panel

Lay the top and bottom rail on the front panel between the marked lines, and position three equally spaced stiles between them. Glue and nail the stiles and rails in place with 1¼-inch nails. Set the corner stiles aside until the panels are assembled.

Step 7: Attach the Shelf Cleats

On the interior side of each panel, mark two horizontal lines 1½ inches and 24 inches from the bottom. Cut 11 cleats to length, leaving room for the side panels and their cleats to butt against the front panel. Install the cleats along the lines by countersinking pilot holes every 8 to 10 inches and driving 1¼-inch screws in place.

Step 8: Assemble the Walls

Apply glue to the front edge of a side panel. Set it upright, butt it into the front panel, and clamp the pieces together. Mark a line along the front panel to help you center your screws into the edge of the side panel’s framing. Drill pilot holes and drive 3-inch screws one at a time, working your way from one end to the other so that you can align the corner as you go. It helps to have a partner.

Step 9: Make the Shelves


Using a circular saw, cut the two shelves to length. For the bottom shelf, cut a 12 to length and glue and nail it underneath the front lip. Set the shelves in place, and nail through them and into the cleats, which will keep the panels square.

Step 10: Attach Corner Stiles and Clad the Sides

Now apply glue to the two front corner stiles and set them in place: snug against the rails and overhanging the edges by ¾ inch. Rip ¾ inch off the width of the side corner stiles, since they butt up against the overhanging front pieces. Apply glue to the back and nail them in place. Overhang the stiles at the back of the side panels by ¾ inch, and glue and nail them in place. Hold the top and bottom rails between the side stiles to scribe them. Cut, glue, and nail them in place. Attach a center stile on each side and trim it—as well as the untrimmed corner stiles—as in Step 6. Butt a 12 against the overhanging stiles to finish the side panels.

Step 11: Size the Bar-Top Base

To determine the width of the three plywood-base layer pieces, hold a section of bar-rail molding against the long edge of your plywood and snug the 112 oak bar top into the notch. Mark the plywood along the back edge of the board, as shown. Rip two lengths of plywood to this width.

Step 12: Install the Base

Cut one of the plywood lengths into two pieces for the sides that, when flush at the back, overhang the front by 6 inches. Arrange them to overhang the sides by 6 inches, too, then measure between them to get the length of the front piece. Cut it to length. Secure the base with 1¼-inch screws.

Step 13: Set the Oak Bar Top

Measure the inside edge of the plywood side pieces and cut two 112 boards to that length. Set them flush with the inside back corners, and measure outside edge to outside edge to get the length of the front 112. It will overlap the seams of the base layer. Cut the front piece to length. Set the boards in place, and use 1¼-inch nails to secure them. Finish the inside edges of the bar top with an oak 12 nailed on edge.

Step 14: Miter the Bar Molding

ad out the saw deck with two strips of scrap plywood to fit in the notch of the molding and keep it level. You’ll have to cut the padding to width, from the first notch of the molding to its back edge, as shown. Miter the end of one length of molding at a 45-degree angle.

Step 15: Dry-Fit the Bar Molding

On the bar top, use a combination square to draw 45-degree lines from the front corners. Take a piece of molding with one mitered end and hold it up to the front edge of the bar; line up the mitered end with the 45-degree mark. Snug the molding up against a mitered scrap to make sure you have a tight corner. Then, at the other end, carry the 45-degree line from the bar top over the molding’s uncut end, and miter the piece to size. Install it by screwing through the plywood underneath with 1¼-inch screws. Miter and cut the remaining sidepieces ¾ inch long to overhang the back of the bar. Finish the back edges of the bar top by cutting a 12 to fit the open notches of the molding with a saw.

Step 16: Attach the Brackets

On the front wall, mark vertical lines over the nailing blocks, equidistant from each edge. Place the brackets on the marks, and screw through the brackets’ holes and into the wall and nailing block.

Step 17: Install the Foot Rail

Slide the rail into the brackets, place a cap on each end, and run a set screw through the rail and into each cap. Fill the fastener holes on the bar with wood filler and caulk any open joints, then sand and paint the inside and outside of the walls and shelves. Sand the oak bar top with 220-grit paper, wipe it and the rail with a stain, and finish with a coat of polyurethane.

The original plan can be found at https://www.thisoldhouse.com.

 
[email_link]

Broadway Bar

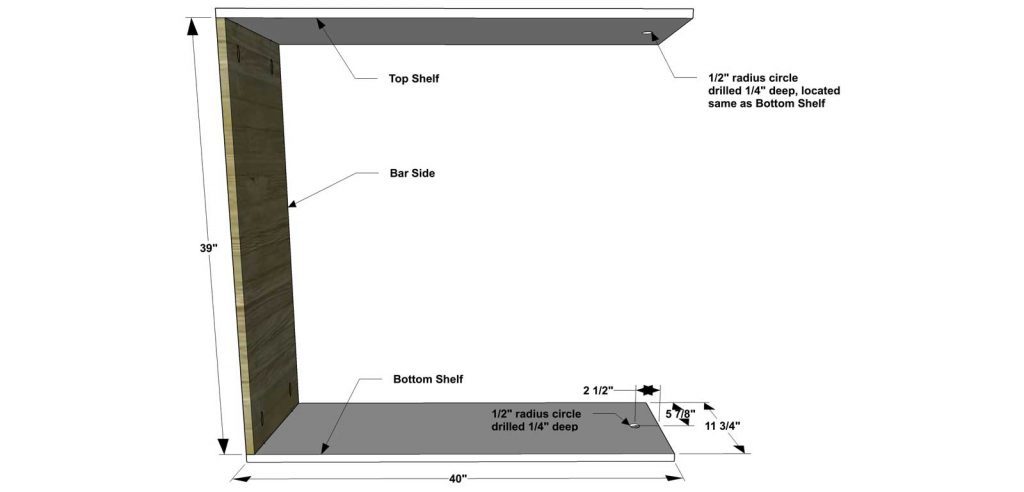
This open bar concept works out to be 40″ long x 40 1/2″ tall x 11 3/4″ deep

Materials:

  • 1 – 3/4” plywood at 4’x8’
  • 2 – 1×2 at 8’
  • 1 – 7/8” diameter dowel at 8’
  • 1 3/8″ Brad Nails
  • 1 ¼” Pocket Hole Screws

Cut List:

  • 2 – 3/4” plywood at 11-3/4”x40”– Top and Bottom Shelves
  • 1 – 3/4” plywood at 11-3/4”x39”– Bar Side
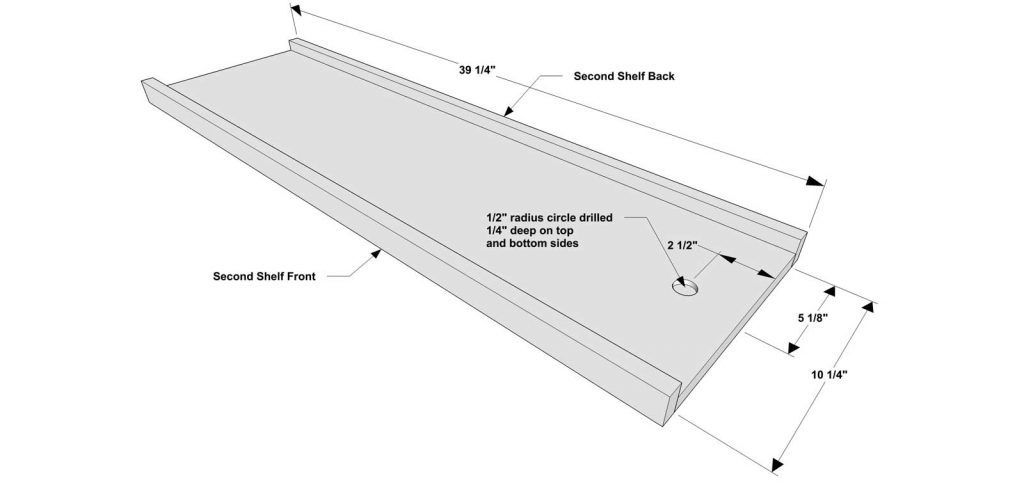
  • 1 – 3/4” plywood at 10-1/4”x39-1/4” – Second Shelf
  • 2 – 1×2 at 39-1/4” – Second Shelf Front and Back
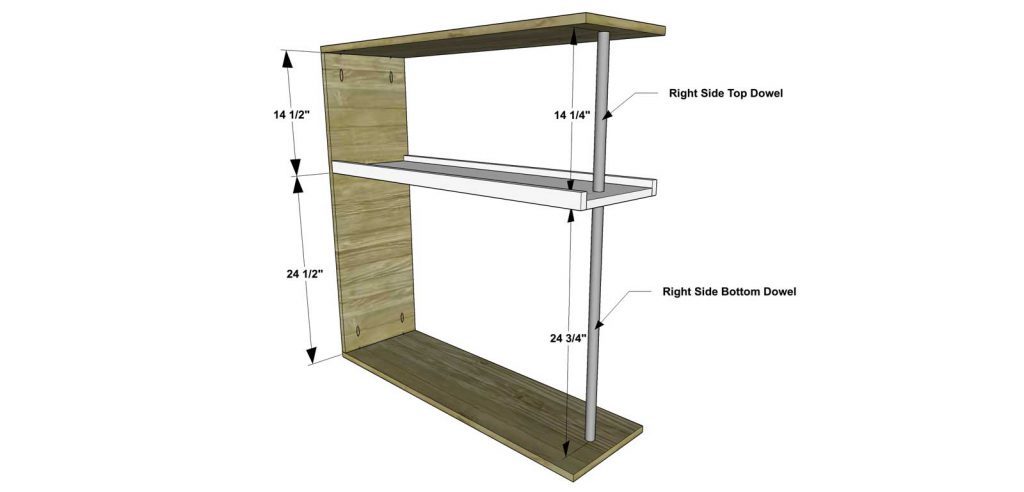
  • 1 – 1” diameter dowel at 14-1/4” – Right Side Top Dowel
  • 1 – 1” diameter dowel at 24-3/4” – Right Side Bottom Dowel
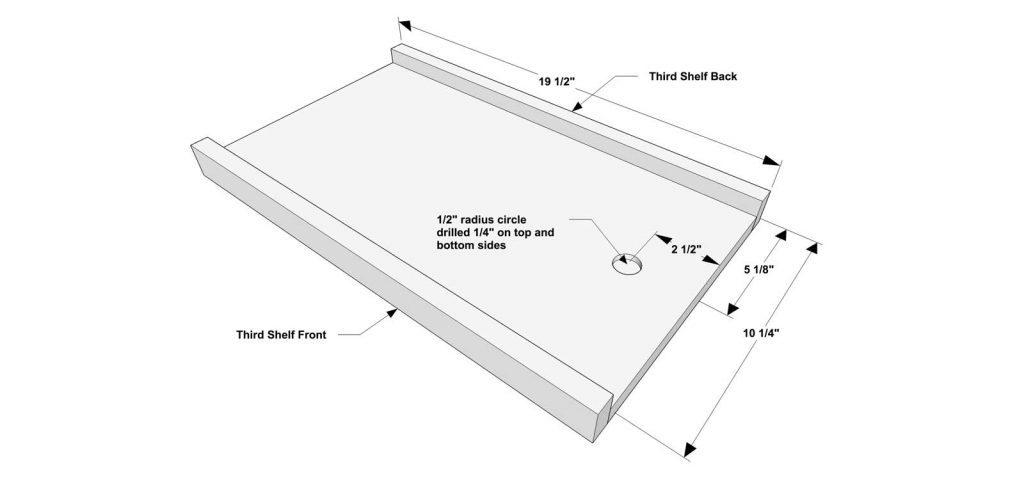
  • 1 – 3/4” plywood at 10-1/4”x19-1/2” – Third Shelf
  • 2 – 1×2 at 19-1/2” – Third Shelf Front and Back
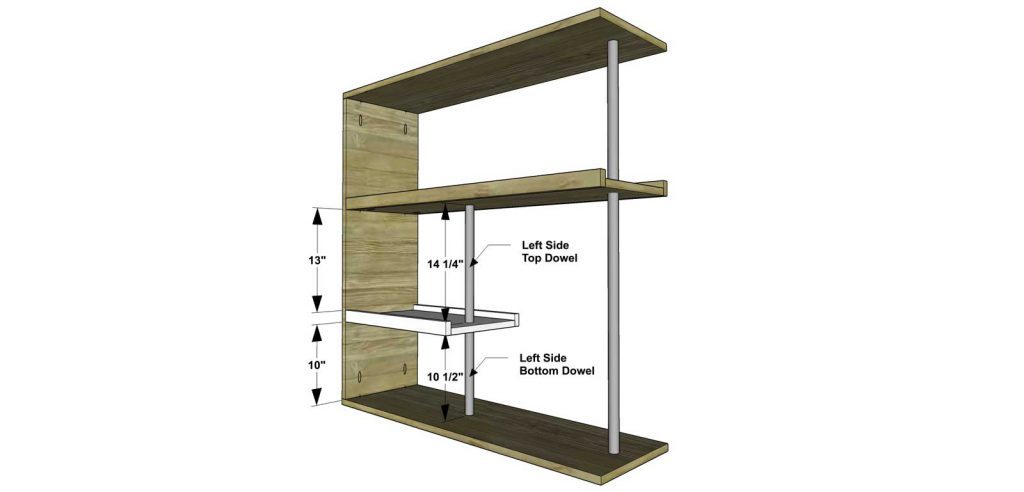
  • 1 – 1” diameter dowel at 14-1/4” – Left Side Top Dowel
  • 1 – 1” diameter dowel at 10-1/2” – Left Side Bottom Dowel
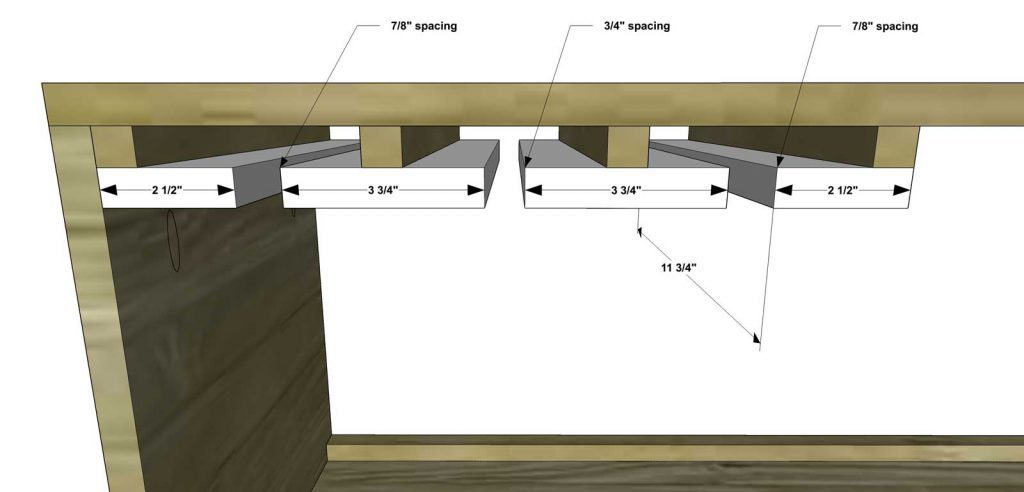
  • 4 – 3/4” plywood at 3/4”x11-3/4” – Spacers
  • 2 – 3/4” plywood at 2-1/2”x11-3/4” – End Slides
  • 2 – 3/4” plywood at 3-3/4”x11-3/4” – Inside Slides

Step 1:

Cut the pieces for the Top and Bottom Shelves and Bar Side. Set the Kreg jig for 3/4” material and drill pocket holes in each end of the Bar Side. Drill a 1” diameter hole 2-1/2” from each end, centered, on the Top and Bottom Shelves. Assemble as shown with the 1” drilled holes facing the inside and with glue and 1-1/4” pocket screws.

Step 2:

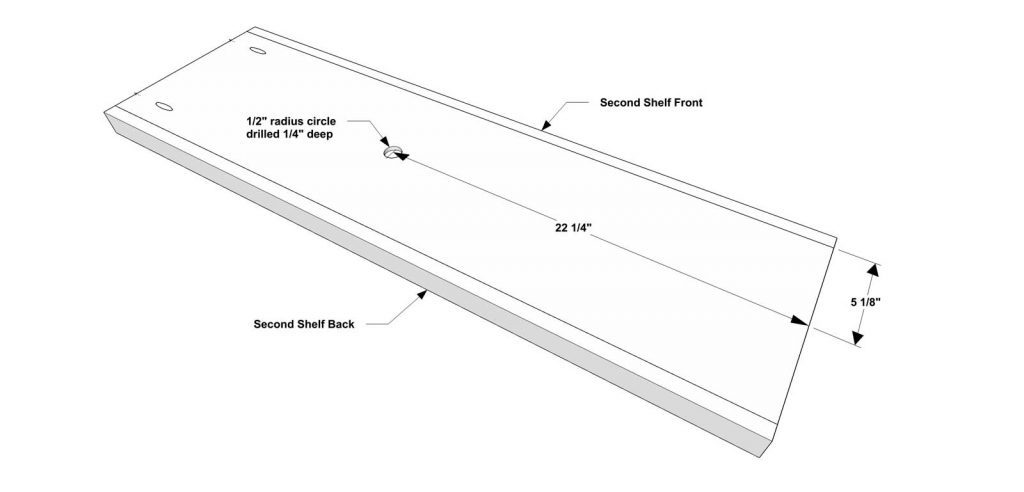
Cut the pieces for the Second Shelf and Second Shelf Front and Back. Set the Kreg jig for 3/4” material and drill pocket holes in one bottom end of the Second Shelf. Drill a 1” diameter hole 2-1/2” from the opposite end of the pocket holes, on the top side and centered. Drill a second 1” diameter hole 22-1/4” from the same end, centered, but on the bottom side. Attach the Second Shelf Front and Back to the Second Shelf as shown with glue and 1-1/4” brad nails. Position Right Side Top Dowel and Right Side Bottom Dowel with glue and attach the Second Shelf (with Front and Back pieces) to the Bar Side as shown with glue and 1-1/4” pocket screws. Note: you can paint the dowels with metallic paint before assembly to make them look like metal rods.

Step 3:

Cut the pieces for the Third Shelf and Third Shelf Front and Back. Set the Kreg jig for 3/4” material and drill pocket holes in one bottom end of the Third Shelf. Drill a 1” diameter hole 2-1/2” from the opposite end of the pocket holes, on the both the top side and bottom side, centered. Attach the Third Shelf Front and Back to the Third Shelf as shown with glue and 1-1/4” brad nails. Position the Left Side Top Dowel and Left Side Bottom Dowel with glue and attach the Third Shelf (with Front and Back pieces) to Bar Side as shown with glue and 1-1/4” pocket screws. Note: you can paint the dowels with metallic paint before assembly to make them look like metal rods.

Step 4:

Cut the pieces for the Spacers. Assemble as shown with glue and 1-1/4” brad nails.

Step 5:

Cut the pieces for the Slides. The End Slides will be located flush with the end Spacers and the Inside Slides will be centered on the Spacers. Assemble as shown with glue and 1-1/4” brad nails.

Step 6:

Fill any Screw, Nail or Pocket Holes, Sand and Finish as Desired.


The original plan can be found at http://www.thedesignconfidential.com

[email_link]

Aquarium Cabinet

A sturdy cabinet that could be used for just about anything… A TV Stand, console, or in this case an aquarium.

Materials needed:

  • 3/4″ plywood (1/2 Sheet)
  • 1/4″ plywood (1/4 Sheet)
  • 1 – 2x10x8 Spruce
  • 3 – 2x4x8 Spruce
  • 2 – 2x2x8 Spruce
  • 2 – 1x3x8 Spruce
  • Cove moulding
  • Crown moulding
  • Base moulding
  • 2 – sets of hinges
  • 2 – knobs/ or pulls
  • 2 1/2″ pocket hole screws
  • 1 1/4″ pocket hole screws
  • Brad nails
  • Wood Glue
  • Wood Putty

Step 1: Build the sides of the Cabinet

What makes this cabinet sturdy, is its frame made mostly of 2×4’s. This cabinet ended up being 32″ tall x 36″ wide x 16 1/2″ deep overall. If you wanted a deeper or taller, change these dimensions as you wish.

First step is to cut four 2×4’s at 30 1/2″ long and four pieces at 7″ long. Then, I assembled two sides like shown using pocket holes and screws. I attached the bottom 2×4 an inch from the bottom

Before attaching the other 2×4 in the frame, I added a piece of 3/4″ plywood to fit in the opening. It’s best to measure and cut exactly to fit, but it should be 7” wide x 22 ½” long.

Lastly, I attached the last 2×4 to complete the two side panels attached using pocket holes and screws.

Step 2: Build Middle Support

To help hold the weight in the middle, I built another frame piece from 2x2s. The two legs should be 30 1/2” long and the two “stretchers” should be 11” long. I attached the bottom stretcher 2 1/4” from the bottom. Assemble this using pocket holes and screws.

Step 3: Assemble the Cabinet

Now, it was time to attach all three of these pieces together. I cut 4 pieces of 2×4 and 4 pieces of 2×2 all at 13” long and drilled pocket holes in both ends of each piece. . I used 2×2’s in the back and 2×4’s in the front and assembled as shown.

First I attached one side panel to the middle support, then attached the other side panel to that using pocket hole screws. I attached the bottom 2×4’s in the front 1” from the bottom and the back bottom 2×2’s 3” from the bottom. (Note: this view is looking from the back.)

Step 4: Add the bottom

I cut a piece of 3/4″ plywood to fit in the bottom of the cabinet. This should be about 11” x 27 1/2”. I drilled pocket holes in both ends and screwed it in place into the two side panels. It should sit right on the bottom piece of the middle support.

Step 5: Attach top

I used a 2×10 to build a top for the cabinet. I made it 36” long and 16 ½” wide. You can use a circular saw or table saw to trim it down to size. Once the top was together, I screwed it in (making sure it was centered side to side) using 2 ½” screws through the back top supports, the middle top support and “toe-nailed” (drove in at an angle) through the front top 2×4.

Step 6: Add the Doors

I made the doors 14” wide and 23 ½” tall. You can see my post here.

Step 7: Add trim and mouldings

Finally, I added crown molding around the top, base around the bottom, and cove to the insides of the side panels. (Note: I added the cove and base before the top…it doesn’t matter whether you do it before or after except for the crown molding.)

Step 8: The finish

I puttied and sanded where needed then, I stained the cabinet in Minwax Golden Oak and polyed with Minwax Polycrylic. I attached the doors with simple overlay hinges and added these pulls from D Lawless Hardware to the doors to match the black hinges I used.

I didn’t add a back, because I wanted to hide the extension cord and power strip in the cabinet, but if you wanted a back, just staple or nail some 1/4” plywood on the back side.

This plan can be originally found at https://www.woodshopdiaries.com/diy-aquarium-cabinet-stand/

[email_link]

Aquarium Stand

Materials:

  • A – Legs – 4 pieces of 2×4 Lumber – 29 1/2″ long
  • B – Frame – 4 pieces of 2×4 Lumber – 23 1/2″ long
  • C – Shelf – 1 piece of 3/4″ plywood – 30 1/2″ x 11 3/4″
  • D – Trims – 2 pieces of 1×4 Lumber – 1 @ 22 1/4″, 1 @ 12 1/4″
  • E – Trims – 2 pieces of 1×4 Lumber – 1 @ 22 1/4″, 1 @ 32″
  • F – Panels – 2 pieces of 1/2″ plywood – 1 @ 5 1/4″ x 22 1/4″, 1 @ 22 1/4″ x 23 1/2″
  • G – Top Trims – 4 pieces of 1×6 Lumber –  2 @ 22 1/4″, 2 @32″
  • H – Tabletop – 1 piece of 3/4″ plywood – 12 1/4″ x 30 1/2″


Directions:

The first step of the woodworking project is to build the faces for the aquarium stand. As you can easily notice in the diagram, we recommend you to build the components out of 2×4 lumber. Take accurate measurements and drill pilot holes at both ends of the horizontal components. Insert 2 1/2″ screws after making sure the edges are flush and the corners are square. Add glue for a proper bond.

Next, you have to lock the faces of the stand together, as in the diagram. Cut the components out of 2×4 lumber and drill pocket holes at both ends. Fit the components between the faces and lock them together using 2 1/2″ screws. Make sure the corners are square and the edges flush.

Build the bottom shelf out of 3/4″ plywood. Mark the cut lines on the sheet of plywood and get the job done with a circular saw. Smooth the edges and check if the notches are cut out properly.

Fit the shelf to the structure and lock it into position by using a few brad nails. You could add glue to enhance the bond of the components. In addition, we recommend you to make sure the edges are perfectly flush one with another.

Building the front wall for the aquarium stand is a straight forward process. Therefore, use lumber for the  frame and 1/2″ plywood for the main panel. Drill pocket holes at both ends of the vertical supports and secure them to the top and bottom trims by using 1 1/4″ screws. Drill pocket holes along the edges of the plywood panel and secure it to the frame by using galvanized screws and glue.

Build the side walls in the same manner described above. Just make sure you adjust the size of the components as in the diagram. Check if the corners are square and make sure there are no gaps between the components.

Continue the project by attaching the exterior walls to the frame. Align the components with great care and secure the panels to the frame studs by using finishing nails. The edges should be perfectly flush for a professional result.

In order to enhance the look of the aquarium stand, you have to attach the trims to the back of the structure, as shown in the diagram. Secure the trims to the structure using brad nails and glue.

One of the last steps of the project is to attach the top component to the stand, as described in the diagram. Cut the piece of plywood at the right dimensions and secure it to the cleats using brad nails and waterproof glue.

Last but not least, we recommend you to take care of the finishing touches. Fill the holes with wood filler and let it to dry out for several hours. Afterwards, smooth the wooden surface with fine-grit sandpaper and vacuum the residues.

This plan can be originally found at http://howtospecialist.com/finishes/furniture/how-to-build-an-aquarium-stand/

[email_link]

Aquarium Stand


Materials:

  • A – Frame – 5 pieces of 2×4 lumber – 2 @ 30 1/2″ long, 3 @ 9 1/4″ long
  • B – Legs – 4 pieces of 2×2 lumber – 26″ long
  • C – Sides – 4 pieces of 1×2 lumber – 9 1/4″ long, 2 pieces of 3/4″ plywood 9 1/4″ x 26″ long
  • D – Front Face – 2 pieces of 1×2 lumber – 27 1/2″ long, 1 piece of 3/4″ plywood 26″ x 27 1/2″ long
  • E – Supports – 2 pieces of 2×2 lumber – 27 1/2″ long
  • F – Bottom – 1 piece of 3/4″ plywood – 9 1/4″ x 27 1/2″ long
  • G – Top – 1 piece of 3/4″ plywood 12 1/4″ x 30 1/2″ long
  • H – Trims – 4 pieces of 1×6 lumber – 2 @ 12 1/4″ long, 2 @ 32″ long

Directions:

The first step of the project is to build the frame for the tabletop. As you can easily can notice in the diagram, use 2×4 lumber for the components. Cut the components at the right dimensions and drill pocket holes at both ends of the short components. Make sure the corners are square and insert 2 1/2″ screws to lock them together tightly.

Build the side panels out of 3/4″ plywood. Attach the 1×2 cleats to the top and bottom of the panel, as described in the diagram. Add glue to the joints and insert 1 1/4″ finishing nails to get the job done in a professional manner.

Drill pocket holes along the sides and top edges of the plywood panels and secure them to the 2×2 legs using 1 1/4″ screws. Add glue to the joints and leave no gaps between the components.

Build the front panel out of 3/4″ plywood and the supports out of 1×2 lumber. Use glue and 1 1/4″ brad nails to lock the supports to the panel. Drill pocket holes along the sides and top edges. Fit the front panel to the side panels and insert 1 1/4″ screws to lock them together tightly. Make sure the corners are square before inserting the screws.

Continue the project by fitting the 2×2 supports to the face of the fish tank stand. Drill pocket holes at both ends of the supports and secure them to the sides using 2 1/2″ screws. Make sure the corners are right-angled.

Continue the woodworking project by attaching the frame to the top of the structure. Align the edges with attention, making sure they are perfectly flush. Insert 2 1/2″ screws through the top of the stand into the 2×4 frame. Leave no gaps between the components and add glue to enhance the rigidity of the structure.

Use 3/4″ plywood to build the top of the aquarium stand. Smooth the edges with sandpaper and attach it to the frame using glue and 1 1/4″ brad nails.

Use 1×6 lumber to build the trims for the top of the stand. Attach the trims to the frame of the stand using 1 1/4″ brad nails and glue. Make sure the corners are square and leave no gaps between the components.

Build the cleats out of 1×2 lumber. Drill pocket holes at both ends of the components and secure them to the structure using 1 1/4″ screws. Check if the corners are right-angled before inserting the screws.

Build the bottom of the stand out of 3/4″ plywood. Smooth the edges with 120-grit sandpaper and fit the sheet to the bottom cleats. Insert a few 1 1/4″ brad nails to lock the sheet to the cleats.

Build the doors panels out of 3/4″ plywood and the frames out of 1×2 lumber. Cut the components at the right dimensions and secure them to the plywood panels using 1 1/4″ brad nails and glue. Leave no gaps between the components and make sure the edges are perfectly flush.

Fit the doors to the opening and secure them to the side using hinges. Leave 1/8″ around the doors and install a magnet door stop. Fit nice handles and then take care of the finishing details.

One of the last steps of the woodworking project is to take care of the finishing touches. Therefore, fill the pilot holes with wood putty and smooth the surface with 120-grit sandpaper.

This plan was originally found at http://myoutdoorplans.com/furniture/fish-tank-stand-plans/

[email_link]

Bow Rack


Building your own bow rack is an easy DIY project for any archery enthusiast. The materials that are needed will cost around $20 depending on your selection of wood, and everything you need can be found at the local home improvement warehouse. The whole project will take about an hour to build (excluding paint or stain) depending on design choice and skill level. The simple bow rack shown in this post is made to hold up to 4 bows.

First, the shopping list:

  • 24 inches of 1 x 6 stain grade pine
  • 12 inches of 1 x 4 stain grade pine
  • 14 inches of 7/8 inch dowel oak
  • 12 inches of 1/4 inch dowel oak
  • 4- 1 5/8 inch drywall screws
  • Mounting hardware – I suggest 4 screws straight into studs or wall anchors rated for 50lbs+
  • Paint or Stain (optional)

Step 1: Cut the 1×6 backer board at 24″


Step 2: Cut (2) 1×4 boards at 6″ long each.


Step 3: Mark the 1×4 with an X for drilling
Measure from one end of the 1×4 that you just cut, 2″ in and 1 3/4” down and put an X where they meet.

Step 4: Drill through the 1×4 with a 7/8″ spade bit.
Take the 7/8″ spade drill bit and center it on the X. Remember it is important that these holes are straight and level otherwise your rack will be lopsided, and nobody wants a lopsided bow rack.


Step 5: Add a creative edge to the backer board.
This is the design step. If you have a router and would like to put a creative edge on your backer board (1×6) now is the time to do it. I used a simple rounded edge bit to add some character. You can do anything you want with this step or leave it that way it is.


Step 6: Measure and mark the boards for drilling
Measure in 4″ from each end of the 1×6 and draw a straight. Then, measure down 1″ from the top and up 1″ from the bottom making a mark on the lines you just drew. This gives you guidelines for mounting your 1×4 boards in the right places. This is important, otherwise the holes you drill in Step 7 will not line up correctly.


Step 7: Measure, mark, and drill for mounting holes
Flip over your backer board (1×6) and measure in towards the center 4 3/8″ from both ends and draw a straight line. Then, measure up 2″ and down 2″ along these lines and make marks. Take the 1/8″ drill bit and pre-drill each of these 4 marks that you just made. These give you pilot holes for mounting your 1×4 brackets.


Step 8: Install Drywall screws through the backer board into the 1×4 components
Take (4) 1 5/8″ drywall screws, start them from the back of the 1×6 into the 4 pre-drilled holes from Step 7. Then take your 1×4 brackets (one at a time) line them up to the guidelines you drew on the front of your 1×6. Screw one screw into the 1×4 and check to make sure you are still within your guidelines and screw the second screw in. You can either get someone to help you hold these in place while you screw them on, or use a clamp. Then repeat this for the second 1×4.


Step 9: Measure, mark, and cut the dowels.
Measure 6 3/4″ on your 7/8″ dowel, mark and cut. You will need two of these.


Step 10: Insert the dowel.
Slide your 7/8″ dowel through the hole you drilled in step 4. It should stick out 3″ on each side. Once you have it centered, mark it on each side.


Step 11: Drill the center of the 1×4 for a locking pin n the dowel
Place the rack flat and measure in 2″ from the end of the 1×4 on the top in the center (remember center is 3/8″ in from either side on any 1x wood). Take your 1/4″ drill bit on your mark and drill down through the 1×4 and 7/8″ dowel. This is probably the hardest step. It is very important to stay straight while drilling this hole as you want it in the center of the 1×4! Do this for both 1×4 brackets.

NOTE: Most 1/4″ Drill bits are long enough to just reach but make sure you verify before drilling.


Step 12: Cut and insert the 1/4″ dowel locking pins
Cut 2 pieces of your 1/4″ dowel to the depth of the holes you just drilled in step 11. Mine were 3″ long but it will vary depending on your drill bit length. An easy thing to do is to hold the dowel next to your drill bit and mark the length of the hole you just drilled, but better to be long than short. (I highly recommend using a hand saw for cutting the 1/4″ dowel)
Step 13: Trim the 1/4 dowels flush.
Take your 1/4″ dowel pieces that you just cut and tap them into the holes you drilled in step 11. They should be flush with the top of the 1×4, if they are not, they may not be all the way in. Otherwise, if you happen to measure a little long then you can just take a hand saw and trim them so they are flat.


Step 14: Sand the bow rack smooth
Sand your brand new bow rack smooth with a 220 grit sandpaper. You can use an electric sander or do it by hand. I sanded this one with one of the new sponge sanding blocks.


Step 15: Stain and seal the rack
Then, you can paint or stain your bow rack to whatever color or design you wish. The one you see pictured below and was stained in the Minwax Gel Stain color Gun Stock and then it got a coat of satin finish polyurethane.


Step 16: Mount the rack
Finally, you can mount your bow rack on your wall just make sure your bow doesn’t hit the floor. I prefer to mount them straight to studs in the wall. Use 4 mounting screws of your choice but make sure they are 2″ long or longer and attack the bow rack to the wall.Wherever you have mounting screws that are not going into a stud, use wall anchors that will hold 50lbs or more!

Here’s a picture of my current bow rack. I built it just like the one we put together, only faster and with scraps of wood I had laying around. It’s not as pretty, but I wanted to show you how it looks mounted to the wall.

Plan originally from https://www.oneprojectcloser.com/how-to-build-a-bow-rack/ by Andy @ Bow Hunting Maryland

[email_link]

Backyard Service Cart

A practical service cart with fold-able shelves that is indispensable next to a barbecue.
This service cart is built with cedar, a naturally weather resistant wood that will last
for many years.

Materials:

  • 10 pieces – 1×6 Cedar – 96″ long
  • 3 pieces – 1×2 Cedar – 96″ long
  • 1 1/2″ screws for treated wood
  • 3 – 36″ piano hinges

Cutting Plan:


1×6 Cedar:

  • A – Contour – 10 pieces – 6″ x 32″
  • B – Door – 4 pieces – 6″ x 28 3/4″
  • C – Top – 3 pieces – 6″ x 23 7/8″
  • D – Shelf – 6 pieces – 6″ x 17″
  • E – Shelf – 3 pieces – 6″ x 20 7/8″
  • F – Base – 2 pieces – 3″ x 20 7/8″
  • G – Base – 2 pieces – 3″ x 15 1/4″

1×2 Cedar:

  • H – Stiffener – 10 pieces – 2″ x 15 1/4″
  • I – Stiffener – 2 pieces – 2″ x 20 7/8″
  • J – Stiffener – 4 pieces – 2″ x 9 3/8″
  • K – 45 degree support – 2 pieces – 2″ x 20 15/16″

Piano Hinge:

  • L – Door hinge – 2 pieces – 28″ long
  • M – Shelf hinge – 1 piece – 15″ long

Assembly:

Step 1:

Assemble each of the two sides by juxtaposing three A boards, connected by three H stiffeners and a G stiffener, centered in relation to the three boards.

– Screw an H stiffener to the higher end of the A boards.
          – Screw the G stiffener to the lower end. Note that this G part is made of a 1″ x 6″ part cut length ways 1″ x 3″.
          – Attach the last two H stiffeners on both sides at the centre of the assembly, 15 1/2″ from the lower end of the A boards.


Step 2:

Assemble the back by juxtaposing four A boards, connected by an I stiffener and an F stiffener centered in relation to the four boards.
– Screw the I stiffener to the higher end of the A boards.
– Screw the F stiffener to the lower end.


Step 3:

Attach the back of the sideboard
to the sides. The back should rest on the sides, and not be caught between them.

Step 4:

Screw an I stiffener on the front
to the two H stiffener above
the side panels.

Step 5:

Screw an F stiffener on the front to two G stiffener of the side panels.


Step 6:

Lay the E boards of the interior shelf on the central H stiffeners, and screw.

Step 7:

Lay the C boards on the higher H stiffeners. The C boards should be centered in relation to the sides. Screw.


Step 8:

Assemble the two hinged shelves by using three D parts, connected
by H stiffeners attached 2″ from the ends of the D boards.

Step 9:

Screw the piano hinges M to the shelves, and then to the sideboard.

Step 10:

Assemble each door by using two B parts connected by J stiffener
that are centered and placed 1 1/2″ from the ends of B.

Step 11:

Assemble each door by using two B parts connected by J stiffener
that are centered and placed 1 1/2″ from the ends of B.

Step 12:

Screw the L piano hinges to the doors and then to the sides of the sideboard.

Step 13:

Support of the hinged shelves, when unfolded, is ensured by the K parts,
which ends are cut at 45 degrees, and are supported by the central external stiffeners.

Although the cedar is weather resistant, it is recommended to store the sideboard during the winter to give it a longer life.


The original plan can be found at https://www.rona.camade by Rona

[email_link]

1 10 11 12 13