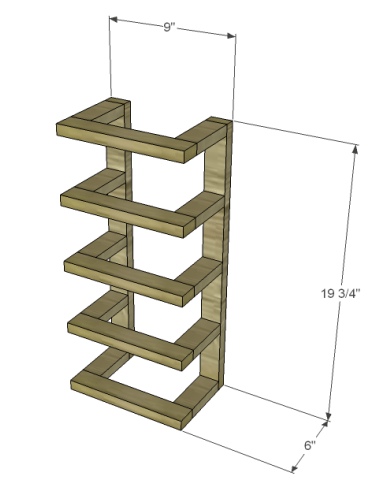
Towel Rack

- 1-1/4″ pocket hole screws
- 2-1/2″ screws
- Wood glue
- Sandpaper (100, 150, 220 grits)
- Finishing supplies (primer & paint, or stain, sealer)
Lumber:
- 1 – 1×2 at 4′
- 1 – 1×2 at 6′
-
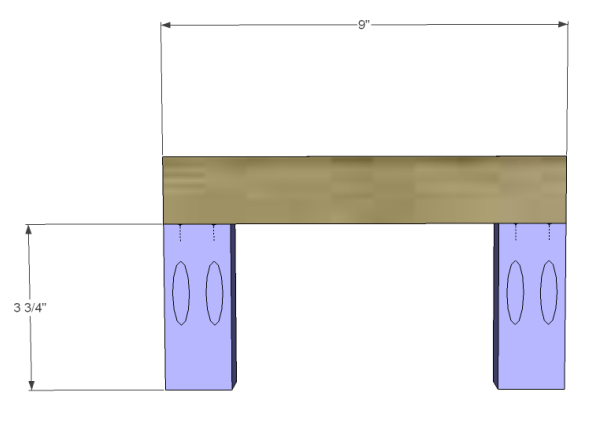
- 5 – 1×2 at 9″ – Shelf
- 10 – 1×2 at 3-3/4″ – Shelf
- 2 – 1×2 at 19-3/4″ – Legs
Notes:
I recommend sealing the towel rack with spar urethane if it will be located in an area where a lot of moisture is present.
Cut the pieces for the shelves. With the pocket hole jig set for 3/4″ material, drill pocket holes in one end only of each shorter shelf piece. Secure to the longer shelf pieces using glue and 1-1/4″ pocket hole screws.
Mark the position for the shelves on the back and front of the longer rack pieces.


Drill countersunk holes in the back of each back frame piece.


Attach the shelves using glue and 2-1/2″ screws from the back. I started with the bottom shelf on mine… Make sure to check for square before adding the remaining shelves!


Finish as desired. Drill countersunk holes in the back frame pieces. Mount the rack to the wall with 2-1/2″ screws into at least one wall stud. If there are no studs in the area where the rack will be mounted, use auger anchors in the drywall then secure using screws.
The original plan can be found at http://designsbystudioc.com
![]() [email_link]
[email_link]