Howell Bar Cabinet

Like to entertain? This is a great bar cabinet for those get-togethers with friends! The DIY plans to build a Howell bar cabinet feature wine storage behind two doors with false drawer fronts, and a long pull-out cabinet in the center. There is plenty of storage for entertaining accessories and spirits in this cabinet!


MATERIALS:

  • 1-1/4″ pocket hole screws
  • 5/8″ brad nails
  • 1-1/4″ brad nails
  • Edge banding, optional
  • 3 sets of 18″ ball-bearing drawer slides
  • 2 sets of hinges
  • 15 cabinet pulls
  • Wood glue
  • Sandpaper (100, 150, 220 grits)
  • Finishing supplies (primer & paint, or stain, sealer)

LUMBER:

  •  1 – 1×2 at 8′
  • 1 – 1×3 at 4′
  • 1 – 1×3 at 6′
  • 1 – 4′x4′ sheet of 1/4″ plywood
  • 1 – 4′x4′ sheet of 1/2″ plywood
  • 3 sheets of 4′x8′ 3/4″ plywood
  • 8 – 3/4″ square dowels at 4′ or 16 – 3/4″ square dowels at 3′

CUT LIST:

  • 2 – 3/4″ plywood at 20-1/4″ x 42-1/4″ – Sides
  • 1 – 3/4″ plywood at 20-1/4″ x 40-1/2″ – Bottom
  • 2 – 3/4″ plywood at 3-1/4″ x 40-1/2″ – Kick Plates
  • 1 – 3/4″ plywood at 38-1/4″ x 40-1/2″ – Back
  • 2 – 3/4″ plywood at 19-1/2″ x 38-1/4″ – Dividers
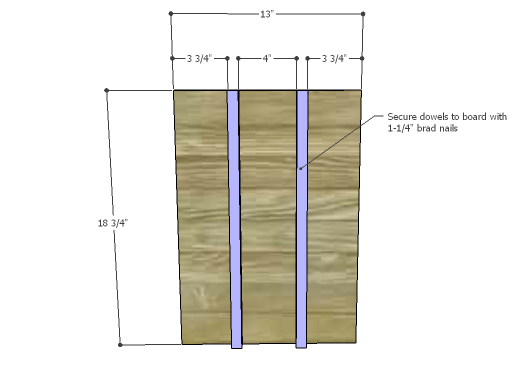
  • 16 – 3/4″ square dowels at 18-3/4″ – Wine Bottle Stops
  • 6 – 3/4″ plywood at 13″ x 18-3/4″ – Shelves
  • 1 – 3/4″ plywood at 19-1/4″ x 40″ – Top Panel
  • 2 – 1×2 at 19-1/4″ – Top Side Trim
  • 1 – 1×2 at 43″ – Top Front Trim
  • 2 – 3/4″ plywood at 12″ x 37-1/2″ – Drawer Front & Back
  • 3 – 3/4″ plywood at 12″ x 16-1/2″ – Drawer Shelf Bottom
  • 6 – 1×3 at 16-1/2″ – Drawer Sides
  • 3 – 1/2″ plywood at 12-3/4″ x 37-15/16″ – Door & Drawer Base
  • 15 – 1/4″ plywood at 7-3/8″ x 12-3/4″ – False Drawer Fronts

Step 1:

Cut the pieces for the sides and the bottom. With the pocket hole jig set for 3/4″ material, drill pocket holes in each end of the bottom. Position the bottom 3-1/4″ up from the bottom edge of the sides securing in place using glue and 1-1/4″ pocket hole screws.

Step 2:

Cut the pieces for the kick plates and drill pocket holes in each end. Secure to the sides under the bottom using glue and 1-1/4″ pocket hole screws. The front kick plate will be positioned 3/4″ back from the front edge of the sides while the back kick plate will be flush with the sides. Add a few 1-1/4″ brad nails through the bottom into the kick plates.

Step 3:

Cut the piece for the back and drill pocket holes in the side and bottom edges. Secure to the sides and bottom using glue and 1-1/4″ pocket hole screws.

Step 4:

Cut the pieces for the dividers. Drill pocket holes in the back and bottom edges, treating the pieces as if they are a left and a right (this way the pocket holes will be hidden in the center drawer area).

Step 5:

Cut the pieces for the wine bottle stops and the shelves. Attach two stops the bottom of each outer cubby as shown, locating them 3/4″ back from the front edge of the bottom. Secure the stops in place using glue and 1-1/4″ brad nails.

Drill pocket holes in the side and back edges of the shelves. Attach the remaining stops to the top of the shelves as shown using glue and 1-1/4″ brad nails. Position the shelves in the outer side cubbies as shown securing in place with glue and 1-1/4″ brad nails.

Step 6:

Cut the piece for the top and the top trim. Drill pocket holes in the side and front edges of the panel as well as one end of the side trim. Attach the side trim to the panel first, using glue and 1-1/4″ pocket hole screws. Attach the front trim piece using glue and 1-1/4″ pocket hole screws. Use a router and a decorative bit to cut a fancy edge on the top!

Position the top so that the back edge is flush and the sides and front overhang by 1/2″. Secure the top to the cabinet using glue and 1-1/4″ brad nails.

Step 7:

Cut the pieces for the center drawer. This drawer is similar to a traditional drawer but has three shelf compartments. Drill pocket holes in the narrower edges of each bottom piece. Secure the bottom pieces to the front and back pieces as shown using glue and 1-1/4″ pocket hole screws.

Drill pocket holes in each end of the side pieces. Position the side pieces over each bottom piece, securing in place with glue and 1-1/4″ pocket hole screws.

Mark the position for the drawer slides on the dividers – the drawer will sit 1/8″ above the bottom. Install the cabinet side pieces of the drawer slides on the dividers locating the slides 3/4″ back from the front edge, then install the drawer side pieces of the slides on the sides of the drawer. Test fit the drawer and make any necessary to the slides.

Step 8:

Cut the pieces for the door/drawer front bases, then cut the pieces for the false drawer fronts. Draw placement lines on the base for the false fronts. The top false front will be located approximately 1/16″ down from the top of the base. The remaining false fronts will be spaced 1/4″ apart. Secure the false fronts using glue and 5/8″ brad nails. drill holes in each false front, all the way through the base, for the cabinet pulls.

Step 9:

Shim the drawer front assembly in the center cubby over the drawer. There will be a 1/8″ gap around all sides. Drive screws through the holes drilled for the cabinet pulls into the drawer. Open the drawer, and secure the drawer front from the inside with countersunk 1-1/4″ screws. Finish drilling the holes through the drawer for the cabinet pulls, then install the pulls.

Step 10:

Install the hinges on the doors, then install the doors in the cabinet. There will be a 1/8″ gap around all sides of the doors in the openings. Install the pulls.

Finish as desired.

The original plan can be found at http://designsbystudioc.com

 
[email_link]

Bar Cabinet

Materials:

  • 1 – 6′ piece of 1/4″ x 1 1/2″ craft board in your desired finish
  • 1 – 8′ piece of 1/2″ x 2 1/2″ craft board in your desired finish
  • 1 – 1×2 piece @ 8′ long
  • 12 – 1×3 pieces @ 8′ long
  • 1 – 1×4 piece @ 6′ long
  • 2 – 1×6 pieces @ 6′ long
  • 2 – 2×2 pieces @ 8′ long
  • 1 – 1/2 sheet of 3/4″ plywood
  • 1 – scrap of 1/4″ plywood at least 15 1/2″ x 17 1/4″
  • 1 – set of euro inset hinges
  • 1 – set of 14″ bottom mount drawer slides
  • 1 – piece of 1/4″ thick glass cut to 15 1/4″ x 15 1/4″
  • 1 1/4″ screws
  • 2″ screws
  • 1 1/4″ pocket hole screws
  • 2 1/2″ pocket hole screws
  • 5/8″ Finishing nails
  • 1 1/4″ Finishing nails
  • 2″ finishing nails


Cut List:

  • 2 – 1 1/2″ Project Board pieces @ 18 1/4″ – Back side of door
  • 2 – 1 1/2″ Project Board pieces @ 15 1/4″ – Back top and bottom of door
  • 4 – 2 1/2″ Project Board Pieces @ 18 1/4″ (Measured at the long side of your mitered cut.  Sides should be mitered at a 45 degree angle.)- Door Sides
  • 1 – 1×2 @ 18 1/2″ – Drawer Divider
  • 1 – 1×2 @ 15″ – Drawer Slide Mount
  • 26 – 1×3 @ 25″ – Plank Casing
  • 6 – 1×3 @ 35″ – Plank Top
  • 2 – 1×4 @ 17 1/4″ – Drawer Front/Back
  • 2 – 1×4 @ 14″ – Drawer Sides
  • 1 – 1×6 @ 18 1/4″ – Drawer Front
  • 6 – 1×6 @ 16 1/2″ (ripped to 4 1/2″ wide. From now on will be mentioned as 1x5s) – Wine Dividers
  • 4 – 2×2 @ 35″ – Front and Back Top/Bottom
  • 4 – 2×2 @ 15″ – Side Top/Bottom
  • 2 – 2×2 @ 25″ – Center Divider
  • 4 – 2×2 @ 31″ – Legs
  • 1 – 1/4″ Plywood @ 17 1/4″ x 15 1/2″ – Drawer Bottom
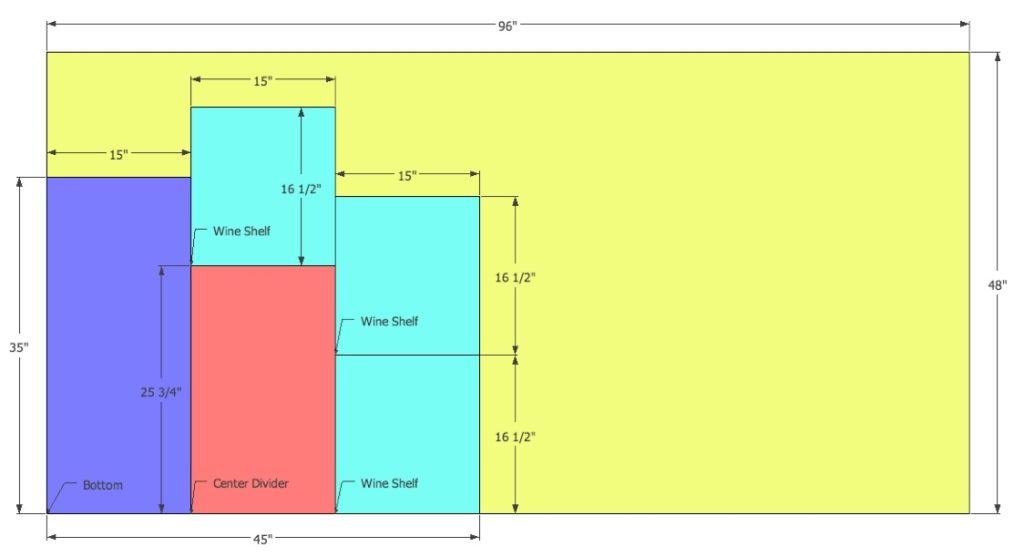
  • 1 – 3/4″ Plywood @ 35″ x 15″ – Bottom
  • 1 – 3/4″ Plywood @ 25 3/4″ x 15″ – Center Divider
  • 3 – 3/4″ Plywood @ 16 1/2″ x 15″ – Wine Shelves

Step 1:

Cut Plywood as shown above

Step 2:

To create your side, first attach your 1×3 plank boards together to create a flat panel.  (Make sure to use wood glue!)  In making this panel, it helps to ensure that all of the “bend” is eliminated from your board to have a straight side.  Once that has been completed, Kreg Jig your panel to the top and bottom 1x2s flush to the back, leaving a 3/4″ gap on the front.  (One trick to doing this is to put a scrap 1x board or 3/4″ thick piece of plywood underneath your 1×3 planks when Kreg Jigging it into the 2×2.  That should remove the guesswork and give you the perfect 3/4″ overhang when you’re finished screwing the panel together.)  (PS – is Kreg Jigging a word?  If not, it totally should be.)

Step 3:

Attach your legs either by using your Kreg Jig or countersinking 3″ screws through the sides into the top/bottom 2x2s that are attached to your panel.  The top of the 2×2 should be flush with the top of your panel.  Repeat steps 2-3 to create your other side.

Step 4:

Just like you created your sides in step 2, Kreg Jig your 1×3 planks together for the back and then attach them to your 2×2 top and bottom back.  Once your panel has been assembled, attach it to the back legs of each of your sides.

Step 5:

Attach your 2×2 front top/bottom boards using your Kreg Jig or by countersinking them into the side 2x2s using 3″ screws and wood glue.  The top 2×2 should be flush with the top of the cabinet and the bottom piece should leave a 3″ gap between the 2×2 and the ground.  It should be even with the surrounding bottom 2x2s.

Step 6:

Attach your plywood bottom into the casing using your Kreg Jig and wood glue.  The top of the plywood should be flush with the top of the front 2×2.  Also, make sure that your bottom is level before putting in the final screws!

Step 7:

Slide your 2×2 center divider into place using the dimensions shown above.  Secure using your Kreg Jig and wood glue.

Step 8:

Slide your plywood center divider into place in between the back and your 2×2 center divider.  When positioning, make sure that the right side (what will be your wine holder side) of the plywood is flush with the outside of the 2×2.  You will have a 3/4″ gap on the left side of the plywood between that and the outside edge of your 2×2.  The measurements shown above represent the plywood’s location in relation to the sides of the casing.

Step 9:

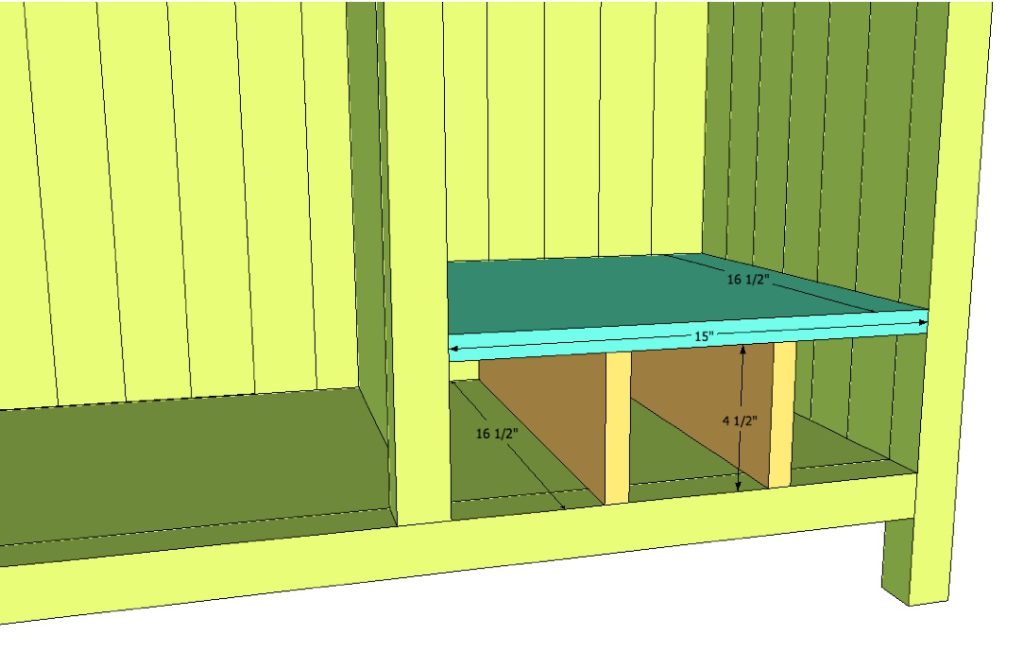
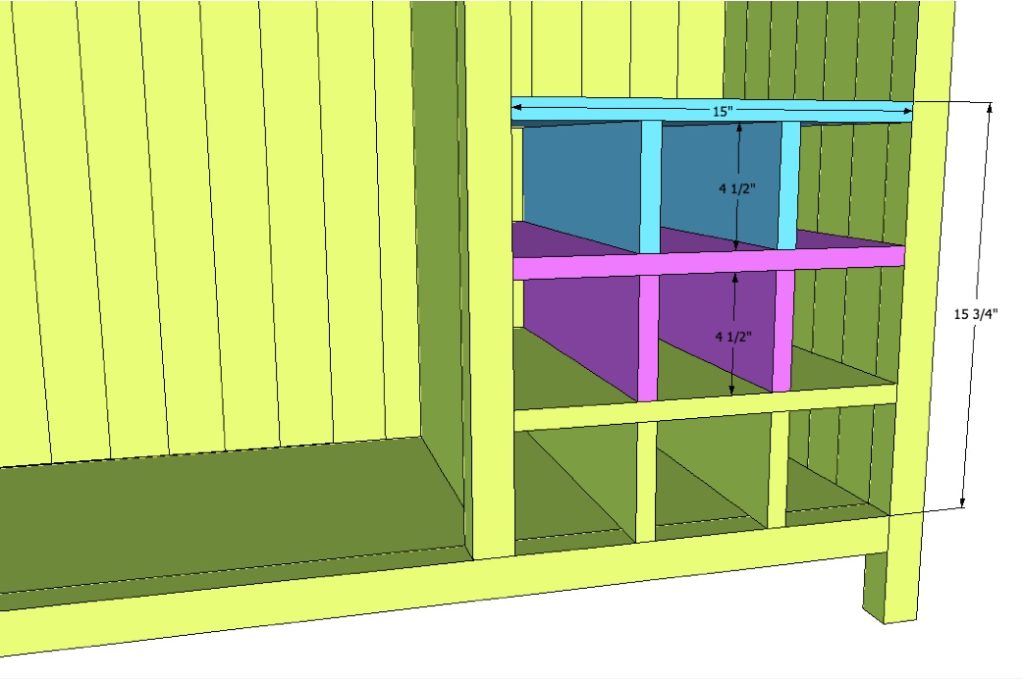
There are a few options for installing the wine holder side of the bar cabinet (Each of the three gaps for the wine bottles should be 4 1/2″ wide):

  1. If you have a right angle drill that can fit into small spaces, you can use your Kreg Jig and attach your 1×5 wine dividers first to the bottom of the cabinet.  Once they’re in place, attach the plywood top of the wine divider to top of the 1x5s and secure in place with your right angle drill from the inside using your Kreg Jig.
  2. If you don’t have a right angle drill, you can attach the 1x5s to the base as described in option 1, but then attach the plywood top by countersinking it from the top into the dividers  using 1 1/4″ screws.
  3. Another option is to attach the 1x5s to the plywood first, and then slide the entire piece into the console and secure using your Kreg Jig and wood glue.

Step 10:

Repeat step 9 twice more to get the full wine rack.

Step 11:

For the top, first attach all of your 1x3s planks together like you did for the sides.  To make this step easier, place the top plank section on the ground (top facing downward) and lay the console on top of it fitting the planks into the top opening.  This way, when you screw it together using your Kreg Jig, you know that your top is even and level.

Step 12:

Attach your drawer divider as shown above using your Kreg Jig.  Make sure that you leave  5 3/4″ above your 1×2 to allow for your drawer.

Step 13:

Since the plywood center divider isn’t flush with the left outside edge of the bar, we need to install a “drawer slide support” to build this out as a platform for your drawer slide.  Your 1×2 should fit directly above your drawer divider.  Attach with 1 1/4″ screws and wood glue.

Step 14:

Assemble the four sides of your drawer first as shown above with your Kreg Jig.  Once you have your boards assembled, add the plywood bottom using finishing nails and wood glue.  (Since you are using bottom mount drawer slides, that will further secure the bottom of the drawer.)  Add your drawer slides as per the manufacturer’s instructions, leaving a 3/4″ gap between the front of the drawer and the end of your console to allow for the drawer front to fit into place.

Step 15:

Once your drawer slides are installed and the inside of your drawer is inserted into the drawer slot, place your drawer front over the opening leaving a 1/8″ gap on all sides.  When you are satisfied with its placement, use finishing nails to secure the front to the inside of the drawer.  (This step is even easier if you turn the console onto its back.)

Step 16:

Glue your door sides together as shown above, making sure that your corners have been mitered at a 45 degree angle.

Step 17:

On top of your door sides, secure the back sides of the door to the front using 5/8″ finishing nails and wood glue.  At this step, you may want to paint/stain your door before you add the glass.

Step 18:

Glue your glass or plexiglass into the inset using liquid nails or another strong adhesive.  You can also secure from the back using mirror clips for additional hold.

Step 19:

Install the door according to the manufacturer’s instructions on your hinges.  This is an inset door and there should be 1/8″ available on each side once installed to allow for easy opening (and closing!).

The original plan can be found at http://www.oldpaintdesign.com

[email_link]

Bar Cabinet


Materials:

  • 1 – 1×2 at 4’
  • 2 – 1×3 at 8’
  • 10 – 1×4 at 8’
  • 1 sheet of ½” plywood
  • 1 half sheet of ¾” plywood
  • 1 sheet of ¾” plywood
  • 1″ Pocket Hole Screws
  • 1-1/4″ Pocket Hole Screws
  • 1-1/4″ Wood Screws
  • 1-1/4″ Brad Nails
  • Edge banding
  • 1 set of 22” drawer slides (side mount with 1/2″ clearance)
  • 1 set of Hinges
  • 2 Drawer/Cabinet Pull

Cut List:

  • 4 – 1×4 at 41-1/4” – Side Legs
  • 6 – 1×4 at 16” – Side Frames
  • 4 – 1/2” plywood at 13-3/8” x 16” – Side Panels
  • 3 – 1×4 at 35-1/2” – Front Frame
  • 2 – 1×4 at 41-1/4” – Front Legs
  • 2 – 1/2” plywood at 13-3/8” x 35-1/2” – Front Panels
  • 2 – 1×4 at 37” – Back Stretchers
  • 2 – 1×4 at 37-3/4” – Back Legs
  • 1 – ¾” plywood at 22-1/4” x 42-1/2” – Bottom Shelf
  • 1 – 1×3 at 26-3/4” – Cabinet Divider
  • 1 – ¾” plywood at 22-1/4” x 29-3/8” – Divider
  • 1 – ¾” plywood at 20-1/2” x 22-1/4” – Shelf
  • 1 – ¾” plywood at 21-1/4” x 22-1/4” – Shelf
  • 1 – 1×2 at 17-3/4” – Drawer Stretcher
  • 1 – 1×2 at 22-1/4” – Drawer Slide Spacer
  • 1 – ¾” plywood at 22-1/4” x 42-1/2” – Countertop
  • 2 – 1×4 at 22-1/4” – Inner Top Spacers
  • 1 – 1×4 at 37” – Inner Top Spacer
  • 2 – 1×4 at 6-3/4” – Top Frame Back
  • 3 – 1×4 at 3-1/4” – Top Frame Spacers
  • 2 – 1×4 at 26-1/4” – Top Frame Sides
  • 1 – 1×4 at 50-1/2” – Top Frame Front
  • 1 – ¾” plywood at 27-3/4” x 50-1/2” – Top
  • 1 – ¾” plywood at 15-1/4” x 20-1/2” Drawer Bottom
  • 2 – 1×4 at 20-1/2” – Drawer Box Sides
  • 2 – 1×4 at 16-3/4” – Drawer Box Front & Back
  • 1 – ¾” plywood at 5-1/2” x 17-1/2” – Drawer Front
  • 2 – 1×3 at 11-1/2” – Door Rails
  • 2 – 1×3 at 26-1/2” – Door Stiles
  • 1 – ½” plywood at 11-1/2” x 21-1/2” – Door Panel

Step 1:


Edge banding will be applied to the exposed edges of the plywood prior to assembly.

Cut the pieces for the legs, side frames, and side panels. Set the Kreg jig for ¾” material and drill pocket holes in each end of the frame pieces. Secure to the legs using glue and 1-1/4” pocket hole screws.

Set the Kreg jig for ½” material and drill pocket holes in all four edges of the panels. Secure to the legs and the frame pieces using glue and 1” pocket hole screws.

Step 2:


Cut the pieces for the legs, front frame, and panels. Set the Kreg jig for ¾” material and drill pocket holes in each end of the frame pieces, as well as one long edge of each leg. Secure to the legs using glue and 1-1/4” pocket hole screws.

Set the Kreg jig for ½” material and drill pocket holes in all four edges of the panels. Secure to the legs and the frame pieces using glue and 1” pocket hole screws.

Secure the entire front assembly to the sides using glue and 1-1/4” pocket hole screws.

Step 3:

Cut the pieces for the back legs and frame pieces. Set the Kreg jig for ¾” material and drill pocket holes in each end of the frame pieces. Secure to the legs using glue and 1-1/4” pocket hole screws.

Secure the back frame to the side legs using glue and 1-1/4” brad nails.

Step 4:


Cut the piece for the bottom shelf and drill pocket holes in all four edges. Secure to the lower frame pieces using glue and 1-1/4” pocket hole screws from the under side.

Cut the piece for the cabinet divider and drill pocket holes in each end. Secure to the back frame pieces using glue and 1-1/4” pocket hole screws.

Cut the piece for the divider and drill pocket holes in all four edges. Secure to the bottom, front frame, and cabinet divider using glue and 1-1/4” pocket hole screws. The back face of the divider (without pocket holes) will be flush with the back edge of the cabinet divider.

Step 5:

Cut the pieces for the shelves and drill pocket holes in the side and back edges. Position in each side of the cabinet and secure using glue and 1-1/4” pocket hole screws.

Step 6:


Cut the piece for the drawer divider and drill pocket holes in each end. Secure to the back leg and cabinet divider as shown using glue and 1-1/4” pocket hole screws.

Cut the piece for the drawer slide spacer and drill pocket holes in each end. Secure to the back leg and the front leg as shown using glue and 1-1/4” pocket hole screws. The bottom of the spacer will line up with the top of the drawer divider.

Step 7:

Cut the piece for the countertop and drill pocket holes in all four edges. Secure to the cabinet using glue and 1-1/4” brad nails through the legs and panels into the countertop. The top face of the countertop will be flush with the top face of the back frame. Add a few 1-1/4” pocket hole screws through the divider into the underside of the countertop.

Cut the pieces for the inner top frame and drill pocket holes at one end as well as one long edge. Secure to the front panel and countertop as shown using glue and 1-1/4” pocket hole screws.

Cut the piece for the inner frame sides and drill pocket holes in each end as well as one long edge. Secure to the sides and countertop using glue and 1-1/4” pocket hole screws.

Step 8:

Cut the pieces for the top frame back. Secure to the side frame and inner top frame using glue and 1-1/4” brad nails.

Cut the piece for the top frame spacers and drill pocket holes in one end. Secure to the front frame using glue and 1-1/4” pocket hole screws.

Cut the pieces for the top frame sides and drill pocket holes in one end. Secure to the back frame pieces using glue and 1-1/4” pocket hole screws.

Cut the piece for the top frame front. Position as shown then secure to the sides and spacers using glue and 1-1/4” brad nails.

Step 9:

Cut the piece for the top. Secure to the top frame using glue and 1-1/4” brad nails.

Step 10:

Cut the pieces for the drawer box. Drill pocket holes in all four edges of the bottom as well as each end of the sides. Assemble the drawer box as shown using glue and 1-1/4” pocket hole screws. Install the drawer slides according to the manufacturer’s installation instructions, locating them ¾” back from the front edge of the sides. Cut the pieces for the drawer front. Mark the position for the drawer pulls and drill the holes. Shim the drawer front in the opening – there will be a 1/8” gap around all sides – then drive screws through the holes for the drawer pulls into the drawer box. Open the drawer, and secure the drawer front using countersunk 1-1/4” screws from the inside. Remove the screws from the holes for the drawer pull then finish drilling the holes. Install the drawer pull.

Step 11:

Cut the pieces for the door. Drill pocket holes in each end of the rails then assemble the frame using glue and 1-1/4” pocket hole screws.

Cut the piece for the center panel. Set the Kreg jig for ½” material and drill pocket holes in all four edges. Secure the panel in the frame using glue and 1” pocket hole screws. The back face of the panel will be flush with the back face of the frame.

Install the hinges on the door, then install the door in the cabinet. Install the cabinet pull.

Step 12:

Fill any Screw, Nail or Pocket Holes, Sand and Finish as Desired

The original plan can be found out http://www.thedesignconfidential.com

[email_link]

Bar Cabinet

Materials:

  • A – Base – 7 pieces of 1×3 Lumber – 2 pieces @ 56” long, 5 pieces @ 17 ¼” long
  • B – Base – 1 piece of ¾” plywood – 56” x 18 ¾”
  • C – Trims – 4 pieces of 1×4 Lumber – 2 pieces @ 57 ½” long, 2 pieces @ 10 ¼” long
  • D – Sides – 4 pieces of ¾” plywood – 16” x 34 ½” long
  • E – Face – 1 piece of ¾” plywood – 54” x 34 ½” long
  • F – Shelves – 4 pieces of ¾” plywood – 2 pieces @ 16” x 16”, 2 pieces @ 16” x 19”
  • G – Trim – 1 piece of 1×3 Lumber – 54” long
  • G – Trim – 11 pieces of 1×2 Lumber – 4 pieces @ 32” long, 4 pieces @ 14 ½” long, 3 pieces @ 19” long
  • H – Countertop – 2 pieces of ¾” plywood 56” x 18 ¾”
  • H – Countertop – 4 pieces of 1×2 Lumber – 2 pieces @ 57 ½” long, 2 pieces @ 20 ¼” long

Building the base

The first step of the woodworking project is to build the base of the diy bar. As you can easily notice in the plans, we recommend you to build the frame out of 1×3 lumber and the top out of 3/4″ plywood. Drill pilot holes along the edges of the plywood sheet and insert the 1 1/4″ screws into the frame. Add waterproof glue to the joints in order to enhance the rigidity of the structure. Check if the corners are square.

Attaching the frame

Continue the project by attaching the frame of the wooden bar. Drill pocket holes at both ends of the plywood components and secure them to the base with 1 1/4″ screws. Drill pocket holes at both ends of the top supports and secure them to the components with 1 1/4 screws. Makes sure the corners are right-angled and place a spirit level to check if they are horizontal.

Fitting the front face

Continue the project by attaching the plywood piece to the front of the bar. Drill pilot holes along the edges of the side components and insert the 1 1/4″ screws into the face of the bar. Add glue to enhance the rigidity of the structure.

Fitting the shelves

In order to add storage space to the bar, we recommend you to fit the 3/4″ plywood shelves to the dimensions described in the article and to drill pocket holes along the edges.

Top Tip: Align the components at both ends and secure them to the frame with 1 1/4″ screws. Add waterproof glue to the joints in order to enhance the rigidity of the structure. Make sure the shelves are horizontal.

Fitting the bottom trims

Add trims to the base of the bar, in order to enhance the look of the woodworking project. Cut both ends of the trims at 45 degrees and lock them together with finishing nails and waterproof glue.

Fitting the bar trims

Cut the top trim out of 1×3 lumber, while the rest of the trims should be made out of 1×2 lumber. It is essential to lock all the trims together after drilling pocket holes and inserting the 1 1/4″ screws.

Top Tip: Afterwards, attach the trims to the frame of the bar and secure them into place with waterproof glue and finishing nails. Smooth the trims with sandpaper, if you want to get a professional result.

Fitting the countertop

Building the countertop of the diy bar is a straight-forward process, as you need to glue two pieces of 3/4″ plywood together. Use several clamps to hold the pieces of plywood together.

Top Tip: Center the tabletop to the frame of the wooden bar and lock it into place by using several galvanized screws. Add glue to enhance the rigidity of the frame and leave it to dry out for several hours.

Fitting the trims

Add 1×2 trims to the exterior of the countertop in order to enhance the look of the diy bar. Cut both ends of the trims at 45 degrees and lock them to the countertop with finishing nails and waterproof glue. Leave no gaps between the components.

One of the last steps of the woodworking project is to take care of the finishing touches. Therefore, fill the pilot holes with wood putty and smooth the surface with 120-grit sandpaper.

Top Tip: If you want to enhance the look of the woodworking project and to protect the bar from decay, we recommend you to cover the components with paint or stain. Place the bench in a proper location and move it whenever necessary.

The original plan can be found at http://myoutdoorplans.com

[email_link]

Backyard Bar

Materials:

  • A – Legs – 4 pieces of 2×4 Lumber – 42” long
  • A – Legs – 4 pieces of 2×6 Lumber – 42” long
  • B – Frame – 15 pieces of 2×4 Lumber – 9 pieces @ 15” long, 6 pieces @ 42” long.
  • C – Shelves – 26 pieces of 1×4 – 18” long
  • D – Panels – 23 pieces of 1×6 Lumber – 14 pieces @ 11” long, 9 pieces @ 40” long
  • E – Countertop – 4 pieces of 2×6 Lumber – 48” long
  • E – Countertop – 4 pieces of 2×4 Lumber – 2 pieces @ 48” long, 2 pieces @ 29” long

Building the frame

The first step of the woodworking project is to build the frames of the bar. As you can easily notice in the image, we recommend you to use 2×4 lumber and to cut the components at the right size before locking them together.

Top Tip: Check if the corners are right-angled and drill pilot holes before inserting the screws, in order to prevent the wood from splitting. Align everything properly.

Building the legs

Build the legs for the bar using 2×4 or 2×6 lumber. Make decorative cuts to the bottom of the legs, as shown in the diagram.

Attaching the legs

Continue the woodworking project by attaching the legs to the three frames. In order to get a professional result, we recommend you to cut the ends of the legs in a decorative manner, by using a nice circular saw. Use 2×4 lumber to build the side legs and lock them into place with galvanized screws. Plumb the legs and check if the frames are perfectly horizontal before inserting the screws.

Attaching the legs

Next, you need to attach the legs to the front and back faces of the bar. Cut the components at the right size and lock them to the structure with 2 1/2″ screws, from the inside. Leave no gaps between the adjacent legs before inserting the screws into place. Add waterproof glue to enhance the rigidity of the joints and remove the excess with a damp cloth. Work with attention, otherwise the end result won’t match your expectations.

Attaching the slats to the shelves

Attach the 1×4 slats to the frames in order to build the shelves. Work with attention and pre-drill holes through the slats before locking them to the frames with 1 1/4″. Place the slats equally-spaced, in order to get a professional result.

Attaching slats to back face

Attach the 1×6 trims to the exterior of the wooden bar starting with the back face. Drill pocket holes at both ends of the slats and secure them to the legs with 1 1/4″ screws. Add waterproof glue to the joints and make sure the edges are flush. Alternatively, use 1 1/4″ nails and glue to lock the trims to the frame.

Attaching slats to sides

Fit the 1×6 slats between the side legs and lock them into place with galvanized screws. Add waterproof glue to the joints in order to enhance the rigidity of the structure.

Top Tip: Place the slats equally-spaced, leaving between them about 1/4″. Align the slats with great care and smooth the cut edges with sandpaper before fitting them into place.

Fitting slats to front

Continue by installing the slats to the front face of the bar, as shown in the image. Align the slats at both ends and secure them to the legs with galvanized screws.

Building the countertop

Building the countertop is a straight-forward process, but you need to tackle it with great care. Align the slats with great care on a level surface and lock them together with galvanized screws. Drill pocket holes along the edges of the slats before inserting the 2 1/2″ screws and add waterproof glue to the joints, in order to create a rigid structure. Make the end slats curved, in order to add value to the wooden bar.

Attaching the countertop

Center the bar to the tabletop, making sure there are no gaps between the components. Drill pocket holes through the frame and insert 2 1/2″ screws into the countertop, to create a rigid structure.

One of the last steps of the woodworking project is to take care of the finishing touches. Therefore, fill the pilot holes with wood putty and smooth the surface with 120-grit sandpaper.

Top Tip: If you want to enhance the look of the woodworking project and to protect the bar from decay, we recommend you to cover the components with paint or stain. Place the bar in a proper location and move it whenever necessary.

The original plan can be found at http://myoutdoorplans.com/furniture/free-bar-plans/

[email_link]

Basement Bar

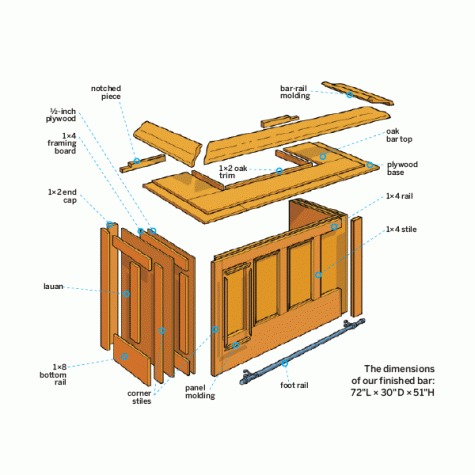
If the notion of building a bar conjures fond and fuzzy memories of hammering 2x4s into some makeshift cup stand back in college, terrific. But that experience won’t help you much here. This is a real piece of furniture, as you can see from the trimmed panels, sturdy oak bar-rail molding, and stainless-steel foot rail. Follow along as This Old House senior technical editor Mark Powers and colleague Douglas Adams build this handsome rec-room centerpiece. And if you want to break out the toga when it’s finished, well, that’s entirely your call.

Paint: Valspar’s Royal Garnet.
Stain: Minwax’s Jacobean.
Bar-rail molding: Bar-rail profile #375; Dykes Lumber.
Foot-rail assembly: Brushed stainless-steel foot-rail tubing, brackets, and caps; KegWorks.

Step 1: Overview

Cut list:

½-inch plywood: 1 @ 60 by 42 inches
½-inch plywood: 2 @ 24 by 42 inches

Lauan sheathing: 1 @ 60 by 42 inches
Lauan sheathing: 2 @ 24 by 42 inches

1×2 framing: 11 @ 37 inches
1×2 framing: 4 @ 24 inches
1×2 framing: 2 @ 60 inches
1×4 nailing block: 2 @ 6 inches

1×4 stile: 5 @ 31¼ inches
1×4 corner stile: 4 @ 42 inches
1×4 corner stile: 2 @ 42 inches (Rip ¾ inch off the board’s width.)
1×2 stile: 2 @ 42 inches

1×4 rail: 1 @ 54½ inches
1×4 rail: Scribe 2 to size.
1×8 rail: 1 @ 54½ inches
1×8 rail: Scribe 2 to size.

Panel molding: Miter 32 to size.

1×2 shelf supports: 1 @ 54 inches
1×2 shelf supports: 2 @ 6 inches

¾-inch plywood bar-top substrate: Cut 2 to size.

1×12 bar top: Cut 1 to size.
1×12 bar top: Cut 2 to size.

Bar-rail molding: Miter 3 to size.

Step 2: Lay Out the Three Sides
Using a circular saw, cut the ½-inch plywood to size for the bar’s front and side panels. With a miter saw, cut the 14 framing boards to length; use them to line the panels’ perimeter, and arrange three more, equally spaced between the side boards, as shown. And if you plan to install brackets for a foot rail, add 6-inch nailing blocks to what will be the lower corners of the front panel. Apply construction adhesive to the back of each 14, and nail them in place using a pneumatic nail gun and 1-inch nails. Mark the location of the vertical boards on the edges of the horizontal boards so that you can pinpoint them once they’re covered.

Step 3: Cut and Attach the Sheathing


Place the lauan finish-face down, and cut it to size with a circular saw. Apply construction adhesive to the framing and affix the lauan. If your pneumatic gun accepts staples, use it to fasten the sheet along the framing with ½-inch staples; if it doesn’t, turn down the air pressure, use ⅝-inch nails, and tilt the gun slightly so that you don’t shoot straight through the lauan.

Step 4: Place the Corner Stiles

Using a miter saw, cut the 14 stiles and rails to length. For the front corner stiles, shift a 1×4 to overhang the panel edge by ¾ inch, using a block to set the space, as shown. Mark the inside edge of the stile on the panel. Do the same at the back edges of the side panels.

Step 5: Miter and Insert the Molding

Lay pieces of molding one by one inside the recessed panels created by the stiles and rails, and mark their length. Using a miter saw, cut the ends at a 45-degree angle, then nail each one in place with 1¼-inch nails. Hold off on the pieces alongside the corner rail for now.

Tip: For a tight fit, miter one side of a long piece of panel molding, hold it in place, and use the panel’s corner to mark a precise cutline for the opposite miter.

Step 6: Attach the Stiles and Rails to the Front Panel

Lay the top and bottom rail on the front panel between the marked lines, and position three equally spaced stiles between them. Glue and nail the stiles and rails in place with 1¼-inch nails. Set the corner stiles aside until the panels are assembled.

Step 7: Attach the Shelf Cleats

On the interior side of each panel, mark two horizontal lines 1½ inches and 24 inches from the bottom. Cut 11 cleats to length, leaving room for the side panels and their cleats to butt against the front panel. Install the cleats along the lines by countersinking pilot holes every 8 to 10 inches and driving 1¼-inch screws in place.

Step 8: Assemble the Walls

Apply glue to the front edge of a side panel. Set it upright, butt it into the front panel, and clamp the pieces together. Mark a line along the front panel to help you center your screws into the edge of the side panel’s framing. Drill pilot holes and drive 3-inch screws one at a time, working your way from one end to the other so that you can align the corner as you go. It helps to have a partner.

Step 9: Make the Shelves


Using a circular saw, cut the two shelves to length. For the bottom shelf, cut a 12 to length and glue and nail it underneath the front lip. Set the shelves in place, and nail through them and into the cleats, which will keep the panels square.

Step 10: Attach Corner Stiles and Clad the Sides

Now apply glue to the two front corner stiles and set them in place: snug against the rails and overhanging the edges by ¾ inch. Rip ¾ inch off the width of the side corner stiles, since they butt up against the overhanging front pieces. Apply glue to the back and nail them in place. Overhang the stiles at the back of the side panels by ¾ inch, and glue and nail them in place. Hold the top and bottom rails between the side stiles to scribe them. Cut, glue, and nail them in place. Attach a center stile on each side and trim it—as well as the untrimmed corner stiles—as in Step 6. Butt a 12 against the overhanging stiles to finish the side panels.

Step 11: Size the Bar-Top Base

To determine the width of the three plywood-base layer pieces, hold a section of bar-rail molding against the long edge of your plywood and snug the 112 oak bar top into the notch. Mark the plywood along the back edge of the board, as shown. Rip two lengths of plywood to this width.

Step 12: Install the Base

Cut one of the plywood lengths into two pieces for the sides that, when flush at the back, overhang the front by 6 inches. Arrange them to overhang the sides by 6 inches, too, then measure between them to get the length of the front piece. Cut it to length. Secure the base with 1¼-inch screws.

Step 13: Set the Oak Bar Top

Measure the inside edge of the plywood side pieces and cut two 112 boards to that length. Set them flush with the inside back corners, and measure outside edge to outside edge to get the length of the front 112. It will overlap the seams of the base layer. Cut the front piece to length. Set the boards in place, and use 1¼-inch nails to secure them. Finish the inside edges of the bar top with an oak 12 nailed on edge.

Step 14: Miter the Bar Molding

ad out the saw deck with two strips of scrap plywood to fit in the notch of the molding and keep it level. You’ll have to cut the padding to width, from the first notch of the molding to its back edge, as shown. Miter the end of one length of molding at a 45-degree angle.

Step 15: Dry-Fit the Bar Molding

On the bar top, use a combination square to draw 45-degree lines from the front corners. Take a piece of molding with one mitered end and hold it up to the front edge of the bar; line up the mitered end with the 45-degree mark. Snug the molding up against a mitered scrap to make sure you have a tight corner. Then, at the other end, carry the 45-degree line from the bar top over the molding’s uncut end, and miter the piece to size. Install it by screwing through the plywood underneath with 1¼-inch screws. Miter and cut the remaining sidepieces ¾ inch long to overhang the back of the bar. Finish the back edges of the bar top by cutting a 12 to fit the open notches of the molding with a saw.

Step 16: Attach the Brackets

On the front wall, mark vertical lines over the nailing blocks, equidistant from each edge. Place the brackets on the marks, and screw through the brackets’ holes and into the wall and nailing block.

Step 17: Install the Foot Rail

Slide the rail into the brackets, place a cap on each end, and run a set screw through the rail and into each cap. Fill the fastener holes on the bar with wood filler and caulk any open joints, then sand and paint the inside and outside of the walls and shelves. Sand the oak bar top with 220-grit paper, wipe it and the rail with a stain, and finish with a coat of polyurethane.

The original plan can be found at https://www.thisoldhouse.com.

 
[email_link]

Broadway Bar

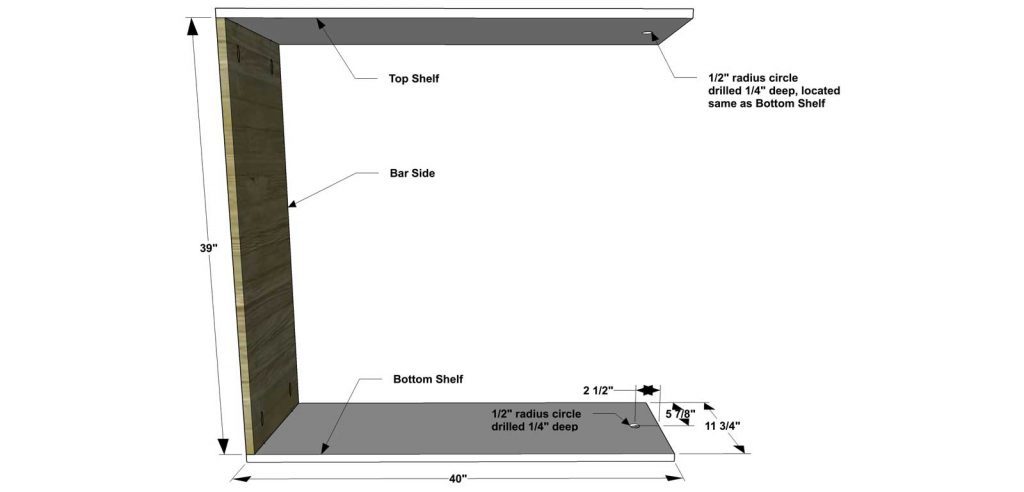
This open bar concept works out to be 40″ long x 40 1/2″ tall x 11 3/4″ deep

Materials:

  • 1 – 3/4” plywood at 4’x8’
  • 2 – 1×2 at 8’
  • 1 – 7/8” diameter dowel at 8’
  • 1 3/8″ Brad Nails
  • 1 ¼” Pocket Hole Screws

Cut List:

  • 2 – 3/4” plywood at 11-3/4”x40”– Top and Bottom Shelves
  • 1 – 3/4” plywood at 11-3/4”x39”– Bar Side
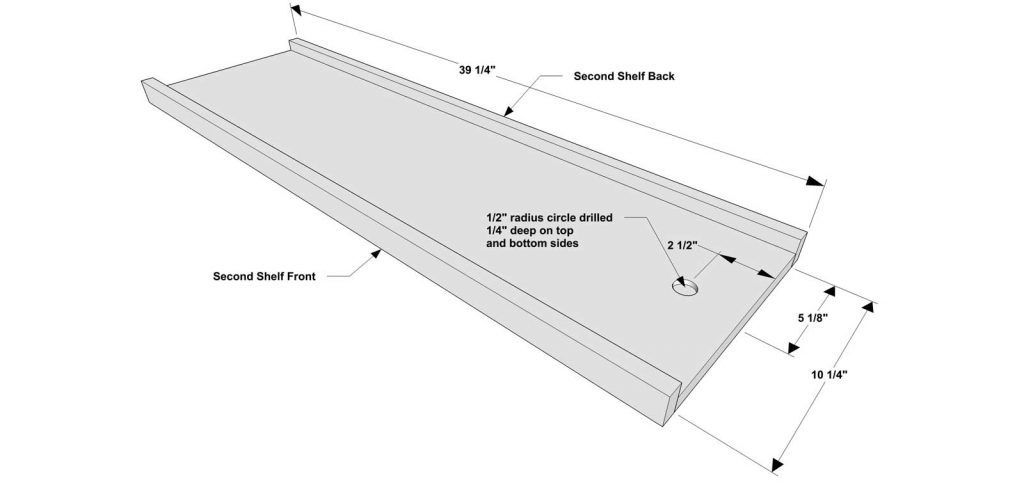
  • 1 – 3/4” plywood at 10-1/4”x39-1/4” – Second Shelf
  • 2 – 1×2 at 39-1/4” – Second Shelf Front and Back
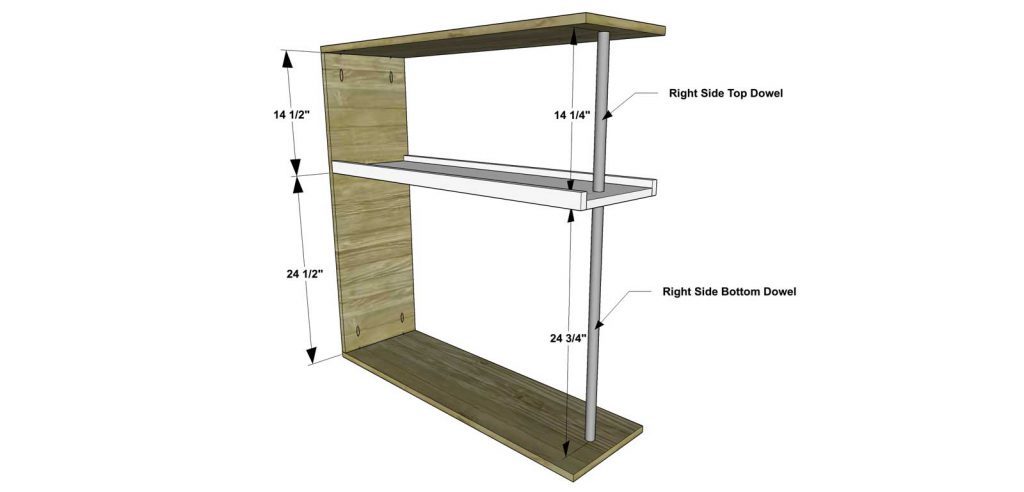
  • 1 – 1” diameter dowel at 14-1/4” – Right Side Top Dowel
  • 1 – 1” diameter dowel at 24-3/4” – Right Side Bottom Dowel
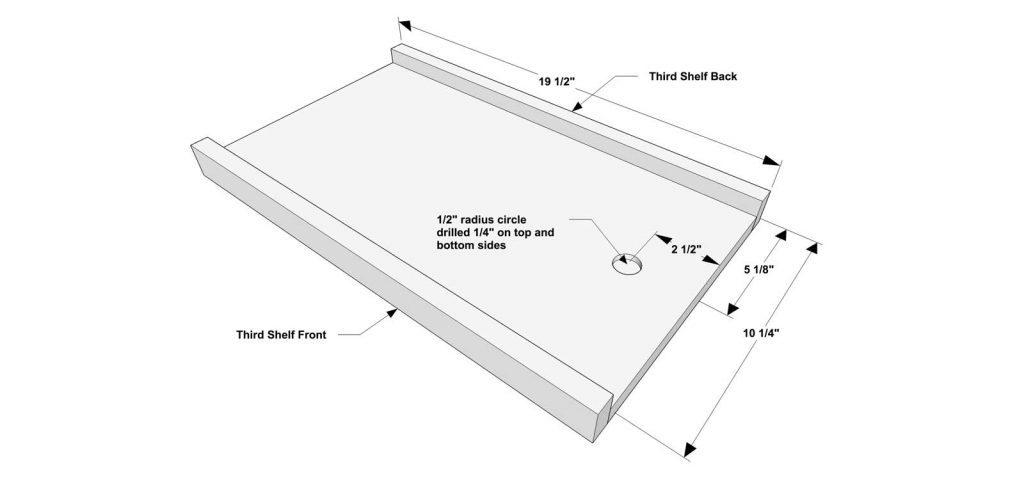
  • 1 – 3/4” plywood at 10-1/4”x19-1/2” – Third Shelf
  • 2 – 1×2 at 19-1/2” – Third Shelf Front and Back
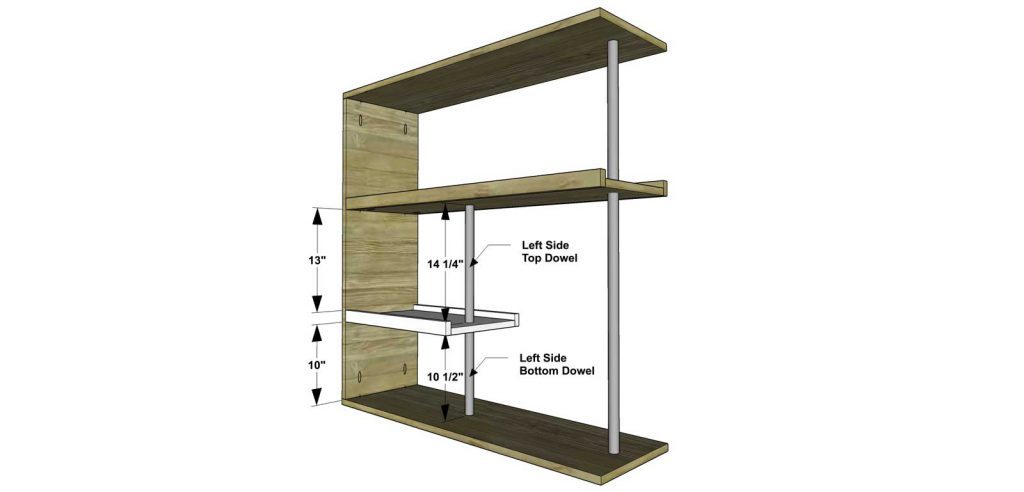
  • 1 – 1” diameter dowel at 14-1/4” – Left Side Top Dowel
  • 1 – 1” diameter dowel at 10-1/2” – Left Side Bottom Dowel
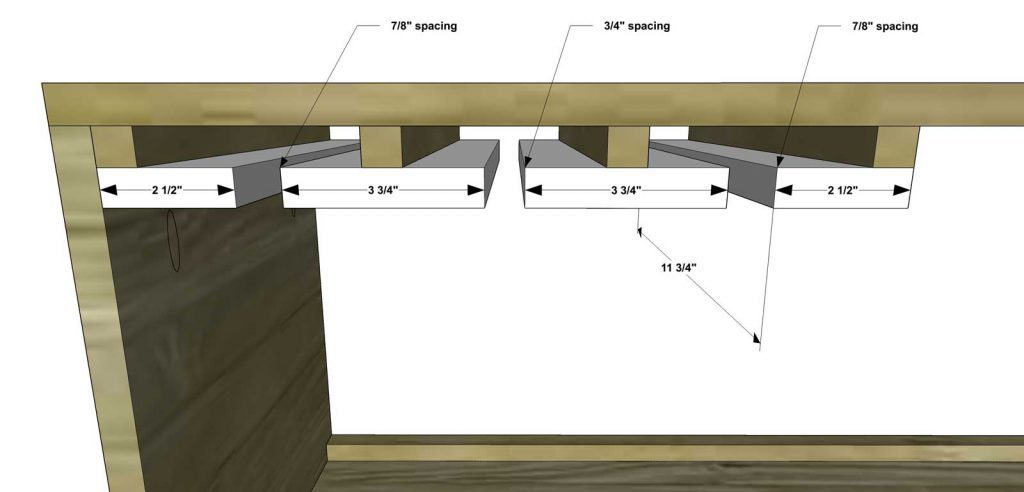
  • 4 – 3/4” plywood at 3/4”x11-3/4” – Spacers
  • 2 – 3/4” plywood at 2-1/2”x11-3/4” – End Slides
  • 2 – 3/4” plywood at 3-3/4”x11-3/4” – Inside Slides

Step 1:

Cut the pieces for the Top and Bottom Shelves and Bar Side. Set the Kreg jig for 3/4” material and drill pocket holes in each end of the Bar Side. Drill a 1” diameter hole 2-1/2” from each end, centered, on the Top and Bottom Shelves. Assemble as shown with the 1” drilled holes facing the inside and with glue and 1-1/4” pocket screws.

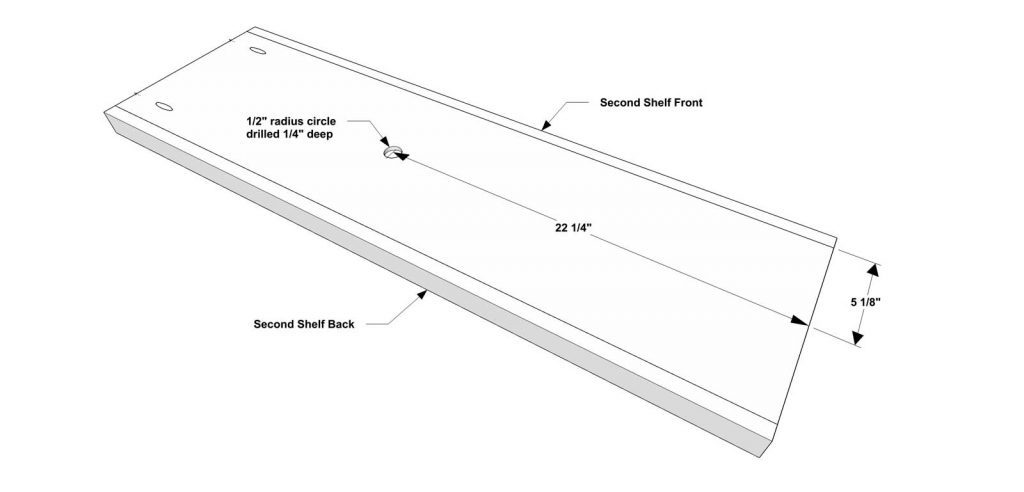
Step 2:

Cut the pieces for the Second Shelf and Second Shelf Front and Back. Set the Kreg jig for 3/4” material and drill pocket holes in one bottom end of the Second Shelf. Drill a 1” diameter hole 2-1/2” from the opposite end of the pocket holes, on the top side and centered. Drill a second 1” diameter hole 22-1/4” from the same end, centered, but on the bottom side. Attach the Second Shelf Front and Back to the Second Shelf as shown with glue and 1-1/4” brad nails. Position Right Side Top Dowel and Right Side Bottom Dowel with glue and attach the Second Shelf (with Front and Back pieces) to the Bar Side as shown with glue and 1-1/4” pocket screws. Note: you can paint the dowels with metallic paint before assembly to make them look like metal rods.

Step 3:

Cut the pieces for the Third Shelf and Third Shelf Front and Back. Set the Kreg jig for 3/4” material and drill pocket holes in one bottom end of the Third Shelf. Drill a 1” diameter hole 2-1/2” from the opposite end of the pocket holes, on the both the top side and bottom side, centered. Attach the Third Shelf Front and Back to the Third Shelf as shown with glue and 1-1/4” brad nails. Position the Left Side Top Dowel and Left Side Bottom Dowel with glue and attach the Third Shelf (with Front and Back pieces) to Bar Side as shown with glue and 1-1/4” pocket screws. Note: you can paint the dowels with metallic paint before assembly to make them look like metal rods.

Step 4:

Cut the pieces for the Spacers. Assemble as shown with glue and 1-1/4” brad nails.

Step 5:

Cut the pieces for the Slides. The End Slides will be located flush with the end Spacers and the Inside Slides will be centered on the Spacers. Assemble as shown with glue and 1-1/4” brad nails.

Step 6:

Fill any Screw, Nail or Pocket Holes, Sand and Finish as Desired.


The original plan can be found at http://www.thedesignconfidential.com

[email_link]

Bar – Corner

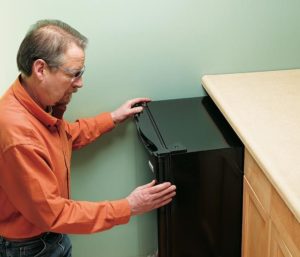
Owning your own in-house bar makes a statement about you. The bar shown here is sleekly styled and smartly laid out for the efficient barkeeper. A small refrigerator gives you access to cold drinks and ice while convenient cabinets create excellent storage spots for party favors. While this is a “dry bar” (no plumbing), the design could be modified in any number of ways to add running water if you wish. All you need to get the party started is a GFCI electrical outlet and the proper floor space.

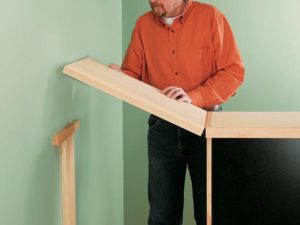
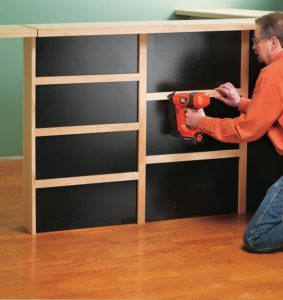
This compact corner bar design features glossy black MDF aprons with decorative cherry appliqués forming a horizontal grid pattern on the aprons. A cherry plywood bar top sits atop a 2 × 6 L-shaped knee-wall, harboring some practical amenities on the bartender side. A flip-up lift gate in the bar top on one end provides pass-through access and can even function as a wait station if you want to get really fancy in your hosting. The key components— base cabinets, a laminate counter top, the fridge, and the wood for a sleek Asian inspired style trim-out—set the stage for your next gathering. Let’s party!

Materials:

Directions:

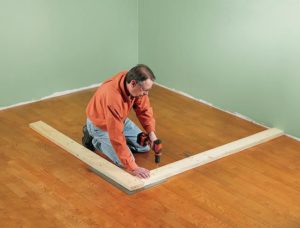
Step 1: Cut the 2 x 6 Sill Plates to Length (68″)

Anchor the sill plates for the knee-walls to the floor so they form a right angle at the corner where they meet. Use 16d common nails or screws and panel adhesive for a wood floor; use a powder-actuated nailer on a concrete floor.

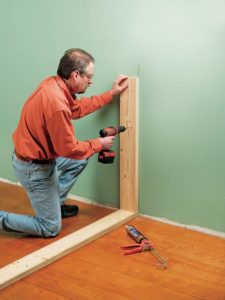
Step 2: Attach the End Stud Against the Back Wall

Use panel adhesive and deck screws to attach the end knee-wall stud to the back wall, attaching at a stud location. If there’s no stud, open the wall and insert a horizontal nailer between the nearest studs.

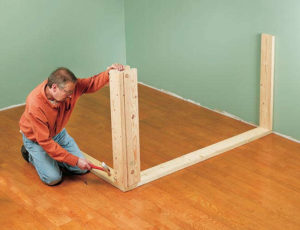
Step 3: Make the Stud Wall Corner

Use 16d common nails to toe-nail the corner studs to the sill plates. Use a level to make sure the studs are vertical.

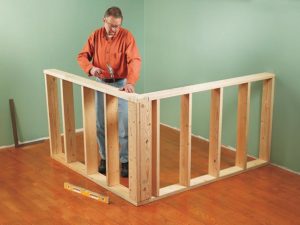
Step 4: Cut Cap Plates the Same Size as the Sill Plates

Complete the framing for the L-shaped knee-wall section. For extra strength, drive a few 3″ deck screws through the studs where they meet at the corner.

Step 5: Make the Aprons and Trim

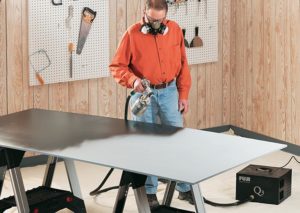
Rip two sheets of 1/2″ MDF to 40 1/2″ wide and trim them to length to make the bar front panels. Sand edges to remove any saw marks. For the smoothest possible finish, spray the front apron panels with an HVLP sprayer. Apply the paint or lacquer over primer, in thin coats.

Step 6: Prepare Hardwood Stock

Prepare at least 80 lineal feet of 3/4 × 11/2″ hardwood stock to trim out the aprons and edges of the bar-top.

Step 7: Apply a Clear Protective Wood Finish

For efficiency, apply a protective finish to the cherry apron trim stock. Dab some finish on the cut ends after you cut each trim piece to length.

Step 8: Apply Panel Adhesive to the Knee-wall Studs

Apply panel adhesive to the knee-wall studs to strengthen the bond with the black aprons. Slip a 1/4-thick spacer beneath each apron to create a gap between the panel and the floor.

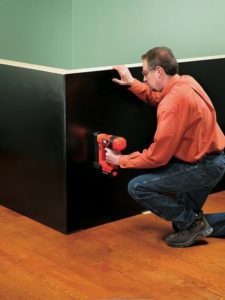
Step 9: Attach the Aprons

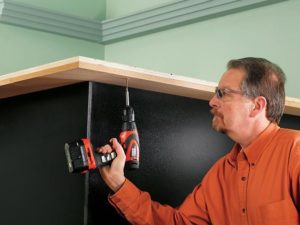
Attach the aprons with a pneumatic nailer and 2 1/2″ Finish Nails Nail the apron panels to the wall studs at 8″ to 12″ intervals.

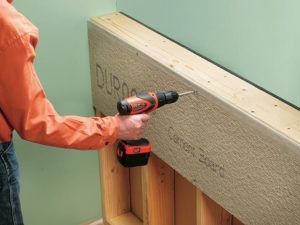
Step 10: Cut 16″ Wide Strips of 1/2″-Thick Cement Boards

Attach cement board strips to the edges of the knee-wall framing members as a backer for the backsplash area.

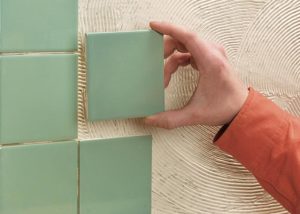
Step 11: Install the Wall Tile

Install the inside wall covering before you cap the wall. We used inexpensive 4 x 4″ ceramic wall tile set into a layer of thin-set adhesive that’s troweled onto the cement board.

Step 12: Bond the Particleboard Sub-base

Bond the particleboard sub-base directly to the top plates of the knee-walls, taking care to achieve even overhangs of 6″ in front and 4″ on the bartender side of the walls.

Step 13: Secure the Sub-base to the Walls

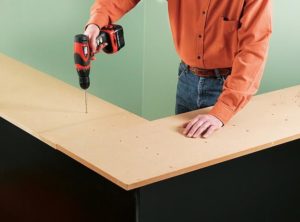
Drive plenty of 2″ deck screws to secure the sub-base to the walls. The screw heads must be sunk beneath the wood surface.

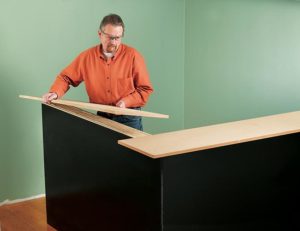
Step 14: Use a Circular Saw to Cut the Bartop

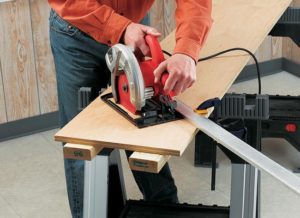
Make 45-degree miter cuts in the bartop top layer using a circular saw and cutting guide.

Step 15: Laminate With Panel Adhesives

Laminate the top layer of cherry plywood to the sub-base with panel adhesives and 1 1/4″ screws driven up through the sub-base.

Step 16: Cut Parts to Length + Attach them to the Edges of the Bar top

Cut a round-over profile in one edge of the cherry edging stock and then cut the parts to length and attach them to the edges of the bartop with nails and glue.

Step 17: Square-Cut a piece of 1 × 2 Edging

Square-cut a piece of 1 × 2 edging to fit exactly between the ends of the round-over edging, and nail and glue it into place.

Step 18: Nail the End Panel to the Wall

Nail the cherry end panel to the wall end to conceal the stud wall and the edges of the wall coverings and trim.

Step 19: Attach a 1 x 2 Stop Block to the Wall

Attach a 1 × 2 stop block for the lift gate to the wall directly above the wall-mounted end panel.

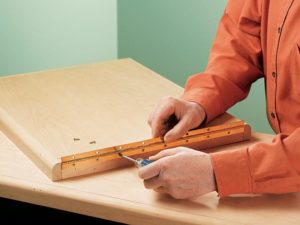
Step 20: Attach the Piano Hinge

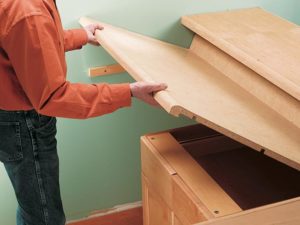
Attach the piano hinge to the lift gate section of the countertop first, then attach the other leaf to the countertop.

Step 21: Attach the Lift Gate

Attach the lift gate to the countertop and test to make sure it operates smoothly and correctly.

Step 22: Create a Ladder Grid Pattern

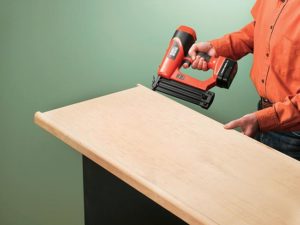
Add the decorative cherry strips in a ladder grid pattern, using an air nailer. Start with the vertical strips, then cut the horizontals to fit.

Step 23: Attach a Countertop to the Base Cabinets

Attach a countertop to the base cabinets to create an easy-to-clean work surface for the bartender.

Step 24: Add a Refrigerator or Appliance of Your Choice (OPTIONAL)

Slide in a refrigerator, or any appliance you choose.
The original plan can be found at http://www.freewoodworkingplan.com

[email_link]

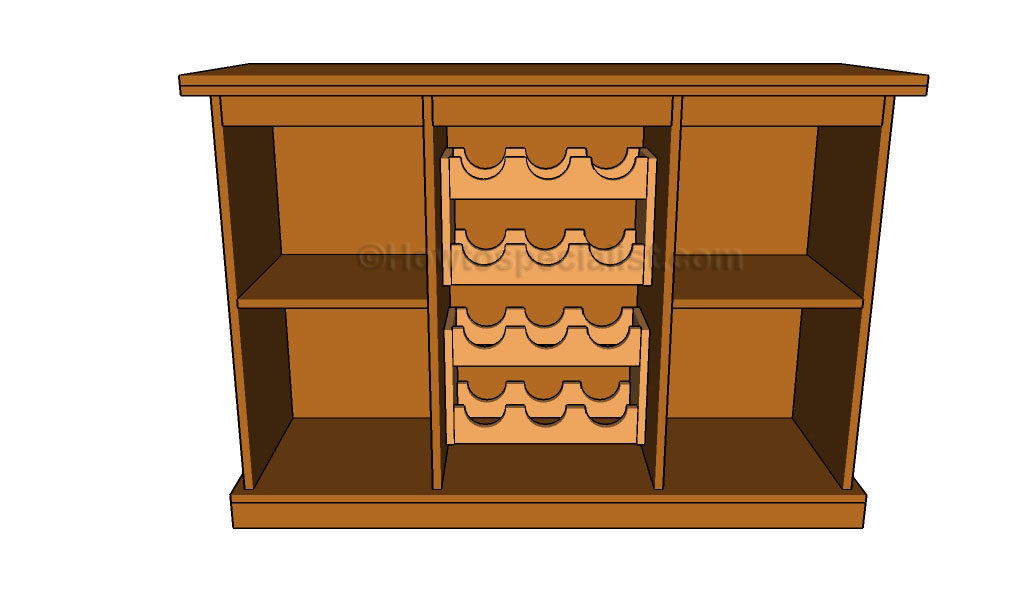
Bar Cabinet

Materials:

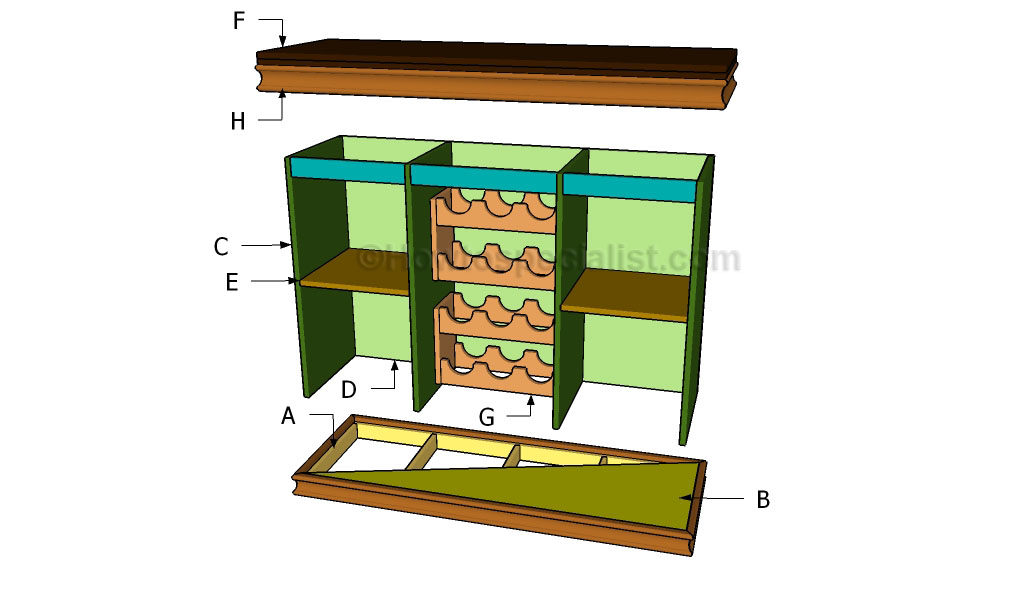
  • A – Frame – 7 pieces of 1×3 lumber – 2 pieces @ 56″ long, 5 pieces @ 17 1/4″ long
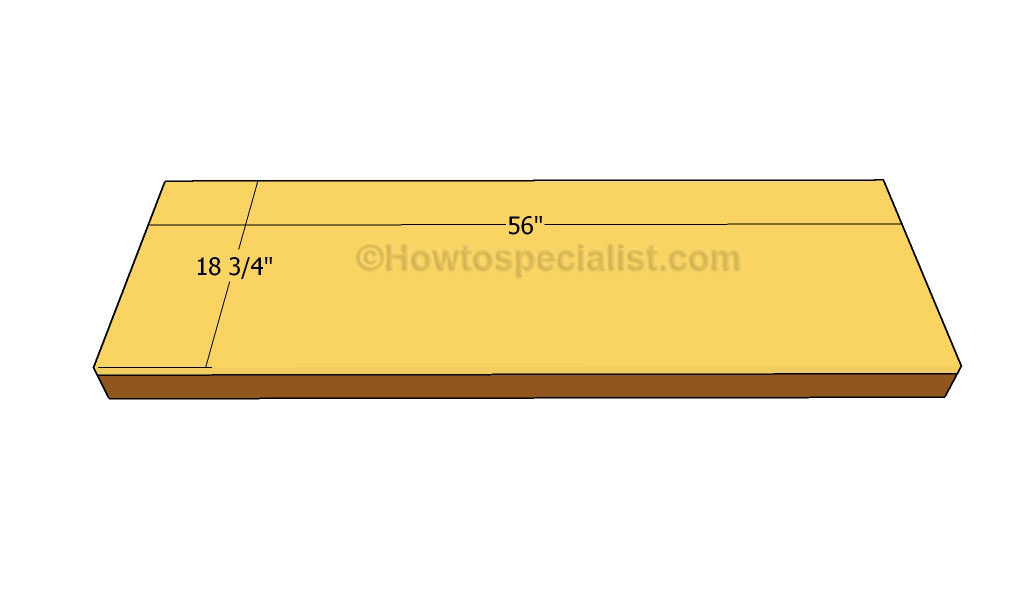
  • B – Base – 1 piece of 3/4″ plywood – 18 3/4″ x 56″ long
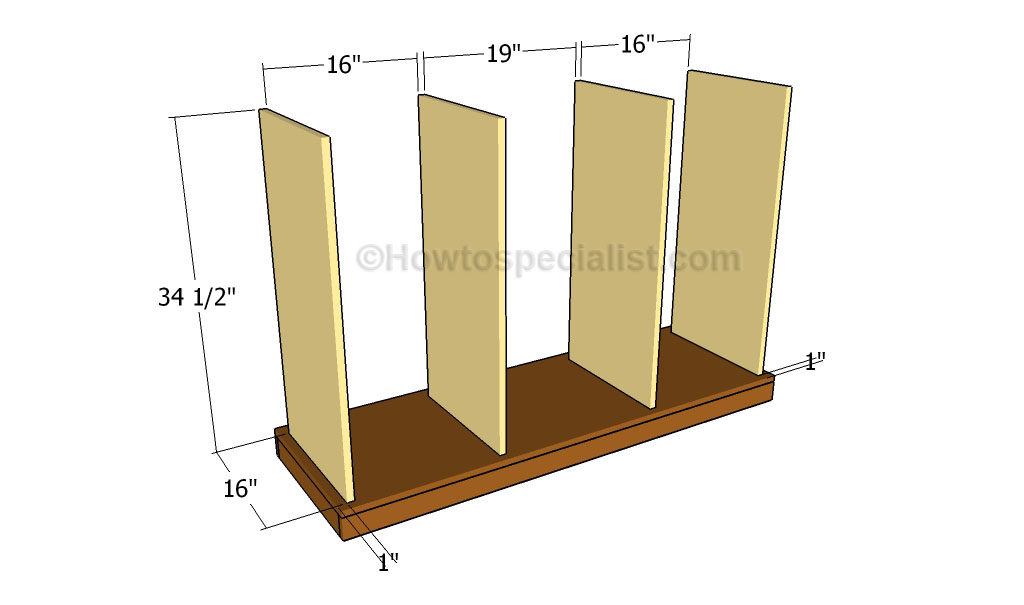
  • C – Sides – 4 pieces of 3/4″ plywood – 16″ x 28 1/2″ long
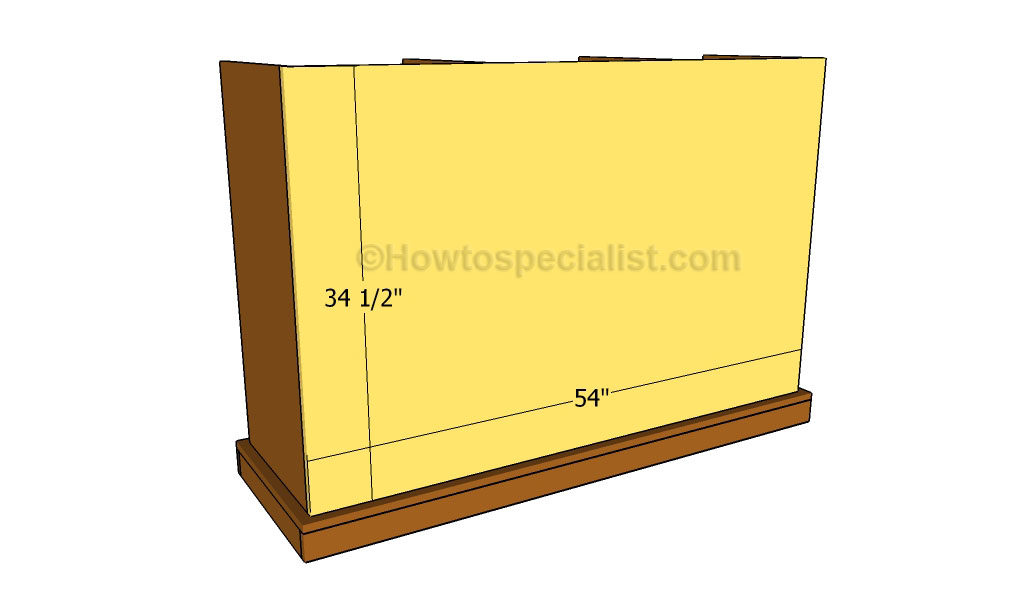
  • D – Face – 1 piece of 3/4″ plywood – 34 1/2″ x 54″ long
  • E – Shelves – 2 pieces of 3/4″ plywood – 16″ x 16″ long
  • F – Countertop – 2 pieces of 3/4″ plywood – 20 1/4″ x 57 1/2″ long
  • G – Supports – 8 pieces of 1×8 lumber – 4 pieces @ 19″ long, 4 pieces @ 11 1/2″ long

Directions:

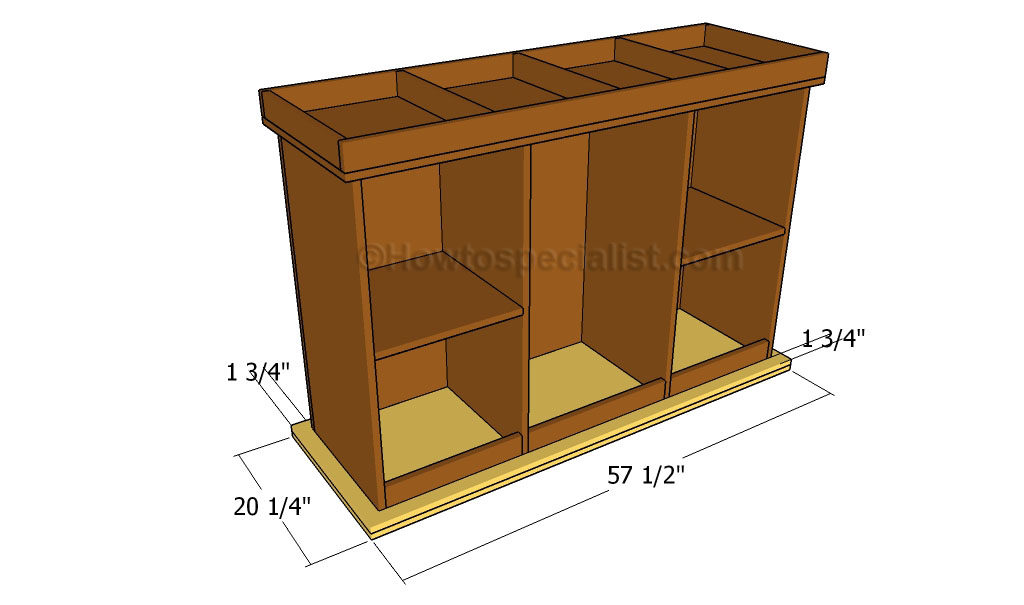
The first step of the woodworking project is to build the base of the bar. As you can easily notice in the plans, we recommend you to build the components out of 1×3 lumber. Cut the components at the right size and lock them together with galvanized screws. Drill pocket holes at both ends of the short slats and secure them to the rim components using 1 1/4″ screws.

Cut a piece of 3/4″ plywood at the right size and attach it over the frame. Drill pilot holes and secure it into place with 1 1/4″ galvanized screws. Make sure there are no gaps between the plywood and the frame and check if the edges are flush.

Continue the project by attaching the sides and the partitions of the bar to the base. Drill pocket holes at both ends, take accurate measurements and lock the plywood pieces to the base with galvanized screws. Add waterproof glue to the joints and make sure the corners are right-angled.

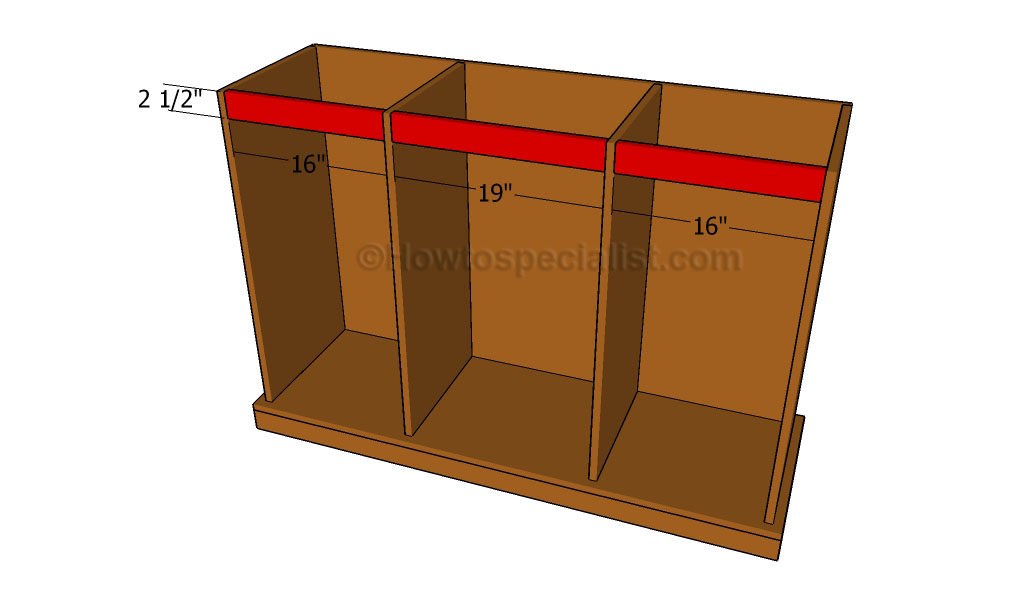
Add the face of the bar to the frame, as described in the diagram. Drill pocket holes along the side edges of the vertical partitions and secure them to the face with 1 1/4″ screws. Align the components with great care and make sure the edges are flush. Add glue to enhance the rigidity of the joints.

Fit 1×3 supports to the top of the frame, as shown in the image. Drill pocket holes at both ends of the supports, align them with great care and lock them to the frame with 1 1/4″ screws. Add waterproof glue to the joints and remove the excess with a damp cloth.

Cut two pieces of 3/4″ plywood at the dimensions highlighted in the diagram and secure them to the frame with 1 1/4″ screws, after drilling pocket holes along the side edges. Take accurate measurements, otherwise the shelves won’t be horizontal.

Building the countertop for the bar is a straight forward process. In order to enhance the look of the project, we recommend you to glue two pieces of 3/4″ plywood together. Clamp the pieces of plywood tightly, in order to create a proper bong between them. Lay the countertop on a level surface and center the frame of the bar as in the image. Insert the 1 1/4″ screws through the pilot holes drilled in the frame of the bar, into the countertop.

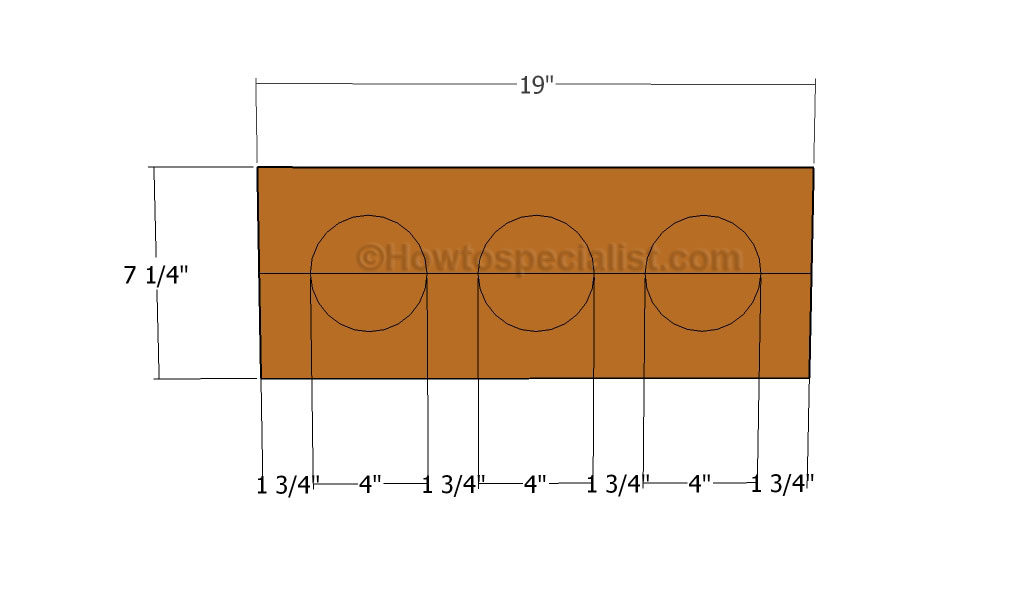
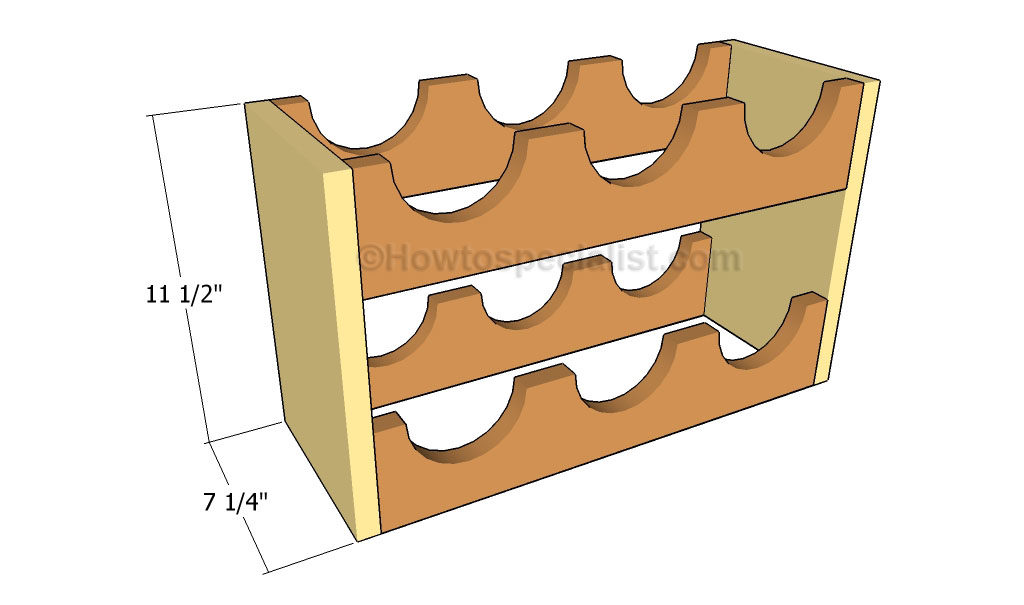
The next step of the project is to build the bottle supports. Cut the four pieces of 1×8 lumber at 19″ and use a 4″ hole saw to make the round cuts. Afterwards, split the slats into half along the cut line and smooth the edges with sandpaper.

Secure the supports to two pieces of 1×8 lumber. Drill pocket holes to both sides of the supports and secure them to the supports.

Fit the wine bottle supports into place and secure them to the partitions with 1 1/4″ screws. You could adjust the height at which you place the supports in order to get a professional result.

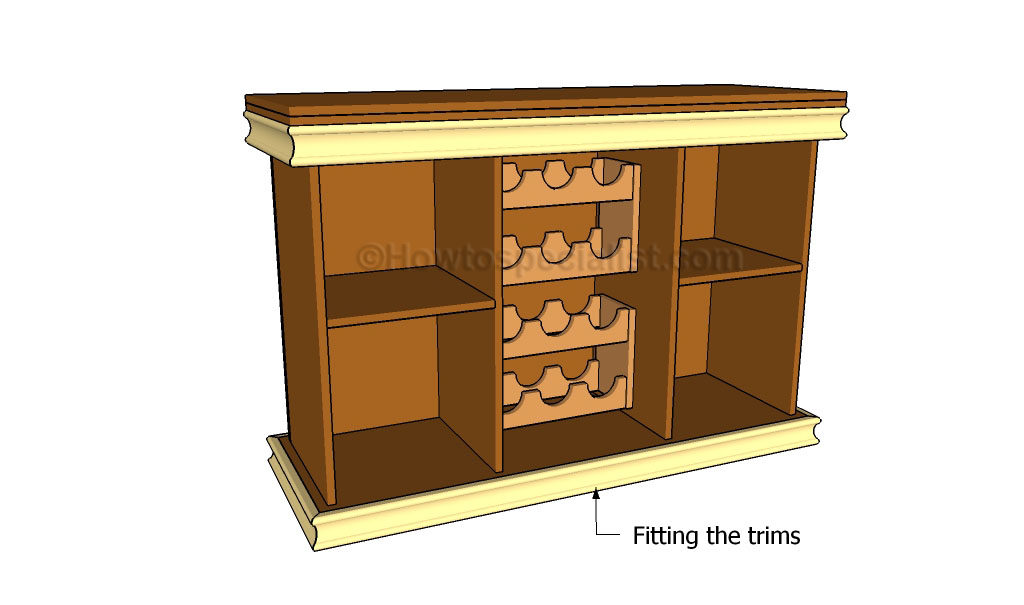
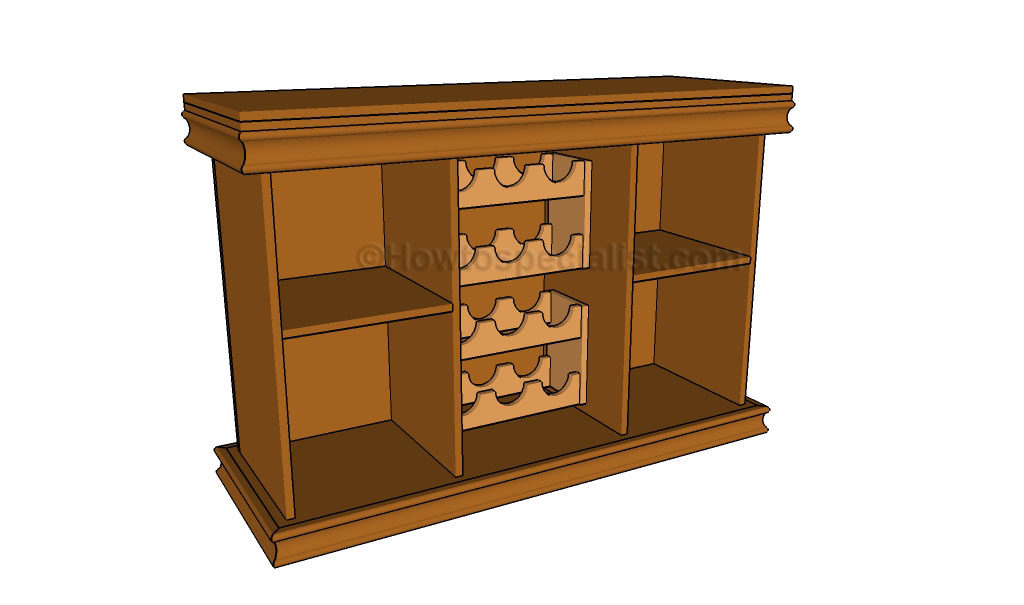
One of the last steps of the project is to attach the trims to the base and to the top of the bar. Cut both ends of the trims at 45 degrees and secure them to the framing with 1 1/4″ finishing nails. Work with attention and add glue to enhance the bond of the trims to the bar.

Last but not least, we recommend you to take care of the finishing touches. Fill the holes with wood filler and let it to dry out for several hours. Afterwards, smooth the wooden surface with fine-grit sandpaper and vacuum the residues.

Smart Tip: Apply several coats of stain or paint to the wooden components, if you want to protect them from decay and to enhance the look of the bar.

The original plan can be found at http://howtospecialist.com

[email_link]

1 2