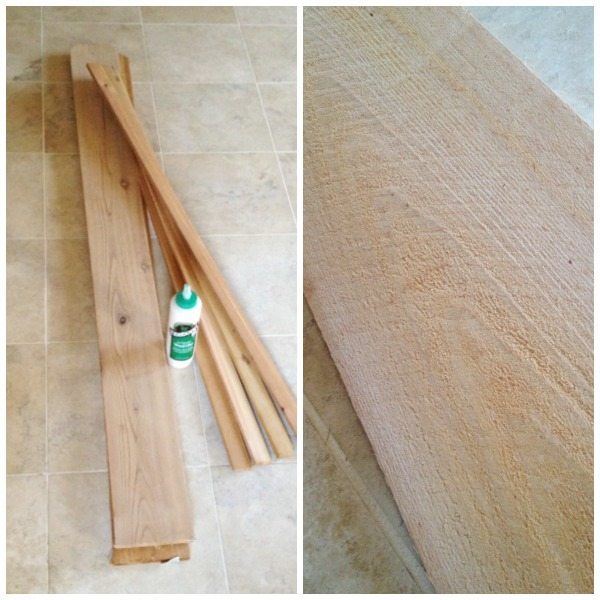
Bathtub Caddy

Materials:

  • 2 Untreated Dog Eared Cedar Fence Pickets 5 1/2″ x 5′
  • 2 Cedar Lattice strips 1 1/2″ x 4′
  • Waterproof Wood Glue
  • Galvanized staples

Step 1:

It is easier to do the major sanding before cutting this lumber. Start with a very rough grit, 36 or 50,  to take off the scurf marks and really rough stuff. Then graduate up through the grits until they are nice and smooth. Cut all sides of the wood to give yourself clean edges and remove any loose knots or damaged wood.

Step 2: Make Cuts

Rip two strips of the pickets 4” wide, then chop them to your desired length. Make a 4 inch by 3 1/2 inch cut out at each end of both pickets. These will form the arms and box for the caddy. Next cut 7″ slats from the lattice, you will need 14 for plan dimensions, but adjust per your specs.

Step 3: Assembly

Attach the lattice slats with wood glue and staples. Start by attaching the 2 slats at each end and getting the caddy square.  Then space the rest along the bottom 1/2” apart (or adjust to your measurements)

Step 4:

Once the caddy is dry, do a final sanding just to round off the edges of the slats and clean up any glue or clamp marks. You know, just make sure that it is nice and smooth everywhere because of that whole NO SLIVERS IN THE BATHTUB rule.

The original plan can be found at https://sawdustgirl.com

[email_link]

Bathtub Caddy

Materials:

  • 1 Untreated Dog Eared Cedar Fence Pickets 5 1/2″ x 5′
  • 2 Cedar Lattice strips 1 1/2″ x 4′
  • Waterproof Wood Glue
  • Galvanized or stainless steel staples

Fence pickets are not the highest quality lumber, so try to find boards that are as straight and as smooth as possible. Avoid boards that have loose knots, are warped, splitting, etc. When I started on my second bath caddy I discovered that Home Depot does not always carry the cedar lattice, so I had to get my lattice from a lumber yard.  Most lumber yards that carry fencing will have both the lattice and pickets. You might want to make a few calls in your area to find who has what, and cut down on the run around.

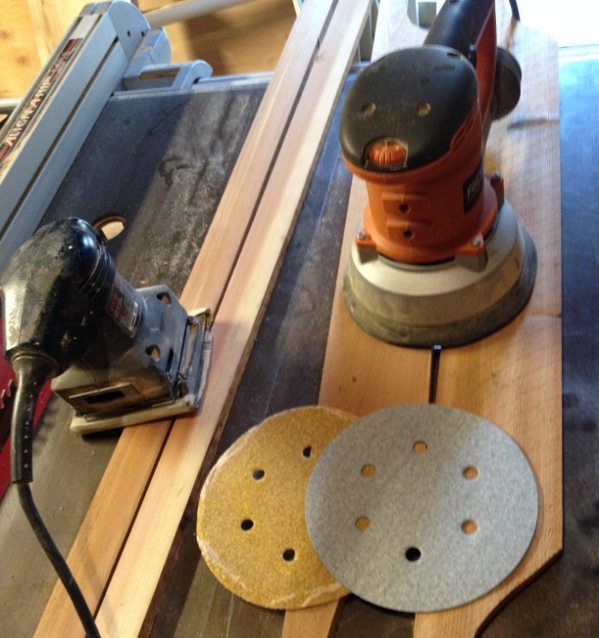
Step 1: Prep the wood

It is easier to do the major sanding before cutting this lumber. Start with a very rough grit, 36 or 50,  to take off the scurf marks and really rough stuff. Then graduate up through the grits until they are nice and smooth. Cut all sides of the wood to give yourself clean edges and remove any loose knots or damaged wood.

Step 2: Make Cuts

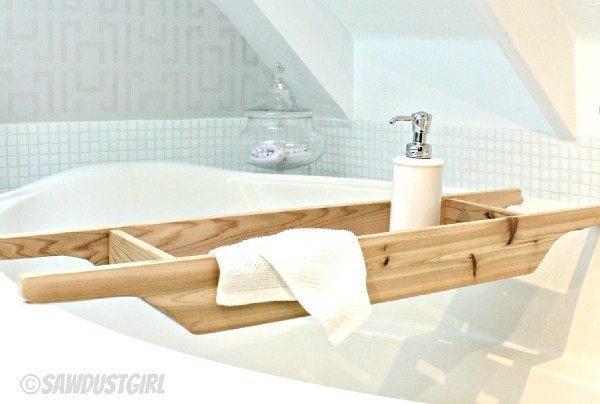
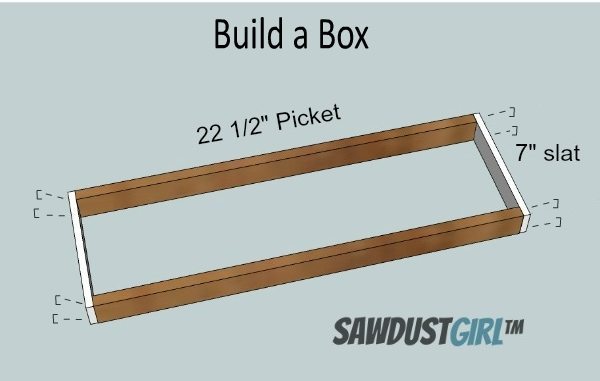
Here is the cut list for the caddy that I made, My tub has a strong oval shape so I have one handle that is 2 inches longer than the other. Measure the tub that you are making your caddy for and adjust as needed. Rip two strips of the fence picket that are 1” and cut to the desired width of your tub handles. Rip another strip that is 1 1/2” wide and cut it into two pieces that will be the length of the box of your caddy.  Cut the lattice into 7” slats. For a 22 1/2″ box you will need 12 slats, but adjust to your specs.

Decide if you want your handles rounded or square. I like mine rounded, but depending on the tub the square can look cool too. Square or rounded, make sure to sand all edges and surfaces and clean up any splinters from cutting.—Nobody wants to get a sliver in the bathtub!

Step 3: Assembly

Start by creating the caddy box. Staple the slats to the sides and make sure to get the box square and flat. I don’t recommend using brad nails on the lattice as it will split easily.

Use waterproof wood glue and galvanized or stainless staples, these will stand up to the water and humidity of a bathroom. If you don’t have galvanized staples you can just glue and use clamps and/or weights but you will need to wait for the glue to dry up quite a bit between steps—and you know how much I love waiting for glue to dry! It does give you a cleaner look without the staples though.

Note: when making this caddy I cut the ends at a 45 degree angle. I thought it would look cool, but after finishing I decided that I would much prefer for the box to just be square. This is why the final pics look a bit different from the plans.  I think it’s much better to do square ends, it will look cleaner and it’s a little easier.

Now glue and staple all of the lattice slats along the bottom of the caddy box. To get perfectly spaced slats cut scraps of wood to use as spacers (1/2 inch for given dimensions).

Step 4: Attach the handles

Center the caddy box onto the handles, glue and clamp in several places or use weights to secure the box to the handles.

For this step I used glue only, as I didn’t want staples, nails, or screws in the top of my handles. If you want, you could nail or screw up from the bottom, but be very careful not to go too far up or get crooked and mar the face of your handles or box.  The wood glue alone will be plenty strong as long as you get it tight together while it dries.

Step 5:

Once the caddy is dry, do a final sanding just to round off the edges of the slats and clean up any glue or clamp marks. You know, just make sure that it is nice and smooth everywhere because of that whole NO SLIVERS IN THE BATHTUB rule.

The original plan can be found at https://sawdustgirl.com

[email_link]

Bathtub Caddy

Materials:

  • 1/2 x 2 x 48 poplar board, #1327
  • 4 – 1/2 x 3 x 48 poplar boards, #1332
  • 1/4 x 36 square poplar dowel, #27546
  • #17 x 1-in brads
  • Valspar signature paint, Brushed Almond


Click to Enlargen

Step 1:

Cut two tray supports (A) to lengths that equal the outside width of your tub. If your tub is mounted against a wall on one side, cut the support short enough to avoid bumping against the wall.

Step 2:

Measure the inside width of the tub and subtract 1 inch. Subtract that dimension from the length of the tray supports and divide the result in half to mark in from the ends of each tray support. Using a ruler and compass set to a 1/2-inch radius, mark the tray support notches on both ends of one tray support as shown on the Bathtub Caddy Project Diagram.

Step 3:

Tape the two tray supports together with the ends flush and begin by cutting the long line with a jigsaw. Stop when you reach the curve, turn off the saw and remove the blade.

Step 4:

From the edges of the supports, jigsaw up to and around the curve. Remove the tape and sand the cut marks smooth. Sand the tray supports with 120-grit and then 180-grit sandpaper and lightly sand the edges and ends.

Step 5:

From a 1/2 x 2 x 48 poplar board, cut two tray ends (B) 11-1/4 inches long. Sand both parts smooth and soften the edges but not the ends.

Step 6:

From 1/2 x 3 x 48 poplar boards, cut four tray bottom slats (C) 22 inches long. (If this is too long to fit your tray supports, you can instead cut them to a length equal to the bottom of the notches minus 8 inches.) Sand the slats and soften the edges and ends.

Step 7:

Cut seven spacers about 3 inches long from a 1/4-inch square dowel. On a flat work surface, lay the four bottom slats side by side with the ends flush and separated with 1/4-inch spacers and a spacer along the outside edge of one outside slat. Apply glue to the face of all four slats at one end and clamp the tray end to the slats with 1/4-inch overhangs on each end. After the glue dries, repeat to install the other tray end. After the glue dries, drill 1/16-inch pilot holes and drive 1-inch brads to reinforce the glue joints.

Step 8:

Center the tray along the length of the tray supports and mark its position. Glue and clamp the tray ends to the supports. After the glue dries, drill 1/16-inch pilot holes and reinforce the glue joints with 1-inch brads. Then fill the nail holes with putty and let dry.

Step 9:

Sand the completed caddy with 120-grit and then 180-grit sandpaper and wipe clean. Apply two coats of paint (Brushed Almond shown).

The original plan can be found at https://www.lowes.com

 
[email_link]

Bathtub Caddy

Materials:

  • 2 Untreated Dog eared Cedar Fence Pickets 5 1/2″ x 5′
  • 2 Cedar Lattice strips 1 1/2″ x 4′
  • Waterproof Wood Glue

Since this is fencing, the lumber is pretty rough.  Pick through the stack to find boards that are straight and as smooth as possible. Avoid boards that have loose knots, are warped, splitting, etc. You can use Cedar planking which has been planed and sanded on one side, it’s quite a bit more expensive and since only one side is sanded, it made more sense to me to save the extra money and just use the fencing.

These are the pieces that you will need for assembly.  Dimensions and number of slats will change if the overall size of the caddy is modified.

Measure the tub that the caddy is for and determine the overall width that you want. The tub that I made my caddy for has a strong oval shape, so I needed one side to be 2 inches longer than the other side.

Chop the Cedar pickets to your desired length (tub width), then rip the pickets to 3 1/4 inches (or desired depth of the caddy). This is removing quite a bit of material, so this is an opportunity to get rid of any parts of the wood that are less desirable.  Also, make sure to cut all sides of the wood to give yourself clean edges.  Some of this excess wood will be used for the ends, so save it for later.

Print and cut out the handles template then transfer the shape to the ends of the pickets. Cut out the handles using a jigsaw or band saw. If one side is longer than the other (like mine) put the difference in the arms, so that the body remains even. Similar to building a drawer, cut a dado a half inch from the bottom on both sides. The dado needs to be 3/8 inch wide and 1/4 inch deep.

Chop the lattice pieces  to your desired width, mine are 7 and 1/2 inches, for an overall caddy width of 8 inches.  I used 10 pieces spaced 3/4 of an inch apart (this worked out nicely as I was able to use 3/4 MDF scraps for spacers).

Dry fit both ends of each lattice into the dado. Sand the edges of any that don’t fit until all of the pieces will fit into the dado.  Note: assembly is easier if all the pieces fit snugly so don’t over-sand.

Use the table saw with the blade set to a 30 degree angle to bevel one edge of two lattice slats.  These will be the outside ends of the caddy, the bevel fills the end of the dado flush and creates a more finished look than if the edges were left square. Next cut the end pieces from the scraps you saved earlier. These go on top of the outside slats. Mine are 7 inches wide by 2 1/2 inches tall, but adjust to your sizing.


Now sand, sand, sand! Because the cedar is so rough I started with 36 grit paper on the circular sander. This took off the scurf marks and really rough stuff. Then I just graduated up through the grits until it was nice and smooth. (Tip:  I did the major sanding on the lattice strips before I cut them as they are harder to sand when they are smaller strips. Then just touched them where needed after they were cut.) Take your time and get everything nice and smooth– Nobody wants to get a sliver in the bathtub!

To assemble, put wood glue one end of each slat and insert into the dado groove on one side. Don’t worry about spacing too much at this point, just get them in. Once all of the slats are in, turn the piece onto it’s side so that the slats are pointing up. Apply glue to the free side of each slat and slide the other caddy side down onto the slats so that the slats go into the dado. This can be a bit tricky and it helps to have a second pair of hands.  Once the slats are in both dados, adjust the slats so that they are evenly spaced and the two beveled edges on the ends line up smoothly with the outside edge.  Place one or two clamps in the middle to hold it all in place.  Put glue on the sides of the two end pieces and then slide them down onto the beveled edge of the outside slats. Check for evenness and square, then clamp the ends together. Wipe away any excess glue with a damp cloth and let the caddy dry according to glue directions.

Remove the clamps and lightly sand any clamp marks or glue residue and your caddy is ready to go! No need to seal cedar as the natural oils  act as preservatives, making the wood extremely long lasting and resistant to moisture.

The original plan can be found at https://sawdustgirl.com

[email_link]