Monica Headboard

Materials:

  • 1-1/4″ pocket hole screws
  • 2-1/2″ pocket hole screws
  • 1-1/4″ brad nails
  • Wood glue
  • Sandpaper (100, 150, 220 grits)
  • Finishing supplies (primer & paint, or stain, sealer)

Lumber:

For a Queen sized headboard:

  • 1 – 1×4 at 6′
  • 1 – 1×6 at 6′
  • 3 – 2×4 at 6′
  • 1 – 4′ x 8′ sheet of 3/4″ plywood

Cut List:

  • 2 – 2×4 at 51-1/4″ – Legs
  • 1 – 2×4 at 58″ – Lower Stretcher
  • 1 – 3/4″ plywood at 32″ x 58″ – Headboard Panel
  • 1 – 1×4 at 65″ – Top Trim
  • 1 – 1 x at 1″ wide (cut from 1×6) at 65″ – Trim
  • 1 – 1x at 2-1/4″ wide (cut from 1×6) at 65″ – Trim

STEP ONE:

Cut the pieces for the legs, stretcher, and panel. With the pocket hole jig set for 1-1/2″ material, drill pocket holes in each end of the stretcher. Secure the stretcher to the legs using glue and 2-1/2″ pocket hole screws.

Set the pocket hole jig for 3/4″ material and drill pocket holes in the side edges of the panel. Secure the panel to the legs using glue and 1-1/4″ pocket hole screws. The front face of the panel will be flush with the front face of the legs.

STEP TWO:

Cut the piece for the top. Secure the top to the top of the legs and the panel using glue and 1-1/4″ brad nails.

STEP THREE:

Cut the 1×6 board to 65” long. Using the router and a decorative bit of your choice, cut a decorative edge on each long side of the board. Rip a 1″ wide piece off of the 1×6 for one of the trim pieces, then rip the remaining piece to 2-1/4″ wide. Secure the wider trim to the front of the headboard under the top using glue and 1-1/4″ brad nails, then layer the narrower piece on top.

Finish as desired.Secure the headboard to the wall or the bed frame. If securing the headboard to the bed frame, additional holes may have to be drilled.

To make the headboard wider for a king size, add 16″ in length to the top, trim, stretcher, and the length of the panel. To make the headboard narrower for a full size bed, subtract 6″ in length from the top, trim, stretcher, and the length of the panel.

The original plan can be found at http://designsbystudioc.com/

 
[email_link]

Shim Headboard

There’s no cutting needed to make these textured and colorful headboard panels. Just assemble with glue and paint them to match your bedroom decor.

Materials

  • ¼ x 24 x 48 birch plywood panels
  • 11 – wood shim packs of 12
  • Large D-ring hangers, pack of 4
  • Valspar spray paint

Instructions:

You can hang these panels vertically or horizontally, depending on the look you want and the size of your mattress. For example, three panels hung vertically and spaced about 14 inches apart will span the width of a king-size mattress, while a single panel hung horizontally will span a twin mattress. For a queen-size mattress, space three panels 6 inches apart. For a double or full-size mattress, space the three panels 3 inches apart.

Step 1:

Cut a 24 x 48 panel into three 16 x 24 pieces. If you don’t have a circular saw or table saw, have a Lowe’s associate cut the plywood for you.

Step 2:

On a 16 x 24 panel, begin by gluing a shim in each corner in a pinwheel pattern. The edges and ends of the shims should be flush with the edges of the panel. Allow these pieces to dry for an hour before you continue.

Step 3:

Fill in the remaining boundary shims, keeping the overlaps as identical as possible from side to side and top to bottom.

Step 4:

Begin filling in the rest of the panel by adding two shims running the opposite direction of two end shims. Add weights while each row dries for about 20 minutes. Then continue adding shims, alternating their direction by row, and applying weight to each row until you reach the top. Repeat for the remaining panels and allow the glue to dry overnight before painting.

Step 5:

Spray two coats of paint on the front and sides, varying the spray angles to reach into the recessed areas of the shims. Then paint the back. Painting the back isn’t necessary for appearance, but it will help keep the panel from warping or twisting from moisture changes.

Step 6:

If you hang the panels vertically, screw a D-ring hanger centered along the top edge on the back of the panel. For a horizontal panel, use two D-ring hangers. Repeat for the remaining panels.


The original plan can be found at https://www.lowes.com/creative-ideas/bed-and-bath/custom-shim-headboard/project#noop

 
[email_link]

Window Headboard

Materials:

  • (1) 2x4x8’ Lumber
  • (4) 2x3x8’ Lumber
  • (5) 1x2x8’ Lumber
  • White Paint
  • Pocket Hole Screws

Cut List:

  • 1 – 2×4 @ 75” long (horizontal support on very bottom)
  • 2 – 2×3 @ 75” long (top and bottom horizontal of headboard)
  • 2 – 2×3 @ 55” long (Side pieces)
  • 10 – 1×2 @ 9” long (horizontal part of “window”)
  • 10 – 1×2 @ 18 ½” long (vertical part of “window”)
  • 10 – 1×2 @ 6” long (for top and bottom of “window”)
  • 6 – 1×2 @ 5” long (in between windows)

Step 1:

Lay out lumber in shape of the headboard as a dry fit. Put the good sides of the lumber (the sides you want to show) face down. Mark the back sides so you know which side to drill the pocket hole into.

Step 2:

Drill pocket holes using jig.

Step 3:

Screw headboard together.  This is where math and a right angle are handy and sand.

Step 4:

Prime.  We used FastPrime2.  It was in our basement. It works.  I applied it with a brush and a mini-roller.  It took FOREVER because there are A LOT of corners.  It won’t look pretty after the prime…don’t get discouraged. 2 coats of paint.  We used Olympic Zero VOC Premium white, semi-gloss.  This paint is great.  It doesn’t smell, is good for the environment, covers well…and did I mention it doesn’t smell. Attach to your bed frame using bolts, nuts, and washers (we used some we dug up in our basement) that are long enough to go through the wood and attach to your bed frame.

The original plan can be found at https://decorandthedog.net/decorandthedog/2011/01/headboard-how-to.html

 
[email_link]

Rustic Headboard

Creating a weathered and distressed look starts with lumber selection. It may be counterintuitive, but when picking lumber for this project you’ll want to look for imperfections such as knots, gouges and nicks. However, do select boards that are straight and true.

This project uses pocket-hole joinery. If you’re not familiar with it, take a look at the basics.

Cut List:

Use the dimensions listed as a guide, but be sure to double check measurements as you build and make adjustments before you cut the parts.

  • sub footer (1) – 3/4 x 4 x 64-1/2
  • footer (1) – 3/4 x 4-3/4 x 66
  • sub header (1) – 3/4 x 4-3/4 x 64-1/2
  • header (1) – 3/4 x 5-1/2 x 66
  • front stiles (2) – 3/4 x 2-1/2 x 50
  • side stiles (2) – 3/4 x 2-1/2 x 50
  • rails (2) – 3/4 x 2-1/2 x 58
  • long slats (9) – 3/4 x 3-1/4 x 61-1/2
  • short slats (8) – 3/4 x 3-1/4 x 30-3/4
  • headboard cleat (1) – 3/4 x 3-1/16* x 63
  • wall cleat (1) – 3/4 x 3-1/16* x 63
    *at the widest point

The finished dimensions (as shown in Image 2) are 53″ high x 66″ wide x 5-1/2″ deep.

Step 1: Build the header and footer assemblies

Position the sub footer flush against one edge and centered (3/4 inch from the ends) on the footer as shown in Image 1.

Attach the sub footer to the footer using glue and #17 x 1-1/4-inch wire brads as shown in Image 2.

Position the sub header as shown in Image 3 (3/4 inch from the edge and end). Attach using glue and wire brads.

Step 2: Build the stile assemblies

Use above image as a guide for drilling pocket holes in the front stiles and side stiles.

Position the side stiles flush with the inside edge of the front stiles as shown in above image and attach using glue and 1-1/4-inch pocket-hole screws as shown below.

Step 3: Attach the rails to the stiles

Use the top image as a guide for drilling pocket holes in the rails.

Position the rails flush with the ends of the front stiles as shown above and attach using glue and 1-1/4-inch pocket-hole screws as shown below. This assembly is the frame.

Step 4: Attach the frame to the header and footer

Position one end of the frame with the back edge of the side stiles placed 3/4 inch from the end and back of the sub header as shown above and attach using glue and 1-1/4-inch pocket-hole screws as shown below. Be sure to clamp the assemblies in place before joining them.

Position the other end of the frame with the back edge of the side stiles placed 3/4 inch from the end of the sub foot and attach using glue and 1-1/4-inch pocket-hole screws. Be sure to clamp the assemblies in place before joining them.

Step 5: Attach the slats

Starting at the footer assembly end, begin alternating placing the long slats and short slats (cut from tongue-and-groove pine) as shown in above images. Attach the slats to the front rails using glue and 1-1/4-inch wire brads as shown below.

If you have trouble placing the grooves on the tongues of mating parts, try using a cutoff of the tongue-and-groove pine to use as a guide, as shown in the first image below. Note that the last long slat placed will leave a gap a couple of inches wide near the sub header, as shown in the very bottom image.

Step 6: Distress the project

There are many methods for distressing lumber to give it an aged and “well-loved” appearance. Beyond the step mentioned in the beginning of selecting boards with imperfections, you can essentially “beat up” a project. Use a scrap length of chain to add dents and nicks. For deeper dents, use a hammer (Above images).

To create the look of wormholes, use an awl or ice pick as shown in top image. Try creating holes in different angles as well. Create worn or chipped edges by cutting notches using a pocket knife or utility knife as shown above.

Wear down random spots using a sander as shown above. It’s hard to give a weathered appearance to new boards, such as the lumber we use here, but you can cheat that gray patina by diluting dark gray paint and applying it as you would a stain. Add water and the paint to a quart-size container and test the finish on pieces of scrap cut from this project until you get the look you desire. Apply a coat of polyurethane when finished.

Step 7: Make and Attach the cleat

Mark a centerline across the end of a 1×6. Mark the center point of this line and draw a 45-degree angle that bisects this center point. Set the saw blade on your table saw at 45 degrees, then set the fence on your table saw so that the 45-degree mark lines up with the saw blade. Rip the 1×6 to create the headboard cleat and wall cleat, as in top image.

Use above image as a guide for drilling vertical pocket holes on the widest face of the headboard cleat at 2 inches from each end, 18 inches from each end and centered.

Position the headboard cleat flush against the sub head and the outside edges of the side stiles and clamp in place. Attach the headboard cleat to the sub header using glue and 1-1/4-inch pocket-hole screws as shown in Image 3. Attach the headboard cleat to the side rails using glue and the side stiles using glue and 1-1/4-inch brads. Apply a finish to the ends of the headboard cleat and wall cleat.

Step 8: Install the headboard

Position the headboard assembly in the desired location, flush against the wall to which you plan to install it.

Place the wall cleat flush underneath and against the headboard cleat as shown above. Mark the position of the wall cleat.

Use a level to square the cleat and attach it to the studs in your wall using 3-1/2-inch screws, as shown above. (The drywall is transparent to illustrate the position of the studs.)

Image below indicates how the headboard cleat (shown here unattached for clarity) will fit on the wall cleat.


The original plan can be found at http://www.diynetwork.com/how-to/skills-and-know-how/carpentry-and-woodworking/how-to-make-a-rustic-style-headboard


[email_link]

Rustic Headboard

Materials:

Board SizeKingCalifornia KingQueenFullTwin
1x22 @ 8'2 @ 8'2 @ 8'2 @ 8'2 @ 8'
1x37 @ 8'7 @ 8'7 @ 8'7 @ 8'7 @ 8'
1x49 @ 8'9 @ 8'4 @ 10'
1 @ 6'
4 @ 10'
1 @ 6'
4 @ 8'
1 @ 4'
1x63 @ 8'3 @ 8'3 @ 6'1 @ 10'
1 @ 6'
1 @ 12'
2x41 @ 8'1 @ 8'1 @ 8'1 @ 8'1 @ 8'

Cut List:

 KingCalifornia KingQueenFullTwin
Dimensions81 1/2" Wide x 57 1/4" Tall77 1/2" Wide x 57 1/4" Tall65 1/2" Wide x 57 1/4" Tall49 1/2" Wide x 57 1/4" Tall44 1/2" Wide x 57 1/4" Tall
Leg Pieces6 - 1x3 cut at 55" long6 - 1x3 cut at 55" long6 - 1x3 cut at 55" long6 - 1x3 cut at 55" long6 - 1x3 cut at 55" long
Inside leg Piece2 - 1x2 cut at 55" long2 - 1x2 cut at 55" long2 - 1x2 cut at 55" long2 - 1x2 cut at 55" long2 - 1x2 cut at 55" long
Smaller Panel Pieces5 - 1x4 cut at 76" long5 - 1x4 cut at 72" long5 - 1x4 cut at 60" long5 - 1x4 cut at 54" long5 - 1x4 cut at 39" long
Larger Panel Pieces3 - 1x6 cut at 76" long3 - 1x6 cut at 72" long3 - 1x6 cut at 60" long3 - 1x6 cut at 54" long3 - 1x6 cut at 39" long
Panel Trim, Front and Back4 -1x4 cut at 74" long4 - 1x4 cut at 70" long4 - 1x4 cut at 58" long4 - 1x4 cut at 52" long4 - 1x4 cut at 37" long
Top Trim1 - 1x3 cut at 80 1/2" long1 - 1x3 cut at 76 1/2" long1 - 1x3 cut at 64 1/2" long1 - 1x3 cut at 48 1/2" long1 - 1x3 cut at 43 1/2" long
Top1 - 2x4 cut at 81 1/2" long1 - 2x4 cut at 77 1/2" long1 - 2x4 cut at 65 1/2" long1 - 2x4 cut at 49 1/2" long1 - 2x4 cut at 44 1/2" long

Step 1: Assemble front leg

Apply glue to one side of a 1×2 inside leg piece. Lay the 1×2, glue side down, on top of a 1×3 leg piece, lining up outside edge and ends. Nail the 1×2 to the 1×3 every 6-8 inches with 1-1/4 inch nails. Build two of these legs as illustrated above. Tip: As you nail down boards, adjust boards to keep outside edges flush.

Step 2: Attach panel boards

Beginning at the top of the headboard, apply glue to ends of a 1×4 panel board. Lay 1×4 panel board on top of legs, and nail down with 1-1/4 inch nails. Use two nails on each end, nailing both sides of panel boards to the legs as illustrated above. Nail remaining panel boards to the legs, using glue and 1-1/4 inch nails, referencing the pattern above for alternating 1x4s and 1x6s. Tip: For increased rustic character, chisel or distress panel boards prior to nailing to the legs, focusing on edges to enhance the planked headboard look.

Step 3: Attach leg pieces

Apply glue to one side of two 1×3 leg pieces and place on headboard legs as shown in illustration. Nail every six to eight inches using 2-inch nails, making sure to keep top and outside edges flush.

Step 4: Attach panel trim

Trim the headboard tops and bottoms by applying glue to 1×4 panel trim boards and nailing panel trim boards to the tops and bottoms of both sides of headboard. Use 1-1/4 inch nails and keep outside edges flush.

Step 5: Attach outside trim

With headboard facedown (the front of the headboard will have minimal nails showing), apply glue then nail remaining two leg pieces to the sides of legs. Keep the front edge flush, but the back may have a slight overhang. Use 2-inch nails every 6-8 inches.

Step 6: Attach top trim

Apply glue to the top of the headboard. Line top trim piece up with outer leg piece and nail down, nailing every six to eight inches. Keep front and outside edges flush.

Step 7: Attach top of headboard

Apply glue to the top of the headboard. Overhang or elevate the headboard so that you can center the 2×4 top piece on the headboard with a 1/2-inch overhang on all sides. Nail every six to eight inches with 2-inch nails.

Tip: For a king-size headboard, scrap wood can be cut and nailed perpendicular to the planks to keep planks in place.

Step 8: Finish headboard

Fill nail holes with wood filler. Let filler dry then sand headboard with 80-grit sandpaper. Fill nail holes again — wood filler can shrink when dry. Sand again, this time with 120-grit sandpaper. Finally, sand with 150-grit sandpaper.

Vacuum headboard with a soft-bristled brush attachment to remove sanding residue then wipe the surface with a damp washcloth. In a well-ventilated area, lightly coat the headboard with spray-on primer, following instructions on spray can. Let dry completely.

Brush on paint, working in the direction of wood grain. Apply two coats, allowing ample time for each coat to fully dry. To distress, rough up edges with sandpaper. Chisel between the plank boards to expose the cracks between the panel boards. Apply glaze to distressed areas and wipe off until desired look is achieved. Spray with clear coat to seal your headboard.

Step 9: Attach to bed frame

Follow the directions on your bed frame to attach headboard to the bed frame.

Step 10: (Option) Stain headboard

The beauty of the solid wood used to build this headboard can be preserved by choosing a stained finish. This headboard was finished with two coats of a dark walnut oil-based stain, topped with satin oil-based polyurethane.


The original plan can be found at http://www.diynetwork.com/how-to/make-and-decorate/decorating/how-to-build-a-rustic-wood-headboard
 
[email_link]

Simple Headboard


Materials:

  • 2 – 1″ x 6″ x 96″ board
  • 1 – 1″ x 3″ x 96″ board
  • 12 – 1 1/4″ screws
  • wood glue
  • sandpaper
  • stain/top coat
  • remnant carpet or felt

Cut List:

  • (4) 1×6 @ 37 1/2″ long
  • (2) 1×3 @ 30″ long
  • (2) 1×3 @ 12″ long

Cut the 1×6’s into 4 pieces that are 37 1/2″ long.  Cut the 1×3 into 2 pieces that are 30″ long and 2 that are 12″ long.  On the 30″ pieces drill pilot holes for screws to attach each of the 37 1/2″ boards.  Apply a little wood glue and attach the 30″ pieces with 1 1/4″ screws to the 1×6’s about 4″ in from each side.  Leave a small gap between planks for a more defined plank look.

Drill pilot holes about 3/8″ from the ends of the 12″ pieces.  Use wood glue and 1 1/4″ screws to attach the 12″ pieces to the ends of the 30″ pieces.  The 12″ pieces (feet) slide between the mattress and box spring to stand the headboard up.

Attach a small remnant of carpet or felt with glue/staples near the top of the 30″ pieces to avoid marring the wall.

The original plan can be found at http://www.hertoolbelt.com/simple-headboard-dusty-theme-room/

[email_link]

Faux Shiplap Headboard

Several months ago I was watching an episode of “Fixer Upper” and caught glimpse of a custom-built shiplap headboard. Since then, I haven’t been able to get the idea out of my head. I don’t have a cool old house with shiplap walls that I can tear down, so I came up with my own solution for a DIY headboard made of faux shiplap— all using materials all found at my local Home Depot store.

Materials:

  • (1) 8 ft.- 2 x 12
  • (3) 8 ft.- 2 x 4
  • (1) 4 x 4 ft. x 3/8 in. sheet of plywood or MDF
  • (1) Timeline Wood Distress—ed Grey Wood Panels – 6 pack
  • (3) 21 in. Galvanized metal strap
  • (3) 5 in. Galvanized tie plate
  • 2½ in. Pocket hole screws
  • 5/8 in. Wood screws
  • 7/8 in. Wood screws


With this DIY headboard project, you can create any kind of arch you’d like (radius, elliptical, cathedral, etc.).

You can create the round shape using a pencil on a string, compass, or even tracing a large round object. Whatever arch shape you choose, make sure the ends are parallel.

Step 1:  Create A Template

First, I vertically taped together sheets of 8½ x 11 in. paper. Then I cut the resulting strip of paper to 38 in. in length (the width of the eventual headboard). I folded the sheet in half and sketch half of an arch, 3½ in. wide. I then cut out my half-arch, and opened the paper to reveal the full shape.

Step 2: Cut the shape of the template

I aligned the outside edge perpendicular to the long sides of my 2 x 12. Using a pencil, I traced the arched shape onto the wood.

Next, I cut along the line using a jig saw with a wood blade.

Step 3: Sand the edges of the Arch

I took my time to sand the cut edges really well, helping to remove any blade marks and to smooth the arch’s shape.

Step 4: Drill the pocket holes

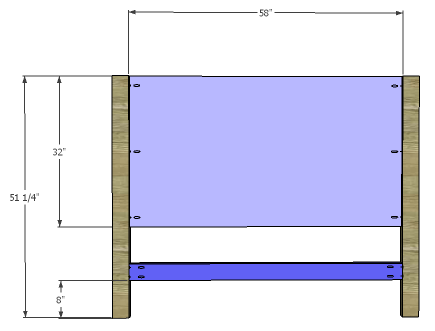
Using a circular saw, I cut two 2 x 4’s, 52 in. in length and one 38 in. in length. I drilled two, 1½-in.-deep pocket holes on either end of the shorter board, and on both ends of the arch.

Step 5: Attach sides to the arch

Next, I laid my 52-in. 2 x 4’s on the ground, face down. I aligned the end of the arch with the top of each 2 x 4 and connected the two with wood glue and 2½ in. pocket hole screws.

Step 6: Attach bracing board

I measured 20 in. from the bottom of each leg and made a pencil mark. I placed the 38 in. board perpendicular between the legs, face down, and lined up the bottom of the board with both pencil marks. I connected the board to the legs with more wood glue and pocket hole screws.

Step 7: Paint the plywood

I knew I would be able to see a small amount of plywood between the wood slats of the faux shiplap, so I needed to make sure the color of the plywood matched the pre-finished slats. I used a roller to paint one side of the plywood a medium grey.

Step 8: Attach the faux shiplap slats

Once the paint had dried for several hours, I started attaching the faux shiplap slats.

I started on one edge of the plywood and lined up the slats parallel to each other. I used a couple pieces of scrap wood ¼ in. thick as spacers between each slat. Quarter inch tile spacers would work well, too.

To give my plywood more rigidity, I ran the boards in the opposite direction of the wood grain on the plywood. I applied a healthy “squiggle” of construction adhesive to the back of each slat and pressed it firmly into place.

I had a few edges that popped up and didn’t want to stay put. So, I placed a couple dumbbells on those areas to hold them down and let the adhesive dry fully.

Step 9: Lay the headboard frame on the faux shiplap strips

After the construction adhesive had several hours to dry, I laid the headboard frame, face up, on top of the panel. I made sure that the slats ran horizontally.

Step 10: Trace the inside of the frame

With a pencil, I traced along the inside of the frame. If you are comfortable using a router, skip to Step 11b. If not, as smoothly as possible, cut out the traced shape from the panel using a jig saw.

Step 11a: Secure the panel to the headboard arch

Flip the frame face down. Lay the panel, face down, in the center. Use scrap wood to raise the panel until the back of the plywood is flush with the back of the frame. Center your three 21 in. metal straps along the seams and drive 5/8 in. screws, securing the frame and plywood panel together. Screw in your three 5 in. tie plates spaced evenly over the arch to secure the plywood panel.

Step 11b: (Router option) Cut a rabbet along edge of headboard arch

I chose to use my router with a ½ in. rabbetting bit and ditched the metal straps all together. Instead of cutting the panel along the traced line, I cut ½ in. outside the traced shape. Then, I ran my router along the inside edge on the back of the frame, cutting a ½ in. wide, ¾ in. deep rabbet. Remember, when removing a large amount of material like this with a router, its best to start shallow, make multiple passes, and gradually cut deeper till you reach your desired depth.

Step 12: Stain and seal the headboard frame

Before attaching the panel, I took time to stain and finish the headboard frame. I was able to match the pre-finished wood slats pretty well by using a water-based grey stain, followed by whitewash of a cream colored acrylic paint. I also sealed the frame with three coats of a clear lacquer in a satin finish, to give the wood extra durability.

Step 13: Attach the faux shiplap to the headboard frame

Once everything was dry, I attached the panel to the frame. I dropped the panel into place and secured it with 7/8 in. wood screws, spaced about every 6 in. apart, along the perimeter of the panel. To avoid splitting, I pre-drilled pilot holes before driving the screws.

The original plan can be found at http://blog.homedepot.com/diy-headboard-faux-shiplap/ target=”_blank” and was created by Pneumatic Addict

 
[email_link]

Barn Door Headboard

Dimensions:

Materials:

  • 8 1×4, 8’ Long
  • 2 1x2s, 8’ Length
  • 3 1×3, 8’ Length
  • 1 1/4” Finish Nails
  • 2” Finish Na

Cut List:

  • 18- 1×4 @ 31” Panel Boards
  • 2 – 1×2 @ 49 1/2 “ Side Legs
  • 2 – 1×3 @ 49 1/2” Front Legs
  • 2 – 1×3 @ 38 1/2” Back Supports
  • 2 – 1×4 @ 38 1/2” Front Trim
  • 1 – 1×4 @ 26” Center Trim
  • 1 – 1×3 @ 44” Top Trim
  • 1 – 1×4 @ 45” Top Trim
  • 2 – 1×4 @ 30” Ends cut at 30 degrees off square, parallel, see last step

Step 1:

Headboard Panel

Start by lining all the 1×4 panel boards up, rotating the grain so the bark side is up, then down. Adjust for square. Then if you have a nailer, glue and nail the top and bottom trim in place. Otherwise, screw from the back to hide your screw holes. Shown above back side up, so you would just screw through the trim into the back side of the panel boards.

Step 2:

Legs

Now screw the legs on with glue and 2″ screws.

Step 3:

Leg Fronts

Nailer would be handy here, but if you don’t have one, you can screw the leg fronts to the legs. Use glue and 2″ screws or nails.

Step 4:

Front Trim

I highly recommend measuring and cutting these to fit. Nails would hide best, and even if you don’t have a nailer, if you plan to stain, I suggest using a hammer and finish nails to hide any holes. If you plan to paint, go ahead with the screws and glue.

Step 5:

Center

Mark the center and use 1 1/4″ fasteners and glue to attach.

Step 6:

Top Trim

Now add the top trim with screws or nails and glue. Center on the top.

Step 7:

Header

Use finish nails and glue to attach the top to the top trim. Center on the top.

Step 8:

Cross Supports

Start by cutting 2 1x4s 36 3/4″ long, with both ends cut at 45 degrees off square, parallel to each other. Then on the top end, measure in 2″ and mark a line square with the top edge (see above diagram). Cut this line. Attach the cross supports to the headboard with 1 1/4″ finish nails and glue, nailing into all of the panel boards.


The original plan can be found at http://www.ana-white.com/2010/11/brookstone-queen-headboard
 
[email_link]