Bathroom Cabinets & Shelves
Gridview

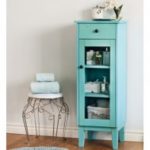
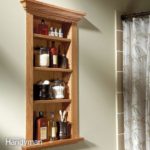
Cottage Bathroom Storage Cabinet
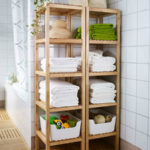
Wire Basket Bath Storage Tower

Free woodworking plans. Your one stop shop for woodworking.

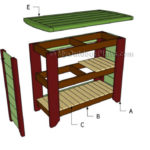
I used my Kreg Jig to attach my shelf. This is super easy to do. If you don’t own a Kreg Jig (yet) you can also attach the boards by using 2.5″ wood screws through the outside boards and into the 2×6 shelf boards. If you do this, make sure to pre-drill first, and cover the head of the wood screw with wood putty before staining.
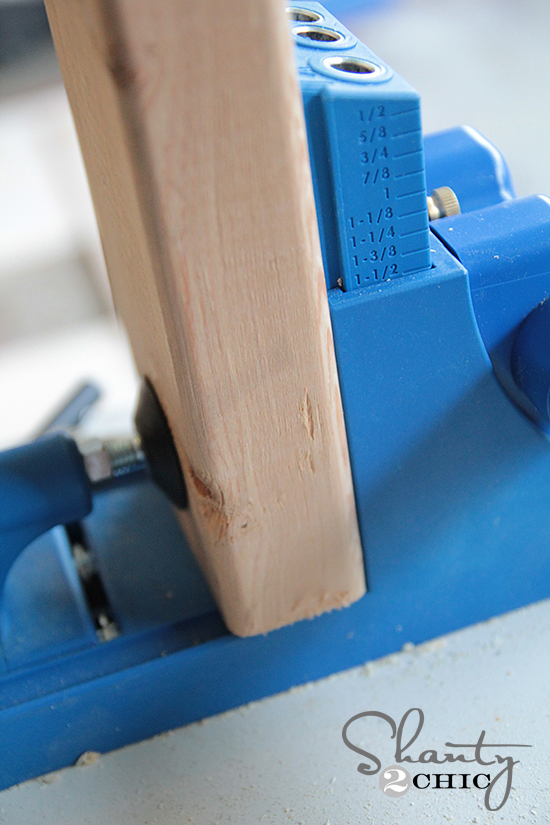
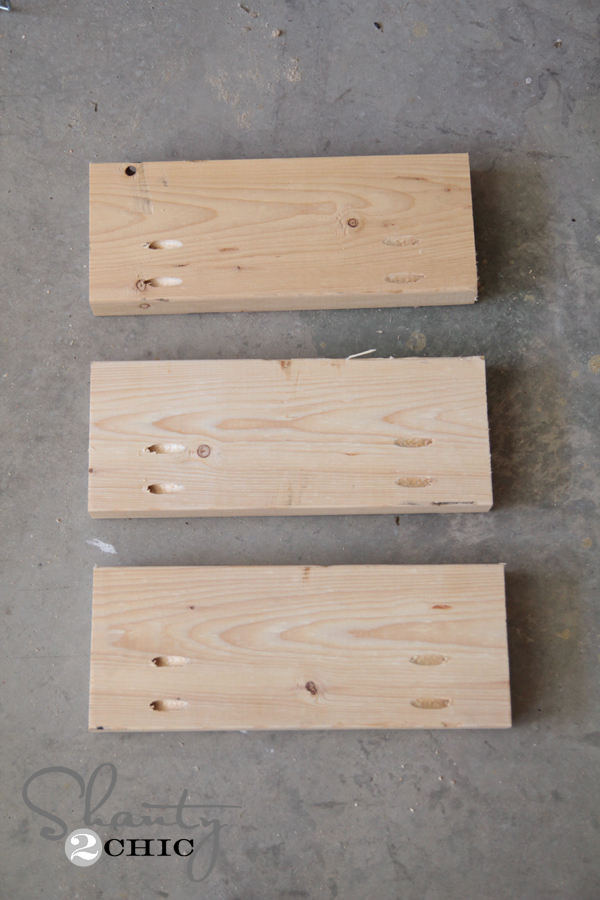
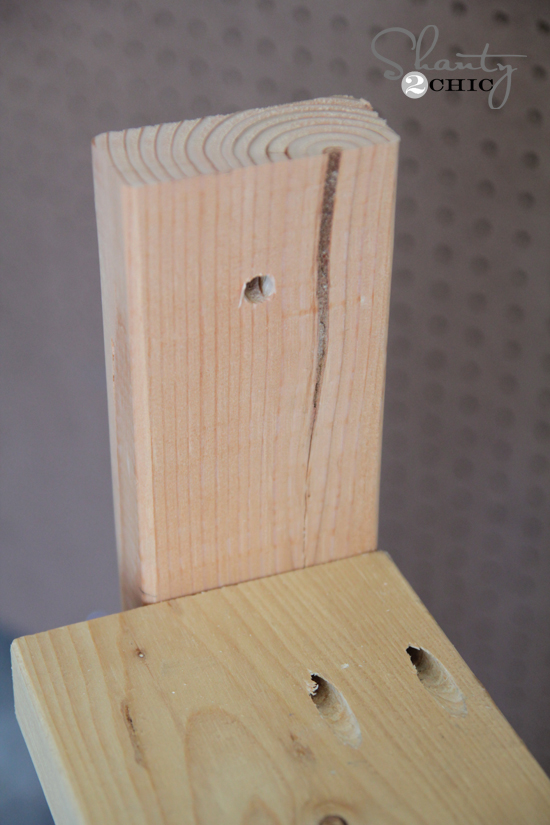
You can see here I have set my measurements to 1.5″ pocket holes because I am joining 2×4 wood and the thickness of the wood is 1 1/2″. I put my pocket holes in my 2×6 boards. This is what they looked like all finished and ready to attach.
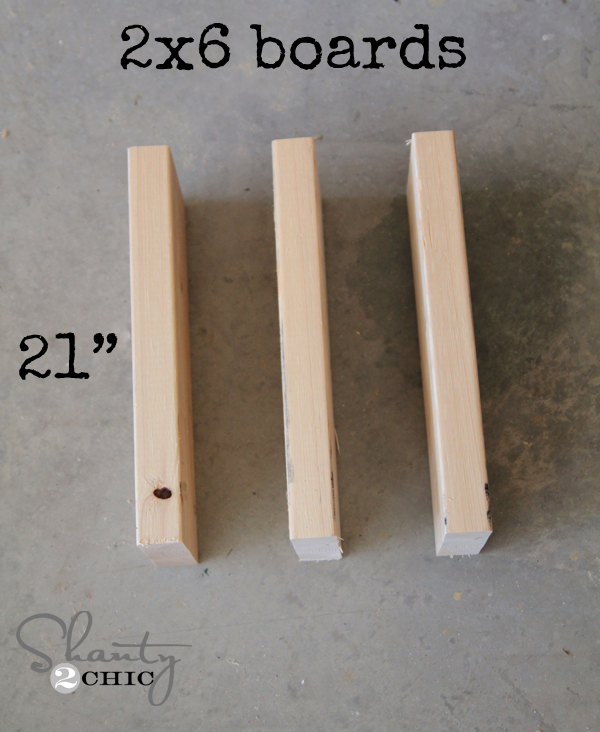
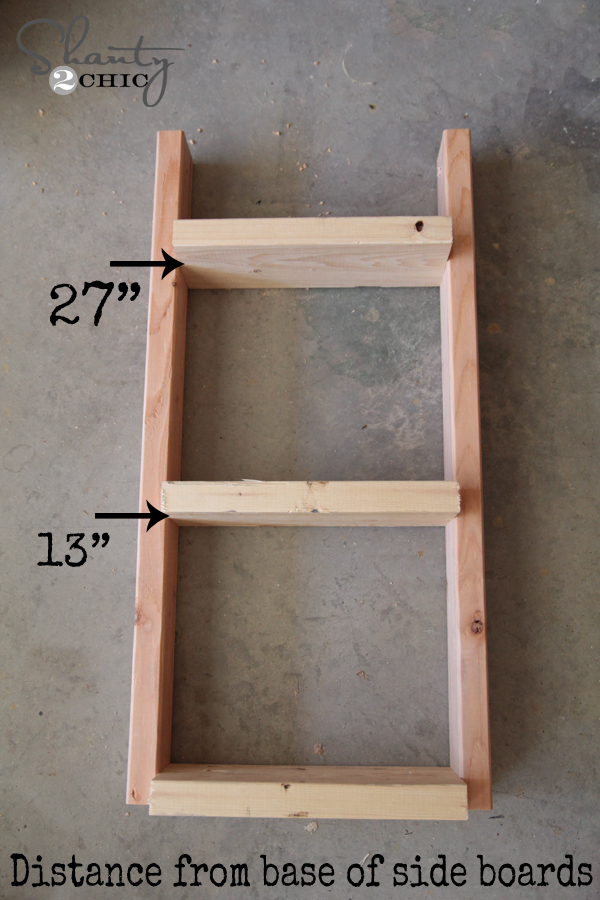
Next I used 2.5″ pocket hole screws to attach the pieces all together. Here are the shelves attached. One is at the base, one is 13″ from the bottom and the other is placed at 27″ from the bottom.
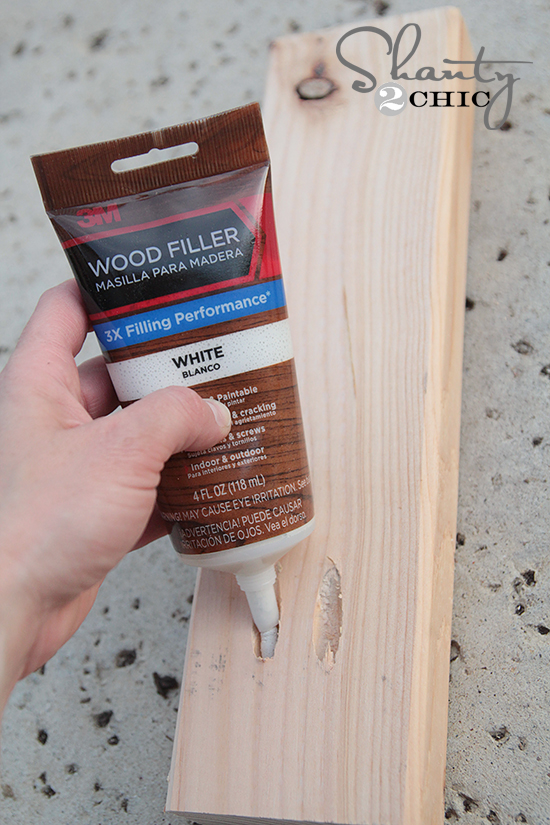
I have found a great way to fill pocket holes and other holes is using 3M Wood Filler! Just squeeze some out into each hole.
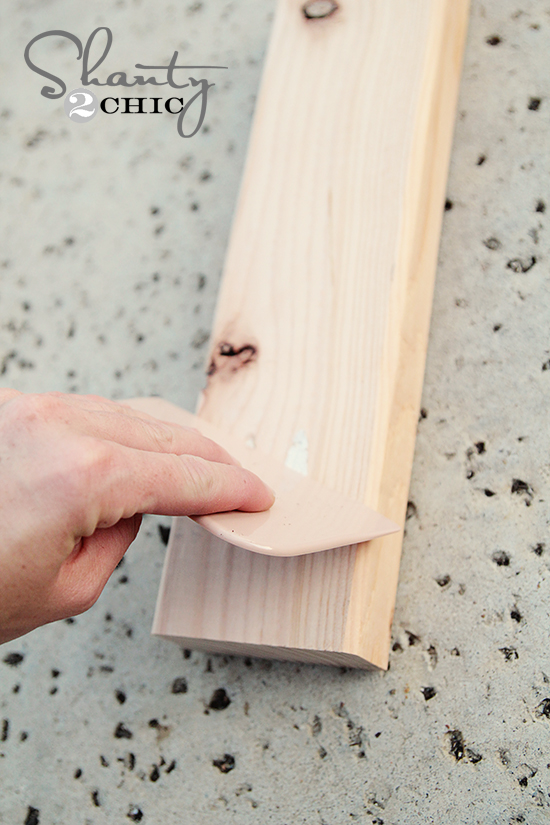
Use a scraper to even it out.
 Next I used my drill to place a 3/8″ hole in the top of each side piece.
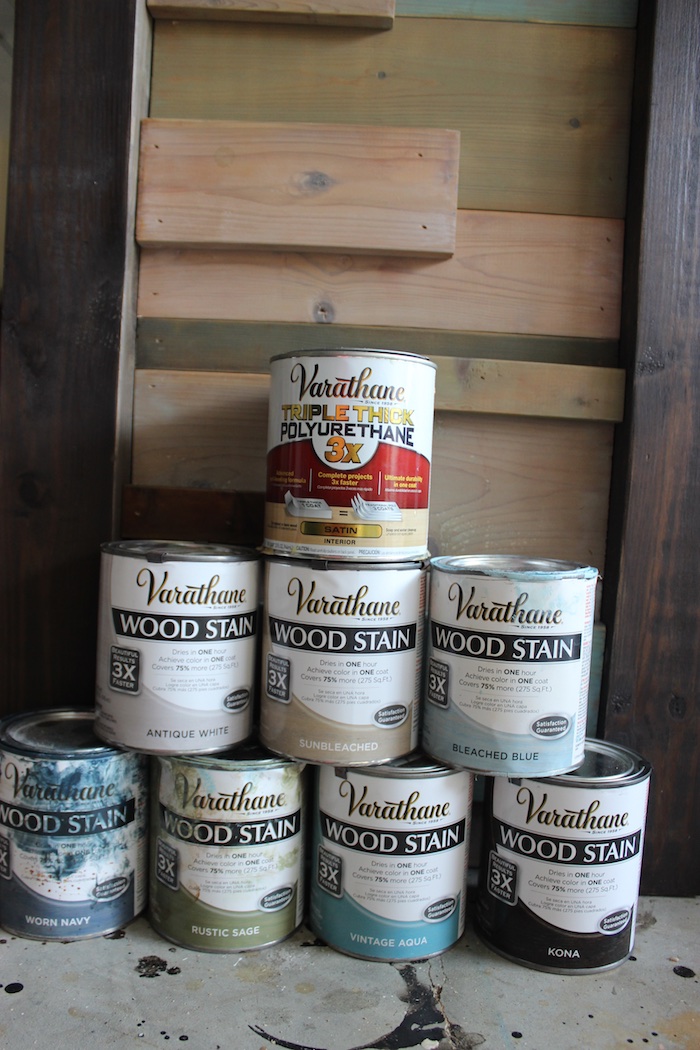
To finish this shelf, I used one of my very favorite stains. Rust-Oleum Ultimate Wood Stain in Dark Walnut. You just brush it on with a foam brush and use an old rag to wipe it off… Easy! You can find this stain at Lowe’s or Walmart.
Finally, I used a piece of sisal rope which I also found at Lowe’s to hang it on the wall. I just ran the ends of the rope through the holes at the top of the shelf and tied knots on each end. I used good anchors in my wall since I wasn’t attaching this to a stud. I found my hook at Lowe’s
The original plan can be found at https://www.shanty-2-chic.com/2013/08/bathroom-shelf.html
![]() [email_link]
[email_link]
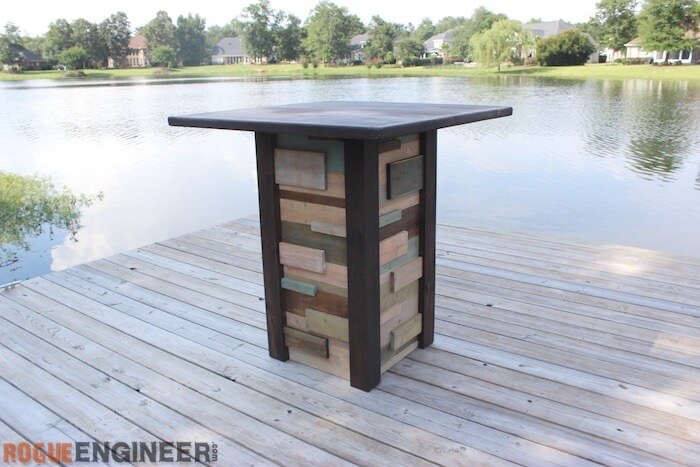


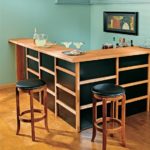
The original plan can be found at https://rogueengineer.com/modern-reclaimed-pub-table/
![]() [email_link]
[email_link]
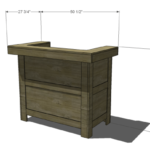
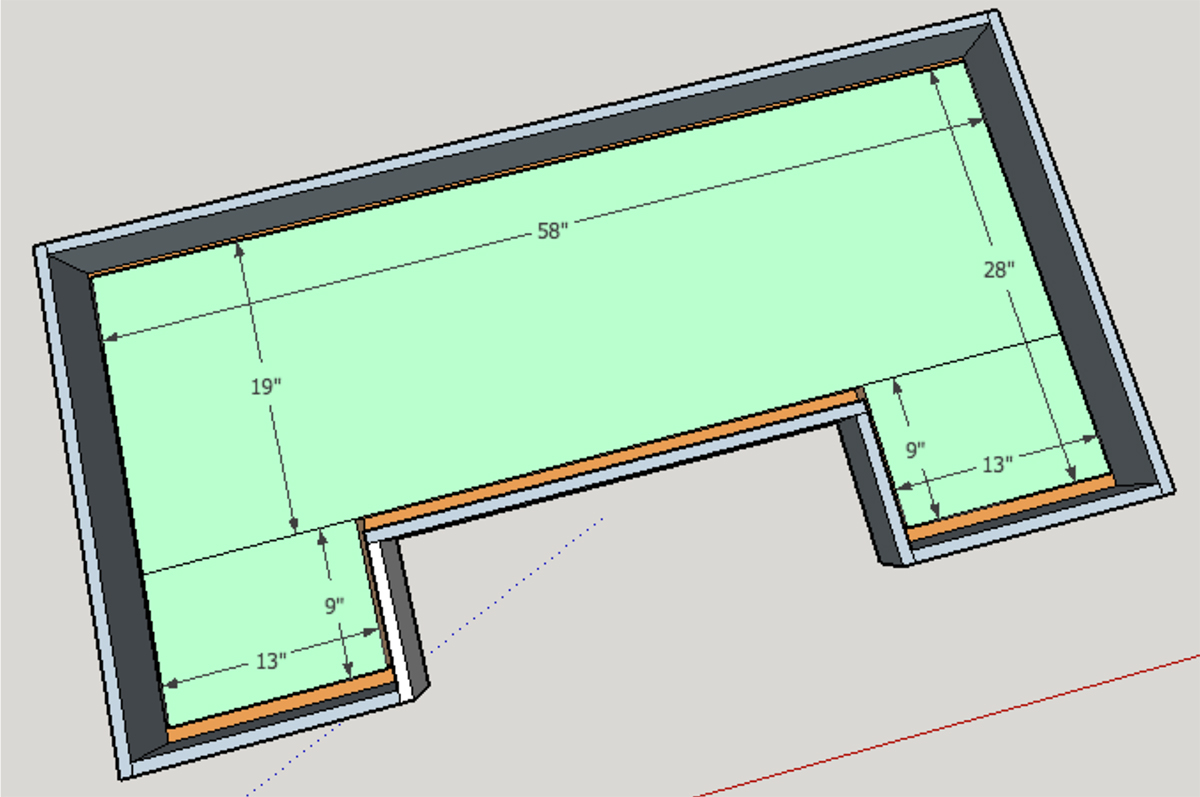
Build the mold for your concrete bar top. Cut ¾ inch thick melamine down to 60” wide by 30”. Then use a jigsaw to cut out the bartender area as seen in the diagram below.

Cut the strips for the sidewalls of your mold. The strips need to be 3 ¾ inches wide by the
dimensions shown in the drawing below. The strips will hold the concrete in and give you a
concrete top that is 3” thick around the outside perimeter of the piece.


Create the foam knockout using 1 ½ inch thick foam. Cut the foam using a sharp knife.
Foam is typically available in large 4 foot by 8 foot sheets or smaller 2 foot by 4 foot
sections. You can piece sheets together as needed to fit the space. Leave a 1 inch channel
around the perimeter of the foam. This will allow the concrete to form around the foam and make an apron. The concrete will look 3 inches thick around all sides. The rest of the
concrete will be 1 ½ inches thick which will reduce the overall weight of the finished bar
top.

Cut the steel re-enforcement to the same dimensions as the foam. The re-enforcement
should fit inside the mold with an inch of play on each side. Use a bolt cutter to cut the re-enforcement.
Fasten the foam to the base of the mold with silicon. Let dry and then mix up your concrete. I’d recommend Quikrete counter top mix or Quikrete 5000. Quikrete counter top mix will be much easier to get a nice smooth during the troweling process. The mix consists of smaller aggregate and additives that help increase the workability and strength of the concrete.
Allow the concrete to set-up. Once the concrete is firm, remove the sidewalls of the mold. If the concrete sags, quickly re-fasten the sidewalls and wait a little longer. When it is ready, fill in any voids with extra concrete and smooth it out using a small trowel. I’d recommend using a mixture with small aggregate for filling things in or making up your own mix of Portland cement, sand, and water
Hard trowel the top surface of the concrete. Use a 12” trowel. Please watch the video for
more tips and information about timing for the troweling process.
Allow the concrete to cure for at least 48 hours and then de-mold the entire piece. Sit the
concrete on wood blocks so the underside of the concrete will dry evenly. Let the concrete
cure for another 24 to 48 hours. Once cured, sand the entire piece by hand with 400 grit sandpaper.
Apply acid stain to the concrete using spray bottles or a pump sprayer. Read the directions
on your stain for more information. I typically recommend diluting the stain 1:1 with water. Allow the stain to sit for at least 8 hours. Then neutralize the acid by pouring a bucket of water on the surface that is mixed with baking soda or a very small amount of ammonia. Use a terry cloth to lightly clean the surface and remove extra residue. If this process is done too early you’ll remove some of the stain because it will not have had enough time to set in the concrete.
Allow the concrete to dry out for a few hours. Then use a water-based outdoor concrete
sealer to seal the concrete top. Apply 2 to 4 coats.
Install the concrete top on the base. First, run a bead of silicon caulk around the top of the
wood base to help prevent the concrete from ever sliding. It is very heavy so it won’t move once in place.
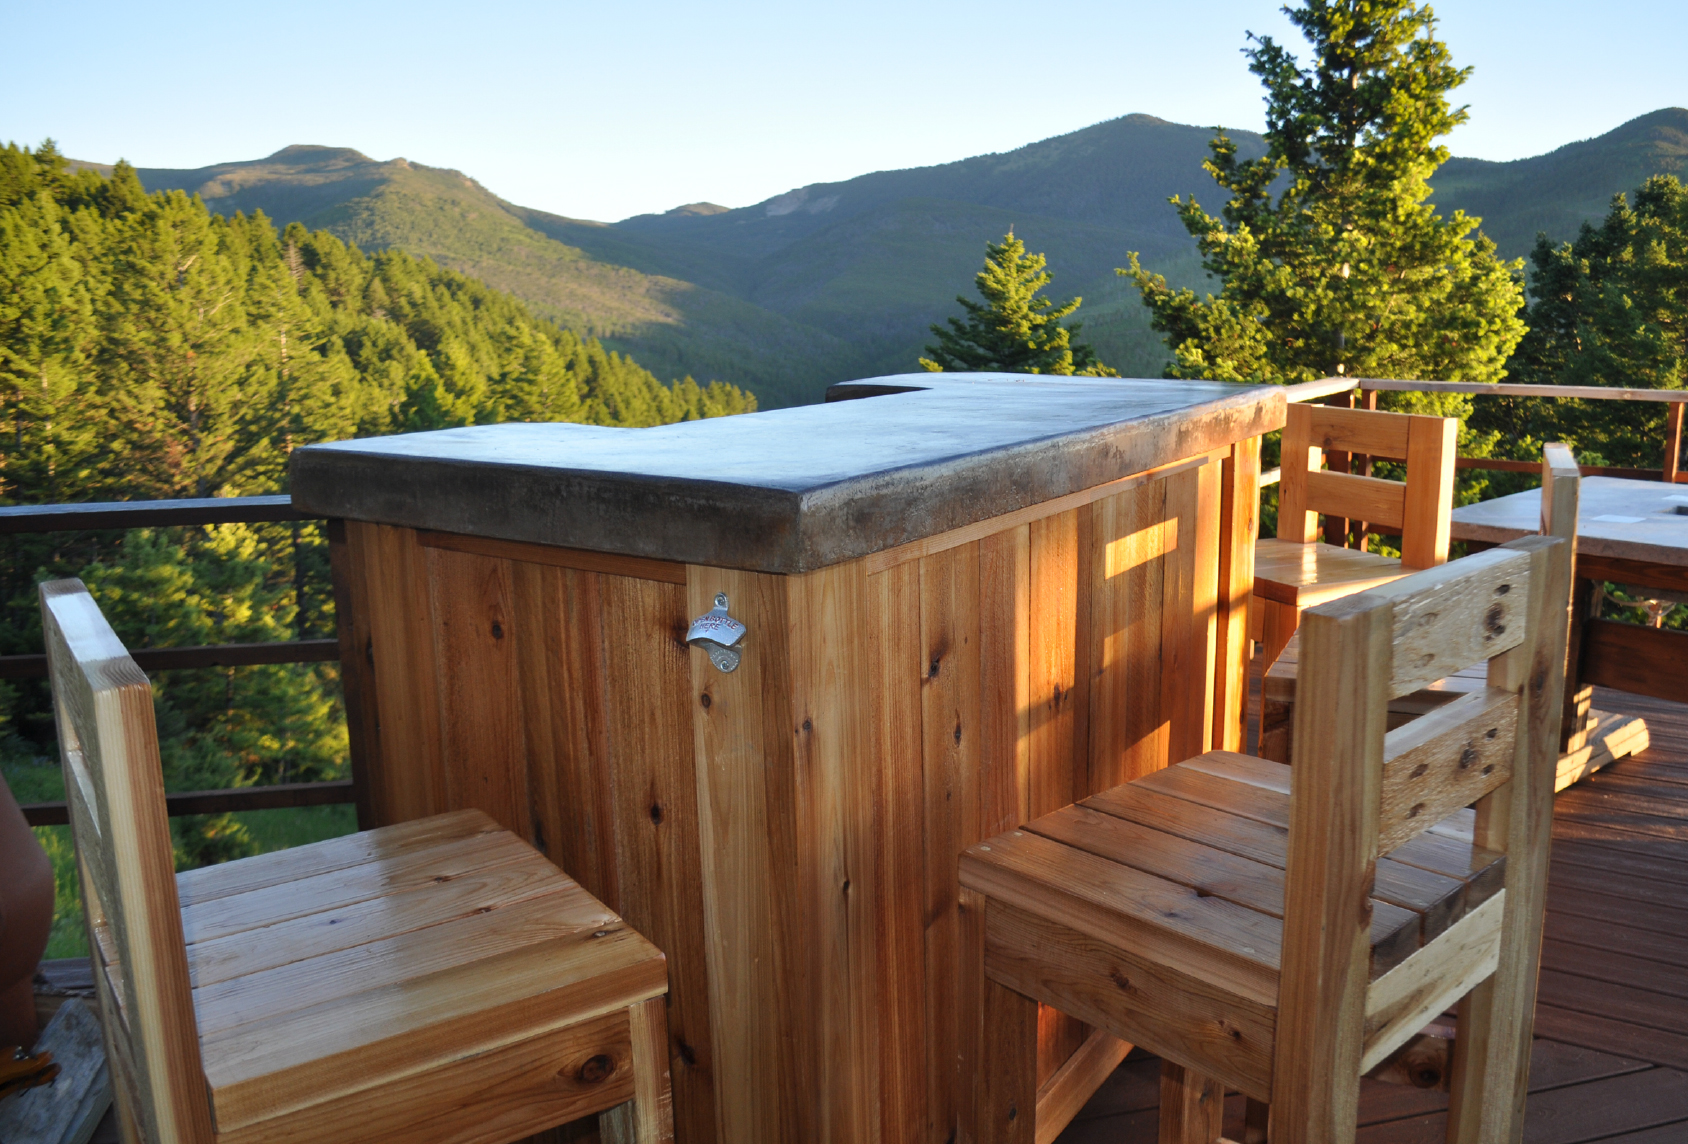
Install LED lighting if you’d like, fill up the cooler, and have your first barbecue! Then send
in a photo of your finished project. I’d love to see your new bar and share it with others to
help inspire more DIY’ers to build it!
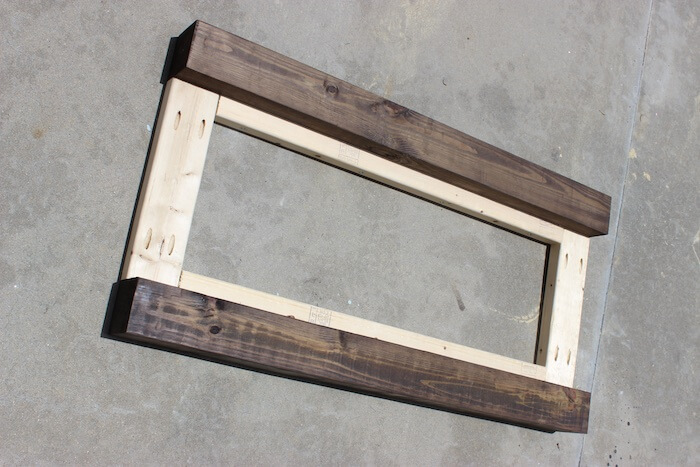
Assemble the top frame for the base. Make all your cuts and then assemble using 3 inch
screws. You could use a Kreg-Jig as well for some of the joints if you’d prefer. See the
diagrams below for measurements.


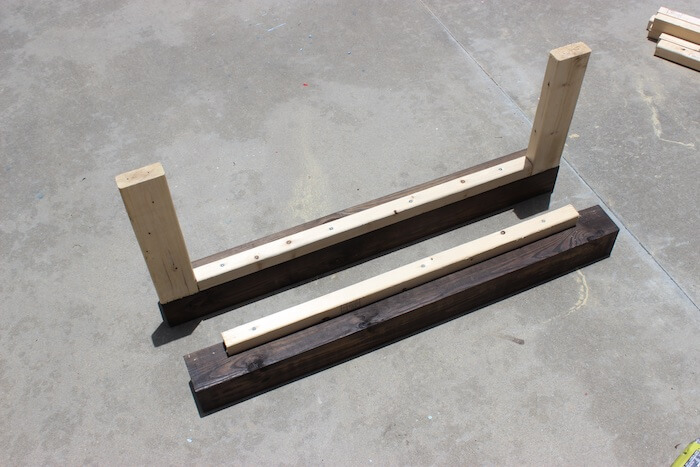
Assemble the lower frame. This is built out of 2×4’s and a 4×4 on each end. The 4×4
provides extra strength and surface area to mount the caster wheels to. Use 3 inch screws.

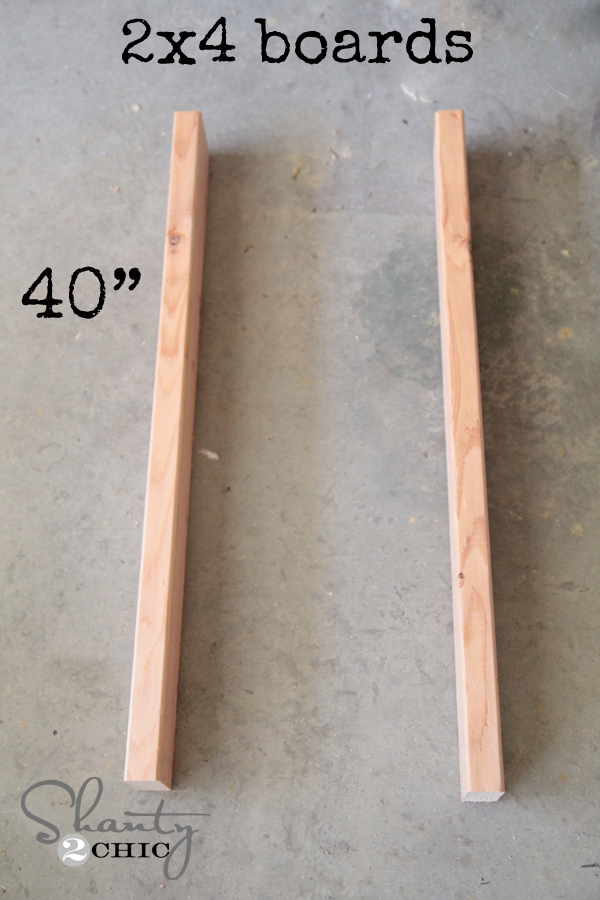
Create the front corners. Connect a 40 inch long 2×4 to a 40 inch long 2×6. A Kreg-Jig and 2 ½ inch screw work great for this process and eliminate screw holes around the outside of
the base. You could attach the boards using 3 inch screws at an angle if you do not have a
Kreg-Jig.

The rear corners consist of two 2×6 boards and one 2×4. All boards are 40 inches long. Use 2 ½ inch Kreg screws to connect the 2×6’s to each other.

Set the top frame on a flat surface and attach the corners/legs. Attach the corners to the frame using 2 ½ inch long wood screws. Use 3 or 4 screws in each board. Pre-drill pilot holes to minimize splitting.


Once the top frame and legs are attached you’ll want to flip the entire piece so it is right
side up. Them attach the lower frame to the corners/legs. Use a scrap ¾ inch thick scrap
boards to prop the lower frame up ¾ of an inch from the bottom of the legs. This will help
hide the wheels a bit and allow the siding to overlap the bottom 2×4.

Attach the 54 inch long middle support using 2 ½ inch long screws. Measure up 19 inches
from the top of the lower frame and make a mark. The top of the 54 inch long 2×4 should
line up with the mark

The middle shelves consist of 2x4s. Attach the 54” wide board first. Next attach the board
on the right, and finally the left side shelving.


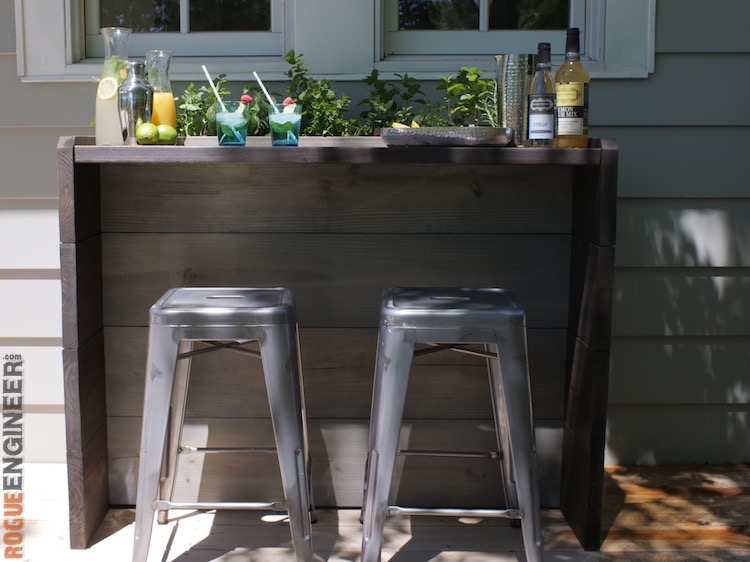
Cut all the siding for the bar out of the 6 foot long cedar pickets. Cut approximately 15
pickets down to 40 inches. Next, measure and attach pickets to the lower and middle
frames to create shelves. Use 1 1/2 inch brad nails if you have an air gun. Or use 2 inch
screws and pre-drill if you do not have an air gun. The boards will be either 16 inches long
or 23 inches long. You may need to rip the end boards using a circular saw/table saw to
ensure a perfect fit.


Attach the cedar picket siding using an air gun and 1 ½ inch long nails. All boards should
be cut to 40 inch lengths. Use 3 on each end and 8 full boards on the front. I worked from
the outside in on the front and ripped the center board to fill the center gap.
Turn the bar on its side and attach the caster wheels if you haven’t already. Pre-drill and
use 2 ½ inch long 7/16 diameter leg bolts, along with a washer. Use 4 bolts and 4 washers
for each caster wheel.

Add trim to the top and bottom of the front and sides of the bar. Rip a couple pickets down
to 3 inches wide. The front trim will be approximately 46 inches long. Use an air nailer,
nails, or screws to attach each trim piece. The side trim will be approximately 16 ½ inches
long.

Run a bead of silicon around the top the base. Then find a few friends to help lift the
concrete into place.

Add a bottle opener and bottle cap catcher if you’d like. LED strip lighting can be ran along
the underside of the concrete which look neat when dark.

The original plan can be found at https://www.diypete.com
![]() [email_link]
[email_link]

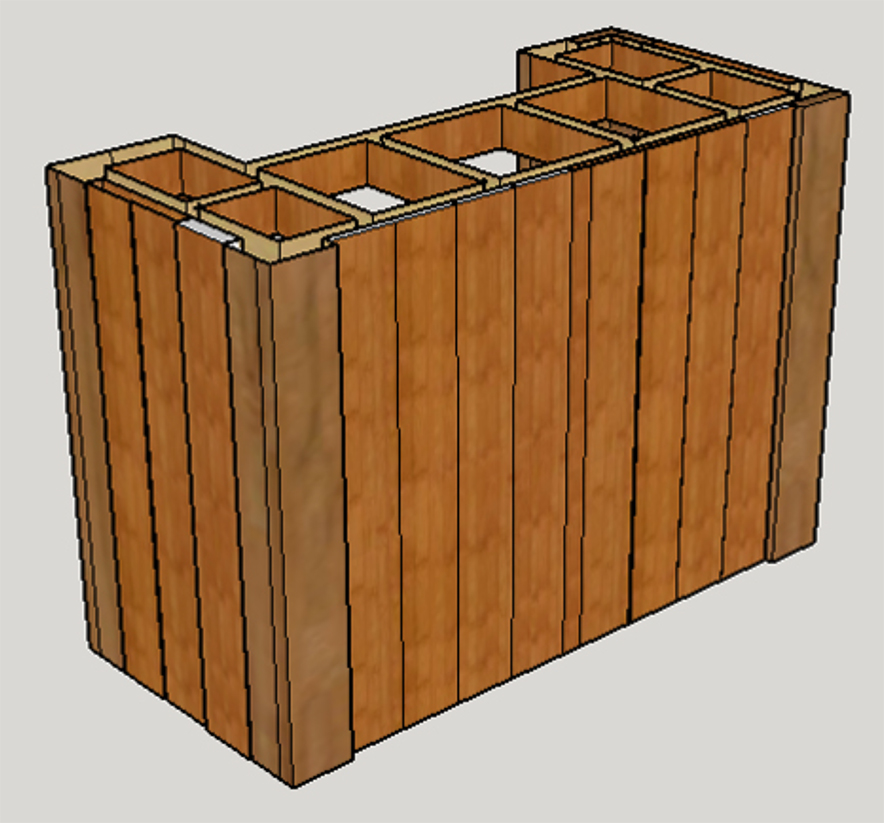
Plywood:
4×4’s:
2×4’s:
1×6’s, Cut one 1×6 into ½” trim:

Build frames by first attaching your short side frames to the legs of the bar with 2 ½” pocket hole screws and wood glue. Next, attach your long frame pieces using the same method of joinery.
IMPORTANT: make sure to include pocket holes in all top frame pieces that are facing up for attaching the top panel later!

Add the side panels with pocket hole screws and wood glue.

Attach the long supports/large frame pieces with 2 ½” pocket hole screws and wood glue.

Attach your shelving braces with 2 ½” pocket hole screws and wood glue.

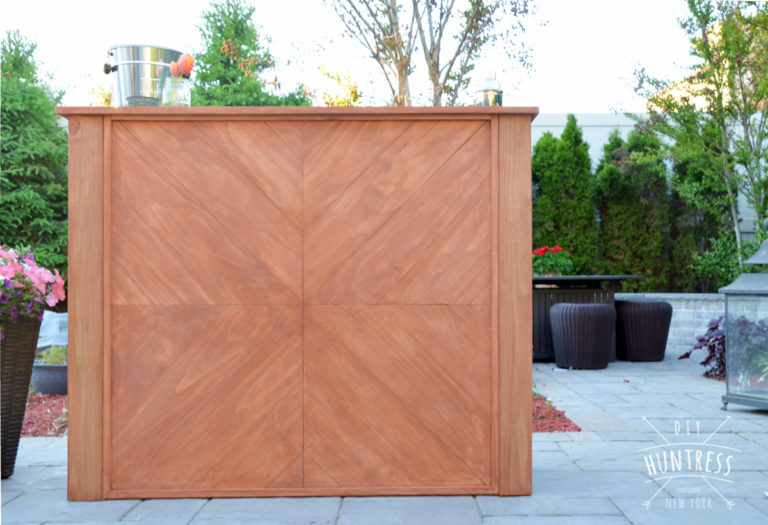
Prep your front panel for artwork! Use a pencil and a straight edge to split your front panel into four equal sections. This will help with lining up your pieces in the next step.

Begin attaching 1×6 pieces. This is done by cutting one end of a 1×6 board at a 45 degree angle and lining it up with the middle intersection you made with your pencil. You can either mark the cut that overhangs at the end here (and trim your pieces as you go), or you can cut your pieces a little long and trim the entire panel down later. Work in one section at a time to avoid mistakes! Use a nail gun and glue to hold your boards down.

Once your panel is complete and the sides are flush, attach it to the front of the bar by screwing and gluing it onto the frames from the inside. This will hide the wood screws on the inside of the bar.

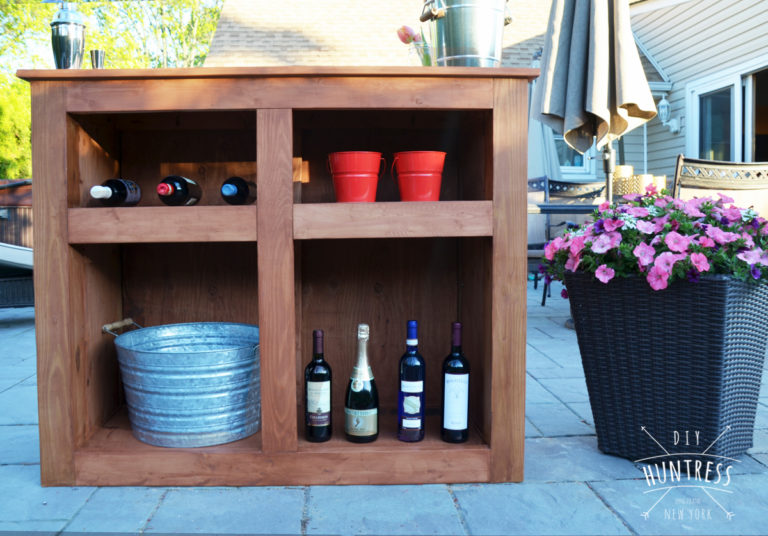
Begin adding your supports to help hold the weight of the shelves and the top (top supports not shown in image below). Attach these to the frames with 2 ½” pocket hole screws and wood glue.
IMPORTANT: In order to make your shelving panels lay flush with the shelving frames, you will have to install your shelf supports ½” (or the equivalent width of your plywood) below the top of your frame pieces. In other words, leave a ½” gap at the top of your supports for the shelf to drop in later.

Drop your shelving panels into place and secure them to the supports with 1” brad nails and wood glue.

Install your top panel with 1 ½” pocket hole screws and wood glue from the bottom frame.

Attach ½ x ¾” trim pieces cut from your 1×6’s to the front panel (@ 41”and 42” — to hide any imperfect gaps – this is optional!) and the top (@ 23” and 51” — to hide the plywood edging).


Sand and then stain and seal your bar with outdoor/waterproofing sealer or stain!


The original plan can be found at http://diyhuntress.com
![]() [email_link]
[email_link]
Materials:
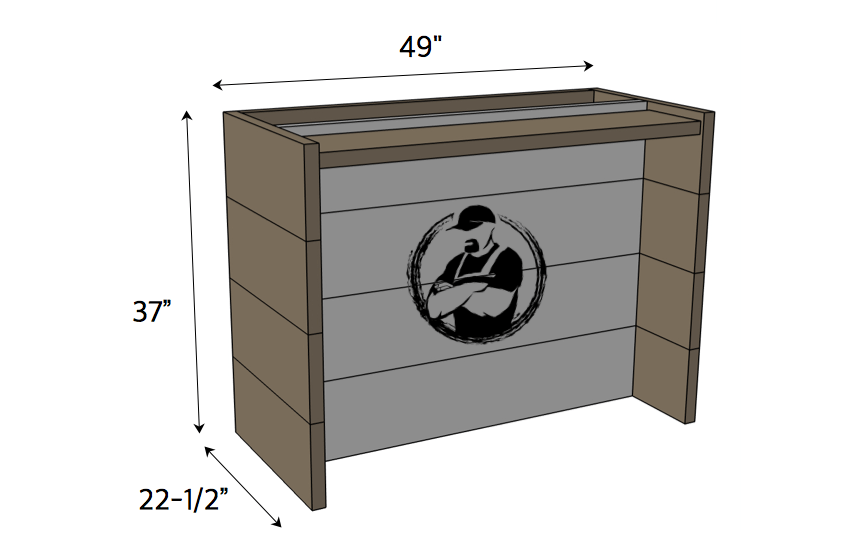


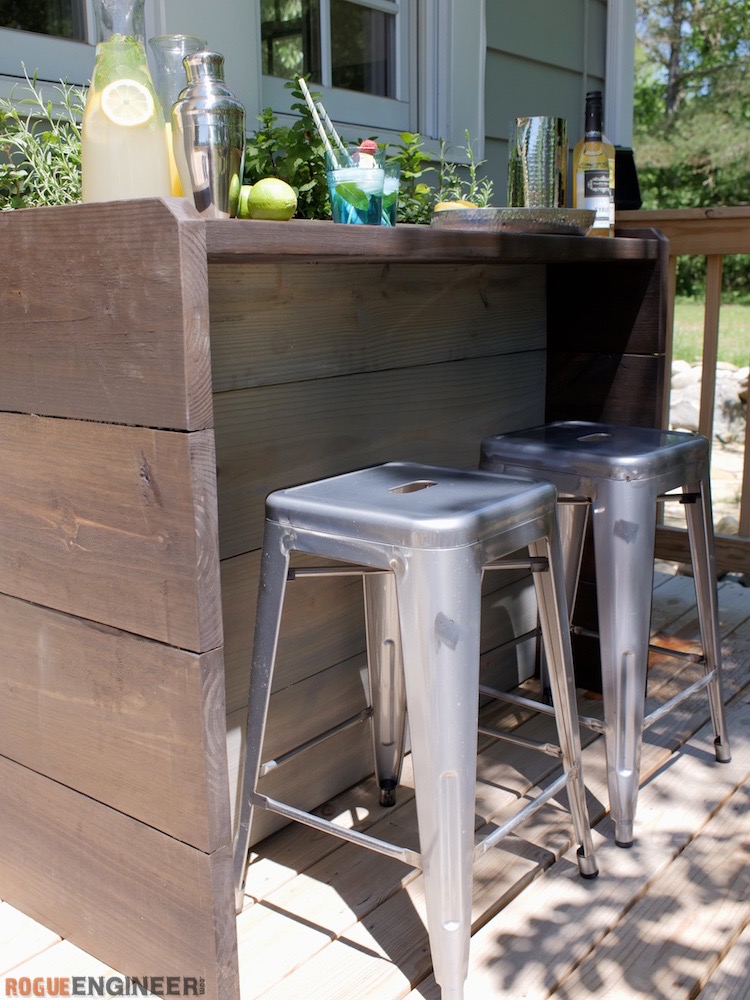
The original plan can be found at https://rogueengineer.com
![]() [email_link]
[email_link]
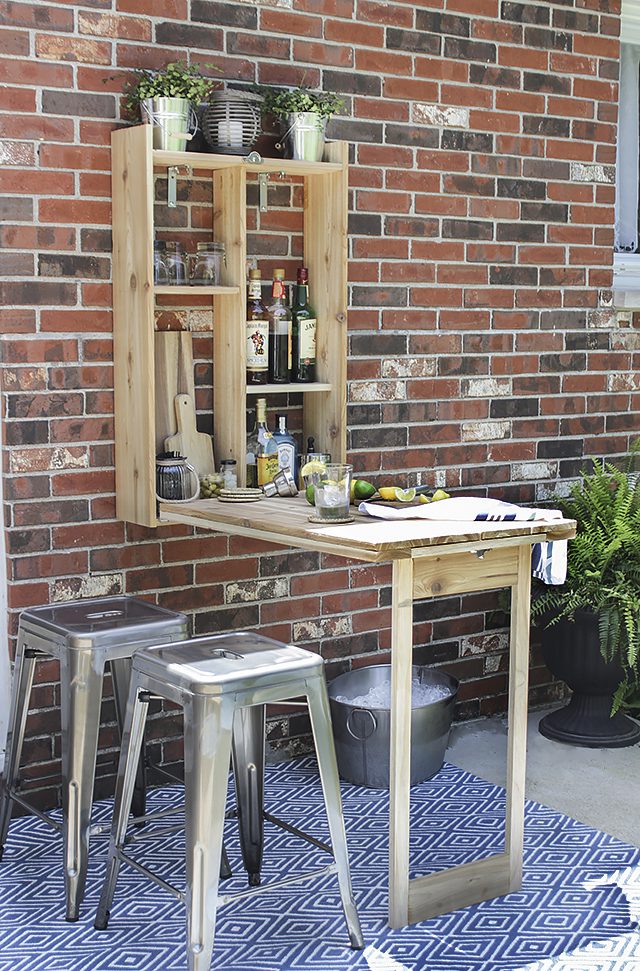
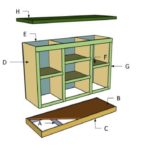
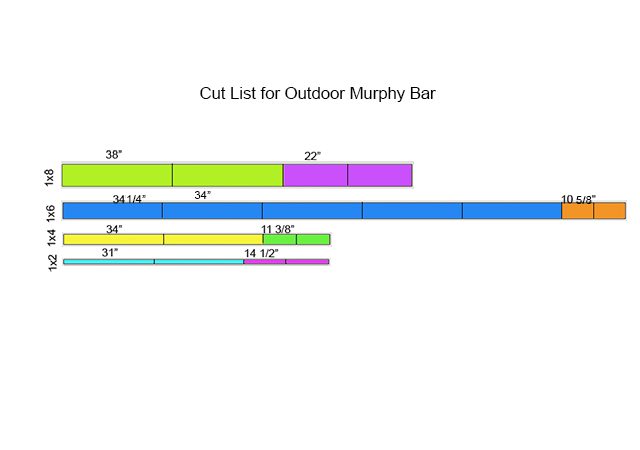
In the illustrations below, you will see the five different phases of what you will be building as well as the cut list for the various wood pieces. You will need to cut:

Use the four one-by-eight pieces to create the box frame. Using the pocket hole joinery system, drill three 3/4-inch pocket holes on either end of the short one-by-eight pieces (top and bottom), about 2 inches apart. Make sure to drill the pocket holes on the rough side of the board. Attach the bottom piece first, flush with the side pieces, using 1 1/4-inch pocket hole screws and wood glue. Then attach the top piece, 3 inches down from the top of the sides, using the same method as the bottom piece. Be sure to wipe up any excess wood glue with a damp rag. The opening between the top and bottom piece should be 34 1/4 inches.


Drill two evenly spaced 3/4-inch pocket holes on either end of the long divider one-by-six board. Measure the center mark at 11 inches on the top and bottom of the box frame and make a line all the way down using a speed square. Line the one-by-six board up so the top and bottom marks are at the center of the one-by-six, and then attach it to the box frame using 1 1/4-inch pocket hole screws and wood glue. For the shelves, place the short one-by-six pieces to your desired heights and attach them on either side of the divider with an electric nail gun and 1 1 /4-inch nails. In this project, the lower shelf was attached 1 foot from the bottom and the upper shelf 11 inches from the top.


The top of the fold-out bar will be built with four one-by-sixes. To attach them together, drill five 3/4-inch pocket holes evenly spaced on the rough side of three of the boards. Assemble them flush together so the rough side is facing up, with one of the boards in the middle not having any pocket holes drilled. If needed, step on the top of the boards as you screw them together using 1 1/4-inch pocket hole screws and wood glue, so as to keep the top flat. Work slowly and don’t over-screw into the wood, as you don’t want the screws to poke out of the other side. This is where you can choose to use the optional 1-inch pocket hole screws instead, so as to not risk the screws coming out of the other side.

Drill two 3/4-inch pocket hole screws on either end of the 14 1/2-inch one-by-twos. Assemble the one-by-twos and the 34-inch one-by-fours on top of the tabletop planks you just screwed together so that the one-by-fours are flush with the long edge and the one-by-twos are flush with the short edge. This is so you make sure the sizes are exactly the same. Use clamps and wood glue to attach the one-by-twos flush on either end of the one-by-fours, making sure the rough sides are facing up. Note: you are not actually attaching the support frame pieces to the tabletop in this step.

Flip the support frame over so the rough side with the pocket holes is facing down toward the rough side of the tabletop. Put wood glue between them and then attach the frame to the tabletop using a nail gun and 1 1/4-inch nails.


Drill two 3/4-inch pocket holes on either end of the shortest one-by-fours. Place the 31-inch one-by-twos inside the support frame along both long sides and the short one-by-fours on either side of the short sides, with the rough sides facing up. On one end, allow a small gap between the one-by-four of the leg frame and the one-by-two of the tabletop support frame so the 2-inch hinges will fit. Keep the hinges there while you attach the leg frame pieces together using 1 1/4-inch pocket hole screws, making sure to put wood glue between the joints first. Note: you are not actually attaching the leg frame pieces to the tabletop in this step.


Flip the leg frame over so the rough side is facing the rough side of the tabletop. Measure and mark with a pencil or pen where the position of the hinges will be to join the leg frame and support frame. In this project, the hinges were positioned 1 inch from the edge of the one-by-four of the leg. Pre-drill holes where you made the marks and attach the hinges with the provided screws.

Place the tabletop with legs attached on top of the box frame. Orient the tabletop so the planks are facing inward and the bottom of the legs are closest to the bottom of the box frame. Push the bar up, allowing a small gap to form at the bottom where the hinges will be placed. Slide the 4-inch hinges in between the one-by-four of the support frame and the edge of the box frame. Mark the location of the holes with a pencil or pen. Pre-drill the holes and then attach the hinges with the screws provided.

Once the hinges are attached, you might notice the bottom of the leg pops out a little bit and doesn’t fit flush (see photo in Step 9). To keep the leg flush, you will need to install a half-turn button on the one-by-two of the support frame that it touches. Measure the middle mark on the one-by-two, pre-drill a hole, and screw in the galvanized half-turn button. Don’t tighten it all the way, so the button can move over the bottom of the leg and keep it flush with the rest of the unit.
Using the pre-marked 11-inch center on the box frame, mark where the screw holes will be on the box frame for the sash lock. Align the other side of the sash lock on the one-by-two of the support frame and mark where the screw holes are. Pre-drill holes and attach with the screws provided.

On the the inside of the box frame, at the top, center on either side of the opening where the 4-inch L-brackets will be attached, and mark with a pencil or pen. Drill the four holes (two on each bracket) with a 1/4-inch drill bit. Attach the 4-inch L-brackets with the 1/4-20 bolts and corresponding size wing nuts, so the wing nuts attach on the inside. Repeat the process on the bottom of the box frame using the smaller 2-inch L-brackets, attaching the wing nuts on the underside. This keeps the inside surface usable. You can also countersink the bolt, so it doesn’t stick up at all. The top L-brackets hold the weight of the bar and the bottom ones just keep it sturdy.

Have a helper position the Murphy bar so the base of the unit is 32 inches off the ground. Mount the murphy bar in your desired location, using 3-inch exterior wood screws if you have wood or vinyl siding, or 1 1/2-inch stainless steel brick screws with lead anchors, pre-drilling the holes first.

This outdoor Murphy bar is the perfect size to prepare cocktails and drinks for an evening get-together…

…or you can stock it with seasonings, sauces and grilling utensils as the perfect prep and serving station for an outdoor grill.
The original plan can be found at https://www.hunker.com
![]() [email_link]
[email_link]