Moreno Bar

Materials:

  • 1 – 1×2 at 6’
  • 2 – 1×3 at 8’
  • 3 – 1×4 at 8’
  • 1 – 2’ x 2’ sheet of ¼” plywood, lauan, or hardboard
  • 1 – half sheet of ¾” plywood
  • 1 – full sheet of ¾” plywood
  • 1-1/4” pocket hole screws
  • 1-1/4” screws
  • 1-1/4” brad nails
  • 1” brad nails
  • Edge banding for the plywood
  • 1 set of 16” drawer slides
  • 3 – Cabinet pulls
  • 2 sets of hinges for the doors
  • 1 set of hinges for the flip-up top
  • 2 Friction Lid Supports

Cut List:

  • 4 – 1×4 (ripped to 2-3/4” wide) at 33-1/4” – Side Legs
  • 2 – ¾” plywood at 10-3/4” x 30-3/4” plywood – Side Panels
  • 2 – 1×4 at 29-3/4” – Front Legs
  • 1 – 1×4 at 45” – Front Stretcher
  • 1 – ¾” plywood at 34-3/4” x 43-1/2” – Back
  • 3 – ¾” plywood at 15-1/2” x 43-1/2” – Shelves
  • 1 – 1×3 at 27-1/4” – Front Divider
  • 1 – 1×4 (ripped to 2-3/4” wide) at 15-1/2” – Top Divider
  • 1 – ¾” plywood at 12-1/8” x 16-3/4” – Fixed Top
  • 1 – ¾” plywood at 16-5/8” x 33-3/4” – Flip-Up Top
  • 4 – 1×3 at 12-1/2” – Door Frame

Step 1:

If using edge banding, it will be applied to the exposed edges of the plywood before assembly. Cut the pieces for the side legs and the side panel. Cut the angle in the leg using a jigsaw. Set the Kreg jig for ¾” material and drill pocket holes in each long end of the panel, and in one long edge of one leg as shown. Keep in mind, there will be a right side assembly and a left side assembly! Attach the legs to the panels using glue and 1-1/4” pocket hole screws.

Step 2:

Cut the pieces for the front legs and the front stretcher. Cut the angle in the legs using a jigsaw, and drill pocket holes in the top edge keeping in mind there will be a right and a left. Cut the hole in the stretcher for the drawer using a jigsaw. Attach the legs to each end of the stretcher using glue and 1-1/4” pocket hole screws, then attach the side panels using glue and 1-1/4” pocket hole screws through the holes drilled in the side legs.

Step 3:

Cut the piece for the back. Draw a 4” radius at each corner and cut with a jigsaw. Drill pocket holes in each side edge. Secure the back piece to the sides using glue and 1-1/4” pocket hole screws. The back will stand 4” above the side to create a “backsplash”.

Step 4:

Cut the pieces for the shelves and drill pocket holes in three edges. Secure to the cabinet as shown using glue and 1-1/4” pocket hole screws. The bottom of the upper shelf will be flush with the bottom of the upper stretcher.

Step 5:

Cut the piece for the front divider and drill pocket holes in the top edge. Secure to the upper stretcher as shown. Add a couple of countersunk 1-1/4” screws through the divider into each of the shelves.

Cut the piece for the top divider and drill pocket holes in each end. Position as shown and secure using glue and 1-1/4” pocket hole screws.

Step 6:

Cut the piece for the fixed top. Position the piece so that it butts up against the backsplash and overhangs the front and side by ½”. Secure in place using glue and 1-1/4” brad nails.

Cut the piece for the flip-up top and install the hinges. There will be a 1/8” gap between the top and the back splash as well as between the top and the fixed top. The front and sides will overhang by ½”.

Step 7:

Cut the pieces for the doors and drill pocket holes as shown. Install the hinges, then install the doors. Attach the cabinet pulls in the location desired.

Step 8:

Cut the pieces for the drawer. Drill pocket holes in each end of the side pieces, and assemble the frame using glue and 1-1/4” pocket hole screws. Attach the bottom using glue and 1” brad nails. Install the drawer slides according to the manufacturer’s instructions. Make any necessary adjustments.

Cut the piece for the drawer front. Install the cabinet pull as desired.

Fill any Screw, Nail or Pocket Holes, Sand and Finish as Desired.

The original plan can be found at http://www.thedesignconfidential.com

 
[email_link]

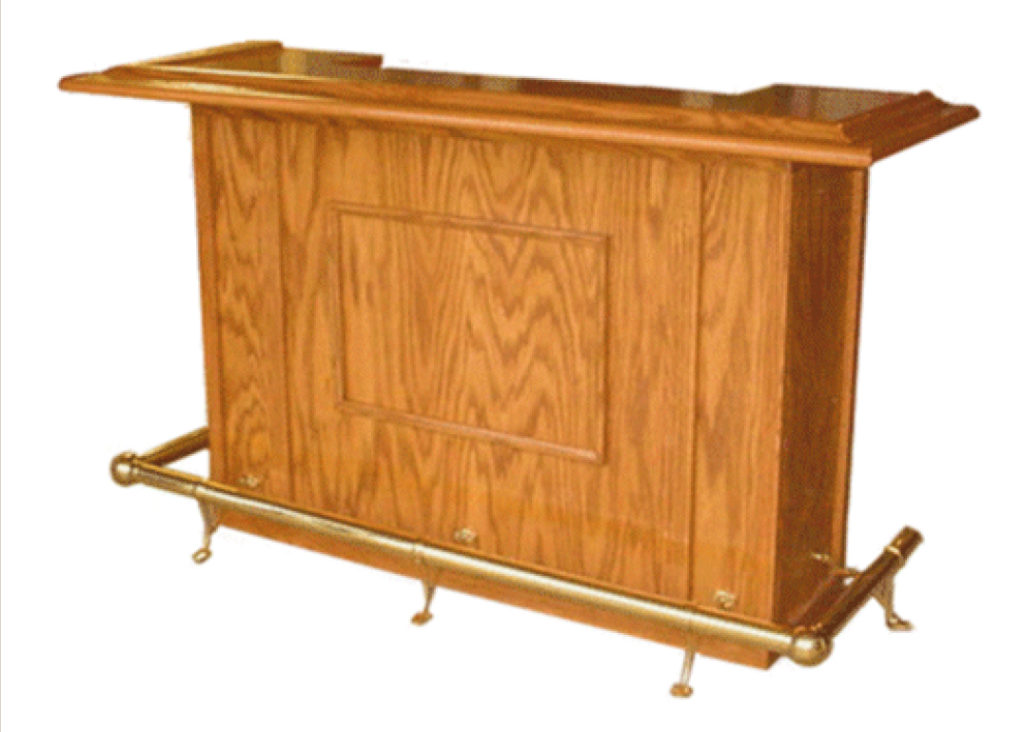
Wet Bar

Entertain your friends in style with this beautiful oak bar. The top is 6 ft. long and 24” deep. The overall height about 42”. The classic design features solid oak armrest molding, solid brass foot rail, a convenient work shelf in the rear, three drawers, and two sliding wine racks. The cabinet is made of ¾” oak veneered plywood. The trim and drawer fronts, from ¾” solid oak. The extensive use of pocket holes makes the assembly of this project easy and intuitive. If you have never used pocket holes in your woodworking projects, you’ll wonder how you ever got by without them. Pocket hole joints are extremely strong and there is no measuring. You simply drill the pocket holes in one of the work pieces to be joined, (the exact location is not critical), clamp the pieces together and insert the screws. Since the screws remain in the joint, they serve as both a dowel and a permanent clamp.

Materials:

  • (2) Sheets of Pine plywood
  • (1) Sheet 3/4″ Oak Veneer Plywood
  • (1) Sheet 1/2″ Oak Veneer Plywood
  • (1) Sheet 1/4″ Hardboard
  • (4) 5 1/2″ x 8′ x 3/4″ Oak boards
  • (1) 6 1/2″ x 8′ x 3/4″ Oak boards
  • (1) 4′ length of Oak Armrest moulding
  • (1) 6′ Length of Oak Armrest moulding
  • (1) 6′ length of 2″ dia. polished brass foot rail
  • (1) 4′ length of 2″ dia polished brass foot rail
  • (5) Polished brass floor brackets
  • (2) 2″ dia polished brass elbows
  • (2) 2″ dia. polished brass end caps
  • (5) 14″ drawer slide sets
  • (3) drawer handles
  • 1 1/4″ Pocket hole screws
  • 1″ Flathead wood screws
  • 1″ Finishing nails
  • 1 1/2″ Finishing nails
  • (7) Small Angle brackets

Building the Cabinet

Cut List:

3/4″ Plywood

  • (2) 6 1/2″ x 41 1/8″ – Left/Right Front Panels
  • (1) 41″ x 41 1/8″ – Center Front Panel
  • (2) 14″ x 41 1/8″ – Cabinet Sides
  • (2) 14″ x 23 1/2″ – Vertical Dividers
  • (2) 14″ x 52 1/2″ – Top Work Shelf/ Bottom
  • (1) 5″ x 52 1/2″ – Kick Panel
  • (1) 16″ x 14″ – Small Shelf
  • (15) 14″ x 2″ – Cleats
  • (2) 19″ x 2″ – Front Cleats

3/4″ Oak Boards

  • (2) 2″ x 55 1/2″ – Top/Bottom Trim (front)
  • (2) 2 1/2″ x 36″ – Fluted Trim (Front)
  • (4) 1 1/2″ x 36″ – Corner Trim
  • (2) 3/4″ x 36″ – Side Corner Trim (Front)
  • (4) 2″ x 16 1/4″ – Top/Bottom Trim (Side)
  • (2) 1″ x 26″ – Decorative Frame (Top/Bottom)
  • (2) 1″ x 18″ – Decorative Frame (Sides)
  • (1) 2″ x 51″ – Bottom Horizontal Trim (Back)
  • (1) 3 1/4″ x 51″ – Top Horizontal Trim (Back)
  • (2) 1 1/2″ x 21″ – Vertical Divider Trim (Back)
  • (2) 1 1/2″ x 40″ – Vertical Corner Trim (Back)
  • (2) 1 1/2″ x 14 1/2″ – Drawer Divider Trim (Back)

Drill pocket holes on the front sides of the center panel as shown above. These
pocket holes are used to attach the three front panels together. The pocket holes will
be covered with the trim later.

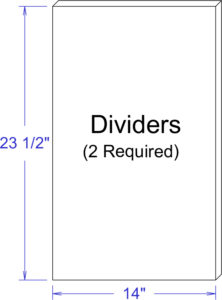
Cut two side panels 14″ wide and 41 1/2″ high from 3/4 inch oak veneered plywood. Cut two vertical divider panels 14″ wide and 23 1/2″ high from the same material.

Cut two pieces of 3/4″ oak veneered plywood 52 1/2″ wide by 14″ deep. One is for the cabinet bottom and the other for the main work shelf.

Cut the Kick Panel 52 1/2″ long by 5″ wide from 3/4″ oak plywood. Cut the notches and drill pocket holes as shown. The location of the pocket holes is not critical.

Cut the small shelf 16″ wide by 14″ deep from 3/4″ oak veneered plywood.

Cut fifteen cleats 14″ long by 2″ wide from 3/4″ oak veneered plywood. Seven of these cleats require pocket holes. All fifteen cleats require three 3/16″ diameter holes for mounting screws. The screw holes need to be countersunk. The pocket holes should be about 1 1/2″ from each end and one in the center. The screw holes 1/2″ from the pocket holes as pictured.

The reason only seven require pocket holes is that five of these cleats will be used only for drawer slide mounts for the three drawers and do not require pocket holes. This will be illustrated in the assembly instructions

Cut two cleats 19″ long by 2″ wide from 3/4″ oak veneered plywood. Drill pocket holes and mounting screw holes as for the 14″ cleats. These are for securing the workshelf and bottom to the cabinet front.

Cut two pieces of 3/4″ oak 36″ long by 2 1/2″ wide for the fluted front trim. These pieces will cover the joint and pocket holes that are used to join the three front panels together. The flutes are not necessary but if you have a router table, I think they are worth the extra trouble. Use your router with a 1/2″ core box bit to cut the flutes. The center flutes should be about 4″ from each end and the edge flutes should be about 4 3/4″ from each end. I recommend using some scrap wood to practice making the flutes. You will need to use your router table and fence for this if you have one.

Tip: make pencil marks on your router table fence on each side of the router bit, one 4″
from the center of the bit and the other 4 3/4″. Then, you can use these marks to determine the start and stop point of the work piece.

For the corner trim, you’ll need four pieces of 3/4″ oak 36″ long by 1 1/2″ wide. For the front corner trim, you’ll also need two pieces of 3/4″ oak 36″ long by 3/4″ wide. For the Top and Bottom Side trim, you’ll need four pieces of 3/4″ oak 16 1/4″ by 2″. One end of the top and bottom trim requires a 45 degree miter cut because it must mate with the front top and bottom trim.

Cut two pieces of molding 26″ long for the frame top. Cut two pieces of molding 18″ long
for the frame sides. All corners must have 45 degree miters. I made the molding from 3/4″ by 1″ wide oak and used a round over bit and ogee bit to give it the shape shown above. If you don’t want to go with the above shape, you could simply round over both sides, use a beading bit, or any other design you choose.

The top and bottom horizontal trim may need to be slightly longer if your plywood is less
than 3/4″ thick. The vertical divider trim needs to be exactly twice the thickness of the
plywood. So, if your plywood is less than 3/4″ thick, the width of these pieces will be a
little less than 1 1/2″. The pocket holes pictured on some of the pieces above are optional but you may want to use them to assemble the trim before attaching it to the cabinet.

Assembly:

  1. Attach the top horizontal trim piece 10″ from the top of the side trim pieces with pocket hole screws as shown.
  2. Attach the vertical divider trim to the top horizontal trim as shown.
  3. Attach the bottom horizontal trim to the vertical side trim and vertical divider trim as shown.
  4. Attach the drawer divider trim as shown.

Top and Armrest:

Cut List:

  • (1) 6′ Oak Arm rest Moulding
  • (2) 2′ Oak Arm rest Moulding
  • (1) 3/4″ x 63 1/2″ x 19″ Oak Plywood – Countertop
  • (1) 3/4″ x 1 1/2″ x 40 1/2″ Oak – Countertop trim
  • (2) 3/4″ x 1 1/2″ x 8″ Oak – Countertop trim
  • (2) 3/4″ x 1 1/2″ x 15 1/8″ – Countertop trim
  • (4) 5/8″ x 4 3/4″ x 2″ Pine Plywood – Countertop risers
  • (3) 5/8″ x 4 1/4″ x 2″ Pine Plywood – Countertop risers
  • (2) 5/8″ x 10 3/4″ x 2″ Pine Plywood – Countertop risers
  • (2) 5/8″  25″ x 2″ Pine Plywood – Countertop risers
  • (2) 1/2″ x 7 3/4″ x 22″ Oak Plywood – End Soffit
  • (1) 1/2″ x 54″ x 7 1/4″ Oak Plywood – Center Soffit

The illustration above shows how to cut the 45° angles with your miter saw. The 1 3/8″ by 3/4″ and the 3 5/8″ by 3/4″ spacer strips hold the molding in the same position it will be installed on the bar top. This is an easy way to make a compound miter cut.

Note: The length and width of the Bar Top depend on the exact inside dimensions of the
assembled armrest molding. I recommend you assemble the armrest molding first, then
measure the inside opening to determine the exact length and width of the Bar Top.

The cuts for the center opening must be perfectly straight and smooth so the trim can fit
flush. I recommend cutting the opening so 1/16″ to 1/8″ of material still needs to be
removed and using your router to true the edges to the exact dimensions. Attach three perfectly straight pieces of 3/4″ thick wood along the edges of the cutout to serve as router guides as shown below. Be sure to attach these strips to the bottom side so you don’t have screw holes showing on the top. Use a straight router bit with a bearing on the end and a 1″ cutting depth. Turn the workpiece over and carefully run the router along the edge guides with the bit bearing following the edge guides. After truing up the edges with your router, the inside corners will need to be carefully trimed with a file.

Countertop trim pieces are all cut from 1 1/2″ by 3/4″ solid oak.

All the risers are 5/8″ thick and 2″ wide. Since armrest dimensions may vary, the lengths given in the drawings above should be considered guidelines only. Wait until you’re ready to assemble the Bar Top before cutting the risers. Then you can tell exactly how long they need to be.

The soffit pieces are used as trim between the armrest molding and the cabinet panels. These pieces also serve to support the outer edges of the molding. The soffit is made from 1/2″ plywood. The dimensions given in the drawings above should be considered guidelines only. As with the risers, wait until you’re ready to assemble the Bar Top before cutting the soffit. Then you can tell exactly what the dimensions should be.

Drawers and Wine Racks:

Cut List:

  • (2) 1/2″ x 12 1/2″ x 3″ Oak Plywood – Top Drawer Box Front & Back
  • (2) 1/2″ x 12 1/2″ x 4″ Oak Plywood – Middle Drawer Box Front & Back
  • (2) 1/2″ x 12 1/2″ x 8″ Oak Plywood – Lower Drawer Box Front & Back
  • (2) 1/2″ x 14″ x 3″ Oak Plywood – Top Drawer Box sides
  • (2) 1/2″ x 14″ x 4″ Oak Plywood – Middle Drawer Box sides
  • (2) 1/2″ x 14″ x 8″ Oak Plywood – Lower Drawer Box sides
  • (3) 1/4″ x 13 1/2″ x 13″ Hardboard – Drawer Bottoms
  • (1) 3/4″ x 15 1/2″ x 5″ Oak – Top Drawer Front
  • (1) 3/4″ x 15 1/2″ x 6″ Oak – Middle Drawer Front
  • (1) 3/4″ x 15 1/2″ x 10″ Oak – Lower Drawer Front
  • (5) 14″ Drawer Slides
  • (2) 3/4″ x 18″ x 14″ Oak Plywood – Wine Rack Bottom
  • (2) 3/4″ x 18 3/4″ x 2 3/4″ Oak – Wine Rack front
  • (2) 3/4″ x 18″ x 1 1/4″ Oak – Wine Rack Back
  • (6) 3/4″ x 12 1/2″ x 3″ Oak – Wine Rack center Divider
  • (4) 3/4″ x 12 1/2″ x 1 1/2″ – Wine Rack Side

If your plywood is exactly 1/2″ thick, the above dimensions will produce a finished drawer width of 13 1/2″. This leaves 1/2″ on each side for the drawer slides. If your plywood is not exactly 1/2″ thick, you will need to adjust the length of fronts and backs accordingly so your finished drawer box width is 13 1/2″. The drawer box sides should still be 14″. You’ll need to cut a slot just slightly more than 1/4″ deep along the the bottom of each of the drawer box sides, fronts, and backs. This slot should be 3/8″ from the bottom and slightly wider than the thickness of the bottom material.

Drawer fronts are made from 3/4″ solid oak

Cut the Drawer Fronts from 3/4″ solid oak. You’ll probably need to glue up some narrower
pieces for the bottom drawer front. The cutout diagrams show a 6″ and 4″ section for making the lower Drawer Front. The fronts will be attached to the boxes and are wider and taller than the boxes so they will overlap the rear cabinet trim. After cutting the fronts to the correct dimensions, you’ll want to put a decorative edge along the edges with your router. I used an ogee bit on the prototype but it’s all a matter of taste. You’ll need three drawer bottoms. These are all the same size. You can use 1/4″ thick hardboard or 1/4″ thick plywood as you prefer.

Cut the wine rack bases 18″ wide by 14″ deep from 3/4″ oak veneered plywood. Drill three
pocket holes along the front edge of the top surface as shown. One in the center and one on each side about one inch from the edges. You’ll need one base for each wine rack you add to your bar. Cut the dividers from 3/4″ solid oak as shown above. You’ll need three dividers and two sides per wine rack.

Cut the wine rack fronts 18 3/4″ wide by 2 3/4″ high from 3/4″ solid oak. Cut the half circle cutouts as shown above.

If you will be adding drawers to your bar, attach the drawer slides to cleats as shown. Three must have the roller on the right and three must have the roller on the left. The lowest part of the drawer slide must be flush with the bottom of the cleat. The roller section must protrude past the end of the cleats by 3/4″ (the thickness of the trim).

Attach three cleats with drawer slides to the left side as shown above. Attach two cleats with drawer slides to left divider panel as shown above. Note: The bottom cleat and drawer slide for the left divider is attached to the bottom with pocket holes later. It will then provide a way to attach the left divider to the bottom.

If you will be including wine racks, in your bar, attach the drawer slides to the divider panels as shown. Note: the drawer slides for the wine racks do NOT protrude 3/4″ past the edge of the divider panels. This is because the wine rack fronts will be flush with the opening while the drawer fronts will be on the outside of the opening.

Attach the cleats to the top surface of the bottom plate as shown. Pocket holes sides should be placed 16″ from the ends with pocket hole sides facing each other as shown. (These cleats are used for mounting the vertical panels to the bottom surface.)  Attach two cleats to the ends of the bottom surface with pocket hole screws. These cleats are flush to the edges of the bottom.

Attach the vertical dividers to the cleats as shown. Attach the front cleat between the panels as shown with pocket hole screws.

Turn the assembly upside down and attach the kick panel as shown with pocket hole screws. Note: the pocket hole screws are on the back side of kick panel.

Now, attach the four cleats to the bottom side of the work shelf with pocket hole screws as shown. The end cleats have pocket holes facing out. The middle cleats have the pocket holes facing each other. The pocket hole side of the middle cleats are placed 16″ from the ends of the workshelf.

Assemble the three front pieces as shown and secure with pocket hole screws. These screws will be covered with trim later.

Attach the front to the cabinet assembly. Use finishing nails to attach the front to the sides (these nails will be covered with trim later.) From the back side, use 1 1/8″ screws through the two front cleats to attach the front to the bottom and the workshelf.


Install the Foot Rail Brackets as shown. Your hardware may be different, so be sure to take your own measurements. Position one bracket so the foot sets flat on the floor and measure the distance of the mounting holes from the floor. This should be about 5 1/2″. The rest of the brackets must all be the same height.

The rear edge of the side brackets should be two inches from the rear vertical trim. The front brackets should be centered side to side between the trim.

Place a piece of tubing in the front supports as shown and measure the distance “X”. (The rear of the cabinet trim to the edge of the tubing.) This should be about nineteen or twenty inches. This will be the length of the tubing for the sides.

Insert a piece of tubing in each side support as shown. Have someone help you hold them so they are parallel to the cabinet and the floor. Measure the distance “Y”. This is the length of the front tubing.

Assemble the rails as shown to the left. The end caps go into the rear of the side rail sections. I recommend completely assembling the rail with the screws provided in the kit and tighten all the screws enough so they make visible marks on the brass rail sections. Then, disassemble the rail and drill 3/16″ holes in the rail where the screw marks are so the screws will all fit flush with the bracket surfaces, elbow collar surfaces, and at the end caps. Since the end caps are inserted into the ends of the rail sections, their screw heads will be on the outside of the rail section.

These photos show a couple of ways to attach the molding corners.

You can join the corners with pocket holes as shown in Figure 1. You’ll need a small pocket hole jig for this. Note: Be sure to place the pocket holes so the screws don’t come through the top surface of the molding. Shorter screws may be necessary. Apply glue and secure with pocket hole screws. You can secure the joints with finishing nails by temporarily securing the corners using some scrap plywood with pocket hole screws as shown in Figure 2. Drill two pocket holes on each of two sides of the plywood. Glue some 100 grit sandpaper to the surface of the scrap plywood where it contacts the lip of the molding (This makes it grip tighter.) Apply glue to the molding joint then secure the molding with the scrap plywood to hold the joint firmly together. Turn the assembly over and secure with two finishing nails as shown (Be sure to pre-drill the nail holes so you don’t split the wood). Countersink the nails so you can fill with putty later. Then you can remove the scrap plywood. The soffit which will be added later will serve to re-enforce the corner joints.

The pocket holes along the back and cutout are for mounting the trim. The ones that are not marked may be placed in approximately the position shown.

Attach the top trim with glue and pocket hole screws as shown above. To ensure the top surfaces of both the Trim and Top are flush, clamp both pieces to a flat surface before inserting pocket hole screws.

This illustration shows how to clamp a piece of trim to plywood. One clamp holds the trim piece flush to a flat surface and the other clamp holds the plywood flat to the same surface. In this case, the plywood represents the bar top. To keep the pieces flush along the whole piece, you’ll want to move the clamps close to each pocket hole as you insert the screws. This will ensure the trim is flush with the top surface.

Apply some glue and arrange the risers on the underside of the top as shown. Attach with either 1 1/8″ flathead screws or 1″ finishing nails.

Note: Even though 1 1/8″ screws won’t penetrate the plywood, they may cause unsightly bumps on the top surface. To avoid this, pre-drill the screw holes in the plywood with a bit slightly larger than the inner diameter of the threaded section of the screws.

The above illustration shows now the armrest molding, countertop, risers and soffit fit together.

Attach the assembled top to the molding assembly with pocket hole screws as shown. Do not glue the top to the molding.

Attach the end soffit pieces to the molding with 1″ flat head screws. Attach the end soffit pieces to the risers with 1 1/8″ pan head screws.

Attach the center soffit pieces to the outside edge of the molding with 1″ pan head screws. Attach the center soffit pieces to the risers with 1 1/8″ pan head screws.

This should leave an opening that is 54″ between the end pieces of soffit and 14 3/4″ between the center soffit and the rear trim. This is the size of the outside dimensions of the cabinet top and this opening must fit over the cabinet top.

This drawing shows an upsidedown view of how the cabinet and top are attached. Use two corner brackets on each end and three in the middle. You don’t want to actually turn the bar upside down to attach the top, it may damage it. Spacing of the corner brackets is not critical. The cabinet trim is not shown for clarity.

Note: You should predrill the bracket screw holes in the top and use screws that go no more that 1/2″ into the wood. Otherwise, the bracket screws may cause unsightly bumps on the top surface of the Bar Top.

Apply a little glue to the mating surfaces and assemble the drawer boxes.

Assemble the front, back, and right side with 1″ long finishing nails as shown in Step 1. Insert the bottom as shown in Step 2. Attach the left side as shown in Step 3.

Support the drawer boxes with 1/2″ thick strips of wood and attach the drawer fronts with 1 1/8″ screws as shown in Step 4. This is necessary because the bottom of the front must be 1/2″ below the bottom of the box so it will overlap the rear cabinet trim when installed. Next, attach the drawer slides as shown in Step 5.

Apply a little glue to the mating surfaces and assemble the wine racks as shown.

Mount the front to the base with pocket hole screws. The base and front are flush on the bottom and the base is centered between the edges of the front.

Two edge dividers are mounted flush with sides of the base. The center one is centered and the other two are 4 1/2″ from the edge of the base to the center of the dividers.
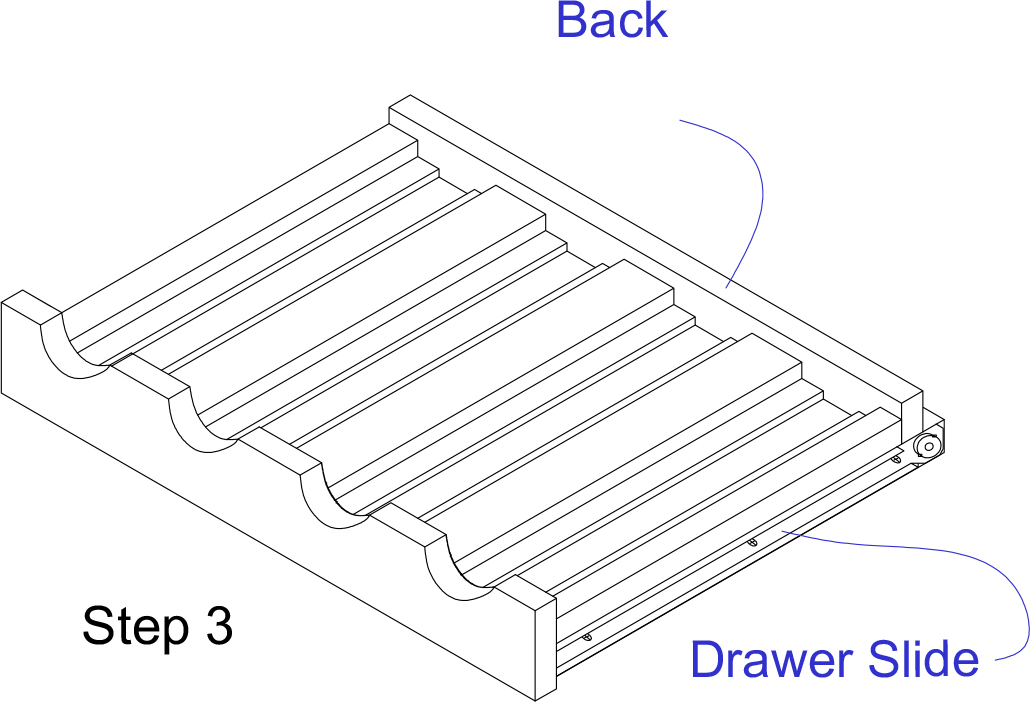
Attach the back to the base with finishing nails or screws as you prefer. Attach the drawer slides as shown with the screws that were provided with the drawer slides.

This completes the assembly of your home bar. Be sure to countersink and fill all finishing nails holes before applying the finish.

Cut Out Suggestions:

These layout diagrams show how to cut the parts from two pieces of 3/4″ oak plywood. Note: Since the Center Front Panel and Small Shelf are almost square, they have an indicator arrow and dimension line to ensure you have the grain oriented properly. The other parts are more obvious since they are not as close to being square. You can cut the small shelf a little larger than it’s listed size with a jig saw and true it up with a table saw since it will still have one straight edge.

Cutout diagrams for the soffit and drawer box parts from 1/2″ oak plywood. Cutout diagrams for risers are not given as they may be made from scrap wood.

The drawer bottoms are made from 1/4″ hardboard.

The original plan can be found at http://www.bobsplans.com

 
[email_link]

Bar Table

I know a lot of you are like me in that you build to get exactly what you want while save money, and I love the cost factor of these plans.  If you already have a scrap piece of 3/4″ plywood, the materials to build the rest of this table are about $10.  Seriously.  If you have to buy a 2’x4′ sheet of plywood, the whole table will cost about $25.  So, lets say you want to build the table and 4 bar stools for your family and have nothing to start with.  That’s a whole dining set for $65!  That’s half the cost of ONE bar stool if you bought the original from West Elm!

Materials:

Wood:

  • 1 – 1×3 @ 4 feet long
  • 3 – 2×2 @ 8 feet long
  • 1 – 2×4 @ 8 feet long
  • 1 – 1/4 sheet of 3/4″ plywood


Hardware and Supplies:

  • 1 1/4″ Pocket Hole Screws
  • 2 1/2″ Pocket Hole Screws
  • Wood Glue
  • Wood Filler
  • Medium Grit Sandpaper
  • Primer or Wood Conditioner
  • Paint or Stain

Cut List:

Boards:

  • 2 – 1×3 @ 21″ – Side Aprons
  • 1 – 2×2 @ 45″ – Center Base
  • 4 – 2×2 @ 21″ – Top/Bottom Sides
  • 4 – 2×2 @ 42″ – Table Legs
  • 2 – 2×4 @ 45″ – Center Aprons

Plywood:

  • 1 – 3/4″ Plywood @ 45″ x 21″ – Table Top

Make sure to re-measure and check for square after every step.  Sometimes when building your measurements can be off very slightly, and it’s important that your numbers are exact.  (Especially when working with doors and drawers!)  Measure your available space before building this plan to make sure that it will fit.  Please read through the entire plan before getting started.

Step 1:

Attach your top/bottom and table legs together using your Kreg Jig.  Remember to place your pocket holes for the bottom piece strategically facing the bottom of the frame and toward the interior of the table on your top piece so you have no holes to fill later.

Step 2:

Set aside your table legs for a moment to build the table top.  (Pictured above is a bottom view of your table top.)  Make sure to pre-drill all of your pocket holes as shown above in your table top before attaching anything.  This will help you in later steps.  When attaching your 2×4 center aprons to your plywood top, make sure each of the edges are flush.

Step 3:

Attach the legs you built in step 1 to the table top you built in step 2 using the pocket holes that you predrilled and some wood glue!

Step 4:

Attach 1×3 side aprons into the 2×4 from your table top using your Kreg Jig.  Remember to drill those pocket holes from the inside to hide them!  The bottom of your 1×3 will not be exactly even with the bottom of your 2×4.  Don’t worry, it’s part of the design!

Step 5:

Attach your 2×2 center base in between your two table legs using pocket holes drilled from the underside. It should sit centered on each side, leaving a 9 3/4″ gap on the bottom side 2x2s (not including the legs).

Finishing:

Finish your project as desired.  Make sure to sand it down with medium grit sand paper and fill in all your holes with wood filler before tackling that paint or stain.


The original plan can be found at http://www.oldpaintdesign.com

 
[email_link]
 

Howell Bar Cabinet

Like to entertain? This is a great bar cabinet for those get-togethers with friends! The DIY plans to build a Howell bar cabinet feature wine storage behind two doors with false drawer fronts, and a long pull-out cabinet in the center. There is plenty of storage for entertaining accessories and spirits in this cabinet!


MATERIALS:

  • 1-1/4″ pocket hole screws
  • 5/8″ brad nails
  • 1-1/4″ brad nails
  • Edge banding, optional
  • 3 sets of 18″ ball-bearing drawer slides
  • 2 sets of hinges
  • 15 cabinet pulls
  • Wood glue
  • Sandpaper (100, 150, 220 grits)
  • Finishing supplies (primer & paint, or stain, sealer)

LUMBER:

  •  1 – 1×2 at 8′
  • 1 – 1×3 at 4′
  • 1 – 1×3 at 6′
  • 1 – 4′x4′ sheet of 1/4″ plywood
  • 1 – 4′x4′ sheet of 1/2″ plywood
  • 3 sheets of 4′x8′ 3/4″ plywood
  • 8 – 3/4″ square dowels at 4′ or 16 – 3/4″ square dowels at 3′

CUT LIST:

  • 2 – 3/4″ plywood at 20-1/4″ x 42-1/4″ – Sides
  • 1 – 3/4″ plywood at 20-1/4″ x 40-1/2″ – Bottom
  • 2 – 3/4″ plywood at 3-1/4″ x 40-1/2″ – Kick Plates
  • 1 – 3/4″ plywood at 38-1/4″ x 40-1/2″ – Back
  • 2 – 3/4″ plywood at 19-1/2″ x 38-1/4″ – Dividers
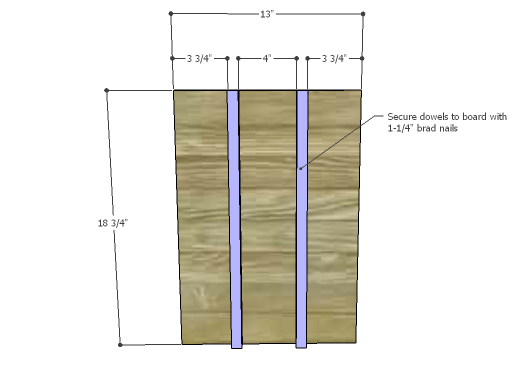
  • 16 – 3/4″ square dowels at 18-3/4″ – Wine Bottle Stops
  • 6 – 3/4″ plywood at 13″ x 18-3/4″ – Shelves
  • 1 – 3/4″ plywood at 19-1/4″ x 40″ – Top Panel
  • 2 – 1×2 at 19-1/4″ – Top Side Trim
  • 1 – 1×2 at 43″ – Top Front Trim
  • 2 – 3/4″ plywood at 12″ x 37-1/2″ – Drawer Front & Back
  • 3 – 3/4″ plywood at 12″ x 16-1/2″ – Drawer Shelf Bottom
  • 6 – 1×3 at 16-1/2″ – Drawer Sides
  • 3 – 1/2″ plywood at 12-3/4″ x 37-15/16″ – Door & Drawer Base
  • 15 – 1/4″ plywood at 7-3/8″ x 12-3/4″ – False Drawer Fronts

Step 1:

Cut the pieces for the sides and the bottom. With the pocket hole jig set for 3/4″ material, drill pocket holes in each end of the bottom. Position the bottom 3-1/4″ up from the bottom edge of the sides securing in place using glue and 1-1/4″ pocket hole screws.

Step 2:

Cut the pieces for the kick plates and drill pocket holes in each end. Secure to the sides under the bottom using glue and 1-1/4″ pocket hole screws. The front kick plate will be positioned 3/4″ back from the front edge of the sides while the back kick plate will be flush with the sides. Add a few 1-1/4″ brad nails through the bottom into the kick plates.

Step 3:

Cut the piece for the back and drill pocket holes in the side and bottom edges. Secure to the sides and bottom using glue and 1-1/4″ pocket hole screws.

Step 4:

Cut the pieces for the dividers. Drill pocket holes in the back and bottom edges, treating the pieces as if they are a left and a right (this way the pocket holes will be hidden in the center drawer area).

Step 5:

Cut the pieces for the wine bottle stops and the shelves. Attach two stops the bottom of each outer cubby as shown, locating them 3/4″ back from the front edge of the bottom. Secure the stops in place using glue and 1-1/4″ brad nails.

Drill pocket holes in the side and back edges of the shelves. Attach the remaining stops to the top of the shelves as shown using glue and 1-1/4″ brad nails. Position the shelves in the outer side cubbies as shown securing in place with glue and 1-1/4″ brad nails.

Step 6:

Cut the piece for the top and the top trim. Drill pocket holes in the side and front edges of the panel as well as one end of the side trim. Attach the side trim to the panel first, using glue and 1-1/4″ pocket hole screws. Attach the front trim piece using glue and 1-1/4″ pocket hole screws. Use a router and a decorative bit to cut a fancy edge on the top!

Position the top so that the back edge is flush and the sides and front overhang by 1/2″. Secure the top to the cabinet using glue and 1-1/4″ brad nails.

Step 7:

Cut the pieces for the center drawer. This drawer is similar to a traditional drawer but has three shelf compartments. Drill pocket holes in the narrower edges of each bottom piece. Secure the bottom pieces to the front and back pieces as shown using glue and 1-1/4″ pocket hole screws.

Drill pocket holes in each end of the side pieces. Position the side pieces over each bottom piece, securing in place with glue and 1-1/4″ pocket hole screws.

Mark the position for the drawer slides on the dividers – the drawer will sit 1/8″ above the bottom. Install the cabinet side pieces of the drawer slides on the dividers locating the slides 3/4″ back from the front edge, then install the drawer side pieces of the slides on the sides of the drawer. Test fit the drawer and make any necessary to the slides.

Step 8:

Cut the pieces for the door/drawer front bases, then cut the pieces for the false drawer fronts. Draw placement lines on the base for the false fronts. The top false front will be located approximately 1/16″ down from the top of the base. The remaining false fronts will be spaced 1/4″ apart. Secure the false fronts using glue and 5/8″ brad nails. drill holes in each false front, all the way through the base, for the cabinet pulls.

Step 9:

Shim the drawer front assembly in the center cubby over the drawer. There will be a 1/8″ gap around all sides. Drive screws through the holes drilled for the cabinet pulls into the drawer. Open the drawer, and secure the drawer front from the inside with countersunk 1-1/4″ screws. Finish drilling the holes through the drawer for the cabinet pulls, then install the pulls.

Step 10:

Install the hinges on the doors, then install the doors in the cabinet. There will be a 1/8″ gap around all sides of the doors in the openings. Install the pulls.

Finish as desired.

The original plan can be found at http://designsbystudioc.com

 
[email_link]

Bar Cabinet

Materials:

  • 1 – 6′ piece of 1/4″ x 1 1/2″ craft board in your desired finish
  • 1 – 8′ piece of 1/2″ x 2 1/2″ craft board in your desired finish
  • 1 – 1×2 piece @ 8′ long
  • 12 – 1×3 pieces @ 8′ long
  • 1 – 1×4 piece @ 6′ long
  • 2 – 1×6 pieces @ 6′ long
  • 2 – 2×2 pieces @ 8′ long
  • 1 – 1/2 sheet of 3/4″ plywood
  • 1 – scrap of 1/4″ plywood at least 15 1/2″ x 17 1/4″
  • 1 – set of euro inset hinges
  • 1 – set of 14″ bottom mount drawer slides
  • 1 – piece of 1/4″ thick glass cut to 15 1/4″ x 15 1/4″
  • 1 1/4″ screws
  • 2″ screws
  • 1 1/4″ pocket hole screws
  • 2 1/2″ pocket hole screws
  • 5/8″ Finishing nails
  • 1 1/4″ Finishing nails
  • 2″ finishing nails


Cut List:

  • 2 – 1 1/2″ Project Board pieces @ 18 1/4″ – Back side of door
  • 2 – 1 1/2″ Project Board pieces @ 15 1/4″ – Back top and bottom of door
  • 4 – 2 1/2″ Project Board Pieces @ 18 1/4″ (Measured at the long side of your mitered cut.  Sides should be mitered at a 45 degree angle.)- Door Sides
  • 1 – 1×2 @ 18 1/2″ – Drawer Divider
  • 1 – 1×2 @ 15″ – Drawer Slide Mount
  • 26 – 1×3 @ 25″ – Plank Casing
  • 6 – 1×3 @ 35″ – Plank Top
  • 2 – 1×4 @ 17 1/4″ – Drawer Front/Back
  • 2 – 1×4 @ 14″ – Drawer Sides
  • 1 – 1×6 @ 18 1/4″ – Drawer Front
  • 6 – 1×6 @ 16 1/2″ (ripped to 4 1/2″ wide. From now on will be mentioned as 1x5s) – Wine Dividers
  • 4 – 2×2 @ 35″ – Front and Back Top/Bottom
  • 4 – 2×2 @ 15″ – Side Top/Bottom
  • 2 – 2×2 @ 25″ – Center Divider
  • 4 – 2×2 @ 31″ – Legs
  • 1 – 1/4″ Plywood @ 17 1/4″ x 15 1/2″ – Drawer Bottom
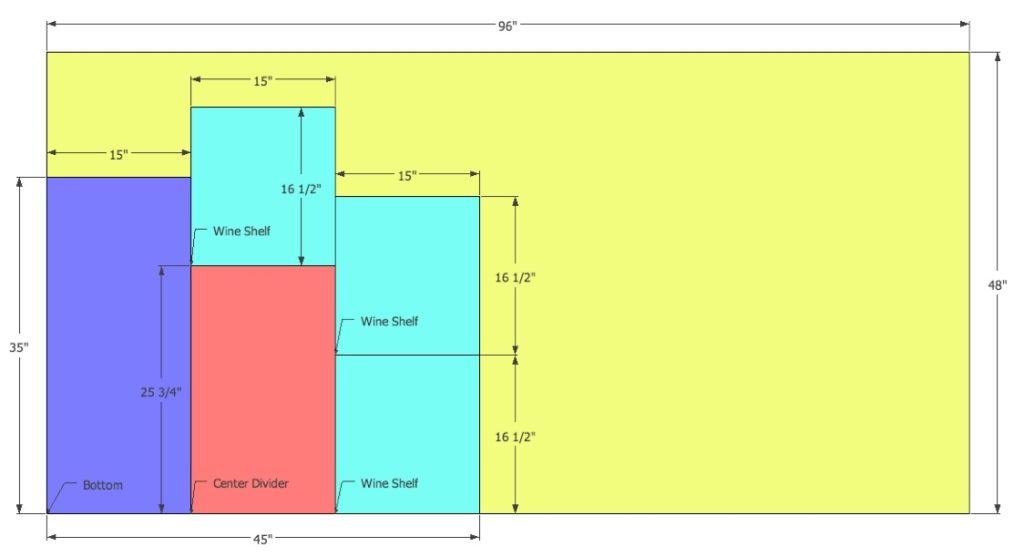
  • 1 – 3/4″ Plywood @ 35″ x 15″ – Bottom
  • 1 – 3/4″ Plywood @ 25 3/4″ x 15″ – Center Divider
  • 3 – 3/4″ Plywood @ 16 1/2″ x 15″ – Wine Shelves

Step 1:

Cut Plywood as shown above

Step 2:

To create your side, first attach your 1×3 plank boards together to create a flat panel.  (Make sure to use wood glue!)  In making this panel, it helps to ensure that all of the “bend” is eliminated from your board to have a straight side.  Once that has been completed, Kreg Jig your panel to the top and bottom 1x2s flush to the back, leaving a 3/4″ gap on the front.  (One trick to doing this is to put a scrap 1x board or 3/4″ thick piece of plywood underneath your 1×3 planks when Kreg Jigging it into the 2×2.  That should remove the guesswork and give you the perfect 3/4″ overhang when you’re finished screwing the panel together.)  (PS – is Kreg Jigging a word?  If not, it totally should be.)

Step 3:

Attach your legs either by using your Kreg Jig or countersinking 3″ screws through the sides into the top/bottom 2x2s that are attached to your panel.  The top of the 2×2 should be flush with the top of your panel.  Repeat steps 2-3 to create your other side.

Step 4:

Just like you created your sides in step 2, Kreg Jig your 1×3 planks together for the back and then attach them to your 2×2 top and bottom back.  Once your panel has been assembled, attach it to the back legs of each of your sides.

Step 5:

Attach your 2×2 front top/bottom boards using your Kreg Jig or by countersinking them into the side 2x2s using 3″ screws and wood glue.  The top 2×2 should be flush with the top of the cabinet and the bottom piece should leave a 3″ gap between the 2×2 and the ground.  It should be even with the surrounding bottom 2x2s.

Step 6:

Attach your plywood bottom into the casing using your Kreg Jig and wood glue.  The top of the plywood should be flush with the top of the front 2×2.  Also, make sure that your bottom is level before putting in the final screws!

Step 7:

Slide your 2×2 center divider into place using the dimensions shown above.  Secure using your Kreg Jig and wood glue.

Step 8:

Slide your plywood center divider into place in between the back and your 2×2 center divider.  When positioning, make sure that the right side (what will be your wine holder side) of the plywood is flush with the outside of the 2×2.  You will have a 3/4″ gap on the left side of the plywood between that and the outside edge of your 2×2.  The measurements shown above represent the plywood’s location in relation to the sides of the casing.

Step 9:

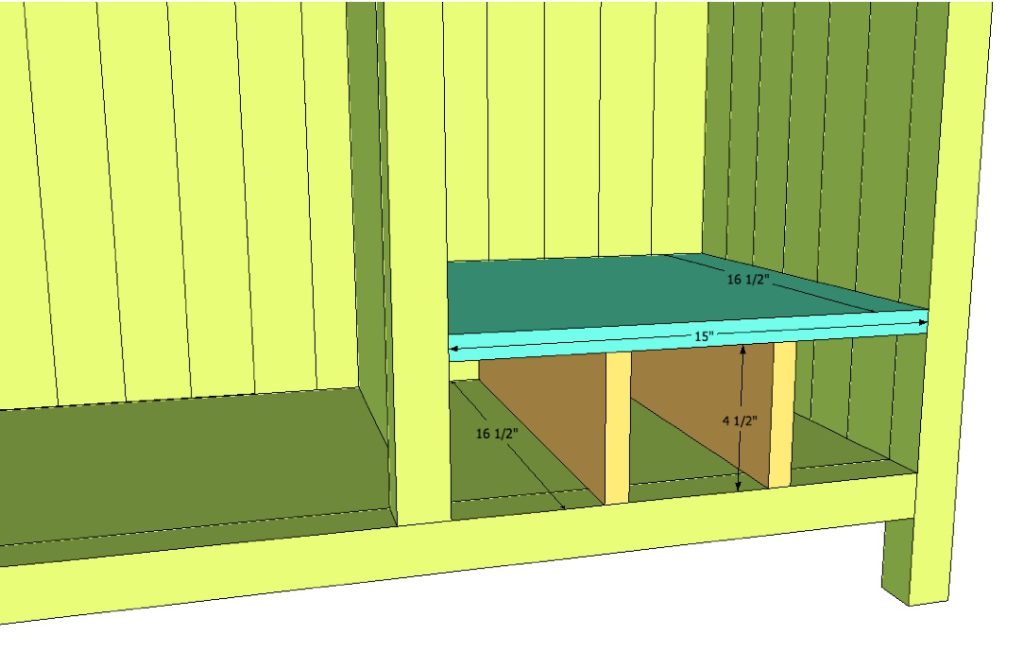
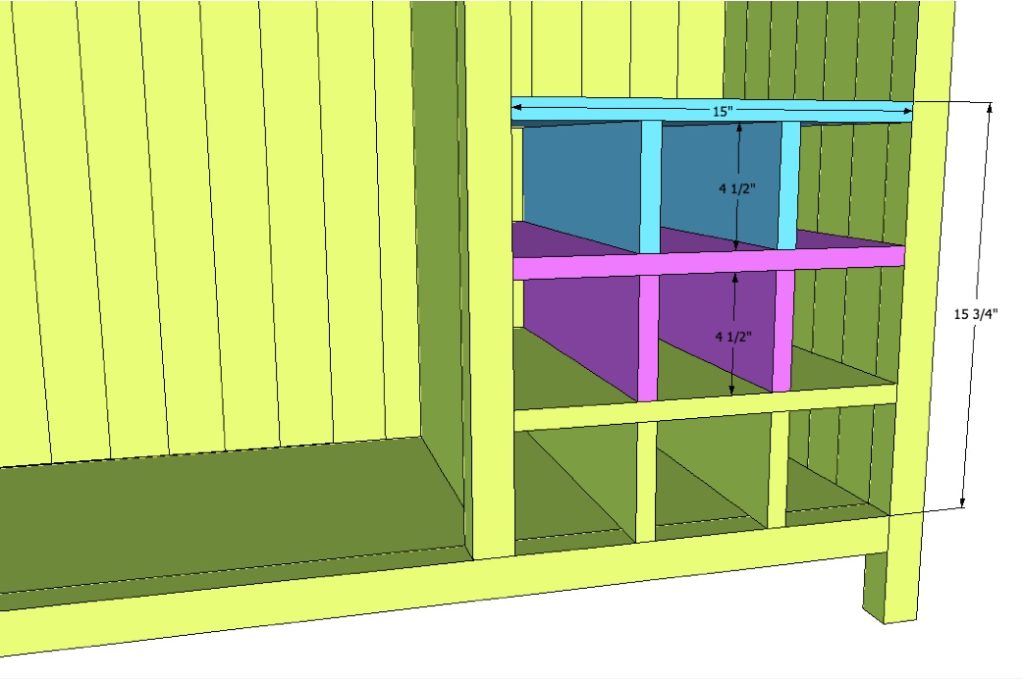
There are a few options for installing the wine holder side of the bar cabinet (Each of the three gaps for the wine bottles should be 4 1/2″ wide):

  1. If you have a right angle drill that can fit into small spaces, you can use your Kreg Jig and attach your 1×5 wine dividers first to the bottom of the cabinet.  Once they’re in place, attach the plywood top of the wine divider to top of the 1x5s and secure in place with your right angle drill from the inside using your Kreg Jig.
  2. If you don’t have a right angle drill, you can attach the 1x5s to the base as described in option 1, but then attach the plywood top by countersinking it from the top into the dividers  using 1 1/4″ screws.
  3. Another option is to attach the 1x5s to the plywood first, and then slide the entire piece into the console and secure using your Kreg Jig and wood glue.

Step 10:

Repeat step 9 twice more to get the full wine rack.

Step 11:

For the top, first attach all of your 1x3s planks together like you did for the sides.  To make this step easier, place the top plank section on the ground (top facing downward) and lay the console on top of it fitting the planks into the top opening.  This way, when you screw it together using your Kreg Jig, you know that your top is even and level.

Step 12:

Attach your drawer divider as shown above using your Kreg Jig.  Make sure that you leave  5 3/4″ above your 1×2 to allow for your drawer.

Step 13:

Since the plywood center divider isn’t flush with the left outside edge of the bar, we need to install a “drawer slide support” to build this out as a platform for your drawer slide.  Your 1×2 should fit directly above your drawer divider.  Attach with 1 1/4″ screws and wood glue.

Step 14:

Assemble the four sides of your drawer first as shown above with your Kreg Jig.  Once you have your boards assembled, add the plywood bottom using finishing nails and wood glue.  (Since you are using bottom mount drawer slides, that will further secure the bottom of the drawer.)  Add your drawer slides as per the manufacturer’s instructions, leaving a 3/4″ gap between the front of the drawer and the end of your console to allow for the drawer front to fit into place.

Step 15:

Once your drawer slides are installed and the inside of your drawer is inserted into the drawer slot, place your drawer front over the opening leaving a 1/8″ gap on all sides.  When you are satisfied with its placement, use finishing nails to secure the front to the inside of the drawer.  (This step is even easier if you turn the console onto its back.)

Step 16:

Glue your door sides together as shown above, making sure that your corners have been mitered at a 45 degree angle.

Step 17:

On top of your door sides, secure the back sides of the door to the front using 5/8″ finishing nails and wood glue.  At this step, you may want to paint/stain your door before you add the glass.

Step 18:

Glue your glass or plexiglass into the inset using liquid nails or another strong adhesive.  You can also secure from the back using mirror clips for additional hold.

Step 19:

Install the door according to the manufacturer’s instructions on your hinges.  This is an inset door and there should be 1/8″ available on each side once installed to allow for easy opening (and closing!).

The original plan can be found at http://www.oldpaintdesign.com

[email_link]

Bar Cabinet


Materials:

  • 1 – 1×2 at 4’
  • 2 – 1×3 at 8’
  • 10 – 1×4 at 8’
  • 1 sheet of ½” plywood
  • 1 half sheet of ¾” plywood
  • 1 sheet of ¾” plywood
  • 1″ Pocket Hole Screws
  • 1-1/4″ Pocket Hole Screws
  • 1-1/4″ Wood Screws
  • 1-1/4″ Brad Nails
  • Edge banding
  • 1 set of 22” drawer slides (side mount with 1/2″ clearance)
  • 1 set of Hinges
  • 2 Drawer/Cabinet Pull

Cut List:

  • 4 – 1×4 at 41-1/4” – Side Legs
  • 6 – 1×4 at 16” – Side Frames
  • 4 – 1/2” plywood at 13-3/8” x 16” – Side Panels
  • 3 – 1×4 at 35-1/2” – Front Frame
  • 2 – 1×4 at 41-1/4” – Front Legs
  • 2 – 1/2” plywood at 13-3/8” x 35-1/2” – Front Panels
  • 2 – 1×4 at 37” – Back Stretchers
  • 2 – 1×4 at 37-3/4” – Back Legs
  • 1 – ¾” plywood at 22-1/4” x 42-1/2” – Bottom Shelf
  • 1 – 1×3 at 26-3/4” – Cabinet Divider
  • 1 – ¾” plywood at 22-1/4” x 29-3/8” – Divider
  • 1 – ¾” plywood at 20-1/2” x 22-1/4” – Shelf
  • 1 – ¾” plywood at 21-1/4” x 22-1/4” – Shelf
  • 1 – 1×2 at 17-3/4” – Drawer Stretcher
  • 1 – 1×2 at 22-1/4” – Drawer Slide Spacer
  • 1 – ¾” plywood at 22-1/4” x 42-1/2” – Countertop
  • 2 – 1×4 at 22-1/4” – Inner Top Spacers
  • 1 – 1×4 at 37” – Inner Top Spacer
  • 2 – 1×4 at 6-3/4” – Top Frame Back
  • 3 – 1×4 at 3-1/4” – Top Frame Spacers
  • 2 – 1×4 at 26-1/4” – Top Frame Sides
  • 1 – 1×4 at 50-1/2” – Top Frame Front
  • 1 – ¾” plywood at 27-3/4” x 50-1/2” – Top
  • 1 – ¾” plywood at 15-1/4” x 20-1/2” Drawer Bottom
  • 2 – 1×4 at 20-1/2” – Drawer Box Sides
  • 2 – 1×4 at 16-3/4” – Drawer Box Front & Back
  • 1 – ¾” plywood at 5-1/2” x 17-1/2” – Drawer Front
  • 2 – 1×3 at 11-1/2” – Door Rails
  • 2 – 1×3 at 26-1/2” – Door Stiles
  • 1 – ½” plywood at 11-1/2” x 21-1/2” – Door Panel

Step 1:


Edge banding will be applied to the exposed edges of the plywood prior to assembly.

Cut the pieces for the legs, side frames, and side panels. Set the Kreg jig for ¾” material and drill pocket holes in each end of the frame pieces. Secure to the legs using glue and 1-1/4” pocket hole screws.

Set the Kreg jig for ½” material and drill pocket holes in all four edges of the panels. Secure to the legs and the frame pieces using glue and 1” pocket hole screws.

Step 2:


Cut the pieces for the legs, front frame, and panels. Set the Kreg jig for ¾” material and drill pocket holes in each end of the frame pieces, as well as one long edge of each leg. Secure to the legs using glue and 1-1/4” pocket hole screws.

Set the Kreg jig for ½” material and drill pocket holes in all four edges of the panels. Secure to the legs and the frame pieces using glue and 1” pocket hole screws.

Secure the entire front assembly to the sides using glue and 1-1/4” pocket hole screws.

Step 3:

Cut the pieces for the back legs and frame pieces. Set the Kreg jig for ¾” material and drill pocket holes in each end of the frame pieces. Secure to the legs using glue and 1-1/4” pocket hole screws.

Secure the back frame to the side legs using glue and 1-1/4” brad nails.

Step 4:


Cut the piece for the bottom shelf and drill pocket holes in all four edges. Secure to the lower frame pieces using glue and 1-1/4” pocket hole screws from the under side.

Cut the piece for the cabinet divider and drill pocket holes in each end. Secure to the back frame pieces using glue and 1-1/4” pocket hole screws.

Cut the piece for the divider and drill pocket holes in all four edges. Secure to the bottom, front frame, and cabinet divider using glue and 1-1/4” pocket hole screws. The back face of the divider (without pocket holes) will be flush with the back edge of the cabinet divider.

Step 5:

Cut the pieces for the shelves and drill pocket holes in the side and back edges. Position in each side of the cabinet and secure using glue and 1-1/4” pocket hole screws.

Step 6:


Cut the piece for the drawer divider and drill pocket holes in each end. Secure to the back leg and cabinet divider as shown using glue and 1-1/4” pocket hole screws.

Cut the piece for the drawer slide spacer and drill pocket holes in each end. Secure to the back leg and the front leg as shown using glue and 1-1/4” pocket hole screws. The bottom of the spacer will line up with the top of the drawer divider.

Step 7:

Cut the piece for the countertop and drill pocket holes in all four edges. Secure to the cabinet using glue and 1-1/4” brad nails through the legs and panels into the countertop. The top face of the countertop will be flush with the top face of the back frame. Add a few 1-1/4” pocket hole screws through the divider into the underside of the countertop.

Cut the pieces for the inner top frame and drill pocket holes at one end as well as one long edge. Secure to the front panel and countertop as shown using glue and 1-1/4” pocket hole screws.

Cut the piece for the inner frame sides and drill pocket holes in each end as well as one long edge. Secure to the sides and countertop using glue and 1-1/4” pocket hole screws.

Step 8:

Cut the pieces for the top frame back. Secure to the side frame and inner top frame using glue and 1-1/4” brad nails.

Cut the piece for the top frame spacers and drill pocket holes in one end. Secure to the front frame using glue and 1-1/4” pocket hole screws.

Cut the pieces for the top frame sides and drill pocket holes in one end. Secure to the back frame pieces using glue and 1-1/4” pocket hole screws.

Cut the piece for the top frame front. Position as shown then secure to the sides and spacers using glue and 1-1/4” brad nails.

Step 9:

Cut the piece for the top. Secure to the top frame using glue and 1-1/4” brad nails.

Step 10:

Cut the pieces for the drawer box. Drill pocket holes in all four edges of the bottom as well as each end of the sides. Assemble the drawer box as shown using glue and 1-1/4” pocket hole screws. Install the drawer slides according to the manufacturer’s installation instructions, locating them ¾” back from the front edge of the sides. Cut the pieces for the drawer front. Mark the position for the drawer pulls and drill the holes. Shim the drawer front in the opening – there will be a 1/8” gap around all sides – then drive screws through the holes for the drawer pulls into the drawer box. Open the drawer, and secure the drawer front using countersunk 1-1/4” screws from the inside. Remove the screws from the holes for the drawer pull then finish drilling the holes. Install the drawer pull.

Step 11:

Cut the pieces for the door. Drill pocket holes in each end of the rails then assemble the frame using glue and 1-1/4” pocket hole screws.

Cut the piece for the center panel. Set the Kreg jig for ½” material and drill pocket holes in all four edges. Secure the panel in the frame using glue and 1” pocket hole screws. The back face of the panel will be flush with the back face of the frame.

Install the hinges on the door, then install the door in the cabinet. Install the cabinet pull.

Step 12:

Fill any Screw, Nail or Pocket Holes, Sand and Finish as Desired

The original plan can be found out http://www.thedesignconfidential.com

[email_link]

Bar Cabinet

Materials:

  • A – Base – 7 pieces of 1×3 Lumber – 2 pieces @ 56” long, 5 pieces @ 17 ¼” long
  • B – Base – 1 piece of ¾” plywood – 56” x 18 ¾”
  • C – Trims – 4 pieces of 1×4 Lumber – 2 pieces @ 57 ½” long, 2 pieces @ 10 ¼” long
  • D – Sides – 4 pieces of ¾” plywood – 16” x 34 ½” long
  • E – Face – 1 piece of ¾” plywood – 54” x 34 ½” long
  • F – Shelves – 4 pieces of ¾” plywood – 2 pieces @ 16” x 16”, 2 pieces @ 16” x 19”
  • G – Trim – 1 piece of 1×3 Lumber – 54” long
  • G – Trim – 11 pieces of 1×2 Lumber – 4 pieces @ 32” long, 4 pieces @ 14 ½” long, 3 pieces @ 19” long
  • H – Countertop – 2 pieces of ¾” plywood 56” x 18 ¾”
  • H – Countertop – 4 pieces of 1×2 Lumber – 2 pieces @ 57 ½” long, 2 pieces @ 20 ¼” long

Building the base

The first step of the woodworking project is to build the base of the diy bar. As you can easily notice in the plans, we recommend you to build the frame out of 1×3 lumber and the top out of 3/4″ plywood. Drill pilot holes along the edges of the plywood sheet and insert the 1 1/4″ screws into the frame. Add waterproof glue to the joints in order to enhance the rigidity of the structure. Check if the corners are square.

Attaching the frame

Continue the project by attaching the frame of the wooden bar. Drill pocket holes at both ends of the plywood components and secure them to the base with 1 1/4″ screws. Drill pocket holes at both ends of the top supports and secure them to the components with 1 1/4 screws. Makes sure the corners are right-angled and place a spirit level to check if they are horizontal.

Fitting the front face

Continue the project by attaching the plywood piece to the front of the bar. Drill pilot holes along the edges of the side components and insert the 1 1/4″ screws into the face of the bar. Add glue to enhance the rigidity of the structure.

Fitting the shelves

In order to add storage space to the bar, we recommend you to fit the 3/4″ plywood shelves to the dimensions described in the article and to drill pocket holes along the edges.

Top Tip: Align the components at both ends and secure them to the frame with 1 1/4″ screws. Add waterproof glue to the joints in order to enhance the rigidity of the structure. Make sure the shelves are horizontal.

Fitting the bottom trims

Add trims to the base of the bar, in order to enhance the look of the woodworking project. Cut both ends of the trims at 45 degrees and lock them together with finishing nails and waterproof glue.

Fitting the bar trims

Cut the top trim out of 1×3 lumber, while the rest of the trims should be made out of 1×2 lumber. It is essential to lock all the trims together after drilling pocket holes and inserting the 1 1/4″ screws.

Top Tip: Afterwards, attach the trims to the frame of the bar and secure them into place with waterproof glue and finishing nails. Smooth the trims with sandpaper, if you want to get a professional result.

Fitting the countertop

Building the countertop of the diy bar is a straight-forward process, as you need to glue two pieces of 3/4″ plywood together. Use several clamps to hold the pieces of plywood together.

Top Tip: Center the tabletop to the frame of the wooden bar and lock it into place by using several galvanized screws. Add glue to enhance the rigidity of the frame and leave it to dry out for several hours.

Fitting the trims

Add 1×2 trims to the exterior of the countertop in order to enhance the look of the diy bar. Cut both ends of the trims at 45 degrees and lock them to the countertop with finishing nails and waterproof glue. Leave no gaps between the components.

One of the last steps of the woodworking project is to take care of the finishing touches. Therefore, fill the pilot holes with wood putty and smooth the surface with 120-grit sandpaper.

Top Tip: If you want to enhance the look of the woodworking project and to protect the bar from decay, we recommend you to cover the components with paint or stain. Place the bench in a proper location and move it whenever necessary.

The original plan can be found at http://myoutdoorplans.com

[email_link]

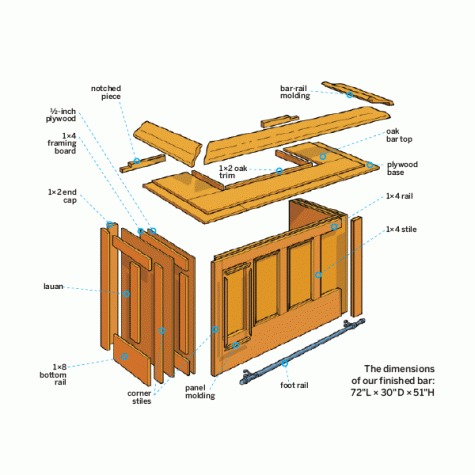
Basement Bar

If the notion of building a bar conjures fond and fuzzy memories of hammering 2x4s into some makeshift cup stand back in college, terrific. But that experience won’t help you much here. This is a real piece of furniture, as you can see from the trimmed panels, sturdy oak bar-rail molding, and stainless-steel foot rail. Follow along as This Old House senior technical editor Mark Powers and colleague Douglas Adams build this handsome rec-room centerpiece. And if you want to break out the toga when it’s finished, well, that’s entirely your call.

Paint: Valspar’s Royal Garnet.
Stain: Minwax’s Jacobean.
Bar-rail molding: Bar-rail profile #375; Dykes Lumber.
Foot-rail assembly: Brushed stainless-steel foot-rail tubing, brackets, and caps; KegWorks.

Step 1: Overview

Cut list:

½-inch plywood: 1 @ 60 by 42 inches
½-inch plywood: 2 @ 24 by 42 inches

Lauan sheathing: 1 @ 60 by 42 inches
Lauan sheathing: 2 @ 24 by 42 inches

1×2 framing: 11 @ 37 inches
1×2 framing: 4 @ 24 inches
1×2 framing: 2 @ 60 inches
1×4 nailing block: 2 @ 6 inches

1×4 stile: 5 @ 31¼ inches
1×4 corner stile: 4 @ 42 inches
1×4 corner stile: 2 @ 42 inches (Rip ¾ inch off the board’s width.)
1×2 stile: 2 @ 42 inches

1×4 rail: 1 @ 54½ inches
1×4 rail: Scribe 2 to size.
1×8 rail: 1 @ 54½ inches
1×8 rail: Scribe 2 to size.

Panel molding: Miter 32 to size.

1×2 shelf supports: 1 @ 54 inches
1×2 shelf supports: 2 @ 6 inches

¾-inch plywood bar-top substrate: Cut 2 to size.

1×12 bar top: Cut 1 to size.
1×12 bar top: Cut 2 to size.

Bar-rail molding: Miter 3 to size.

Step 2: Lay Out the Three Sides
Using a circular saw, cut the ½-inch plywood to size for the bar’s front and side panels. With a miter saw, cut the 14 framing boards to length; use them to line the panels’ perimeter, and arrange three more, equally spaced between the side boards, as shown. And if you plan to install brackets for a foot rail, add 6-inch nailing blocks to what will be the lower corners of the front panel. Apply construction adhesive to the back of each 14, and nail them in place using a pneumatic nail gun and 1-inch nails. Mark the location of the vertical boards on the edges of the horizontal boards so that you can pinpoint them once they’re covered.

Step 3: Cut and Attach the Sheathing


Place the lauan finish-face down, and cut it to size with a circular saw. Apply construction adhesive to the framing and affix the lauan. If your pneumatic gun accepts staples, use it to fasten the sheet along the framing with ½-inch staples; if it doesn’t, turn down the air pressure, use ⅝-inch nails, and tilt the gun slightly so that you don’t shoot straight through the lauan.

Step 4: Place the Corner Stiles

Using a miter saw, cut the 14 stiles and rails to length. For the front corner stiles, shift a 1×4 to overhang the panel edge by ¾ inch, using a block to set the space, as shown. Mark the inside edge of the stile on the panel. Do the same at the back edges of the side panels.

Step 5: Miter and Insert the Molding

Lay pieces of molding one by one inside the recessed panels created by the stiles and rails, and mark their length. Using a miter saw, cut the ends at a 45-degree angle, then nail each one in place with 1¼-inch nails. Hold off on the pieces alongside the corner rail for now.

Tip: For a tight fit, miter one side of a long piece of panel molding, hold it in place, and use the panel’s corner to mark a precise cutline for the opposite miter.

Step 6: Attach the Stiles and Rails to the Front Panel

Lay the top and bottom rail on the front panel between the marked lines, and position three equally spaced stiles between them. Glue and nail the stiles and rails in place with 1¼-inch nails. Set the corner stiles aside until the panels are assembled.

Step 7: Attach the Shelf Cleats

On the interior side of each panel, mark two horizontal lines 1½ inches and 24 inches from the bottom. Cut 11 cleats to length, leaving room for the side panels and their cleats to butt against the front panel. Install the cleats along the lines by countersinking pilot holes every 8 to 10 inches and driving 1¼-inch screws in place.

Step 8: Assemble the Walls

Apply glue to the front edge of a side panel. Set it upright, butt it into the front panel, and clamp the pieces together. Mark a line along the front panel to help you center your screws into the edge of the side panel’s framing. Drill pilot holes and drive 3-inch screws one at a time, working your way from one end to the other so that you can align the corner as you go. It helps to have a partner.

Step 9: Make the Shelves


Using a circular saw, cut the two shelves to length. For the bottom shelf, cut a 12 to length and glue and nail it underneath the front lip. Set the shelves in place, and nail through them and into the cleats, which will keep the panels square.

Step 10: Attach Corner Stiles and Clad the Sides

Now apply glue to the two front corner stiles and set them in place: snug against the rails and overhanging the edges by ¾ inch. Rip ¾ inch off the width of the side corner stiles, since they butt up against the overhanging front pieces. Apply glue to the back and nail them in place. Overhang the stiles at the back of the side panels by ¾ inch, and glue and nail them in place. Hold the top and bottom rails between the side stiles to scribe them. Cut, glue, and nail them in place. Attach a center stile on each side and trim it—as well as the untrimmed corner stiles—as in Step 6. Butt a 12 against the overhanging stiles to finish the side panels.

Step 11: Size the Bar-Top Base

To determine the width of the three plywood-base layer pieces, hold a section of bar-rail molding against the long edge of your plywood and snug the 112 oak bar top into the notch. Mark the plywood along the back edge of the board, as shown. Rip two lengths of plywood to this width.

Step 12: Install the Base

Cut one of the plywood lengths into two pieces for the sides that, when flush at the back, overhang the front by 6 inches. Arrange them to overhang the sides by 6 inches, too, then measure between them to get the length of the front piece. Cut it to length. Secure the base with 1¼-inch screws.

Step 13: Set the Oak Bar Top

Measure the inside edge of the plywood side pieces and cut two 112 boards to that length. Set them flush with the inside back corners, and measure outside edge to outside edge to get the length of the front 112. It will overlap the seams of the base layer. Cut the front piece to length. Set the boards in place, and use 1¼-inch nails to secure them. Finish the inside edges of the bar top with an oak 12 nailed on edge.

Step 14: Miter the Bar Molding

ad out the saw deck with two strips of scrap plywood to fit in the notch of the molding and keep it level. You’ll have to cut the padding to width, from the first notch of the molding to its back edge, as shown. Miter the end of one length of molding at a 45-degree angle.

Step 15: Dry-Fit the Bar Molding

On the bar top, use a combination square to draw 45-degree lines from the front corners. Take a piece of molding with one mitered end and hold it up to the front edge of the bar; line up the mitered end with the 45-degree mark. Snug the molding up against a mitered scrap to make sure you have a tight corner. Then, at the other end, carry the 45-degree line from the bar top over the molding’s uncut end, and miter the piece to size. Install it by screwing through the plywood underneath with 1¼-inch screws. Miter and cut the remaining sidepieces ¾ inch long to overhang the back of the bar. Finish the back edges of the bar top by cutting a 12 to fit the open notches of the molding with a saw.

Step 16: Attach the Brackets

On the front wall, mark vertical lines over the nailing blocks, equidistant from each edge. Place the brackets on the marks, and screw through the brackets’ holes and into the wall and nailing block.

Step 17: Install the Foot Rail

Slide the rail into the brackets, place a cap on each end, and run a set screw through the rail and into each cap. Fill the fastener holes on the bar with wood filler and caulk any open joints, then sand and paint the inside and outside of the walls and shelves. Sand the oak bar top with 220-grit paper, wipe it and the rail with a stain, and finish with a coat of polyurethane.

The original plan can be found at https://www.thisoldhouse.com.

 
[email_link]

Broadway Bar

This open bar concept works out to be 40″ long x 40 1/2″ tall x 11 3/4″ deep

Materials:

  • 1 – 3/4” plywood at 4’x8’
  • 2 – 1×2 at 8’
  • 1 – 7/8” diameter dowel at 8’
  • 1 3/8″ Brad Nails
  • 1 ¼” Pocket Hole Screws

Cut List:

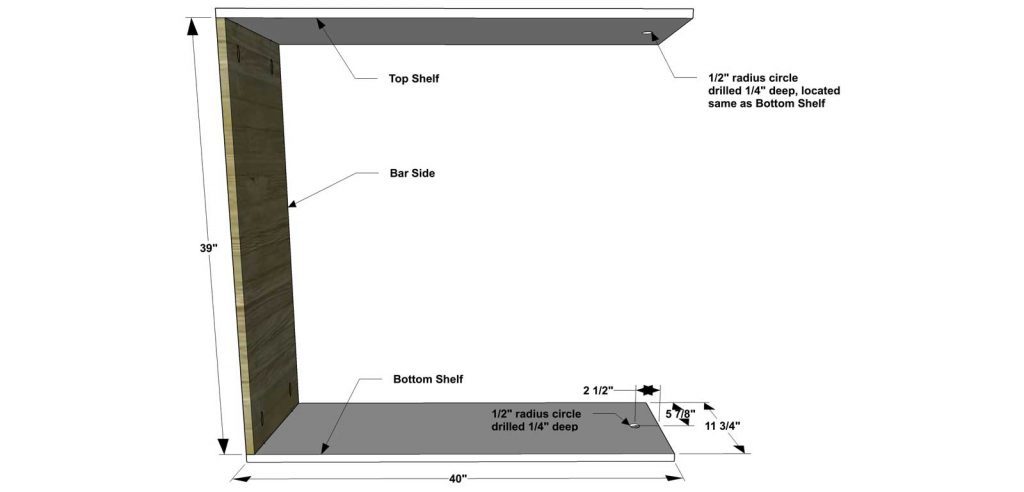
  • 2 – 3/4” plywood at 11-3/4”x40”– Top and Bottom Shelves
  • 1 – 3/4” plywood at 11-3/4”x39”– Bar Side
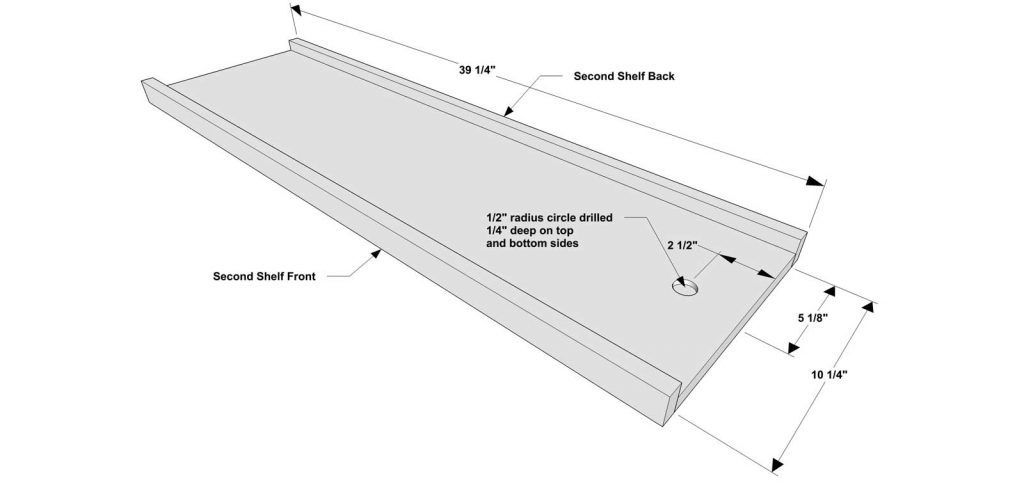
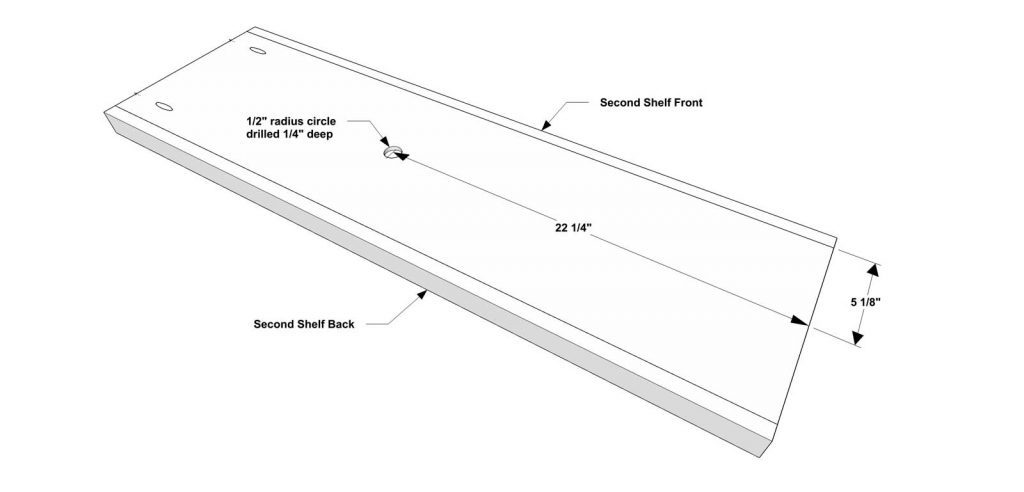
  • 1 – 3/4” plywood at 10-1/4”x39-1/4” – Second Shelf
  • 2 – 1×2 at 39-1/4” – Second Shelf Front and Back
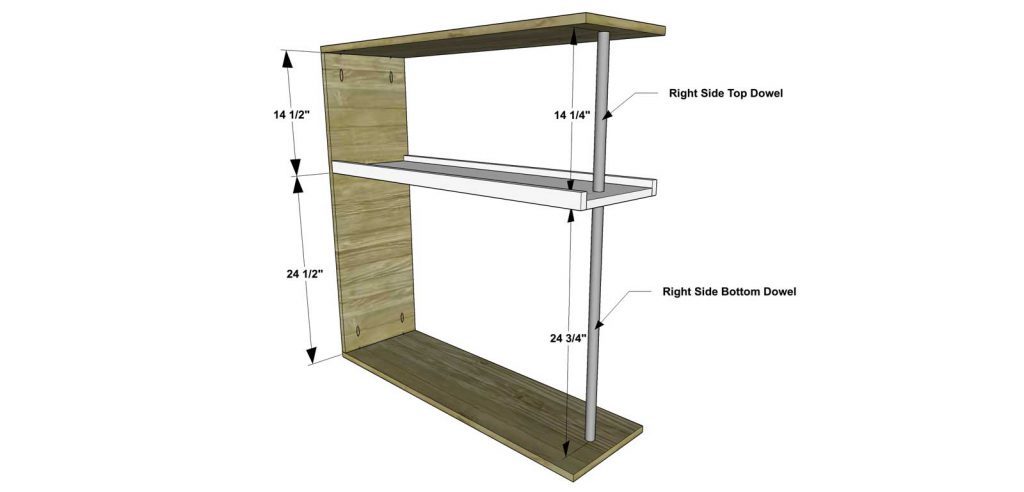
  • 1 – 1” diameter dowel at 14-1/4” – Right Side Top Dowel
  • 1 – 1” diameter dowel at 24-3/4” – Right Side Bottom Dowel
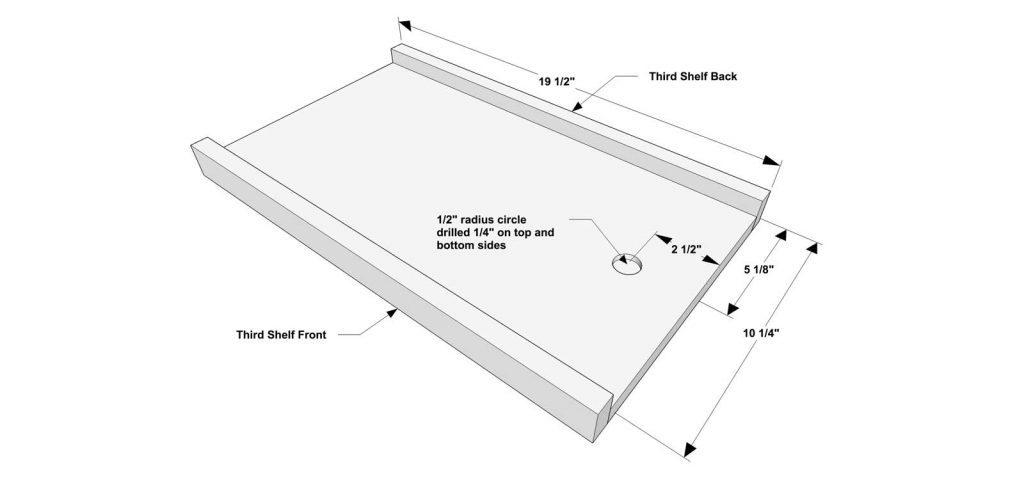
  • 1 – 3/4” plywood at 10-1/4”x19-1/2” – Third Shelf
  • 2 – 1×2 at 19-1/2” – Third Shelf Front and Back
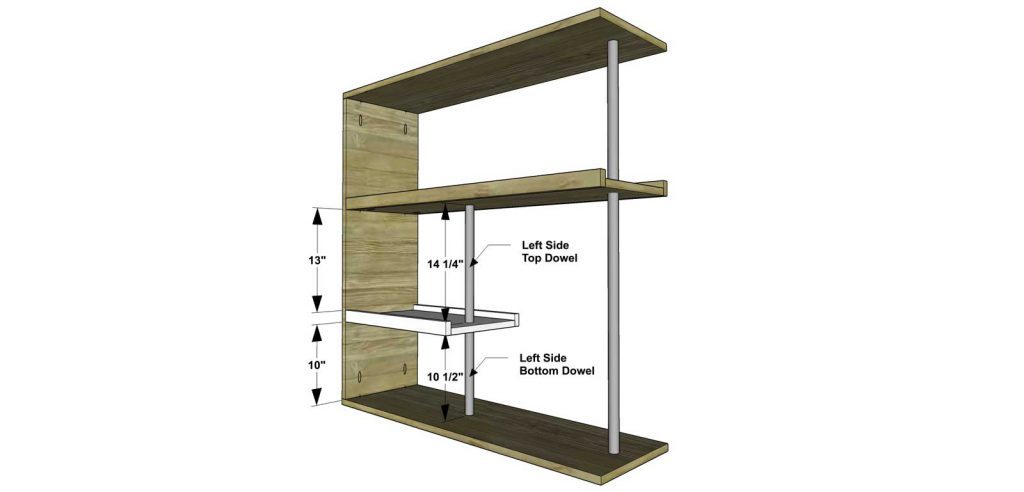
  • 1 – 1” diameter dowel at 14-1/4” – Left Side Top Dowel
  • 1 – 1” diameter dowel at 10-1/2” – Left Side Bottom Dowel
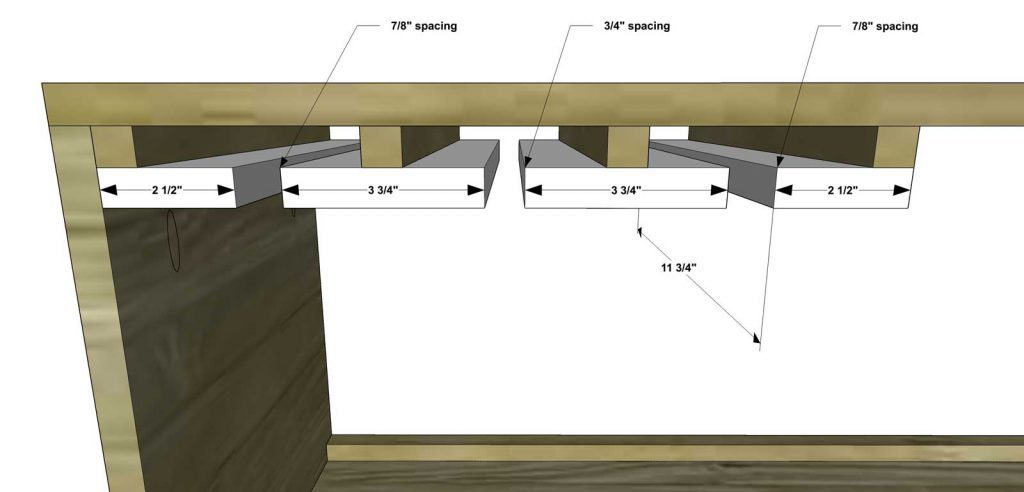
  • 4 – 3/4” plywood at 3/4”x11-3/4” – Spacers
  • 2 – 3/4” plywood at 2-1/2”x11-3/4” – End Slides
  • 2 – 3/4” plywood at 3-3/4”x11-3/4” – Inside Slides

Step 1:

Cut the pieces for the Top and Bottom Shelves and Bar Side. Set the Kreg jig for 3/4” material and drill pocket holes in each end of the Bar Side. Drill a 1” diameter hole 2-1/2” from each end, centered, on the Top and Bottom Shelves. Assemble as shown with the 1” drilled holes facing the inside and with glue and 1-1/4” pocket screws.

Step 2:

Cut the pieces for the Second Shelf and Second Shelf Front and Back. Set the Kreg jig for 3/4” material and drill pocket holes in one bottom end of the Second Shelf. Drill a 1” diameter hole 2-1/2” from the opposite end of the pocket holes, on the top side and centered. Drill a second 1” diameter hole 22-1/4” from the same end, centered, but on the bottom side. Attach the Second Shelf Front and Back to the Second Shelf as shown with glue and 1-1/4” brad nails. Position Right Side Top Dowel and Right Side Bottom Dowel with glue and attach the Second Shelf (with Front and Back pieces) to the Bar Side as shown with glue and 1-1/4” pocket screws. Note: you can paint the dowels with metallic paint before assembly to make them look like metal rods.

Step 3:

Cut the pieces for the Third Shelf and Third Shelf Front and Back. Set the Kreg jig for 3/4” material and drill pocket holes in one bottom end of the Third Shelf. Drill a 1” diameter hole 2-1/2” from the opposite end of the pocket holes, on the both the top side and bottom side, centered. Attach the Third Shelf Front and Back to the Third Shelf as shown with glue and 1-1/4” brad nails. Position the Left Side Top Dowel and Left Side Bottom Dowel with glue and attach the Third Shelf (with Front and Back pieces) to Bar Side as shown with glue and 1-1/4” pocket screws. Note: you can paint the dowels with metallic paint before assembly to make them look like metal rods.

Step 4:

Cut the pieces for the Spacers. Assemble as shown with glue and 1-1/4” brad nails.

Step 5:

Cut the pieces for the Slides. The End Slides will be located flush with the end Spacers and the Inside Slides will be centered on the Spacers. Assemble as shown with glue and 1-1/4” brad nails.

Step 6:

Fill any Screw, Nail or Pocket Holes, Sand and Finish as Desired.


The original plan can be found at http://www.thedesignconfidential.com

[email_link]

1 2