Pub Table


Materials:

  • Qty 6  –  2 x 2 x 8′ Pine
  • Qty 2  –  2 x 4 x 96″ Premium Studs
  • Qty 2  –  4 x 4 x8′ Pine (preferably untreated)
  • Qty 3  –  1 x 2 x 8′ Common Boards; Pine
  • Qty 4  –  1 x 4 x 8′ Common Boards; Pine
  • Qty 3  –  1 x 6 x 8′ Common Boards; Pine
  • Qty 2  –  1 x 10 x 8′ Common Boards; Pine
  • 3/4″ x 48″ x 96″ Plywood
  • 2-1/2″ Kreg Pocket Hole Screws (Coarse)
  • 1-1/4″ Brad Nails
  • 1-1/4″ Wood Screws
  • 2-1/2″ Wood Screws

The original plan can be found at https://rogueengineer.com/modern-reclaimed-pub-table/

 
[email_link]

Moreno Bar

Materials:

  • 1 – 1×2 at 6’
  • 2 – 1×3 at 8’
  • 3 – 1×4 at 8’
  • 1 – 2’ x 2’ sheet of ¼” plywood, lauan, or hardboard
  • 1 – half sheet of ¾” plywood
  • 1 – full sheet of ¾” plywood
  • 1-1/4” pocket hole screws
  • 1-1/4” screws
  • 1-1/4” brad nails
  • 1” brad nails
  • Edge banding for the plywood
  • 1 set of 16” drawer slides
  • 3 – Cabinet pulls
  • 2 sets of hinges for the doors
  • 1 set of hinges for the flip-up top
  • 2 Friction Lid Supports

Cut List:

  • 4 – 1×4 (ripped to 2-3/4” wide) at 33-1/4” – Side Legs
  • 2 – ¾” plywood at 10-3/4” x 30-3/4” plywood – Side Panels
  • 2 – 1×4 at 29-3/4” – Front Legs
  • 1 – 1×4 at 45” – Front Stretcher
  • 1 – ¾” plywood at 34-3/4” x 43-1/2” – Back
  • 3 – ¾” plywood at 15-1/2” x 43-1/2” – Shelves
  • 1 – 1×3 at 27-1/4” – Front Divider
  • 1 – 1×4 (ripped to 2-3/4” wide) at 15-1/2” – Top Divider
  • 1 – ¾” plywood at 12-1/8” x 16-3/4” – Fixed Top
  • 1 – ¾” plywood at 16-5/8” x 33-3/4” – Flip-Up Top
  • 4 – 1×3 at 12-1/2” – Door Frame

Step 1:

If using edge banding, it will be applied to the exposed edges of the plywood before assembly. Cut the pieces for the side legs and the side panel. Cut the angle in the leg using a jigsaw. Set the Kreg jig for ¾” material and drill pocket holes in each long end of the panel, and in one long edge of one leg as shown. Keep in mind, there will be a right side assembly and a left side assembly! Attach the legs to the panels using glue and 1-1/4” pocket hole screws.

Step 2:

Cut the pieces for the front legs and the front stretcher. Cut the angle in the legs using a jigsaw, and drill pocket holes in the top edge keeping in mind there will be a right and a left. Cut the hole in the stretcher for the drawer using a jigsaw. Attach the legs to each end of the stretcher using glue and 1-1/4” pocket hole screws, then attach the side panels using glue and 1-1/4” pocket hole screws through the holes drilled in the side legs.

Step 3:

Cut the piece for the back. Draw a 4” radius at each corner and cut with a jigsaw. Drill pocket holes in each side edge. Secure the back piece to the sides using glue and 1-1/4” pocket hole screws. The back will stand 4” above the side to create a “backsplash”.

Step 4:

Cut the pieces for the shelves and drill pocket holes in three edges. Secure to the cabinet as shown using glue and 1-1/4” pocket hole screws. The bottom of the upper shelf will be flush with the bottom of the upper stretcher.

Step 5:

Cut the piece for the front divider and drill pocket holes in the top edge. Secure to the upper stretcher as shown. Add a couple of countersunk 1-1/4” screws through the divider into each of the shelves.

Cut the piece for the top divider and drill pocket holes in each end. Position as shown and secure using glue and 1-1/4” pocket hole screws.

Step 6:

Cut the piece for the fixed top. Position the piece so that it butts up against the backsplash and overhangs the front and side by ½”. Secure in place using glue and 1-1/4” brad nails.

Cut the piece for the flip-up top and install the hinges. There will be a 1/8” gap between the top and the back splash as well as between the top and the fixed top. The front and sides will overhang by ½”.

Step 7:

Cut the pieces for the doors and drill pocket holes as shown. Install the hinges, then install the doors. Attach the cabinet pulls in the location desired.

Step 8:

Cut the pieces for the drawer. Drill pocket holes in each end of the side pieces, and assemble the frame using glue and 1-1/4” pocket hole screws. Attach the bottom using glue and 1” brad nails. Install the drawer slides according to the manufacturer’s instructions. Make any necessary adjustments.

Cut the piece for the drawer front. Install the cabinet pull as desired.

Fill any Screw, Nail or Pocket Holes, Sand and Finish as Desired.

The original plan can be found at http://www.thedesignconfidential.com

 
[email_link]

5 Drawer Dresser

Materials:

  • 1-1/4″ pocket hole screws
  • 1/2″ brad nails
  • 1-1/4″ brad nails
  • Edge banding for the exposed edges of the plywood, optional
  • Four furniture legs or bun feet at least 4″ tall plus hardware
  • Five sets of 14″ drawer slides
  • Five drawer pulls

Lumber:

  • 1 – 1×6 at 8′
  • 1 – 1×6 at 4′
  • 3 – 1×10 at 8′
  • One 4′ x 4′ sheet of 3/4″ plywood
  • Two sheets of 3/4″ plywood
  • One half sheet of 1/2″ plywood
  • One quarter sheet of 1/4″ plywood

Cut List:

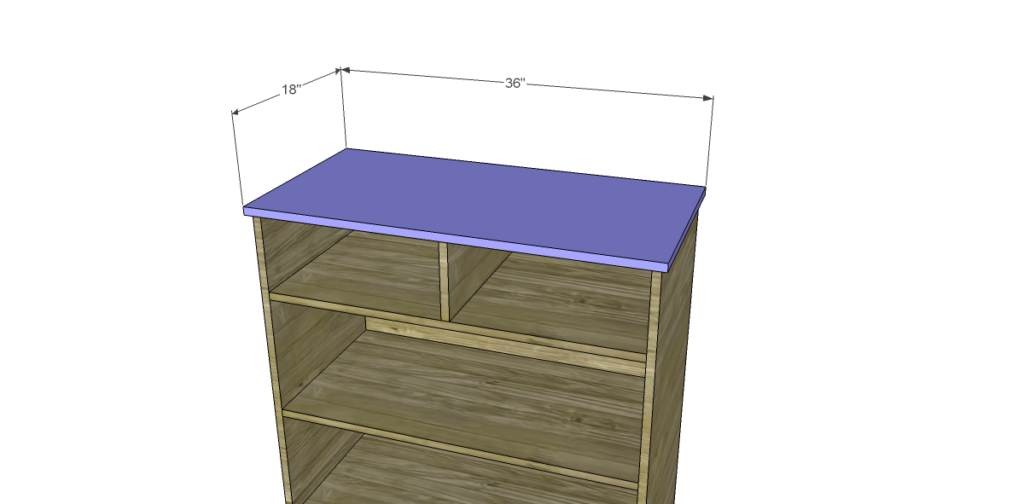
  • 2- 3/4″ plywood at 18″ x 36″ – Bottom & Top
  • 2 – 3/4″ plywood at 17-1/2″ x 44″ – Sides
  • 1 – 3/4″ plywood at 33-1/2″ x 44″ – Back
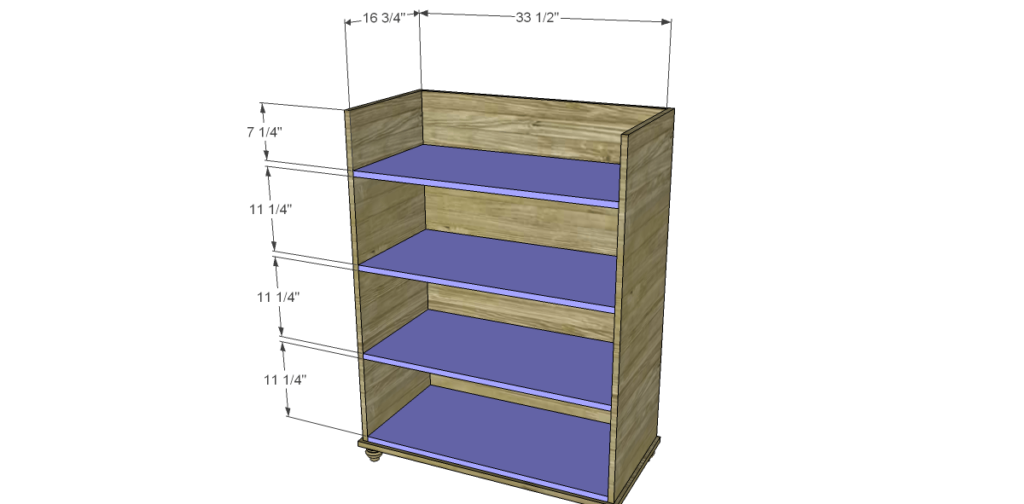
  • 4 – 3/4″ plywood at 16-3/4″ x 33-1/2″ – Shelves
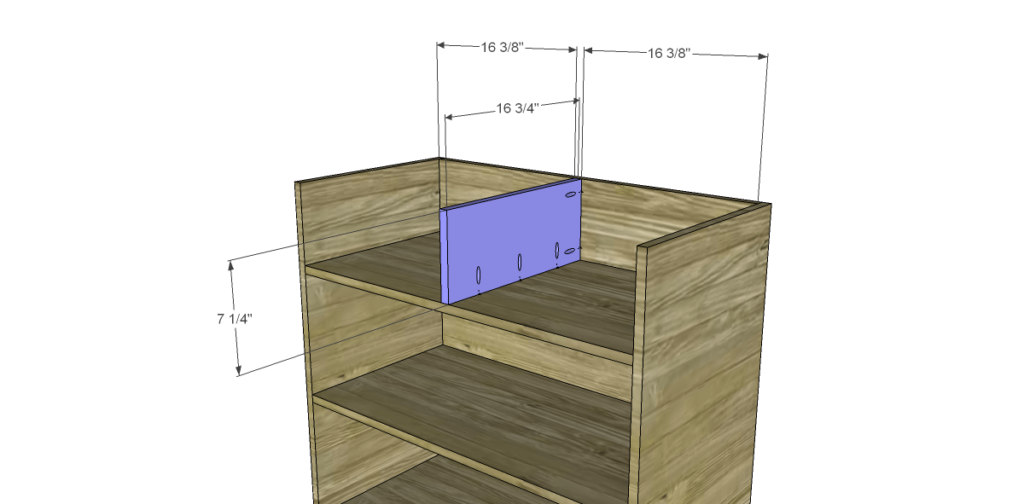
  • 1 – 3/4″ plywood at 7-1/4″ x 16-3/4″ – Divider
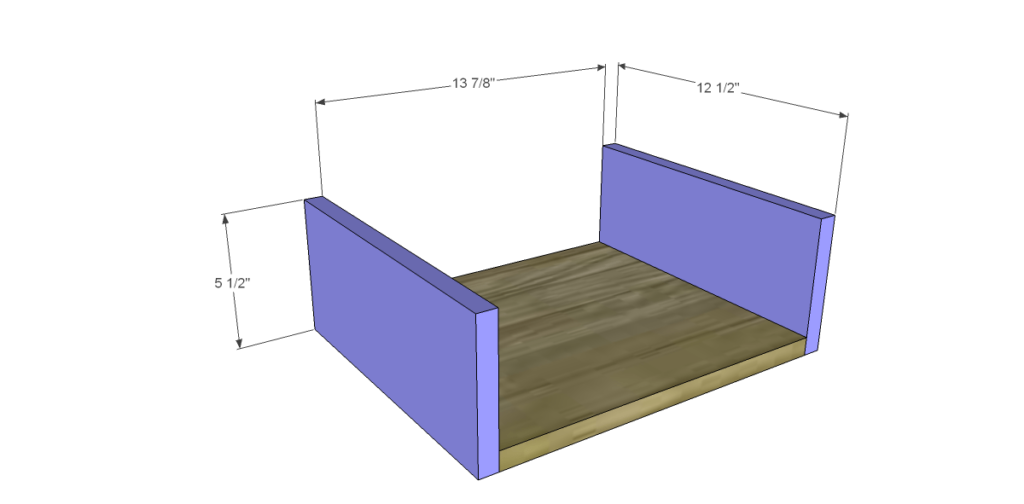
  • 2 – 3/4″ plywood at 12-1/2″ x 13-7/8″ – Small Drawer Bottom
  • 4 – 1×6 at 12-1/2″ – Small Drawer Sides
  • 4 – 1×6 at 15-3/8″ – Small Drawer Front & Back
  • 3 – 3/4″ plywood at 12-1/2″ x 31″ – Large Drawer Bottom
  • 6 – 1×10 at 12-1/2″ – Large Drawer Sides
  • 6 – 1×10 at 32-1/2″ – Large Drawer Front & Back
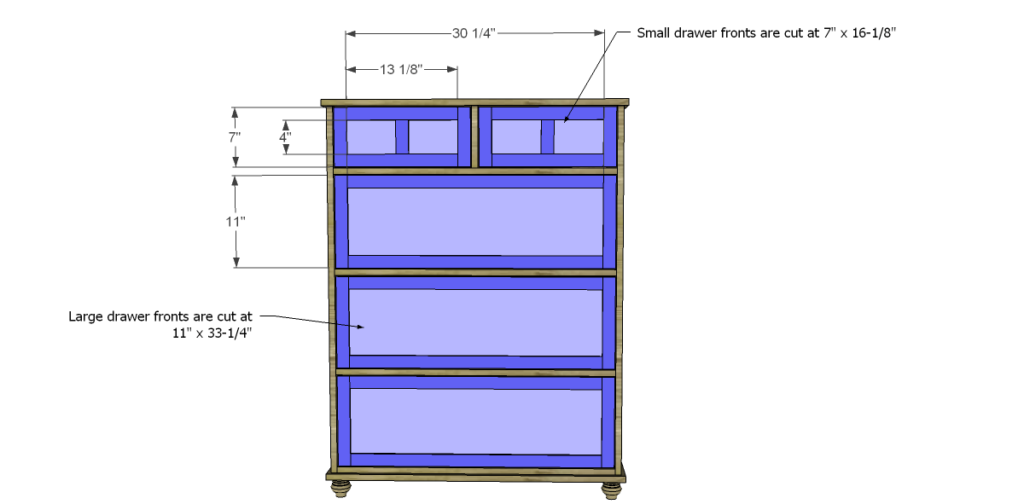
  • 2 – 1/2″ plywood at 7″ x 13-1/8″ – Small Drawer Front Base
  • 3 – 1/2″ plywood at 11″ x 33-1/4″ – Large Drawer Front Base
  • 4 – 1/4″ plywood at 1-1/2″ x 7″ – Small Drawer Trim
  • 4 – 1/4″ plywood at 1-1/2″ x 13-1/8″ – Small Drawer Trim
  • 2 – 1/4″ plywood at 1-1/2″ x 4″ – Small Drawer Trim
  • 6 – 1/4″ plywood at 1-1/2″ x 11″ – Large Drawer Trim
  • 6 – 1/4″ plywood at 1-1/2″ x 30-1/4″ – Large Drawer Trim

Step 1:

Edge banding should be applied to all exposed edges of plywood before assembly. Cut the pieces for the bottom. Attach the hardware for the legs to the bottom positioning the legs so they are at least 1″ from each edge.

Step 2:

Cut the pieces for the sides and drill pocket holes at the bottom edge. Position the sides so they are set back 1/2″ from the front edge, and 1/2″ from the sides. Secure using glue and pocket hole screws.

Step 3:

Cut the piece for the back and drill pocket holes in the side edges as well as the bottom edge. Attach to the sides and bottom using glue and pocket hole screws.

Step 4:

Cut the pieces for the shelves. Drill pocket holes in the sides and back edge of three shelves. Position the fourth shelf on the bottom as shown in the drawing. Secure with glue and brad nails. Attach the other shelves as shown using glue and pocket hole screws.

Step 5:

Cut the piece for the divider and drill pocket holes as shown. Position the divider on the top shelf and secure with glue and pocket hole screws.

Step 6:

Cut the piece for the top. The front and sides will overhang by 1/2″. Secure with glue and brad nails through the top into the sides and back.

Step 7:

Cut the pieces for the drawer boxes. Drill pocket holes in all four edges of the bottom pieces as well as each end of the side pieces. Attach the sides to the bottom using glue and pocket hole screws, then attach the front and back in the same manner. Install the drawer slides according to the manufacturer’s instructions.

Step 8:

Cut the pieces for the drawer front bases as well as the trim pieces. Position the trim pieces and secure using glue and 1/2″ brad nails. Clamp until dry. There will be a 1/8″ gap around all sides of the drawer fronts. Install the drawer pulls.

Finish as desired.

The original plan can be found at http://designsbystudioc.com/free-plans-to-build-a-pier-one-inspired-ashworth-5-drawer-dresser/

 
[email_link]
 

4 Drawer Dresser

Materials:

  • 1 – 2×2 at 3’
  • 2 – 1×2 at 8’
  • 4 – 1×6 at 8’
  • 1 sheet of ¾” plywood
  • 1-1/4” pocket hole screws
  • 1-1/4” screws
  • 1-1/4” brad nails
  • Edge banding, if desired
  • 4 cabinet pulls
  • 4 sets of 16” drawer slides
  • 4 – 3” x 3” Flat Angle Plates
  • 6 – 3” x 3” Flat T Plates

Cut List:

  • 4 – 2×2 at 6-1/4” – Legs
  • 8 – 1×2 at 5-1/2” – Leg Braces
  • 2 – ¾” plywood at 18” x 36” – Top & Bottom
  • 2 – ¾” plywood at 18” x 18-3/4”- Sides
  • 1 – ¾” plywood at 18-3/4” x 34-1/2”- Back
  • 2 – 1×2 at 34-1/2” – Stretchers
  • 1 – 1×2 at 5-3/4” – Divider
  • 1 – 1×2 at 15-3/4” – Drawer Slide Support
  • 2 – ¾” plywood at 14-3/8” x 14-1/2” – Small Drawer Bottoms
  • 4 – 1×6 at 14-1/2” – Small Drawer Sides
  • 4 – 1×6 at 15-7/8” – Small Drawer Front & Back
  • 1 – ¾” plywood at 14-1/2” x 32” – Large Drawer Bottoms
  • 4 – 1×6 at 14-1/2” – Large Drawer Sides
  • 4 – 1×6 at 33-1/2” – Large Drawer Front & Back
  • 2 – ¾” plywood at 5-1/2” x 16-5/8” – Small Drawer Fronts
  • 2 – ¾” plywood at 5-1/2” x 34-1/4” – Large Drawer Fronts

Step 1:

Edge banding will be applied to the exposed edges of the plywood before assembly. Cut the pieces for the legs and the leg braces. Set the Kreg jig for ¾” material and drill pocket holes in one end of each of the leg braces. Attach to the leg using glue and 1-1/4” pocket hole screws. Cut the piece for the bottom. Attach the legs to each corner using glue and countersunk 1-1/4” screws.

Step 2:

Cut the pieces for the sides and drill pocket holes in each end. Attach to the bottom using glue and 1-1/4” pocket hole screws.

Step 3:

Cut the piece for the back and drill pocket holes in all four edges. Secure to the sides and back using glue and 1-1/4” pocket hole screws.

Step 4:

Cut the piece for the top. Secure with glue and 1-1/4” pocket hole screws through the sides and back.

Step 5:

Cut the pieces for the stretchers and drill pocket holes at each end. Position as shown then secure using glue and 1-1/4” pocket hole screws.

Cut the pieces for the divider and drawer slide support. Drill holes at each end of the drawer slide support. Position the divider as shown then secure using glue and 1-1/4” brad nails. Position the drawer slide support then secure using glue and 1-1/4” pocket hole screws.

Step 6:

Cut the pieces for the drawer boxes. Drill pocket holes in each end of the sides as well as all four edges of the bottoms. Assemble the drawers as shown using glue and 1-1/4” pocket hole screws. Install the drawer slides according to the manufacturer’s installation instructions. Make any necessary adjustments.

Step 7:

Cut the pieces for the drawer fronts. Mark the position for the drawer pull and drill the holes. Install the drawer box, then shim the drawer front in place. Finish drilling the holes for the drawer pulls, then install.

Paint the angle and bracket hardware as desired, then install. Fill any Screw, Nail or Pocket Holes, Sand and Finish as Desired.


The original plan can be found at http://www.thedesignconfidential.com/2013/08/free-diy-furniture-plans-build-four-drawer-campaign-side-table-dresser/
 
[email_link]

Brecken Dresser

Materials:

  • 1-1/4” pocket hole screws
  • 2-1/2” pocket hole screws
  • 1-1/4” brad nails
  • 1-3/4” brad nails
  • Edge banding
  • 3 sets of 16” Drawer slides
  • Cabinet pulls
  • Wood glue
  • Sandpaper (100, 150, 220 grits)
  • Finishing supplies (primer & paint, or stain, sealer)

Lumber:

  • 8 – ¼” x 2 craft boards at 3’
  • 3 – 1×6 at 8’
  • 2 – 2×2 at 8’
  • 1 – 4’ x 8’ sheet of ¼” plywood
  • 1 – 2’ x 4’ sheet of ½” plywood
  • 1 – 4’ x 8’ sheet of ¾” plywood

Cut List:

  • 4 – 2×2 at 29-1/8” – Legs
  • 4 – 2×2 at 15” – Side Framing
  • 2 – ¾” plywood at 15” x 21-3/4” – Side Panels
  • 6 – 2×2 at 32” – Front & Back Stretchers
  • 1 – ¼” plywood at 24-3/4” x 33-1/2” – Back
  • 1 – ¾” plywood at 18-1/4” x 35” – Top
  • 6 – 1×6 at 16” – Drawer Box Sides
  • 6 – 1×6 at 31” – Drawer Box Front & Back
  • 3 – ¼” plywood at 15” x 31-1/2” – Drawer Bottom
  • 3 – ½” plywood at 6” x 31-3/4” – Drawer Front Base
  • 12 – ¼” x 2” craft board at 6” – Drawer Front Trim
  • 12 – ¼” x 2” craft board at 15-7/8” – Drawer Front Trim

Step 1:

Cut the pieces for the legs and the side framing. With the pocket hole jig set for 1-1/2” material, drill pocket holes in each end. Secure the framing pieces to the legs using glue and 2-1/2” pocket hole screws.

Cut the pieces for the side panels. Set the pocket hole jig for ¾” material and drill pocket holes in all four edges. Secure the panels to the side frames using glue and 1-1/4” pocket hole screws. The back face of the panel will be flush with the back face of the frame.

Step 2:

Cut the pieces for the stretchers. Set the pocket hole jig for 1-1/2” material and drill pocket holes in each end. Secure the stretchers as indicated in the drawings using glue and 2-1/2” pocket hole screws.

Step 3:

Cut the piece for the back panel. Position the back panel so the top is flush with the top of the back legs securing in place using glue and 1-1/4” brad nails.

Step 4:

Cut the piece for the top. If using edge banding, it will be applied to the exposed edges of the top prior to attaching the top to the cabinet. Position the top on the cabinet so that the sides and front are flush with the legs, framing, and front stretchers (the top will overhang the back panel) securing in place using glue and 1-3/4” brad nails.

Step 5:

Cut the pieces for the drawer box sides, front, and back. Cut the groove in the bottom edge of each piece at 1/4″ wide by 1/4″ deep using a table saw or a router and a straight bit. Set the pocket hole jig for 3/4″ material and drill pocket holes in each end of the drawer box front and back pieces on the opposite side as the groove. Make sure that the pocket holes will not interfere with the groove. Secure the sides to the back using glue and 1-1/4″ pocket hole screws.

Step 6:

Cut the piece for the drawer bottom. Slide the bottom into the grooves in the sides and back. The piece should fit snugly but not too tight.

Step 7:

Insert the front edge of the drawer box bottom into the groove on the drawer box front. Secure the drawer box front to the drawer box sides using glue and 1-1/4″ pocket hole screws. Install the drawer slides according to the manufacturer’s installation instructions locating them ¾” back from the front edge of the sides.

Step 8:

Cut the pieces for the drawer fronts. Cut the ¼” detail pieces with 45° miters at each end. Evenly spread glue on the back side of each piece and clamp the pieces in place until dry. Mark the position for the drawer pulls and drill the holes. Shim the drawer front in the opening – there will be a 1/8” gap around all sides – then drive screws through the holes for the drawer pulls into the drawer box. Open the drawer, and secure the drawer front using countersunk 1-1/4” screws from the inside. Remove the screws from the holes for the drawer pull then finish drilling the holes. Install the drawer pull.

Finish as desired


The original plan can be found at http://designsbystudioc.com/diy-plans-build-brecken-dresser/

[email_link]

3 Drawer Dresser

Materials:

  • 3 – 1×2 at 6’
  • 3 – 1×10 at 6’
  • 2 – 1×10 at 8’
  • 1 – 2×2 at 4’
  • 2 sheets of ¾” plywood
  • 1-1/4” pocket hole screws
  • 2-1/2” screws
  • 1-1/4” brad nails
  • 3 sets of 16” drawer slides


Cut List:

  • 1 – ¾” plywood at 17” x 34-1/2” – Bottom
  • 2 – 1×2 at 17” – Bottom Frame
  • 2 – 1×2 at 36” – Bottom Frame
  • 4 – 2×2 at 4-3/4” – Legs
  • 2 – ¾” plywood at 17-3/4” x 34-1/4” – Sides
  • 1 – ¾” plywood at 34-1/4” x 34-1/2” – Back
  • 2 – 1×2 at 34-1/2” – Stretchers
  • 1 – ¾” plywood at 18-1/2” x 36” – Top
  • 3 – ¾” plywood at 14-1/2” x 32” – Drawer Bottoms
  • 6 – 1×10 at 14-1/2” – Drawer Box Sides
  • 6 – 1×10 at 33-1/2” – Drawer Box Front & Back
  • 3 – ¾” plywood at 11-1/4” x 36” – Drawer Fronts

Step 1:

Cut the pieces for the bottom panel and the bottom frame. Set the Kreg jig for ¾” material and drill pocket hole in each end of the shorter 1×2 frame pieces as well as all four edges of the bottom panel. Assemble the panel as shown using glue and 1-1/4” pocket hole screws. Insert the panel then secure using glue and 1-1/4” pocket hole screws. The top face of the panel will be flush with the top edge of the frame.

Step 2:

Cut the pieces for the legs. Position them on the underside of the bottom snug against the frame in each corner. Secure using glue and countersunk 2-1/2” screws through the bottom into the legs.

Step 3:

Cut the pieces for the sides and drill pocket holes in the top and bottom edges. Secure to the bottom frame locating them ¾” back from the front edge of the bottom frame.

Step 4:

Cut the piece for the back and drill pocket holes in all four edges of the panel. Secure to the sides and bottom using glue and 1-1/4” pocket hole screws.

Step 5:

Cut the pieces for the stretchers and drill pocket holes in each end. Secure to the sides as shown using glue and 1-1/4” pocket hole screws.

Step 6:

Cut the piece for the top. The front and sides will overhang by ½”. Secure using glue and 1-1/4” pocket hole screws through the sides and back.

Step 7:

Cut the pieces for the drawer boxes. Drill pocket holes in all four edges of the bottom as well as each end of the sides. Assemble the drawer box as shown using glue and 1-1/4” pocket hole screws. Install the drawer slides according to the manufacturer’s installation instructions, locating them ¾” back from the front edge of the sides. Make any necessary adjustments.

Step 8:

Cut the pieces for the drawer fronts. Mark the position for the drawer pulls and drill the holes. Starting with the bottom drawer front, position it with a 1/8” gap at the bottom then drive screws through the holes for the drawer pulls into the drawer box. Open the drawer, and secure the drawer front using countersunk 1-1/4” screws from the inside. Position the next drawer fronts in the same manner with a 1/8” gap between them and secure the same way. Remove the screws from the holes for the drawer pull then finish drilling the holes. Install the drawer pull.

Fill any Screw, Nail or Pocket Holes, Sand and Finish as Desired.


The original plan can be found at http://www.thedesignconfidential.com/2014/01/free-diy-furniture-plans-how-to-build-oslo-3-drawer-dresser/
 
[email_link]

3 Drawer Dresser

Materials:

  • 1-1/4″ pocket hole screws
  • 1-1/4″ brad nails
  • Edge banding, optional
  • 3 sets of drawer slides (shortened to 11-1/2″)
  • 3 cabinet pulls

Lumber:

  • 3 – 1×2 at 8′
  • 4 – 1×8 at 6′
  • 2 – 2×2 at 6′
  • 1 – 2′ x 4′ sheet of 3/4″ plywood
  • 1 full sheet of 3/4″ plywood

Cut List:

  • 4 – 2×2 at 31-3/4″ – Legs
  • 4 – 1×2 at 11″ – Side Frames
  • 2 – 3/4″ plywood at 11″ x 26-1/4″ – Side Panels
  • 6 – 1×2 at 36″ – Back Frame & Front Stretchers
  • 1 – 3/4″ plywood at 26-1/4″ x 36″ – Back
  • 1 – 3/4″ plywood at 14-1/2″ x 40″ – Top
  • 3 – 3/4″ plywood at 10″ x 33-1/2″ – Drawer Bottoms
  • 6 – 1×8 at 10″ – Drawer Box Sides
  • 6 – 1×8 at 35″ – Drawer Box Front & Back
  • 3 – 3/4″ plywood at 8″ x 35-3/4″ – Drawer Fronts

Notes:
Edge banding will be applied to the exposed edges of the plywood before assembly.

Step 1:

Cut the pieces for the legs. Cut a 45 degree bevel in one edge of each piece at 27-3/4″ long. Cut the taper in the lower edge of each piece using a jigsaw or a tapering jig on the table saw. The tapers will face to the inside of the dresser while the beveled edges will face to the outside edge. Keep in mind there will be two legs with the bevel on the right and two legs with the bevel on the left.

Step 2:

Cut the pieces for the side frame and panels. With the pocket hole jig set for 3/4″ material, drill pocket holes in each end of the frame pieces as well as all four edges of the panels. Secure the frame pieces to the panels using glue and 1-1/4″ pocket hole screws. The back face of the panel will be flush with the back edge of the frame pieces. Orient the pocket holes in the frame pieces so they face away from the panels. Secure the panel assembly to the legs using glue and 1-1/4″ pocket hole screws.

Step 3:

Cut the pieces for the back frame, front stretchers, and back panel. Drill pocket holes in each end of the frame pieces and stretchers, as well as all four edges of the panel. Secure the frame pieces to the panel using glue and 1-1/4″ pocket hole screws. The back face of the panel will be flush with the back edge of the frame pieces. Orient the pocket holes in the frame pieces so they face away from the panels. Secure the panel assembly to the legs using glue and 1-1/4″ pocket hole screws.

Secure the stretchers to the front legs as shown using glue and 1-1/4″ pocket hole screws.

Step 4:

Cut the piece for the top. Cut a 45 degree bevel in each corner of the front edge making it 1/4″ deep. The front and sides will overhang by 1/2″. Secure using glue and 1-1/4″ brad nails.

Step 5:

Cut the pieces for the drawer boxes. Drill pocket holes in all four edges of the bottom as well as each end of the sides. Assemble the drawer box as shown using glue and 1-1/4” pocket hole screws.

Use a hacksaw to shorten the drawer slides. Install the drawer slides according to the manufacturer’s installation instructions, locating them ¾” back from the front edge of the sides. Make any necessary adjustments.

Step 6:

Cut the pieces for the drawer fronts. Mark the position for the drawer pulls and drill the holes. Shim the drawer front in the opening – there will be a 1/8” gap around all sides – then drive screws through the holes for the drawer pulls into the drawer box. Open the drawer, and secure the drawer front using countersunk 1-1/4” screws from the inside. Remove the screws from the holes for the drawer pull then finish drilling the holes. Install the drawer pull.

Finish as desired!


The original plan can be found at http://designsbystudioc.com/diy-three-drawer-dresser-plans/

 
[email_link]
 

3 Drawer Dresser

Materials:

  • (1) 2×2 at 3’
  • (2) 1×2 at 8’
  • (3) 1×6 at 6’
  • (1) 1×6 at 8’
  • (1) 4’ x 8” x ¾” plywood
  • 1 ¼” pocket hole screws
  • 1 ¼” screws
  • 3 drawer pulls
  • (3) sets of 16” drawer slides
  • (4) 3” x 3” Flat Angle Plates
  • (4) 3” x 3” Flat T Plates

Cut List:

  • (4) 2×2 at 6-1/4” – Legs
  • (8) 1×2 at 5-1/2” – Leg Braces
  • (2) ¾” plywood at 18” x 36” – Top & Bottom
  • (2) ¾” plywood at 18” x 18-3/4”- Sides
  • (1) ¾” plywood at 18-3/4” x 34-1/2”- Back
  • (2) 1×2 at 34-1/2” – Stretchers
  • (3) ¾” plywood at 14-1/2” x 32” – Drawer Bottoms
  • (6) 1×6 at 14-1/2” – Drawer Sides
  • (6) 1×6 at 33-1/2” – Drawer Front & Back
  • (3) ¾” plywood at 5-1/2” x 34-1/4” – Drawer Fronts

Step 1:

Edge banding will be applied to the exposed edges of the plywood before assembly. Cut the pieces for the legs and the leg braces. Set the Kreg jig for ¾” material and drill pocket holes in one end of each of the leg braces. Attach to the leg using glue and 1-1/4” pocket hole screws. Cut the piece for the bottom. Attach the legs to each corner using glue and countersunk 1-1/4” screws.

Step 2:

Cut the pieces for the sides and drill pocket holes in each end. Attach to the bottom using glue and 1-1/4” pocket hole screws.

Step 3:

Cut the piece for the back and drill pocket holes in all four edges. Secure to the sides and back using glue and 1-1/4” pocket hole screws.

Step 4:

Cut the piece for the top. Secure with glue and 1-1/4” pocket hole screws through the sides and back.

Step 5:

Cut the pieces for the stretchers and drill pocket holes at each end. Position as shown then secure using glue and 1-1/4” pocket hole screws.

Step 6:

Cut the pieces for the drawer boxes. Drill pocket holes in each end of the sides as well as all four edges of the bottoms. Assemble the drawers as shown using glue and 1-1/4” pocket hole screws. Install the drawer slides according to the manufacturer’s installation instructions. Make any necessary adjustments.

Step 7:

Cut the pieces for the drawer fronts. Mark the position for the drawer pulls and drill the holes. Install the drawer box, then shim the drawer front in place. Finish drilling the holes for the drawer pulls, then install. Paint the angle and bracket hardware as desired, then install.

Fill any Screw, Nail or Pocket Holes, Sand and Finish as Desired.


The original plan can be found at http://www.thedesignconfidential.com/2013/08/free-diy-furniture-plans-build-campaign-three-drawer-dresser/

 
[email_link]

3 Drawer Dresser

Materials:

  • 4’ x 8’ x ¾” plywood
  • 4’ x 8’ x ¼” plywood
  • 4’ x 4’ x ½” plywood
  • (1) 1×3 @ 6’ long
  • (1) 1×3 @ 4’ long
  • (4) 1×8 @ 8’ long
  • (1) 1×8 @ 4’ long
  • 1 ½” pocket hole screws
  • 1” brads
  • (3) sets of 18” drawer slides


Cut List:

  • 2 – ¾” plywood at 19-3/4” x 31” – Sides
  • 1 – ¾” plywood at 19-3/4” x 32-1/2” – Bottom
  • 1 – ¾” plywood at 20-1/4” x 34” – Top
  • 1 – ¼” plywood at 31-3/4” x 34” – Back
  • 2 – 1×3 (ripped to 2” wide) x 16-3/4” – Pedestal
  • 2 – 1×3 (ripped to 2” wide) x 32-1/2” – Pedestal
  • 6 – 1×8 at 16-1/2” – Drawer Boxes
  • 6 – 1×8 at 31-1/2” – Drawer Boxes
  • 3 – ¼” plywood at 18” x 31-1/2” – Drawer Bottoms
  • 3 – ½” plywood at 10-1/2” x 34” – Drawer Fronts
  • 15 – ¼” plywood at 1-1/2” x 34” – Trim Slats

Step 1:

Edge banding should be applied to all exposed edges of plywood before assembly. Cut the pieces for the sides and bottom. Set the Kreg jig for ¾” material and drill pocket holes in each end of the bottom piece as well as the top of the side pieces. Attach using glue and 1-1/2” pocket hole screws.

Step 2:

Cut the piece for the top. Attach to the sides using glue and 1-1/2” pocket hole screws through the holes in the sides into the top. Check for square.

Step 3:

Cut the piece for the back then attach using glue and 1” brad nails.

Step 4:

Cut the pieces for the pedestal. Drill pocket holes in each end of the shorter pieces, as well as one long end of each piece. Assemble the frame using glue and 1-1/2” pocket hole screws, then attach to the bottom of the cabinet. There will be a ¾” border around the pedestal.

Step 5:

Cut the pieces for the drawer boxes. Assemble as shown using glue and 1-1/2” pocket hole screws. Cut the pieces for the drawer box bottoms and attach using glue and 1” brad nails. Attach the drawer slide hardware according to the manufacturer’s instructions.

Step 6:

Cut the pieces for the drawer fronts. Attach to the drawer boxes with glue and a few 1” brad nails. Place the brad nails where they will be covered by the trim slats.

Step 7:

Cut the pieces for the trim slats. There will be ½” spacing between slats. Attach to the drawer fronts using glue and 1” brad nails.

Fill any Screw, Nail or Pocket Holes, Sand and Finish as Desired.

The original plan can be found at http://www.thedesignconfidential.com/2012/09/free-diy-furniture-plans-build-west-elm-inspired-stria-3-drawer-dresser/

[email_link]

3 Drawer Dresser

Materials:

  • (1) Sheet of ¾” plywood
  • (1) 1×3 at 6’ long
  • (1) 1×6 at 3’ long
  • (2) 1×8 at 8’ long
  • (1) Sheet of ¼” plywood
  • (3) Sets of 16” drawer sliders
  • (3) Drawer pulls
  • 1 ¼” Pocket hole screws
  • 1 ¼” brad nails

Cut List:

  • 2 – 1×6 at 14” –Base
  • 1 – ¾” plywood at 18” x 34-1/2” – Bottom
  • 2 – 1×3 at 29” – Base Stretchers
  • 2 – ¾” plywood at 18” x 27-3/4” – Sides
  • 2 – ¾” plywood at 17-1/4” x 34-1/2” – Shelves
  • 1 – ¼” plywood at 27-3/4” x 36” – Back
  • 1 – ¾” plywood at 18-1/4” x 36” – Top
  • 6 – 1×8 at 14-1/2” – Drawer Box
  • 6 -1×8 at 33-1/2” – Drawer Box
  • 3 – ¼” plywood at 16” x 33-1/2” – Drawer Bottom
  • 2 – ¾” plywood at 8-3/4” x 34-1/4” – Drawer Fronts
  • 1 – ¾” plywood at 9” x 34-1/4” – Middle Drawer Front

Step 1:

Apply optional edge banding to exposed edges of plywood before assembly. Cut the pieces for the base and bottom. Set the Kreg jig for ¾” material and drill pocket holes in one long edge of each base piece. Also drill pocket holes in each end of the bottom to attach the sides. Position the base pieces on the bottom as shown and attach using glue and 1-1/4” pocket hole screws. Cut the pieces for the base stretchers. Drill pocket holes in each end as well as one long edge of each piece. Attach to the bottom and existing base pieces using glue and 1-1/4” pocket hole screws.

Step 2:

Cut the pieces for the sides. Drill pocket holes in the top edge of each piece to attach the top. Attach to the bottom using glue and 1-1/4” pocket hole screws.

Step 3:

Cut the piece for the shelves. Drill pocket holes in each edge. Secure to the sides as shown using glue and 1-1/4” pocket hole screws. The shelves will be set ¾” back from the front edge of the sides.

Step 4:

Cut the piece for the back and attach using glue and 1-1/4” brad nails.

Step 5:

Cut the piece for the top. Attach to the sides using glue and 1-1/4” pocket hole screws.

Step 6:

Cut the pieces for the drawer boxes. Assemble as shown using glue and 1-1/4” pocket hole screws. Cut the pieces for the drawer bottoms. Attach to the drawer boxes using glue and 1-1/4” brad nails. Attach the drawer slide hardware according to the manufacturer’s instructions. Make any necessary adjustments.

Step 7:

Cut the pieces for the drawer fronts. There will be a 1/8” gap all around. Attach the drawer pulls.

Fill any Screw, Nail or Pocket Holes, Sand and Finish as Desired.


The original plan can be found at http://www.thedesignconfidential.com/2012/09/free-diy-furniture-plans-build-west-elm-inspired-emmerson-3-drawer-dresser/


[email_link]

1 2