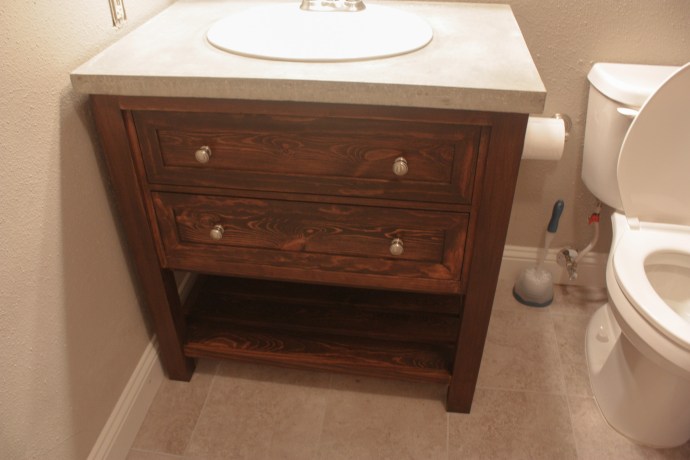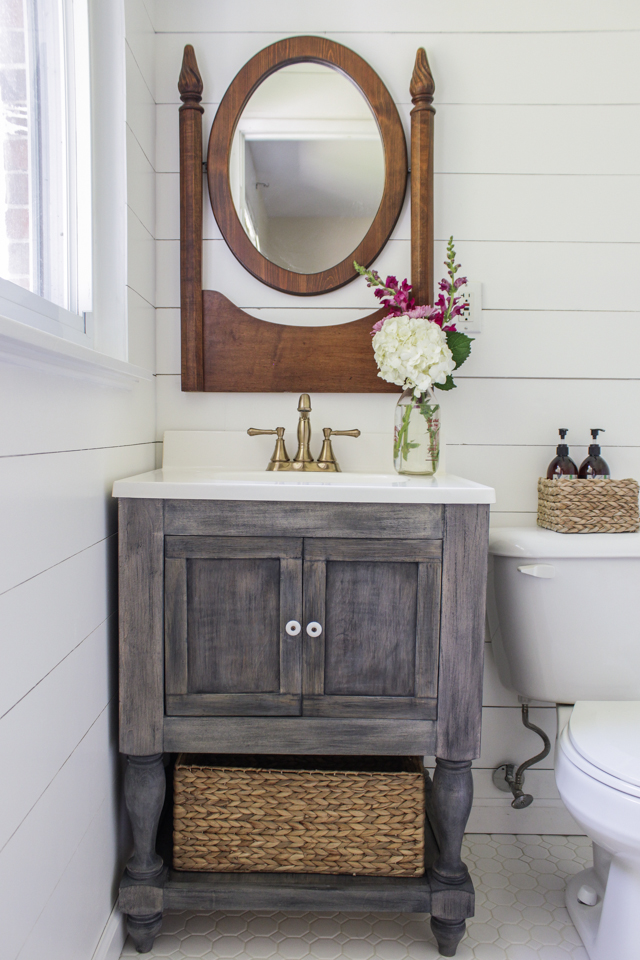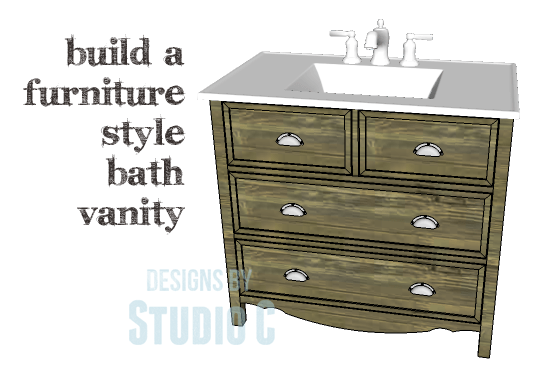
Bathroom Vanity

Materials:

  • 1-1/4″ pocket hole screws
  • 1-1/4″ brad nails
  • Edge banding, optional
  • 2 sets of 16″ Drawer slides
  • Cabinet pulls
  • Wood glue
  • Sandpaper (100, 150, 220 grits)
  • Finishing supplies (primer & paint, or stain, sealer)

Lumber:

  • 2 – 1×2 at 6′
  • 1 – 1×4 at 4′
  • 2 – 1×8 at 8′
  • 2 – 2×2 at 8′
  • 1 – 2′ x 4′ sheet of 1/2″ plywood
  • 1 – 4′ x 8′ sheet of 3/4″ plywood
  • 1 – 3/4″ square dowel at 3′
  • 3 – 1/4″ x 3/4″ decorative moulding at 8′

Cut List:

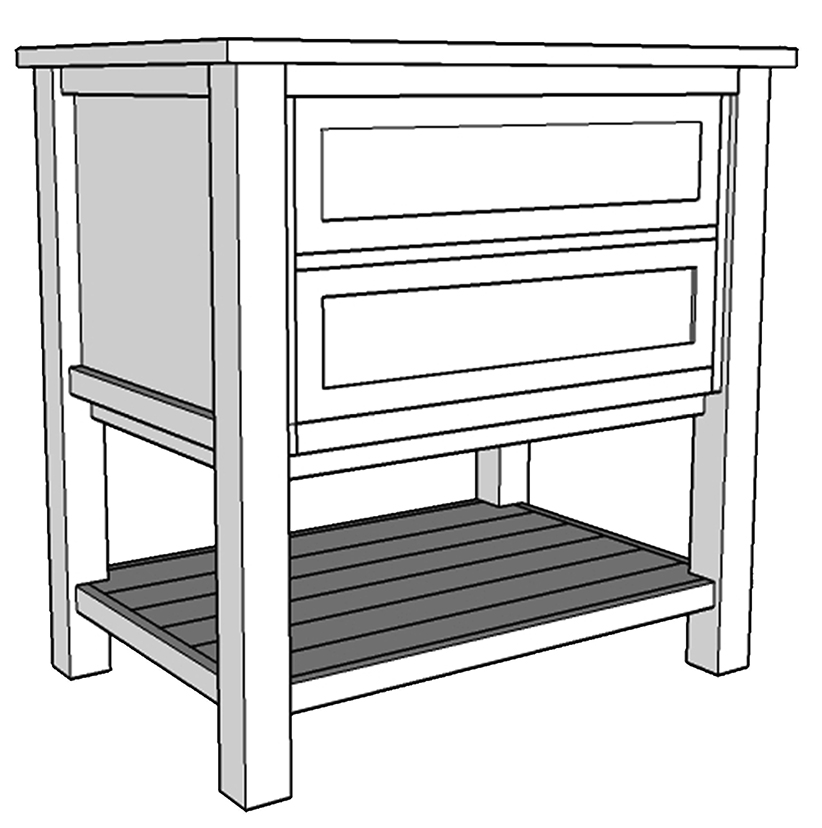
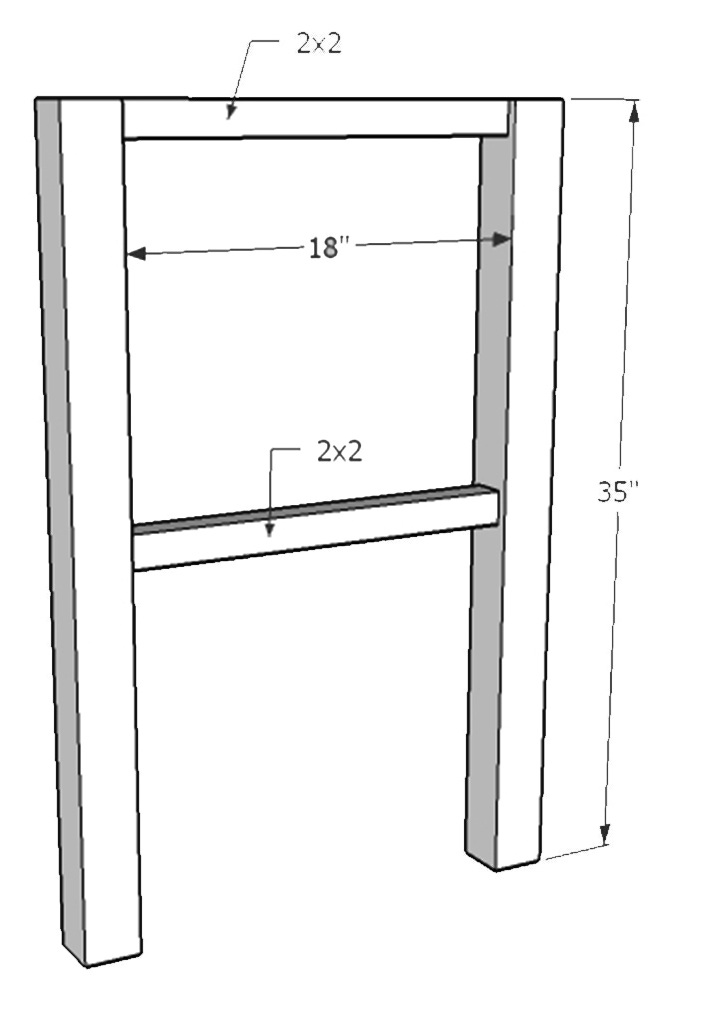
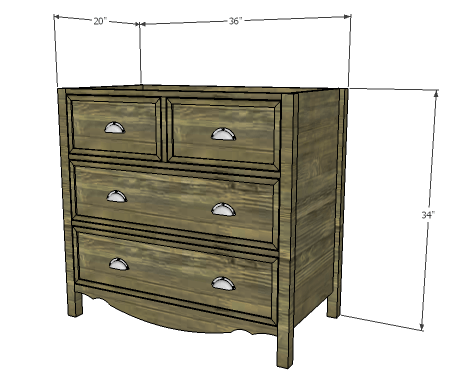
  • 4 – 2×2 at 34″ – Legs
  • 2 – 3/4″ plywood at 17″ x 30″ – Side Panels
  • 1 – 3/4″ plywood at 30″ x 33″ – Back
  • 1  – 1×3 at 33″ – Curved Lower Stretcher
  • 3 – 1×2 at 33″ – Front Stretchers
  • 1 – 1×2 at 8-1/2″ – Drawer Divider
  • 2 – 3/4″ plywood at 14-1/2″ x 30-1/2″ – Drawer Box Bottom
  • 4 – 1×8 at 14-1/2″ – Drawer Box Sides
  • 4 – 1×8 at 32″ – Drawer Box Front & Back
  • 2 – 1/2″ plywood at 8-3/4″ x 32-3/4″ – Drawer Front Base
  • 4 – 1/4″ x 3/4″ moulding at 8-3/4″ – Drawer Front Side Trim
  • 4 – 1/4″ x 3/4″ moulding at 32-3/4″ – Drawer Front Top & Bottom Trim
  • 4 – 3/4″ square dowels at 8-1/2″ – False Drawer Spacers
  • 2 – 1/2″ plywood at 8-1/4″ x 15-7/8″ – False Drawer Front Base
  • 4 – 1/4″ x 3/4″ moulding at 8-1/4″ – False Drawer Front Side Trim
  • 4 – 1/4″ x 3/4″ moulding at 15-7/8″ – False Drawer Front Top & Bottom Trim
Directions:

Step 1:

Edge banding will be applied to the exposed edges of the plywood prior to assembly.

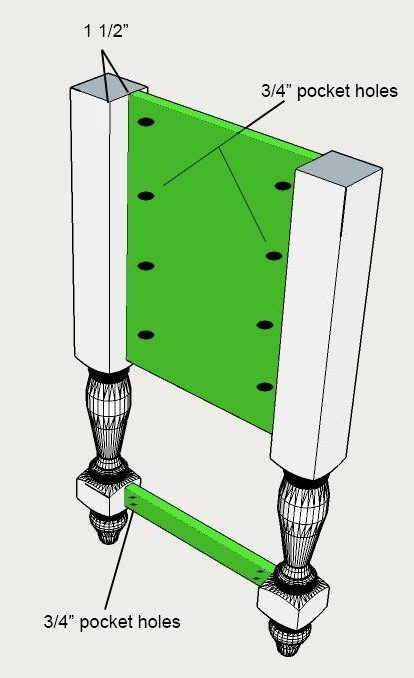
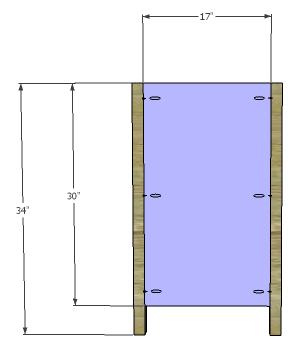
Cut the pieces for the legs and the side panels. With the pocket hole jig set for 3/4″ material, drill pocket holes in the long edges of the side panels. Secure the side panels to the legs using glue and 1-1/4″ pocket hole screws. The back face of the panels will be flush with the inside faces of the legs.
Step 2:

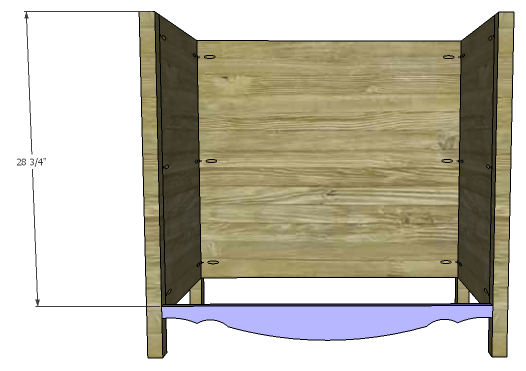
Cut the piece for the back panel and drill pocket holes along the side edges. Secure the panel to the legs using glue and 1-1/4″ pocket hole screws. The back face of the panel will be flush with the inside faces of the legs.

Step 3:

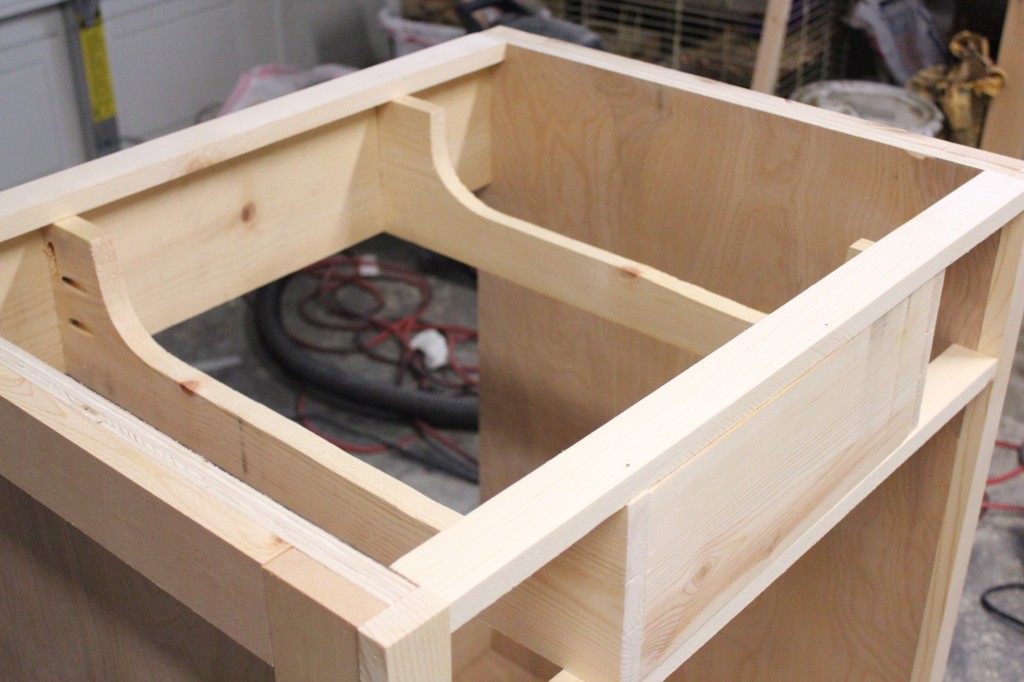
Cut the piece for the lower curved stretcher. Maintaining the side dimension (1-1/4″) and the center dimension (3-1/2″), draw a decorative curve in the board. The top edge will remain straight. Cut the curve using a jigsaw or a bandsaw.

Drill pocket holes in the side edges, and secure the stretcher to the legs using glue and 1-1/4″ pocket hole screws. The front face of the stretcher will be flush with the front face of the legs.

Step 4:

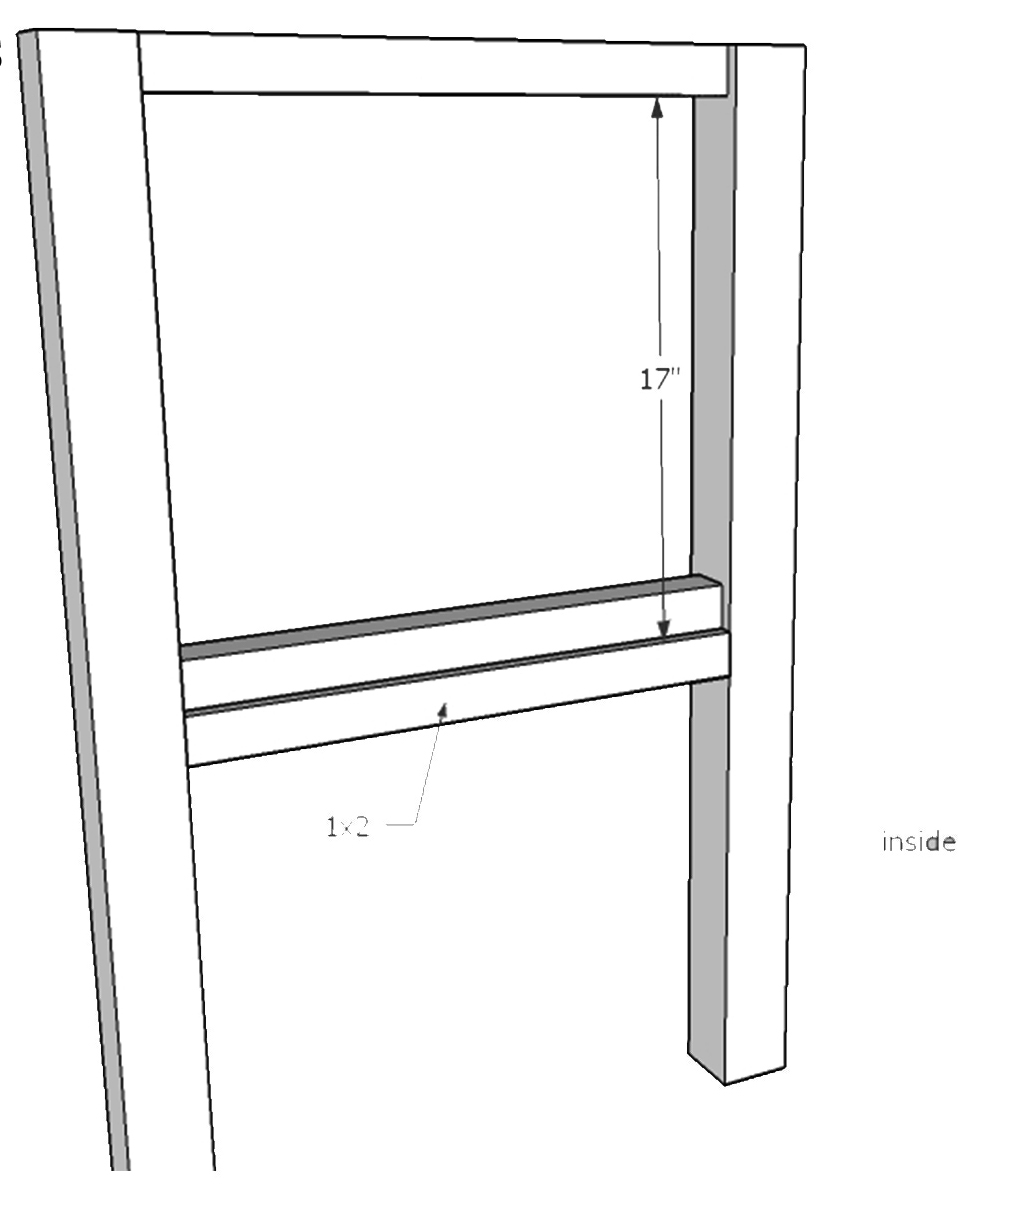
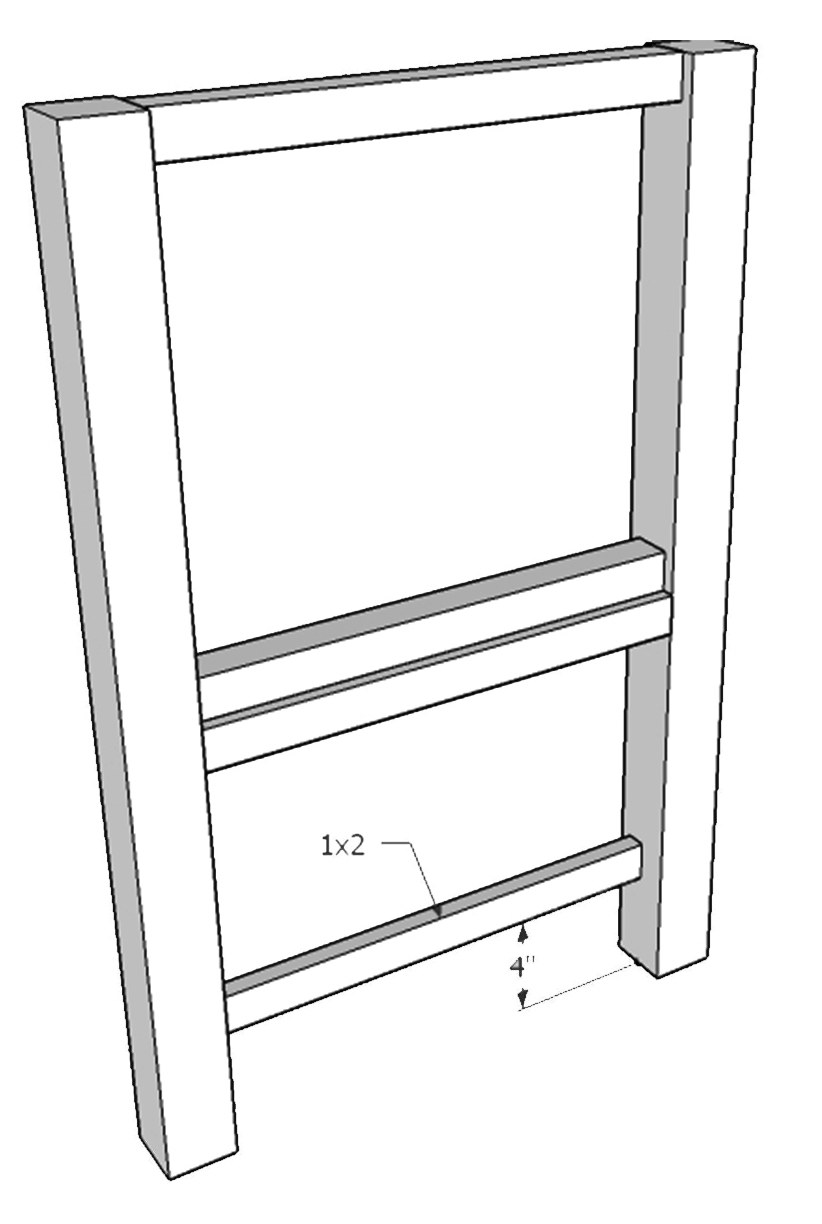
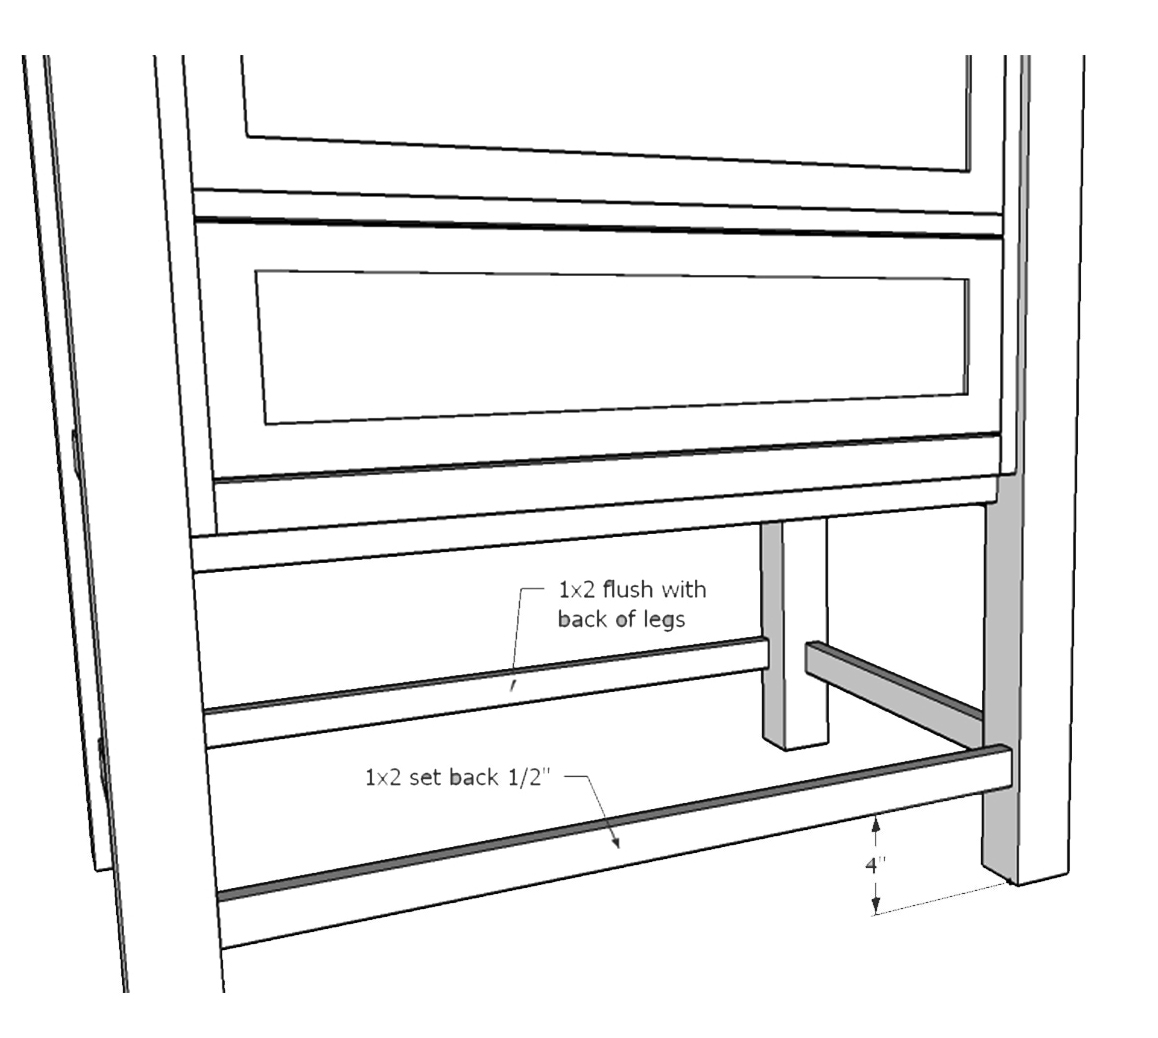
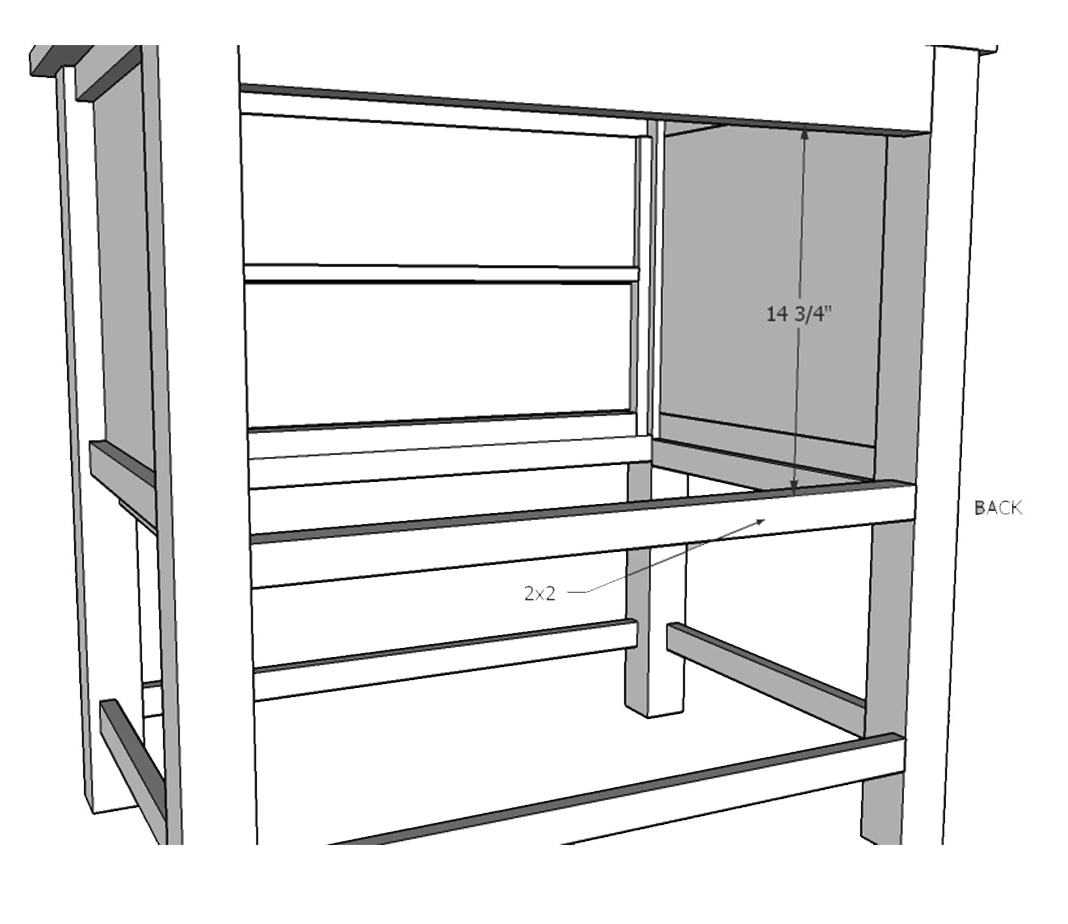
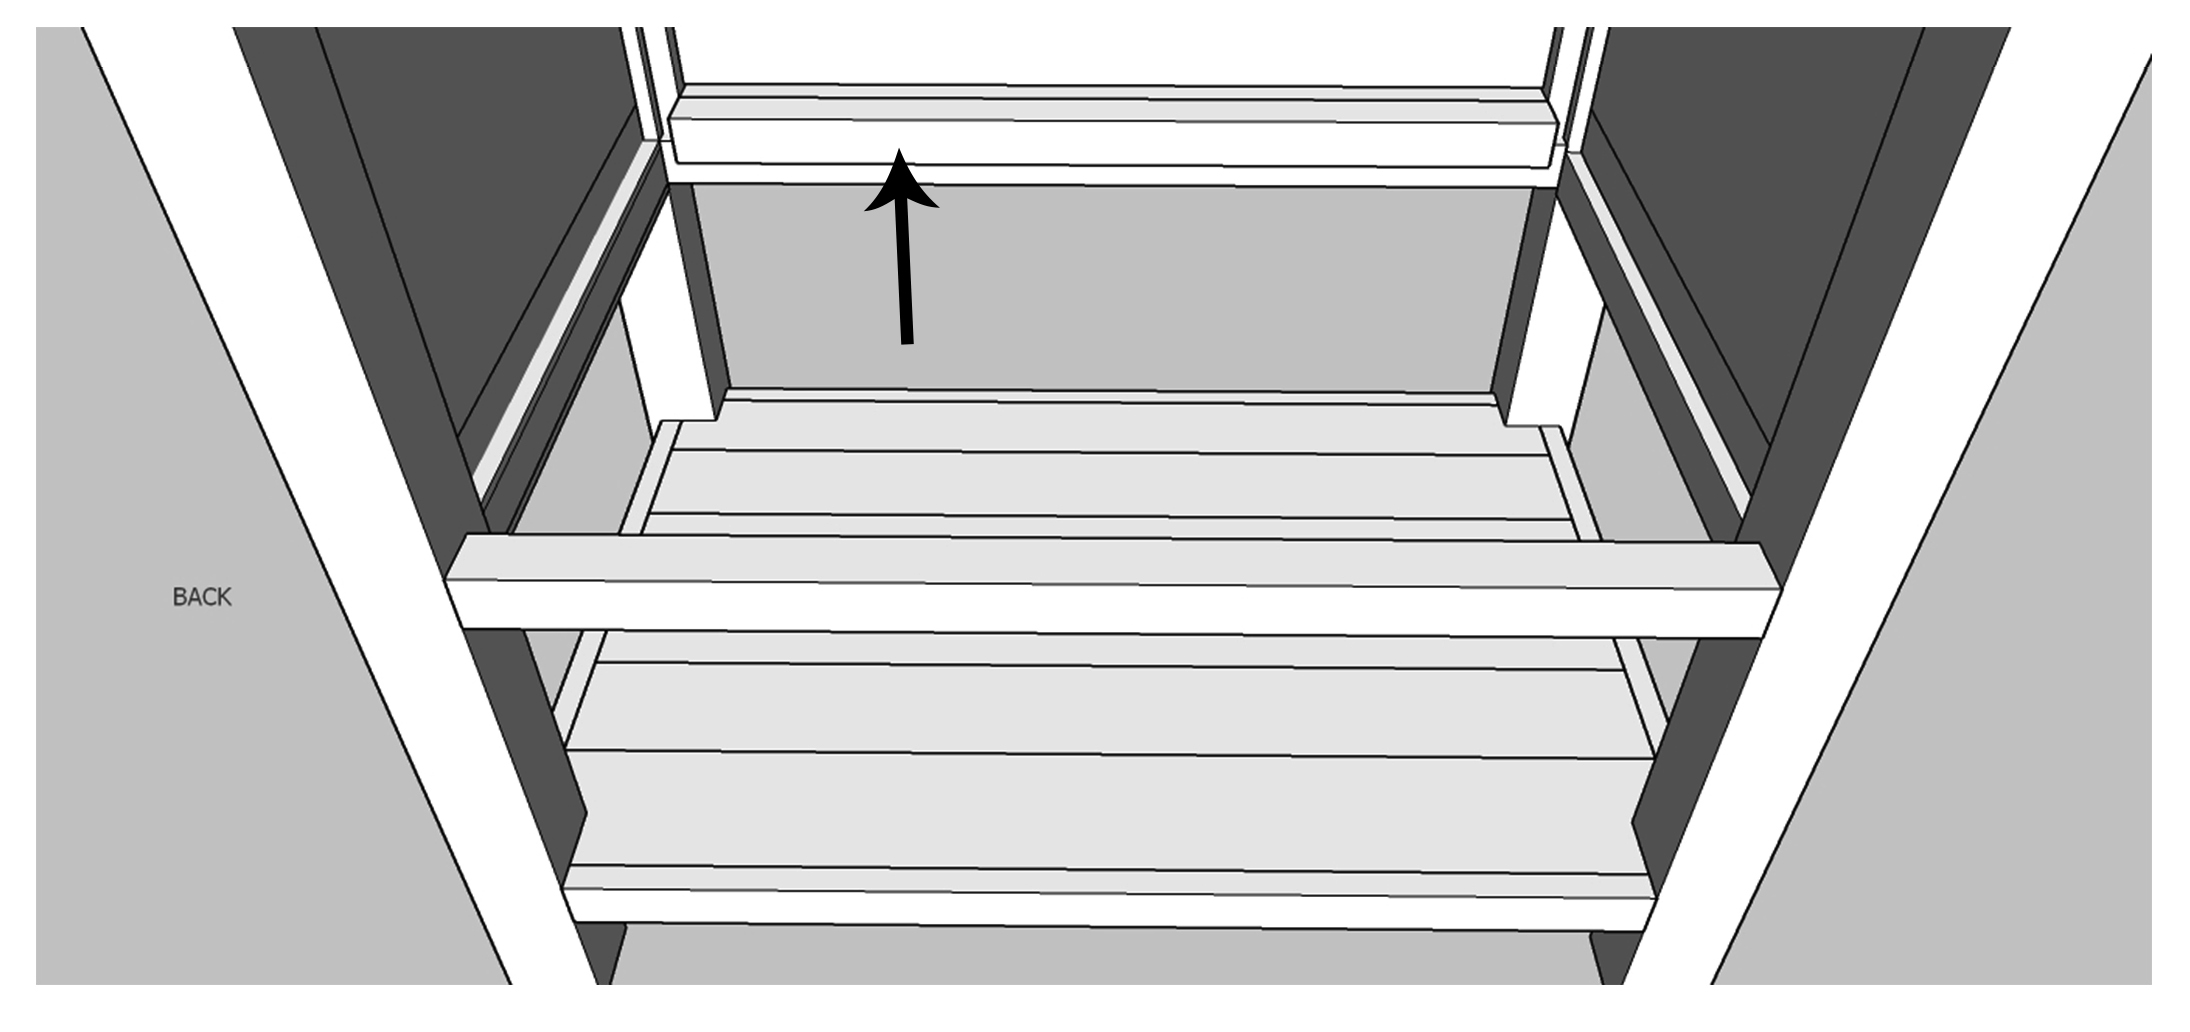
Cut the pieces for the stretchers and drill pocket holes in each end. Secure the stretchers to the legs as shown using glue and 1-1/4″ pocket hole screws. On the middle stretcher and the lower stretcher, orient the pocket holes so they face down. The pocket holes on the upper stretcher will face up and will be covered by the countertop.

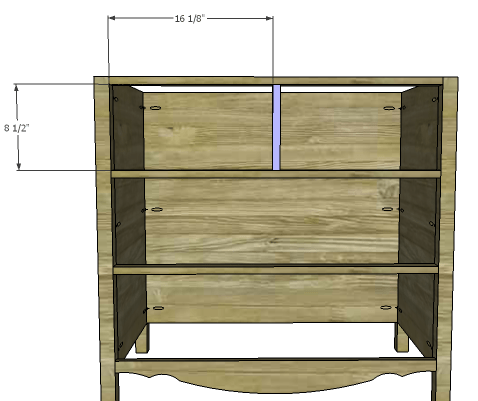
Cut the piece for the drawer divider. Secure in place using glue and 1-1/4″ brad nails through the stretchers above and below it.

Step 5:

Before cutting the drawer boxes, make sure the p-trap or any other plumbing will not interfere with the upper drawer. The drawer can be shortened, or a notch cut in the back of the drawer box to accommodate the plumbing.

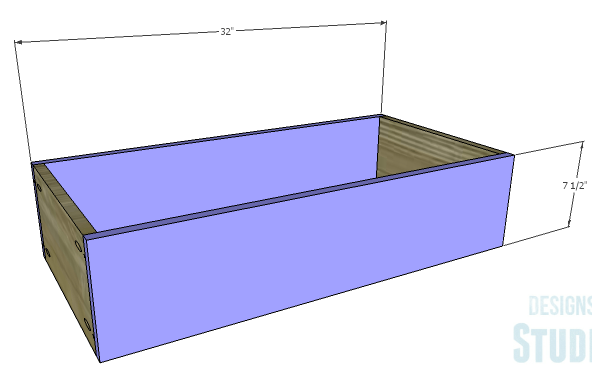
Cut the pieces for the drawer boxes. Drill pocket holes in all four edges of the bottom as well as each end of the sides. Assemble the drawer boxes as shown using glue and 1-1/4” pocket hole screws. Install the drawer slides according to the manufacturer’s installation instructions, locating them ¾” back from the front edge of the sides. Make any necessary adjustments.

Step 6:

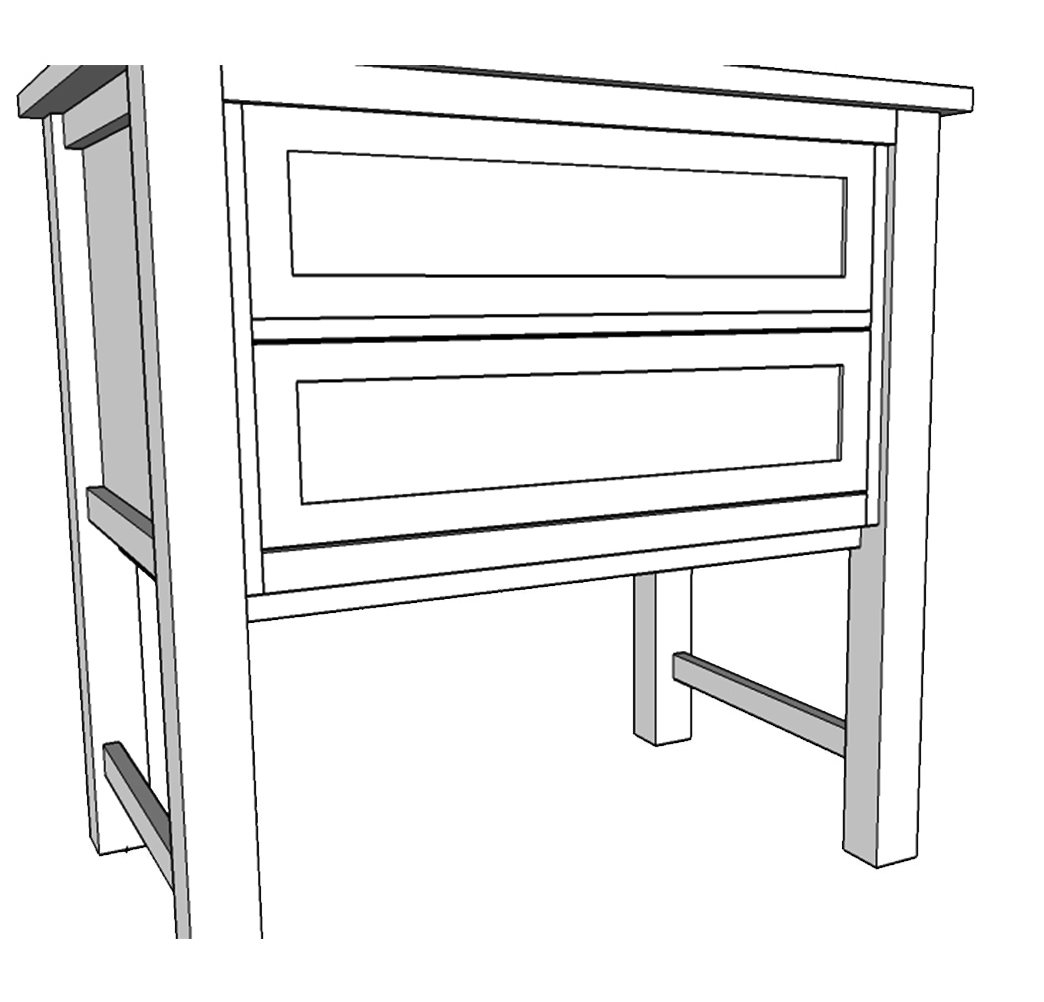
Cut the pieces for the drawer fronts as well as the moulding for the trim. Position the moulding on the front face of the drawer fronts and secure in place using glue. Clamp until dry.

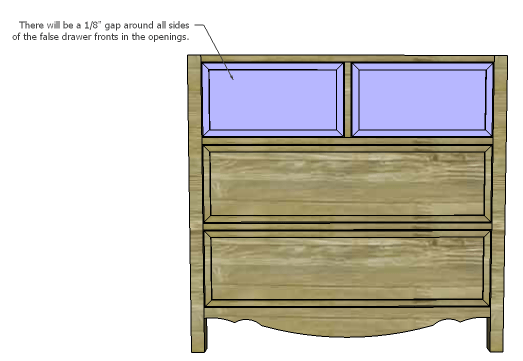
Mark the position for the drawer pulls and drill the holes. Shim the drawer front in the opening – there will be a 1/8” gap around all sides – then drive screws through the holes for the drawer pulls into the drawer box. Open the drawer, and secure the drawer front using countersunk 1-1/4” screws from the inside. Remove the screws from the holes for the drawer pull then finish drilling the holes. Install the drawer pull.

Step 7:

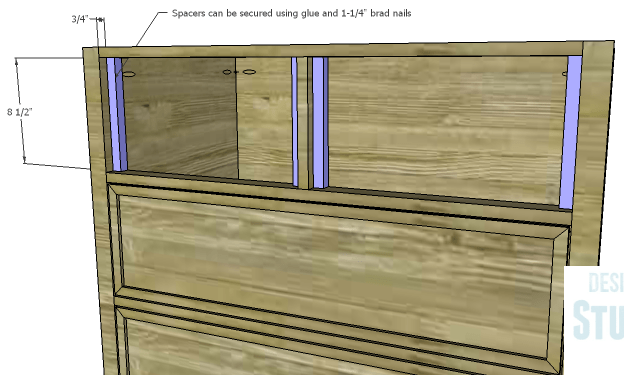
Cut the pieces for the false drawer front spacers. Secure the spacers in place using glue and 1-1/4″ brad nails through the spacers into the legs and drawer divider. The spacers will be positioned 3/4″ back from the front edge of the stretchers making them flush with the back edge.
Step 8:

Cut the pieces for the false drawer fronts. Apply the moulding in the same manner as the drawer fronts. There will be a 1/8″ gap around each of the false fronts in the openings. Shim the false fronts in place, then secure them to the spacers using glue and 1-1/4″ brad nails.

Finish as desired

The original plan can be found at http://designsbystudioc.com

 
[email_link]
 

Bathroom Vanity

The vanity is constructed almost entirely out of plywood with edge banding applied. This was to keep the cost down as we were using oak plywood.

Materials:

  • 1″ pocket hole screws
  • 1-1/4″ pocket hole screws
  • 3 sets of 18″ drawer slides
  • 3 sets of shelf pins
  • Edge banding, if desired
  • 4 cabinet pulls
  • 1 set of hinges
  • Finishing supplies

Lumber:

  • 1 sheet of 3/4″ plywood
  • Half sheet of 3/4″ plywood – cabinet grade
  • Quarter sheet of 1/2″ plywood
  • Scrap piece of 1×2

Cut List:

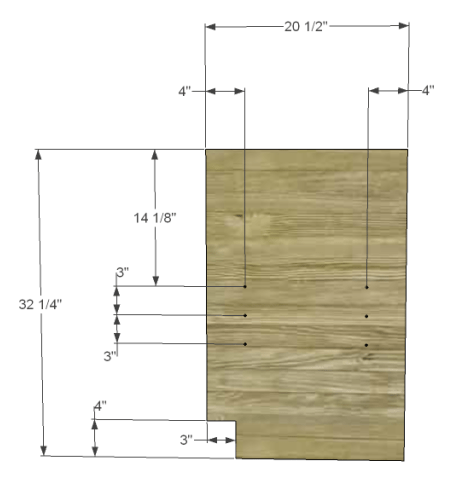
  • 2 – 3/4″ plywood at 20-1/2″ x 32-1/4″ – Sides
  • 1 – 3/4″ plywood at 20-1/2″ x 28-1/2″ – Bottom
  • 1 – 3/4″ plywood at 4″ x 28-1/2″ – Kickplate
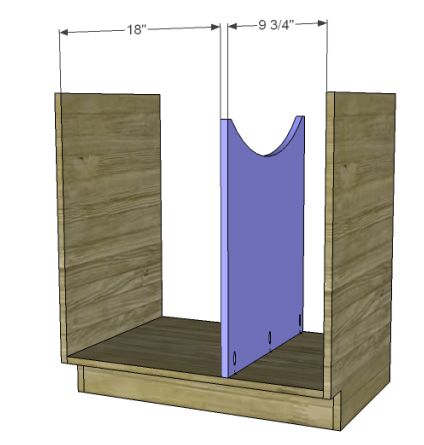
  • 1 – 3/4″ plywood at 20-1/2″ x 25″ – Divider
  • 1 – 1×2 at 9-3/4″ – Divider Support
  • 2 – 3/4″ plywood at 2-1/2″ x 28-1/2″ – Upper Stretchers
  • 2 – 3/4″ plywood at 1-1/2″ x 9-3/4″ – Drawer Dividers
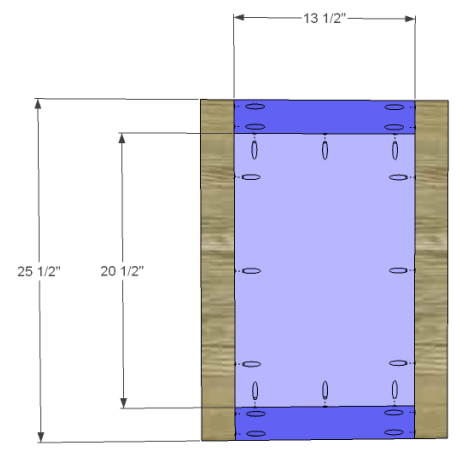
  • 2 – 3/4″ plywood at 2-1/2″ x 13-1/2″ – Door Rails
  • 2 – 3/4″ plywood at 2-1/2″ x 25-1/2″ – Door Stiles
  • 1 – 1/2″ plywood at 13-1/2″ x 20-1/2″ – Door Panel
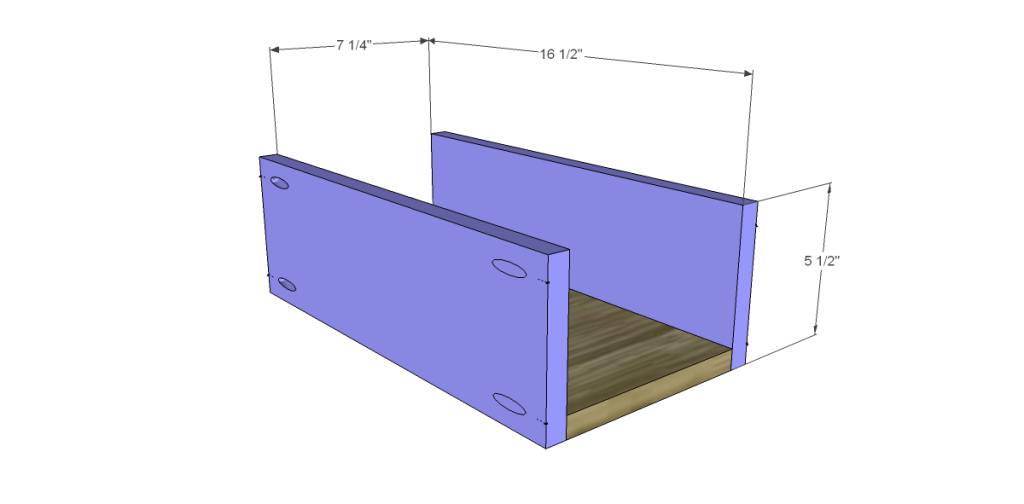
  • 3 – 3/4″ plywood at 7-1/4″ x 16-1/2″ – Drawer Bottoms
  • 6 – 3/4″ plywood at 5-1/2″ x 16-1/2″ – Drawer Sides
  • 6 – 3/4″ plywood at 5-1/2″ x 8-3/4″ – Drawer Front & Back
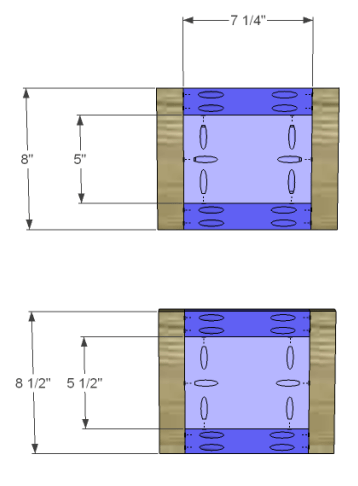
  • 6 – 3/4″ plywood at 1-1/2″ x 7-1/4″ – Drawer Front Rails
  • 2 – 3/4″ plywood at 1-1/2″ x 8″ – Upper Drawer Front Stiles
  • 4 – 3/4″ plywood at 1-1/2″ x 8-1/2″ – Drawer Front Stiles
  • 1 – 1/2″ plywood at 5″ x 7-1/4″ – Upper Drawer Front Panel
  • 2 – 1/2″ plywood at 5-1/2″ x 7-1/4″ – Drawer Front Panels
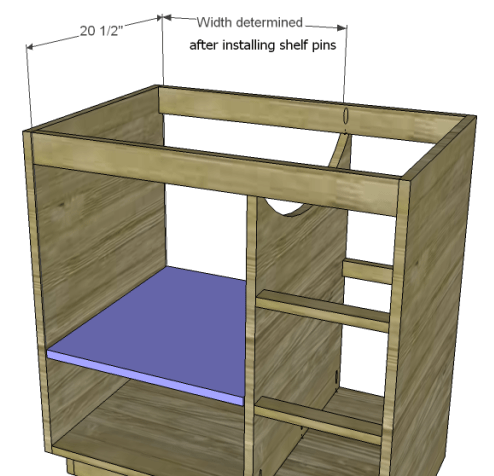
  • 1 – 3/4″ plywood at width (after shelf pins are installed) x 20-1/2″ – Shelf

Directions:

Step 1:

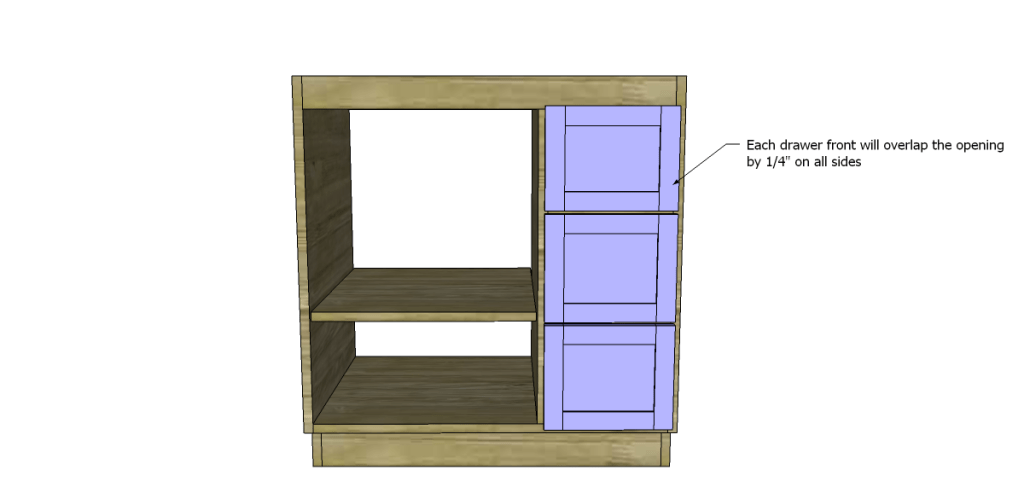
Edge banding will be applied before assembly! Cut the pieces for the sides. Cut the notch for the kickplate using a jigsaw. Drill the holes for the shelf pins (only on the side piece that will be on the left!) but only go about halfway through the plywood!

Step 2:

Cut the piece for the bottom and drill pocket holes at each end. Attach to the sides just above the horizontal line for the kickplate using glue and 1-1/4″ pocket hole screws.

Step 3:

Cut the piece for the kickplate and drill pocket holes at each end. Secure as shown using glue and 1-1/4″ pocket hole screws.

Step 4:

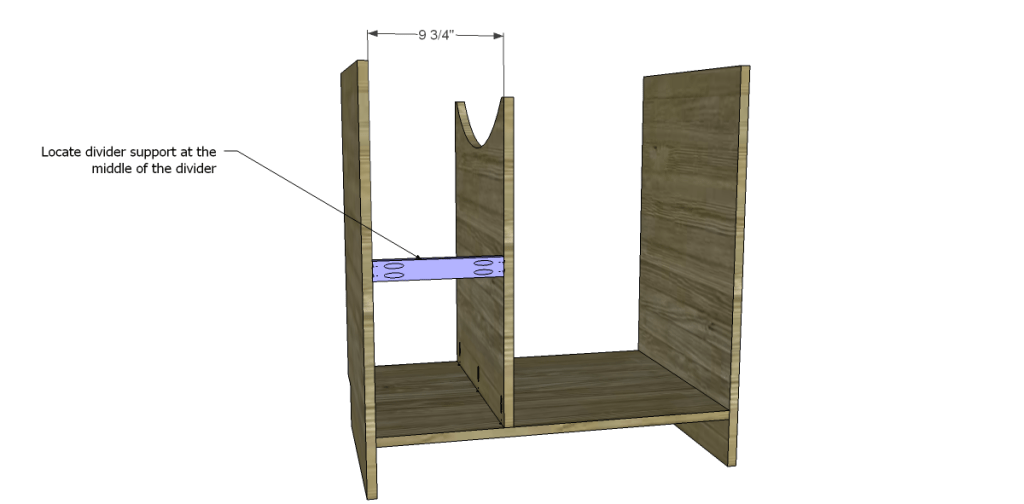
Cut the piece for the divider. Cut the arc as shown using a jigsaw and leaving 3/4″ square at each end of this edge. Drill pocket holes in the lower edge (opposite the side that is shown in the drawing). On the opposite side, drill holes for the shelf pins as shown. Secure the divider to the bottom as shown using glue and 1-1/4″ pocket hole screws.

Step 5:

Cut the piece for the divider support and drill pocket holes in each end. Position at the center of the divider and attach using glue and 1-1/4″ pocket hole screws.

Step 6:

Cut the pieces for the upper stretchers. Drill pocket holes in each end as well as one pocket hole as shown to secure the divider. (Drill the pocket hole on the piece as shown in the drawing, then reverse the dimensions to drill the pocket hole in the other piece.) Position as shown, then secure to the sides and the divider using glue and 1-1/4″ pocket hole screws.

Step 7:

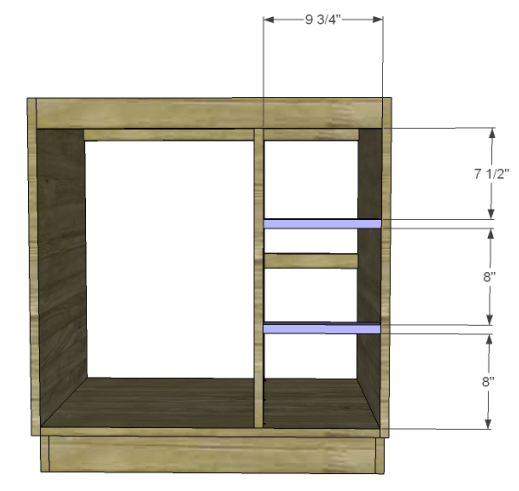
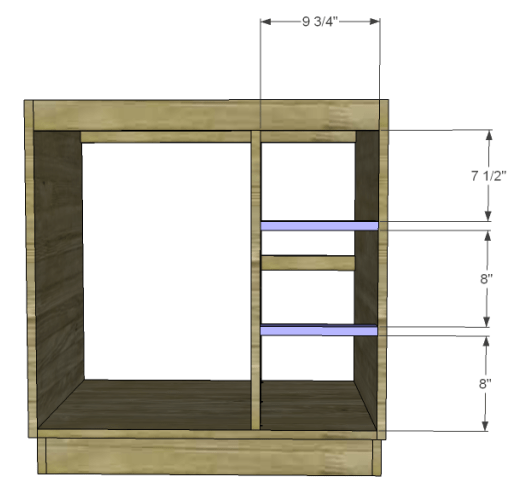
Cut the pieces for the drawer stretchers and drill holes in each end. Position as shown then secure using glue and 1-1/4″ pocket hole screws.

Step 8:

Install the shelf pins to determine the width of the shelf, then cut the piece for the shelf and position it inside.. In our case, the shelf would measure 17-3/4″ wide.

Step 9:

Cut the pieces for the drawers. Drill pocket holes in each end of the side pieces as well as all four edges of the bottom. Assemble as shown using glue and 1-1/4″ pocket hole screws. Install the drawer slides according to the manufacturer’s instructions. Make any necessary adjustments, then install the drawer boxes.

Step 10:

Cut the pieces for the drawer fronts. Drill pocket holes as shown. Attach the rails to the center panels using glue and 1″ pocket hole screws. The back face of the panel will be flush with the back face of the rails. Attach the stiles to the assembly using glue and 1-1/4″ pocket hole screws through the rails and 1″ pocket hole screws through the panel. Locate and drill holes for the cabinet pull. The drawer fronts will overlap the opening by 1/4″ on all sides. Drive screws through the holes drilled for the cabinet pull into the drawer box. Open the drawer, then secure the front from the inside of the box.

Step 11:

Cut the pieces for the door and assemble in the same manner as the drawer fronts. Attach the hinges according to the manufacturer’s instructions.

Finish as desired.

The original plan can be found at http://designsbystudioc.com/

 
[email_link]
 

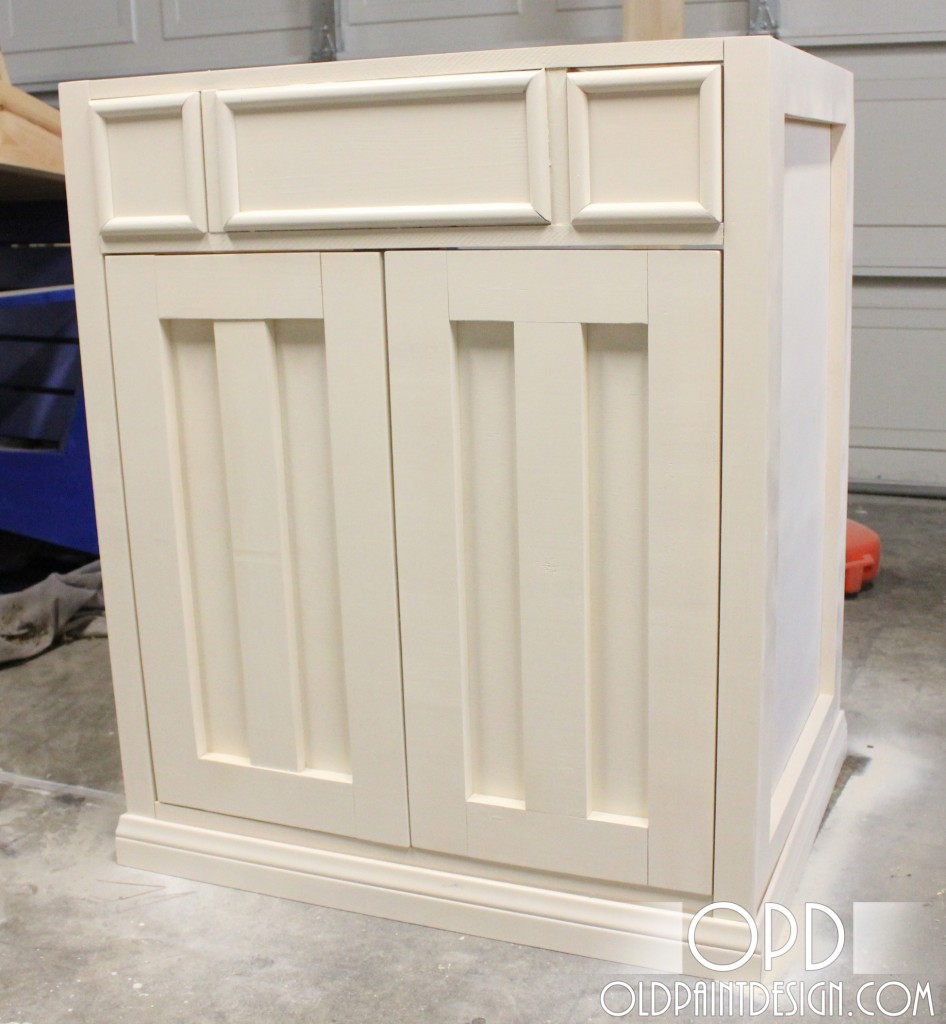
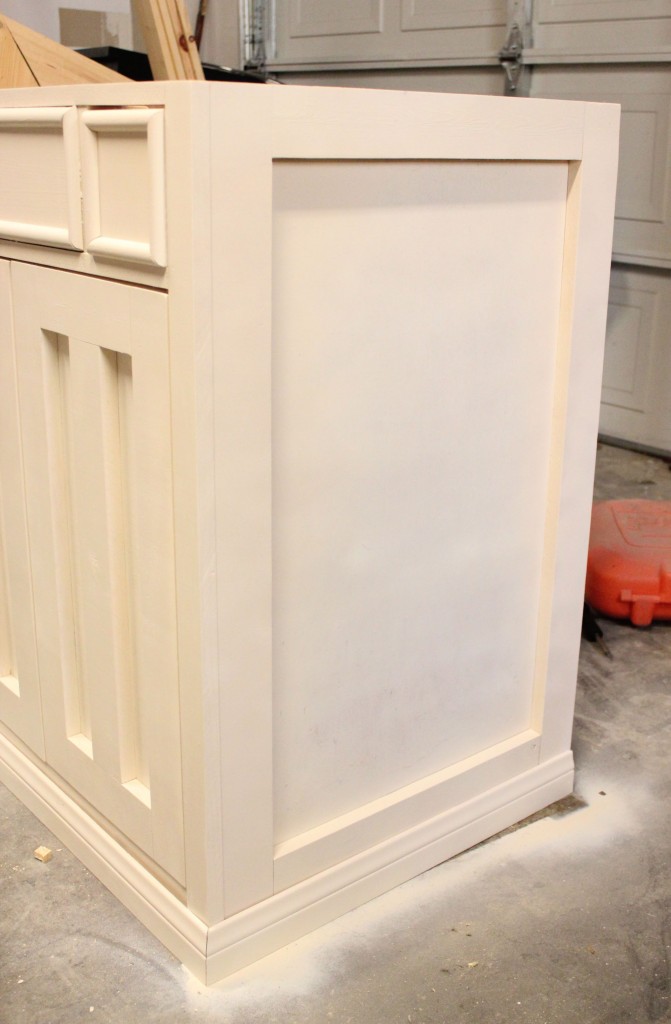
Napoleon Bathroom Vanity

Shopping List:

Wood:

  • 2 – 1×2 @ 9 ft long
  • 4 – 1×3 @ 8 ft long
  • 1 – 1×4 @ 9 ft long
  • 1 – 1×6 @ 9 ft long
  • 1 – piece of half round molding @ 9 ft long
  • 1 – piece of 2 1/2″ base molding @ 9 ft long
  • 1 – Sheet of 3/4″ plywood (you will have quite a bit of scrap for your next project)*
  • 1/4 – Sheet of 1/4″ plywood

Hardware and Supplies:

  • 2 – sets of cheap-o bottom mount 20″ or 22″ drawer slides
  • 2 – sets of Euro Inset Hinges
  • 1 1/4″ Screws
  • 1 1/4″ Pocket Hole Screws
  • 5/8″ Finishing Nails
  • 1 1/4″ Finishing Nails
  • 2″ Finishing Nails
  • Wood Glue
  • Wood Filler
  • Medium Grit Sandpaper
  • Primer or Wood Conditioner
  • Paint or Stain


Cut List:

  • 2 – 1/4″ PLY @ 24 1/2″ x 16 1/4″ – Door Back
  • 2 – 1/4″ PLY @ 22 3/4 x 4 1/2″ – Drawer Bottom
  • 2 – 3/4″ PLY @ 35″ x 23 1/2″ – Side
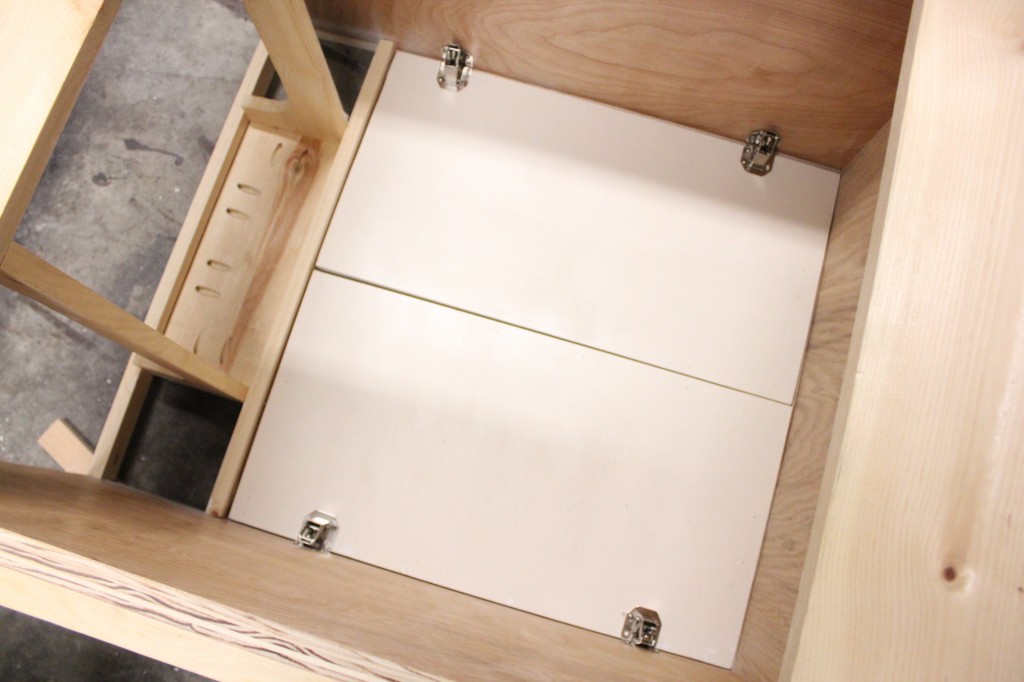
  • 1 – 3/4″ PLY @ 33″ x 23 1/2″ – Bottom Shelf
  • 1 – 1×2 @ 33″ – Base Support
  • 2 – 1×2 @ 35″ – Side Trim (front)
  • 3 – 1×2 @ 33″ Front Trim
  • 2 – 1×3 @ 19 1/2″ – Door Trim (center)
  • 4 – 1×3 @ 24 1/2″ – Door Trim (sides)
  • 4 – 1×3 @ 11 1/4″ – Door Trim (top/bottom)
  • 4 – 1×3 @ 35″ – Side Trim (sides)
  • 4 – 1×3 @ 18 1/2″ – Side Trim (top/bottom)
  • 4 – 1×4 @ 3 1/2″ – Drawer Back/Inside Front
  • 4 – 1×4 @ 22 3/4″ – Drawer Side
  • 2 – 1×6 @ 33″ – Back Support
  • 2 – 1×6 @ 5 1/4″ – Drawer Front
  • 2 – 1×6 @ 23 1/2″ – Drawer Side Support
  • 1 – 1×6 @ 20 1/2″ – Fake Drawer Front Base molding and half round cut to fit

General Instructions:

Make sure to re-measure and check for square after every step.  Sometimes when building your measurements can be off very slightly, and it’s important for this plan that your numbers are exact.  (Especially when working with doors and drawers!)  Measure your available space and purchase your sink before building this plan to make sure that it will fit.

Step 1:

Cut plywood as shown above.  My mock-up is based on a full 4′x8′ sheet, but this project is much more ideal if you are able to use up some plywood scrap for the 1/4″ piece.

Step 2:

Attach 1×3 trim along the outside edge of of your plywood with 1 1/4″ finishing nails and glue, leaving a 1 3/4″ gap between the base and the bottom of your lowest piece of horizontal trim.

Step 3:

Attach your side trim (front) to the side of your base with 1 1/4″ finishing nails and glue. Repeat steps 2-3 to create the other side, remembering to put the side trim (front) on the opposite side of the other panel.  (The side with the trim will be the front of your vanity.)

Step 4:

Attach 1×6 and 1×2 back and top supports with your Kreg Jig using 1 1/4″ screws and wood glue.  For the top of the back section, add the 1×2 first to get the positioning of your 1×6 right underneath it.  Attach these two pieces together with 1 1/4″ screws, remembering to countersink your holes.  In addition to the kreg screws, I also attached the 1x2s from the outside with 2″ finishing nails to prevent the board from rotating.

Step 5:

Attach the bottom shelf with your Kreg Jig and 1 1/4″ pocket hole screws, making sure that it’s level.  The back of the plywood should fit underneath your base support 1×6.

Step 6:

Join the fake drawer front to your drawer side supports using your Kreg Jig before attaching it to the inside of the console.  There should be a 5 1/2″ gap on either side of the side supports when placed inside the vanity.  Kreg Jig the drawer side supports to the 1×6 back support of the vanity using 1 1/4″ pocket hole screws.  Attach the top of the fake drawer front to the 1×2 top support using your Kreg Jig. Depending on the size of your sink, you may have to notch out your 1x6s to make room for it.  Since my vanity had to be smaller to fit the space, I had to do this.  I used my jigsaw to cut out large, rounded rectangles to make room for the sink, making sure to keep the bottom at least 2″ high at all times to allow for future drawer slides.  If you need this step, make sure to do it first, before attaching them to your fake drawer front. Since this step is a bit complicated, here are a few additional pictures to help.

Side view of the notched out 1×6 drawer supports to make room for the sink.

Front-ish view of the vanity, showing the notched boards and kreg screws into the back 1×6 support

View from behind the vanity showing the kreg screws on fake drawer front to the 1×2 top.

Step 7:

Attach 1×2 front trim underneath your fake drawer to the sides of your vanity using your Kreg Jig.  Use 2″ finishing nails to give it some extra support on either side and 1 1/4″ finishing nails to attach it to your fake drawer. Attach base trim to the bottom shelf using 1 1/4″ finishing nails and wood glue.

Step 8:

Build your drawer as shown above using your Kreg Jig and 1 1/4″ finishing nails.  (My drill wasn’t big enough to get into the small spaces, so I Kreg Jig-ed one drawer front/back piece to each side and then used 1 1/4″ finishing nails to attach the two pieces like a puzzle.  Attach the 1/4″ plywood base to the bottom of each drawer using 1 1/4″ finishing nails and glue.

Step 9:

Attach your drawer slides as shown above to both the drawer and the inside of both the right and left sides of the vanity.

Step 10:

Center the fronts of your drawers into the opening, leaving 1/8″ around all sides.  When it’s in place, attach with 1 1/4″ finishing nails.

Step 11:

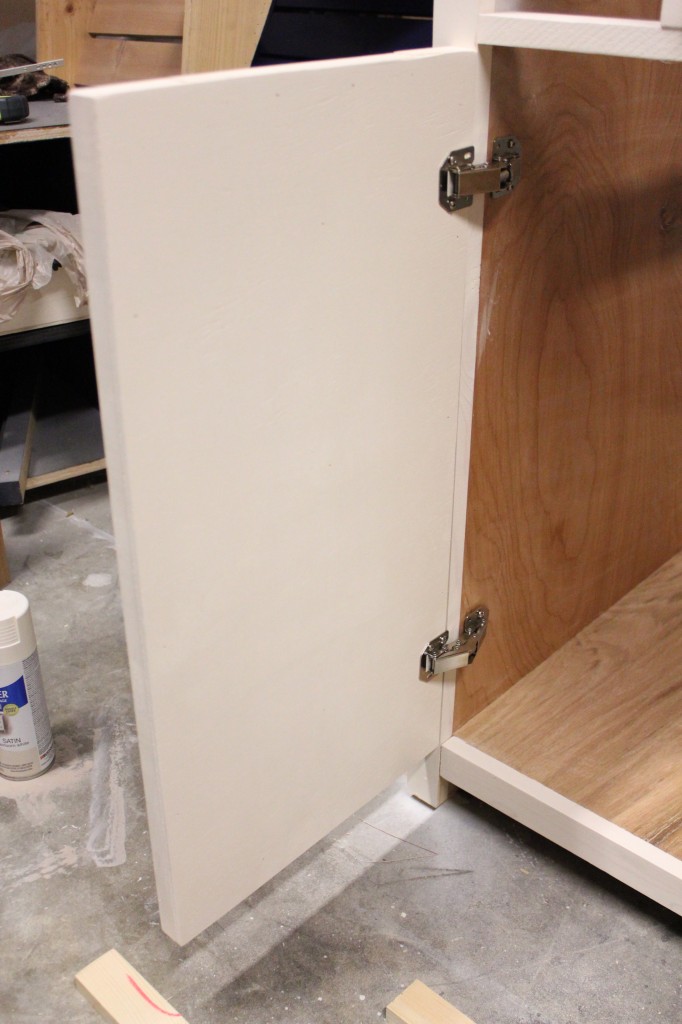
Attach 1×3 door trim to the your plywood from the back with 5/8″ finishing nails and glue.  There should be a 4 3/8″ space on either side of your center door trim between that and the insides of your side trim.  (For a stronger hold, you could kreg jig your 1x3s together from the back prior to attaching them to the plywood.) Attach each door to the inside of the vanity using your inset hinges, making sure to leave a 1/8″ gap on all sides.

Step 12:

Attach doors to the vanity using your inset hinges. Put your vanity face down and place your doors where you would like them to go, leaving 1/8″ along all sides.

Align hinges along the edges and screw in a few of the screws.  (I do two screws per hinge on the door side and two on the frame.)

Stand your console back up and test how the hinges work.  If they’re lining up where you want them to, screw in the other half of the screws.

Close your doors and enjoy your new hinges!

Step 13:

Attach base molding as shown, mitering your corners.  I’ve attached rough measurements, but make sure to measure your base prior to cutting – every handmade project is just a little different, and those 1/8″s count!

The original plan can be found at http://www.oldpaintdesign.com

 
[email_link]
 

Bathroom Vanity

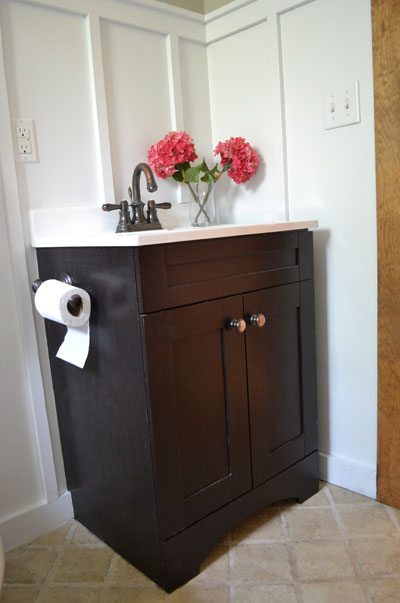
Build a small bath vanity with storage. These simple, step by step woodworking plans are designed for the beginner and can be built from a single sheet of plywood.

Shopping List: 

  • 1 Sheet of 3/4″ Plywood
  • 1 – 1×3 @ 8 feet long
  • 1 – 1×6 @ 4 feet long (optional)
  • 1 – 1×2 – 1/4″ thick stock @ 8 feet long (optional decorative door trim)
  • 1 – 25 foot long roll edge banding for stained finishes
  • 3/4″ finish nails or brad nails if you are applying decorative trim
  • Either pocket hole screws or countersunk screws/finish nails
  • 2 inch screws
  • 1 1/4 inch finish nails
  • 1-1/4″ Pocket Hole Screws
  • Elmer’s Wood Glue
  • Elmer’s Wood Filler
  • 120 grit sandpaper
  • Primer
  • wood conditioner
  • paint
  • paint brush

Cut List:

  • 1 – 3/4″ Plywood @ 22 1/2″ x 18″
  • 2 – 3/4″ Plywood @ 32″ x 18″
  • 2 – 3/4″ Plywood @ 30 3/4″ x 12″
  • 2 – 1×6 OR 3/4″ Plywood @ 24″
  • 4 – 1×3 @ 24″
  • Cut trim pieces to fit door faces

Step 1: 

Cut plywood as shown above, with the grain, cutting long cuts first. So you would cut an 18″ wide strip off of your plywood, and then from that 18″ strip, cut the sides and shelf. You can ask the lumber store to make the cuts for you, and your plywood will be easier to transport and store.

Step 2: 

Place the bottom shelf as shown above between the sides, either using the Kreg Jig or countersunk screws or 2″ finish nails and wood glue.

Step 3: 

Attach the 1x3s as shown above. The front 1×3 needs to be placed with a 4″ space above it. The back 1x3s need to be placed at the top, bottom of the bottom shelf, and centered.

Step 4: 

Now the toe kick. Cut out and attach with 2″ finish nails and wood glue.

Step 5: 

Now the front apron. Same thing.

Step 6: 

For the front apron, you can glue and attach the 1/4″ trim pieces as shown above.

Step 7 Instructions: 

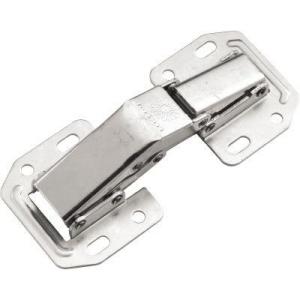
And the doors. You can attach trim pieces as well. The best hinges I’ve found for doors like these (full overlay) are these ones from the Home Depot

Preparation Instructions: 

Fill all holes with wood filler and let dry. Apply additional coats of wood filler as needed. When wood filler is completely dry, sand the project in the direction of the wood grain with 120 grit sandpaper. Vacuum sanded project to remove sanding residue. Remove all sanding residue on work surfaces as well. Wipe project clean with damp cloth. It is always recommended to apply a test coat on a hidden area or scrap piece to ensure color evenness and adhesion. Use primer or wood conditioner as needed.

The original plan can be found at http://www.ana-white.com

 
[email_link]

Bathroom Vanity

Materials:

  • (4) 3×3 x 36″ poplar legs
  • (1) 3/4″ project panel 2′ x 4′
  • (2) 2×2 x 8 Lumber
  • (1) 2×6 x 8′ Lumber
  • (1) 1×8 x 8′ Lumber
  • (2) 1×4 x 8′ Lumber
  • (3) 1×2 x 8′ Lumber
  • (2) 1/4″ x 1 1/2″ x 8′ moulding
  • 2 inset hinges
  • 2 magnetic clasps
  • 4 knobs

Cut List:

  • (4) 3×3 @ 35″
  • (2) 2×2 @ 29″
  • (1) 2×2 @ 27 1/2″
  • (1) 2×6 @ 29″
  • (4) 2×2 @ 18″
  • (1) 1×8 @ 27 1/2″
  • (1) 1×8 @ 27 1/4″
  • (2) 3/4″ x 15 1/2″ x 18″ plywood
  • (2) 1×2 @ 17″
  • (3) 1×2 @ 29″
  • (1) 1×2 @ 27 1/2″
  • (4) 1×2 @ 18″
  • (2) 1/4″ x 1 1/2″ @ 7″ mitered at 45
  • (4) 1/4″ x 1 1/2″ @ 27 1/4″ mitered at 45
  • (2) 1/4″ x 1 1/2″ @ 7 1/4″ mitered at 45

Step 1:

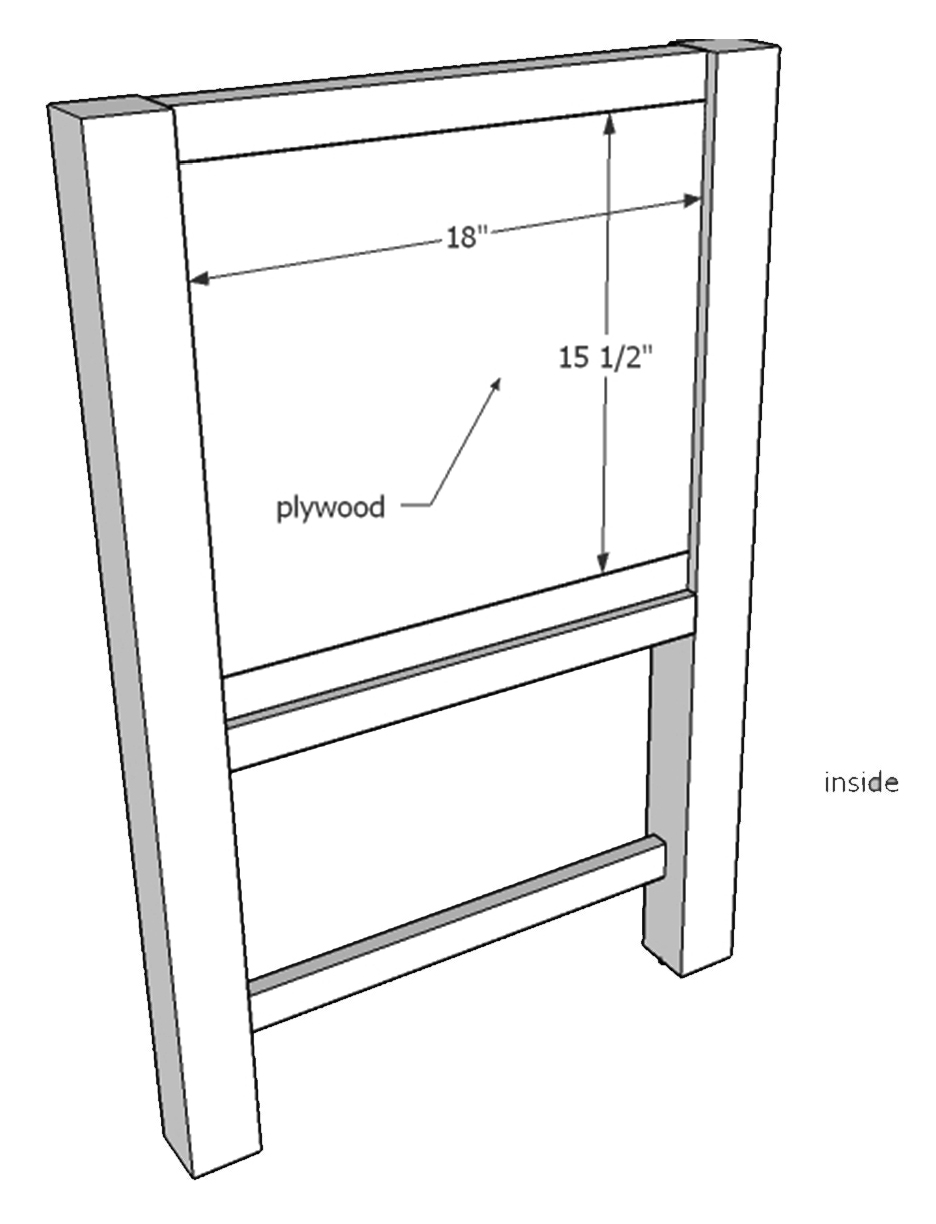
Build the side frame by attaching the 2×2 @ 18″ to the 3x3s with 1 1/2″ pocket holes and 2 1/2″ pocket hole screws and glue! Top 2×2 is flush with the tops of the 3x3s but set back 1/2″ and the second 2×2 is placed at 15 1/2″ from the bottom of the top 2×2 and set back 1/2″! Whichever way you place your pocket holes will determine the inside of the side!

Step 2:

Attach the 1×2 @ 18″ flush with the 3x3s to the back. Attach with 3/4″ pocket holes and 1 1/4″ screws and glue. Make sure pocket holes are facing the “inside”.

Step 3:

Place another 1×2 @ 18″ 4″ up from the bottom of the 3x3s and set back 1/2″ from the front. This will be attached with the same 3/4″ pocket holes and 1 1/4″ screws and glue!


Step 4:

Place your plywood piece cut at 18 x 15 1/2″ in the square space created by your frame! This is attached with 3/4″ pocket holes all around the edges and 1 1/4″ screws and glue! It should be flush with your 2x2s!

Step 5:

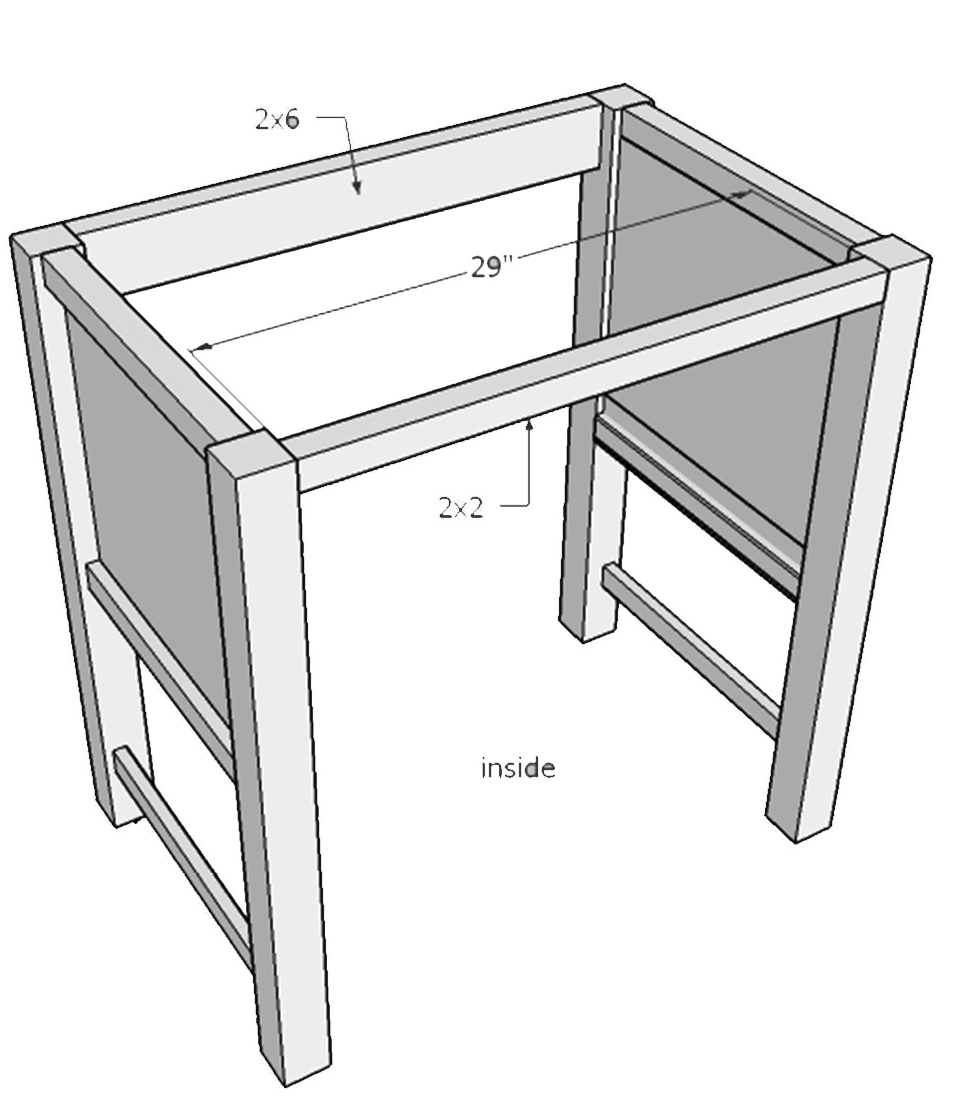
After building the sides, using the 2×6 @ 29″ and the 2×2@ 29″ attach both sides together! Using 1 1/2″ pocket holes on both and 2 1/2″ screws and glue on both! The 2×6 is going to be flush with the top and what will be the back and the 2×2 is flush with the top and what will be the front!

Step 6:

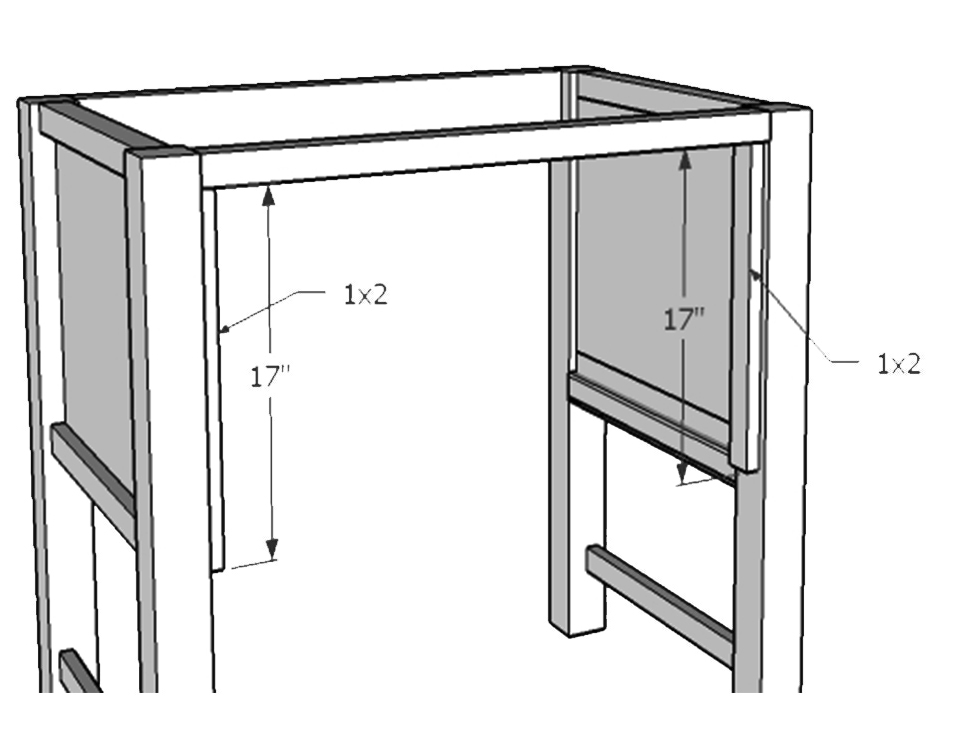
Attach the 2 – 1×2 @ 17″ to the 3x3s…they are glued and attached using countersunk screws! To do this you will need a 1/2″ countersink drill bit, drill the 1x2s in each place you would like to place a screw and then when you screw the screw in, it will sit down inside a little hole that you can then putty over and no one will ever know it was there! Three screws on each 1×2 should be fine. The 1x2s are set back 1/2″!

Step 7:

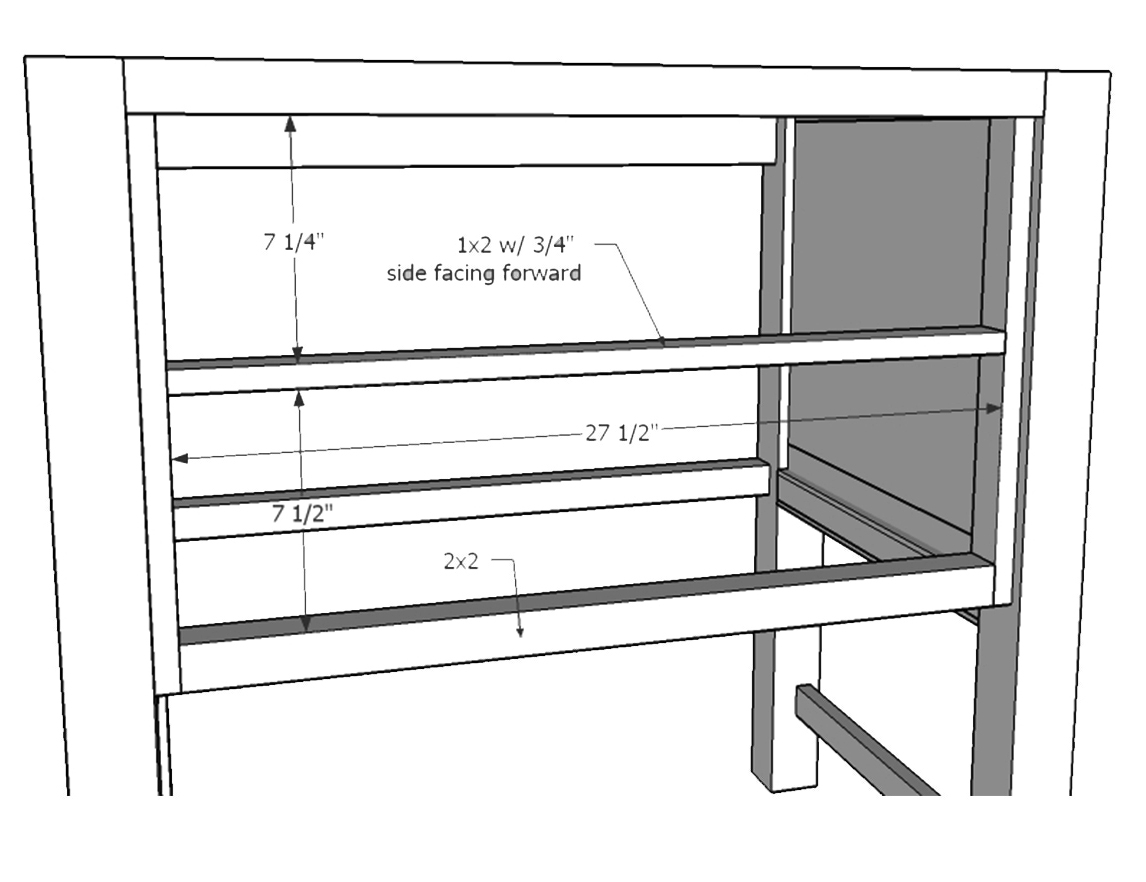
Attach the 1×2 @ 27 1/2″ using 3/4″ pocket holes and 1 1/4″ screws and glue. This should be 7 1/4″ down from the bottom of the 2×2 across the top. Attach the 2×2 @ 27 1/2″ flush with the bottom of the 1x2s that run along the 3x3s. Use 1 1/2″ pocket holes and 2 1/2″ screws and glue to attach.

Step 8:

Attach the 1×2 @ 29″ below the 2×2 flush to the back of the 3x3s though. Using 3/4″ pocket holes and 1 1/4″ screws and glue to attach.

Step 9:

Take the 1×8 @ 27 1/2″ and cut your 1/4″ molding leaving a 1/8″ gap around all sides of Mitering the corners at 45 degrees off square, make sure and measure your board here. Glue and staple this to the front of the 1×8… on the back you will drill normal 3/4″ pocket holes and attach using 1 1/4″ screws and glue… if you do not want the bottom drawer to flip down, you can make two of this same size only bring the molding all the way to the top and bottom edges since room has already been left in this bottom space for it to move… if you want the flip down door continue to step 10.

Step 10:

Take the 1×8 @ 27 1/4″ and place 1/4″ molding all the way to the edges of the board, mitered at 45 degrees off square. Make sure and measure your board. This board will be attached with hinges and magnetic claps… later on in the instructions. I sanded and stained it before attaching.


Step 11:

Attach the 2 – 1×2 @ 29″ up four inches from the bottom. Using 3/4″ pocket holes and 1 1/4″ screws and glue. The front 1×2 will be set back 1/2″ and the back 1×2 will be flush with the back.

Step 12:

Attach the 2×2 @ 29″ across the back… you may want to measure your plumbing before placing this board as it can easily be moved up or down right now but not once it’s glued. It is flush with the back. Using 1 1/2″ pocket holes and 2 1/2″ screws and glue.

Step 13:

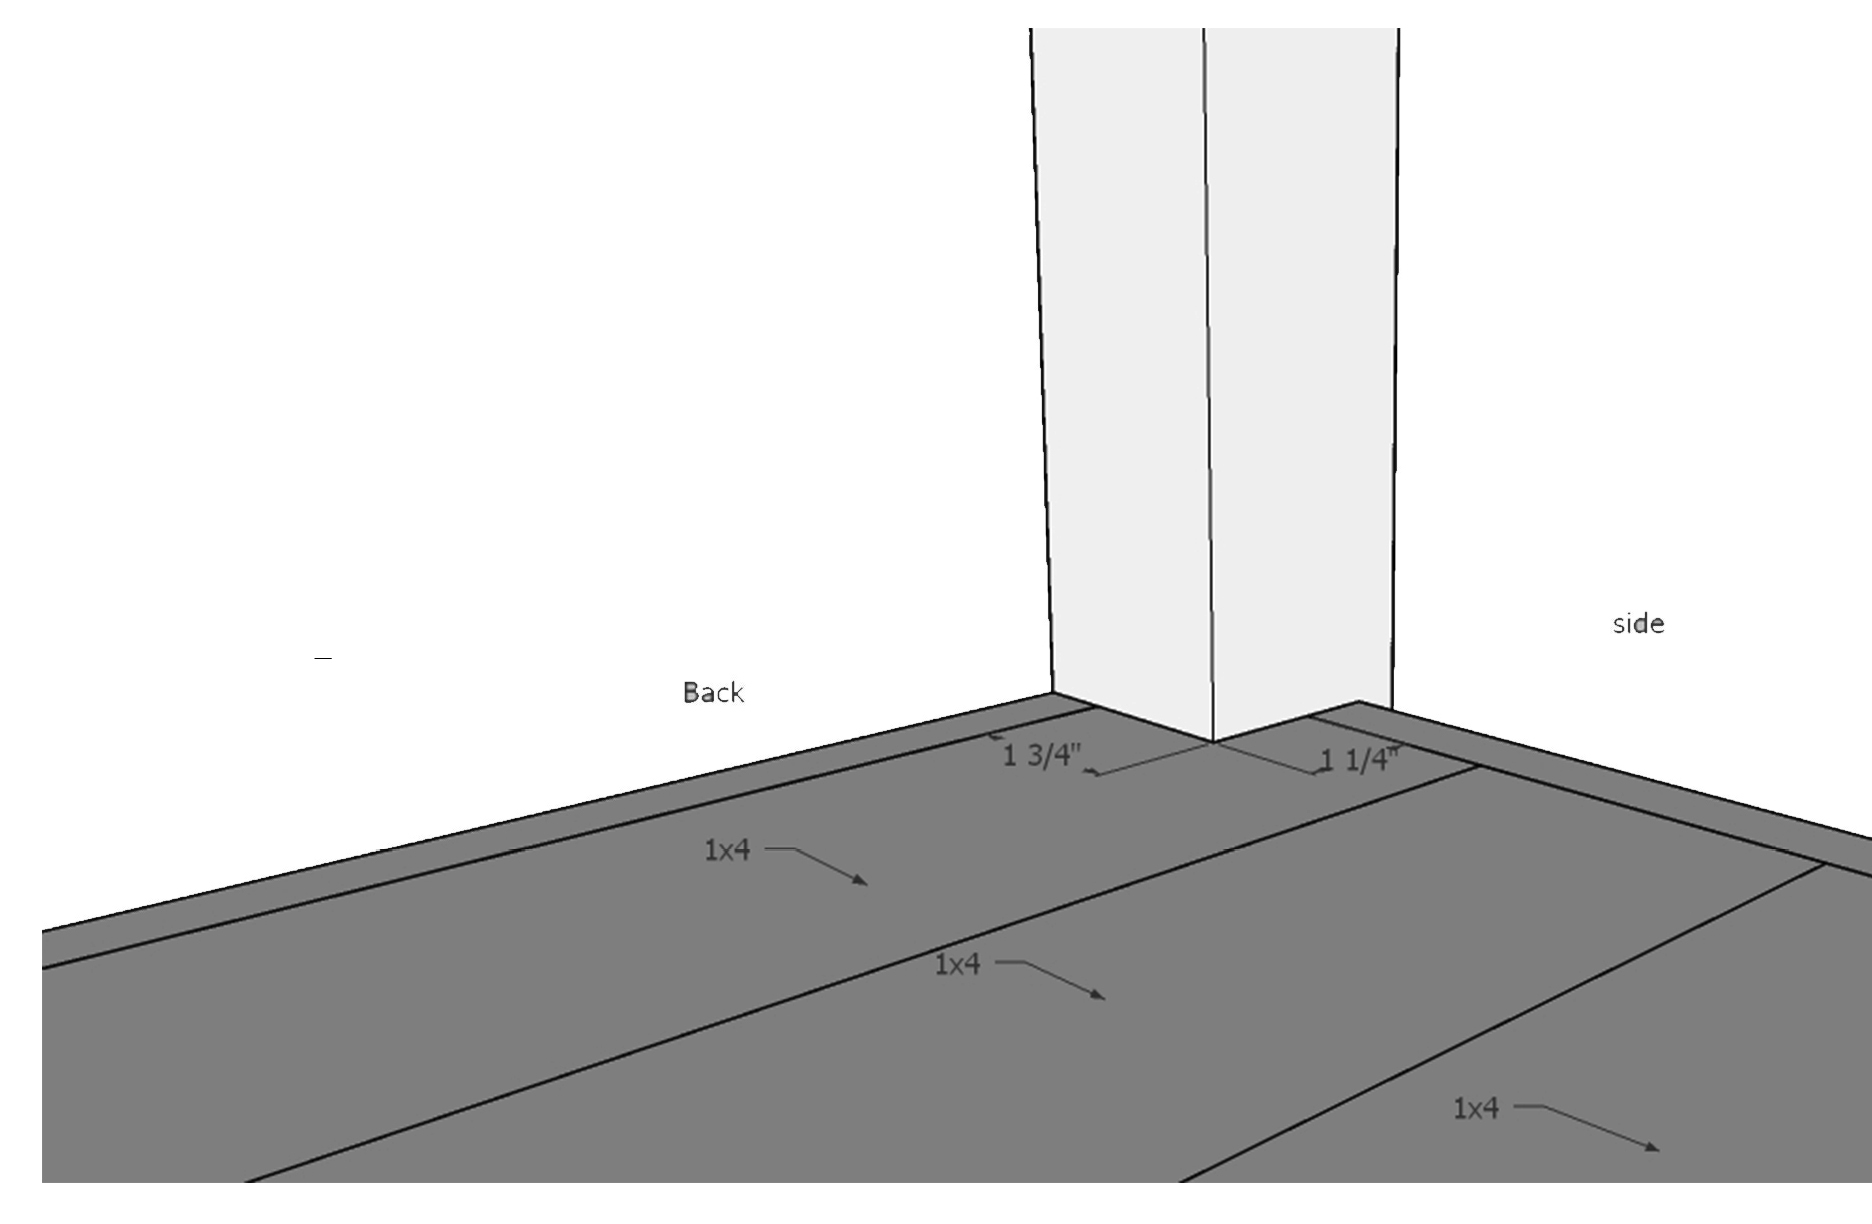
The front and back 1x4s @ 31 1/2″ along the bottom where they meet the 3x3s will need to be cut, taking a jigsaw you can quickly make these cuts. The measurements here are for the back 1x4s are all cut normal @ 31 1/2″. And the front 1x4s is cut at 1 1/4″ in and 1 1/4″ in. Attach using 3/4″ pocket holes and 1 1/4″ screws and glue.

Step 14:

Attach the 2×2 @ 27 1/2″ to the other 2×2 that is along the bottom of the ‘drawers’… just using 1 1/2″ pocket holes drilled toward the other 2×2 (not on the ends but along the whole 2×2 as if you were planking them together) and connecting it to the other 2×2 with 2 1/2″ screws and glue. Now using the hinges and magnetic clasps you can finish the vanity. After sanding and staining you’re done.

The original plan can be found at http://builditcraftitloveit.com

 
[email_link]

Bathroom Vanity


Shopping List:

  • (1) – 8′ length of 1×3 poplar
  • (4) – 35.5″ x 3″ Marshall Island Legs by Osborne Wood in Soft Maple
  • (1) – 12′ length of 1×2 poplar
  • 3/4″ ply, 4′ x 8′ sheet Purebond birch plywood
  • 1/2″ plywood, 2′ x 4′ sheet Purebond birch plywood
  • 220 grit sandpaper
  • 1 1/4″ pocket hole screws
  • 1″ pocket hole screws
  • 1 1/4″ nails
  • 4 euro style inset hinges
  • 2 knobs
  • Stain and top coat of choice

Cut List:

  • (4) – 35.5″ Marshall Island Legs @ 32 3/8″ (3 1/8″ off the top)
  • (2) – 3/4″ plywood @ 12 1/2″ x 17 1/8″ (sides)
  • (1) – 3/4″ plywood @ 18 1/2″ x 10″ (back)
  • (2) – 3/4″ plywood @ 16 1/2″ x 21″ + notches cut out of each corner – 1 1/4″ x 2″
  • (2) – 1/2″ plywood @ 6 1/8″ x 9 3/8″
  • (2) – 1×2 @ 12 1/2″ (sides of bottom shelf frame)
  • (2) – 1×2 @ 18 1/2″ (front and back shelf frame)
  • (4) – 1×2 @ 9 1/8″ (cabinet door frame – top)
  • (4) – 1×2 @ 9 3/8″ (cabinet door frame – sides)
  • (2) – 1×3 @ 18 1/2″ (front frame)
  • (4) – 1×3 @ 12 1/2″ (side trim)

Step 1:

Drill 3/4″ pocket holes on sides of 3/4″ plywood (the long sides of the 17 1/8″ x 12 1/2″ pieces) and 1x2s. Attach to 3/4″ plywood to legs, so the top is flush and there is a 1 1/2″ space from the inner corner of the legs to the plywood, using 1 1/4″ pocket hole screws. This will leave a 3/4″ ‘inset’ on the ‘outside’, which will allow the trim to be attached and flush at a later step. Attach the 1×2 to the bottom of legs, with the same inset.

Step 2:

Drill 2, 3/4″ pocket holes on either end of the 1x2s for the front and back of the bottom shelf frame. Drill holes of the same size for the 1x3s of the front cabinet door frame, and the back 3/4″ plywood piece.  Attach with 1 1/4″ pocket hole screws.


Repeat process for the other side.

Step 3:

Notch out the base of the cabinet and the bottom shelf using the above guideline. Note that you will likely have to dry fit a few times and make minor adjustments so the shelf will fit before making 3/4″ pocket holes and attaching with wood glue and 1 1/4″ pocket hole screws. Allow a small inset (1/16″ or less) from the top of the shelf (3/4″ ply) to the edge of the frame (1×2) of the bottom shelf, so that when you attach the screws, it doesn’t go through all the way.  Small gaps can be filled with wood filler and sanded smooth.

Step 4:

To build the shaker-style doors, simply drill 2, 1/2″ pocket holes along all four sides of the 1/2 plywood. Then drill 3/4″ pocket holes into the 9 3/8″ long 1x2s. Using 1″ pocket hole screws, attach into the plywood to the 1x2s on either side, allowing a 1/4″ inset on the front. The back should be flush.


Turn the vanity upside down when attaching the shelves and attach the cabinet base one first, then the lower shelf.

Step 5:

Attach the top pieces of the doors, first screwing in the side 1x2s to the top and bottom 1x2s with 1 1/4″ pocket hole screws. Then screw the plywood into the top and bottom 1x2s.

Step 6:

Hang the doors in the opening of the vanity, allowing 1/16″ gap on the top bottom and either side where the hinges will attach. Attach the euro style inset hinge by marking, pre-drilling, and screwing into place on both the legs and the doors. Doors should be touching each other so they can stay closed.

Step 7:

Mark, pre-drill, and attach knobs.

Step 8:

Attach side trim pieces (to both sides of the vanity) so both the bottom and top are flush, using 1 1/4″ nails and a nail gun.

Step 9:

Fill nail holes and gaps with wood filler, let dry, and sand entire vanity smooth with 22o grit sandpaper.

Step 10:

Paint or stain with desired color and apply a durable top coat that is water-resistent, like an oil-based poly.

The original plan can be found at http://www.shadesofblueinteriors.com

 
[email_link]
 

Farmhouse Bathroom Vanity


Material List:

  • 2 – 4″x4″x8′ (only need 29.25″ out of the second one)
  • 1 – 1″x20″x48″
  • 6 – 2″x2″x8′ (or I used 3 2″x4″ and ripped to width on a table saw)
  • 1 – 1″x4″x8′
  • 1 – 36″ 1/2″ black iron pipe
  • 2 – 1/2″ Black iron flanges
  • 2″ pocket hole screws
  • 1 1/4″ pocket hole screws
  • Franklin International Titebond Original Wood Glue
  • 1 1/4″ black screws (attaching flanges to legs)
  • Vessel sink and faucet
  • Plumbing connections in the same finish as the faucet
  • Stain/paint
  • Poly/Acrylic sealer
  • Bath Adhesive Caulk

Cut List:

  • (4) – 4×4 @ 29 ¼” long (legs)
  • (1) – 1×20 @ 38” long (top)
  • (2) – 2×2 @ 31” long (front/back of lower slats)
  • (4) – 2×2 @ 13” long (slats between 4×4’s)
  • (15) – 2×2 @ 17” long (slats between 31” 2×2’s)
  • (2) – 1×4 @ 31” long (front/back apron)
  • (2) – 1×4 @ 13” long (side aprons)

Instructions:

Put pocket holes into the back of both sides of all apron pieces.  Use wood glue and attach to 4×4’s, offsetting back 1/4″ from the outside edge using 2″ pocket hole screws.

Put pocket holes at the inside of the top of the 4×4’s and along the top of the aprons.  These will secure the top to the bottom.  Using wood glue, place bottom upside down onto the top piece. Attach with 1 1/4″ pocket hole screws.

At this point in time we stained/poly’d all pieces, including the ends of the slats. When they are attached, the small amount of the natural rounded edges of the 2×2’s could be exposed so it is best to have it stained ahead of time.

It is best to do the next part with the vanity upside down.  Measure down 7″ from the bottom of the inside of all legs.  Attach the 4 outside 2×2’s using pocket holes placed on the bottom and wood glue.  Put the other 13″ 2×2’s so they are lined up with the inside of the 2×2’s. They should be approximately 1/2″ apart.

Mark the following lines on the 31″ 2×2’s (see photo below), both sides, these will be the starting points for the 17″ slats in between.  Attach all with 1 1/4″ pocket hole screws and wood glue.

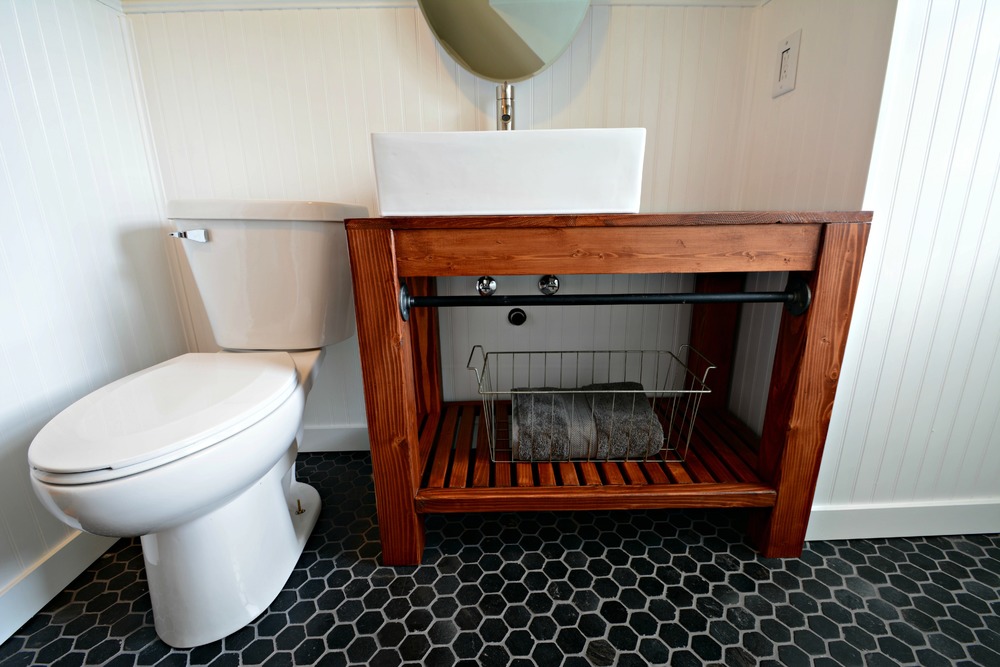
For the front metal bar, we used a black iron pipe.  We used flanges that the pipe could screw into. I cut the pipe around 29 3/4″ as there was a 1/2″ on each flange between where the threading stopped and the leg, then a little room to get the pipe between, then screw it out so it out so it was tight.  We purchased a pipe threader kit threads pipes up to 1″.  After cutting and threading the pipe, we held it up and marked the holes for each flange (doesn’t have to be exact, just whatever looks good).  They were probably 2″ on center from the bottom of the apron.  Attach with the black screws.

Place the sink/faucet on top of the vanity to determine the best placement.  For this sink, we determined that placing the sink about 2″ from each edge looked best.  Mark holes for the drain and faucet.

Drill holes according to instructions provided with your sink.  Our sink required a 1 1/4″ hole for the sink and 1 3/4″ for the drain.  Attach sink/faucet according to the directions provided with the sink/faucet.  Our sink required us to chisel out a small area around the drilled hole to accommodate a gasket for the bottom of the sink.  A router or wood chisel may be needed. Attach sink to vanity top using bath adhesive caulk.  Hook up plumbing, etc.


Enjoy that new bathroom vanity!

The original plan can be found at https://decorandthedog.net

 
[email_link]