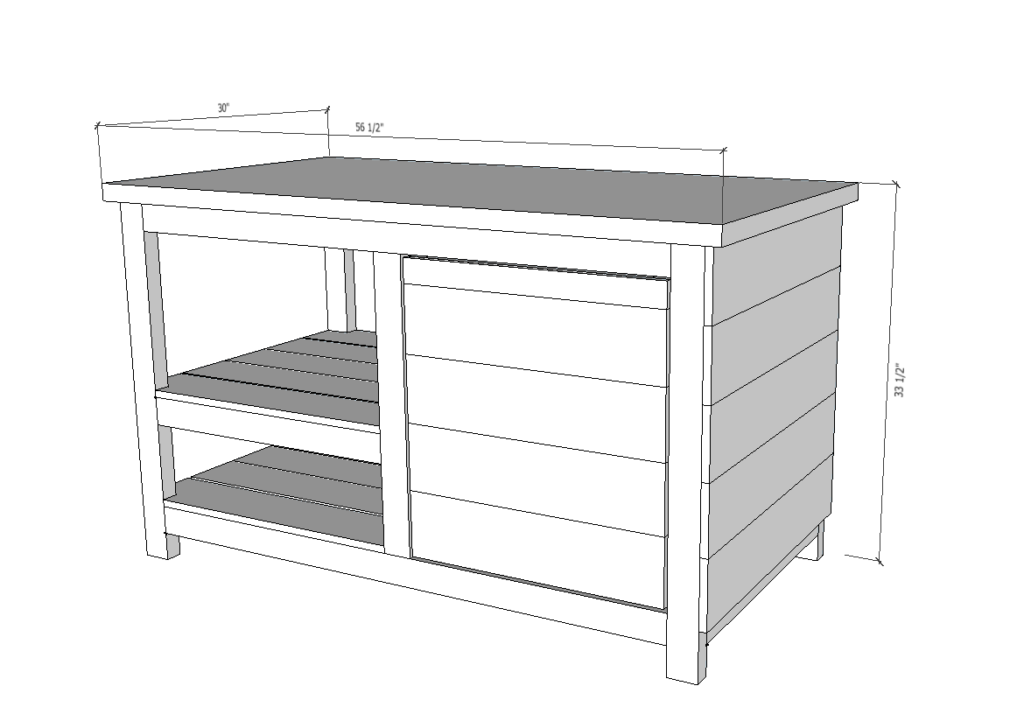
BBQ Grilling Station

Please note that these plans do not include instructions/materials for the top of the table. I planned to do a concrete top to inset the grill, but Mr. Goats broke his toe and I am physically unable to handle an 80lbs bag of concrete. The top photographed is made from cedar fence pickets and i would be perfectly content with it if I hadn’t had my heart set on a concrete top. It’s weather-resistant and beautiful! If you love it, add 5 fence pickets to your shopping list.

Shopping List:


  • 8 – 2×3@8′
  • 12 – 5 1/2″ x 72″ (1×6) Cedar Fence Pickets (we only have dog-eared, so that’s what I used)
  • 3 – 1×2@8′
  • 1 – set of outdoor hinges + pull
  • 1 1/4″ outdoor pocket hole screws
  • 2 1/2″ outdoor pocket hole screws
  • Outdoor Glue (I use Titebond III)


Cut List:

2×3

  • 4 @ 49″ (stretchers)
  • 4 @ 32″ (legs)
  • 2 @ 24″ (shelf stretcher)
  • 2 @ 24 1/2″ (front/back divider)
  • 8 @ 25″ (deep stretchers)


1×6 Cedar Fence Pickets

  • 15 @ 28″ (shelf boards and side slats)
  • 7 @ 22″ (front and back of “drawer”)
  • 6 @ 21″ (sides of “drawer”)
  • 3 @ 22″ (bottom of “drawer”)

1×2

  • 2 @ 24″ (drawer frame front stiles)
  • 2 @ 17″ (drawer frame back stiles)
  • 4 @ 19″ (drawer frame rails)
  • 4 @ 21″ (drawer stretchers)

56 1/2″ W x 30″ D x 33 1/2″ H (dimensions are given based on suggested tabletop size, accounting for a 1 1/2″ top)

Step 1:

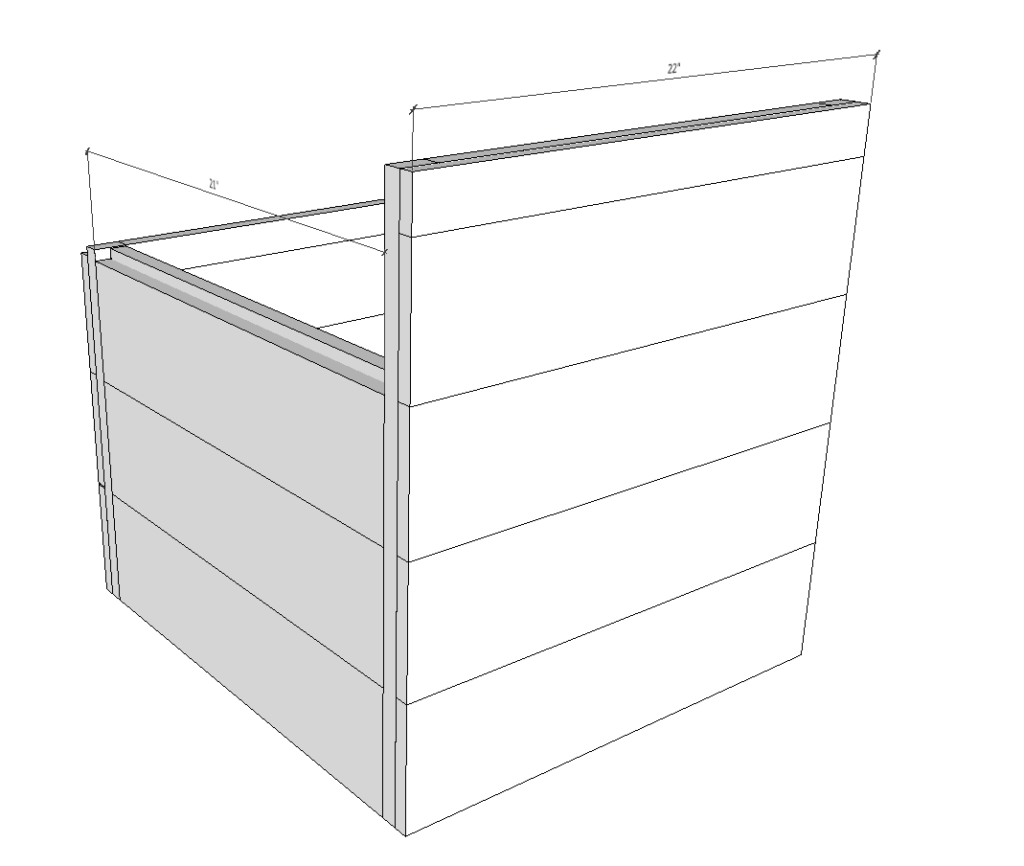
You get two pictures in one step because I didn’t capture all of the dimensions in a single shot.

Begin by building the main frame using wood glue and 2 1/2″ pocket hole screws. The top “shelf” can be placed at your desired height, but make sure to match the front and back frames. Make two.

Step 2:

With your front and back frames built, you can add the 25″ stretchers as pictured. I found it easiest to start from the outsides, in. The only thing to pay special attention to is the bottom, middle stretcher. It should be flush with the top of the adjoining boards.

Step 3:

Finish adding the stretchers to create the top shelf.

Step 4:


Make the front frame for your “drawer” using glue and 1 1/4″ pocket hole screws.

Step 5:


Make the back frame for your “drawer”.

Step 6:

With your 21″ dividers, create your drawer “box” as shown above.

Step 7:

Finish your box by first gluing/screwing the side boards in from the front and back of the frames (countersinking your screws) and then gluing/screwing the front and backs. I screwed from the inside of the drawer frames into the outer boards. Set aside.

You have the option of leaving gaps between the boards to fill up all the space or ripping a board to the remaining gap, but I just left the space at the top.

Step 8:

Notch out four of the shelf boards to the dimensions above. These will be the front and back boards of your shelves.

Screw your shelf boards in place, starting with the bottom shelf, first. Use glue and 1 1/4″ outdoor screws (I used pocket hole screws w/o pocket holes, because it was what I had).

Step 9:

Insert the pull out “drawer”, using a 1/4″ spacer on the bottom. Attach hinges and drawer pull. If necessary, add a stop block (created with a wood scrap) to the inside of the frame using glue and screws.

Step 10:

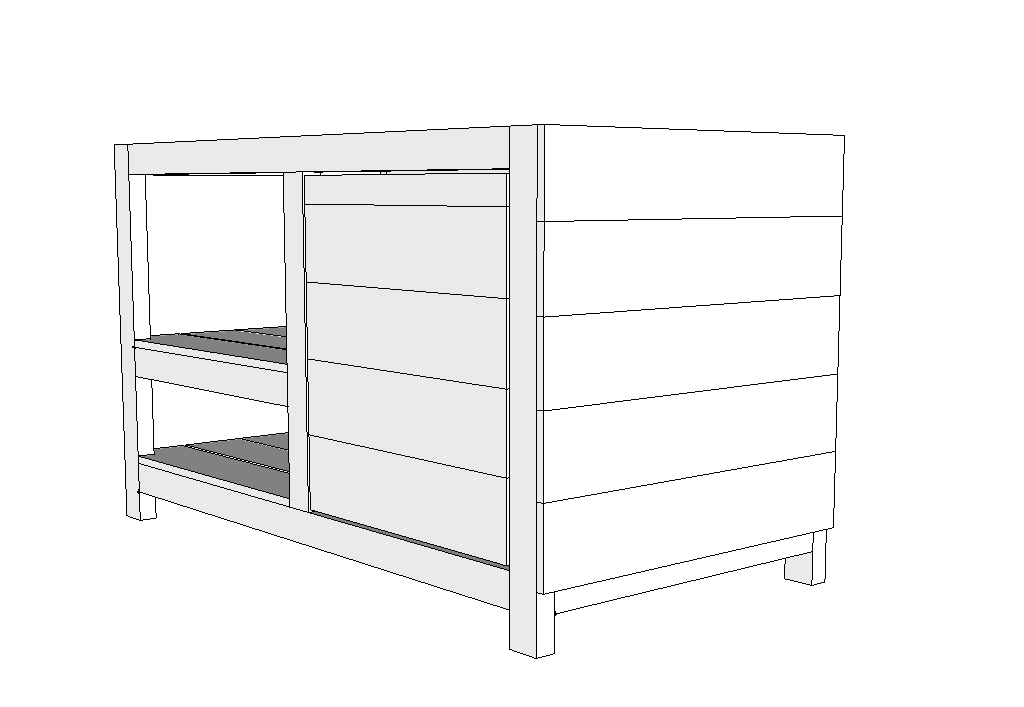
Screw on the side slats using glue and 1 1/4″ screws.

There! Your table is built!! The choices on tops are endless, from tile to wood to concrete! Suggested dimensions for the top are 30″ x 56 1/2″.


The original plan can be found at http://www.ladygoats.com

 
[email_link]

BBQ Grill Cart

Materials:

  • (5) 2 x 8 x 8-ft. boards
  • (6) 2 x 4 x 8-ft. boards
  • (4) 3-in. steel swivel casters
  • (4) 2 x 2 x 36″ Angle irons
  • 3″ Deck screws
  • 1 Can of spray paint
  • Mineral oil to season the butcher block surface
  • Butcher block conditioner
  • Cutting oil to use as a lubricant for drilling through the metal

Step 1: Cut the lumber

Cut the wood into the lengths shown in the diagram above.

Step 2: Build the Shelves

Screw together the 2x4s into rectangular frames and then screw the longer pieces of 2x8s and 2x4s on top of them.

Step 3: Drill through the angle irons

Drill through the angle irons with the 3/16 in. bit. Check to make sure that the screws fit through the holes. Then use the larger drill bit to create a hole over the 3/16th hole to countersink the screws.

Step 4: Paint the angle irons

Clean the cutting oil off the angle irons and then paint them with spray paint.

Step 5: Attach the angle irons

Screw through the holes drilled in the angle irons and into the wood shelves.

Step 6: Attach the top

Screw through the top boards and into the frame.

Step 7: Seal or stain wood

Finish the wood with a butcher-block conditioner.

Step 8: Add wheels and accessories

Screw on the wheels and other accessories.


The original plan can be found at http://blog.homedepot.com


[email_link]

BBQ Grill Cart

You’ve perfected your grilling technique. You’ve mastered the marinade. Now take your outdoor culinary skills to the next level by building our red cedar cookout cart. It’s the perfect mobile staging area for storing and preparing food. Chop vegetables or slice meat on its lift-off polyethylene cutting board, then dump scraps through its hole and into a sliding stainless-steel pan below. Another larger pan on the left slides out to give you access to stored meat, fish, vegetables or ice. Lean cookbooks against the backsplash and keep condiments in the lift-out tray on the left. After the feast, the slide-out pans, the cutting board and the condiment tray come inside for cleaning while the cart stays outside with your grill.

Materials:

  • A – (2) 5/4” x 4” x 44” (handle)
  • B – (2) 1” x 4” x 34 ½” (front leg)
  • C – (2) 1” x 4” x 32” (rear leg)
  • D – (6) 1” x 4” x 22” (frame end)
  • E – (6) 1” x 4” x 30 ½” (frame side)
  • F – (2) 1” x 4” x 20 ½” (frame, stretcher)
  • G – (1) ¾” dia. x 24 ¼” (steel handle)
  • H – (2) 8” dia. (cart wheel)
  • I – (1) 1” x 4” x 17 7/8” (top, center) (actual width is 4”; rip from 1×6)
  • J – (1) 1” x 4 ½” x 17 7/8” (top, end) (rip from 1×6)
  • K – (1) 1” x 3” x 37 ¼” (top, back)(rip from 1×4)
  • L – (1) 1” x 4” x 23 ½” (top, stretcher)
  • M – (1) 1” x 4 ¼” x 37 ¼” (top, front) (rip from 1×6)
  • N – (2) 1” x 1 ¾” x 20 ½” (top, cleat)(rip from scrap or 1×4)
  • O – (2) 1” x 1 ¾” x 22 ¼” (top, cleat)(rip from scrap or 1×4)
  • P – (1) 1” x 6 ¼” x 37 ¼” (backsplash)(cut from 1×8)
  • Q – (3) 5/4” x 1 ¾” x 22” (pan runners)
  • R – (6) 3/8” x 2 ½” (dowels)
  • S – (4) 1” x 2 ¼” x 2 ¼” (corner block)
  • T – (2) 1/8” x 8” x 14” (knife shield)
  • U – (1) ¾” x 17 ¾” x 23 ¾” (cutting board)
  • V – (22) 3/8” x 1 ½” x 31 7/8” (shelf slats)
  • W – (1) 6” x 12 ¾” x 21” (large pan)
  • X – (1) 6” x 10 ½” x 12” (small pan)
  • Y – (1) 3” x 5” x 18 ¾” (condiment tray)

Step 1: Clamp, then screw

Crosscut the parts for the three frames. Clamp the parts together and bore countersunk pilot holes. Apply waterproof glue to the joint to add a little strength and to seal the end grain. Next, drive 1¼-inch galvanized or stainless-steel screws into each joint.

Step 2: Install the legs

Crosscut the two rear legs, apply waterproof glue to the joint and fasten the legs using 1¼-inch screws driven into pilot holes.

Step 3: Add safety

Make a knife shield from two pieces of acrylic plastic cut to shape with a jigsaw. Drill and countersink three screw holes into each piece. Then screw one to the outer surface of the upper frame. Attach the other to the inner surface of the wood handle.

Step 4: Hide the screws

Fasten the cart’s wood handle to the upper frame with glue and deck screws. Drive the screws from the back so they’ll be hidden. Make sure that the square end of each handle is flush with the rear legs.

Step 5: Dowels make knife slots

To create five partitions to hang knives, start by drilling six holes through the upper frame and both acrylic panels, and into (but not through) the wood handle. Insert a dowel into each hole, then trim it flush.

Step 6: Rip the slats

Rip the slats from a cedar 2 x 4 and sand or plane them smooth. Shape their top edges with a router and a rounding-over bit. Using a pneumatic finish nailer, fasten the slats to the frame, spaced 5/8 inch apart.

Step 7: Build the top

Rip and crosscut the top parts and test fit the cutting board in it. Next, use glue and biscuits to assemble the top and clamp the assembly. Screw the cleats to the bottom of the assembly.

Step 8: Add Runners

With the cart upside down, screw on the runners, which will support the two stainless-steel pans.

Step 9: Fasten the backsplash

Rip and crosscut the back-splash from a cedar 1 x 8, then cut the gentle top curve using a jigsaw. Finally, fasten it by driving deck screws through pilot holes into the back of the top assembly.


The original plan can be found at https://www.popularmechanics.com

 
[email_link]