BBQ & Grill Carts
Gridview
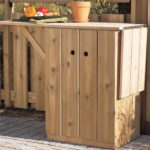


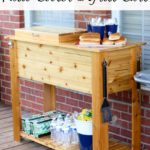


BBQ Grilling Station

Free woodworking plans. Your one stop shop for woodworking.
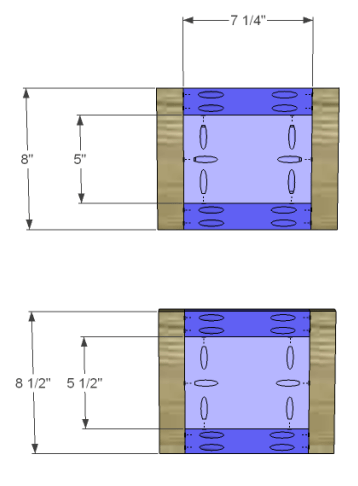
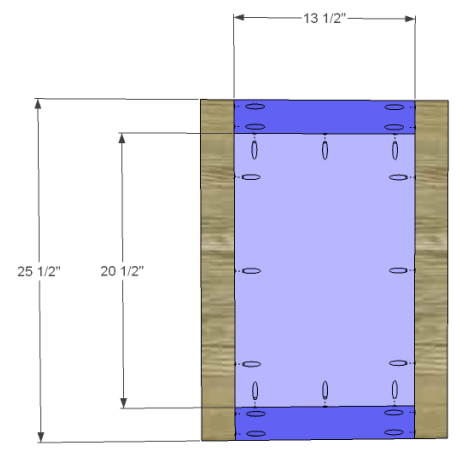
Lumber:
Step 1:
Edge banding will be applied to the exposed edges of the plywood prior to assembly.
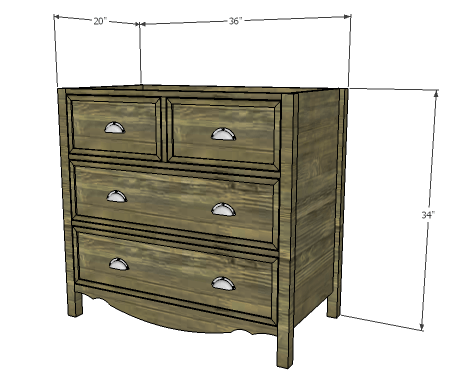
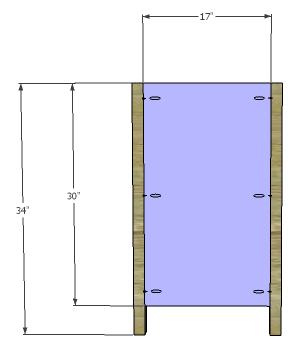
Cut the pieces for the legs and the side panels. With the pocket hole jig set for 3/4″ material, drill pocket holes in the long edges of the side panels. Secure the side panels to the legs using glue and 1-1/4″ pocket hole screws. The back face of the panels will be flush with the inside faces of the legs.
Step 2:
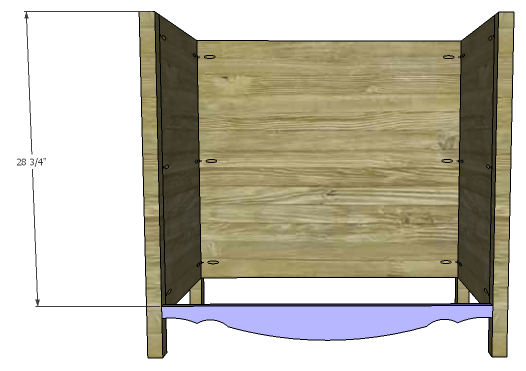
Cut the piece for the back panel and drill pocket holes along the side edges. Secure the panel to the legs using glue and 1-1/4″ pocket hole screws. The back face of the panel will be flush with the inside faces of the legs.

Step 3:
Cut the piece for the lower curved stretcher. Maintaining the side dimension (1-1/4″) and the center dimension (3-1/2″), draw a decorative curve in the board. The top edge will remain straight. Cut the curve using a jigsaw or a bandsaw.
Drill pocket holes in the side edges, and secure the stretcher to the legs using glue and 1-1/4″ pocket hole screws. The front face of the stretcher will be flush with the front face of the legs.

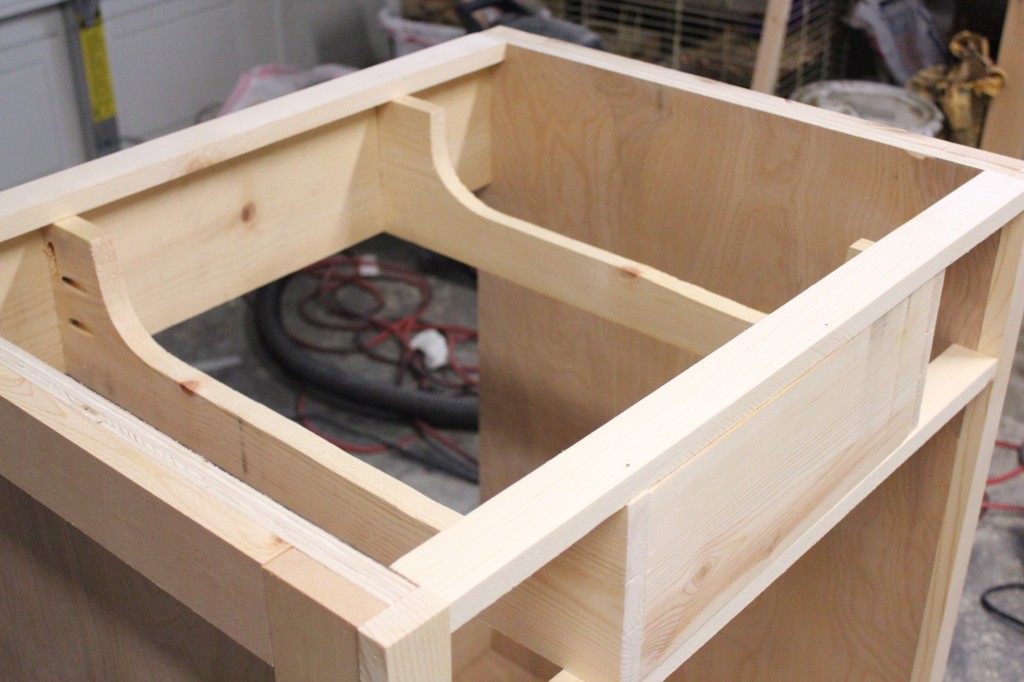
Step 4:
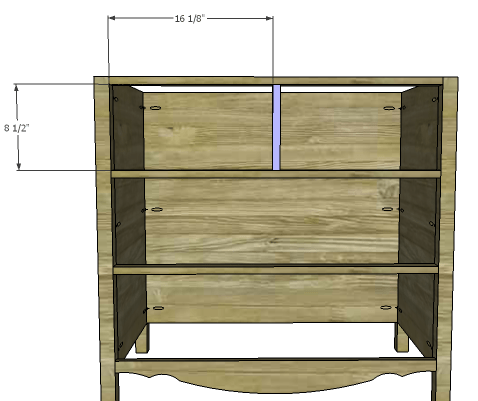
Cut the pieces for the stretchers and drill pocket holes in each end. Secure the stretchers to the legs as shown using glue and 1-1/4″ pocket hole screws. On the middle stretcher and the lower stretcher, orient the pocket holes so they face down. The pocket holes on the upper stretcher will face up and will be covered by the countertop.
Cut the piece for the drawer divider. Secure in place using glue and 1-1/4″ brad nails through the stretchers above and below it.

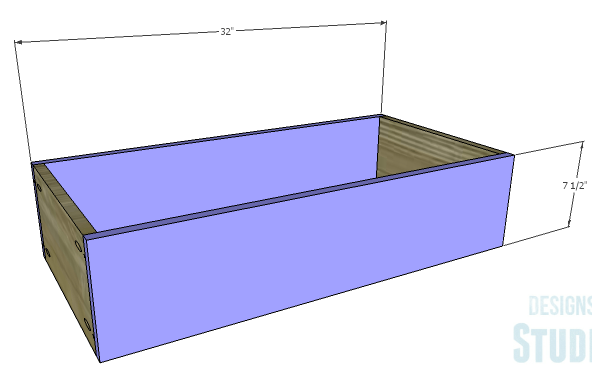
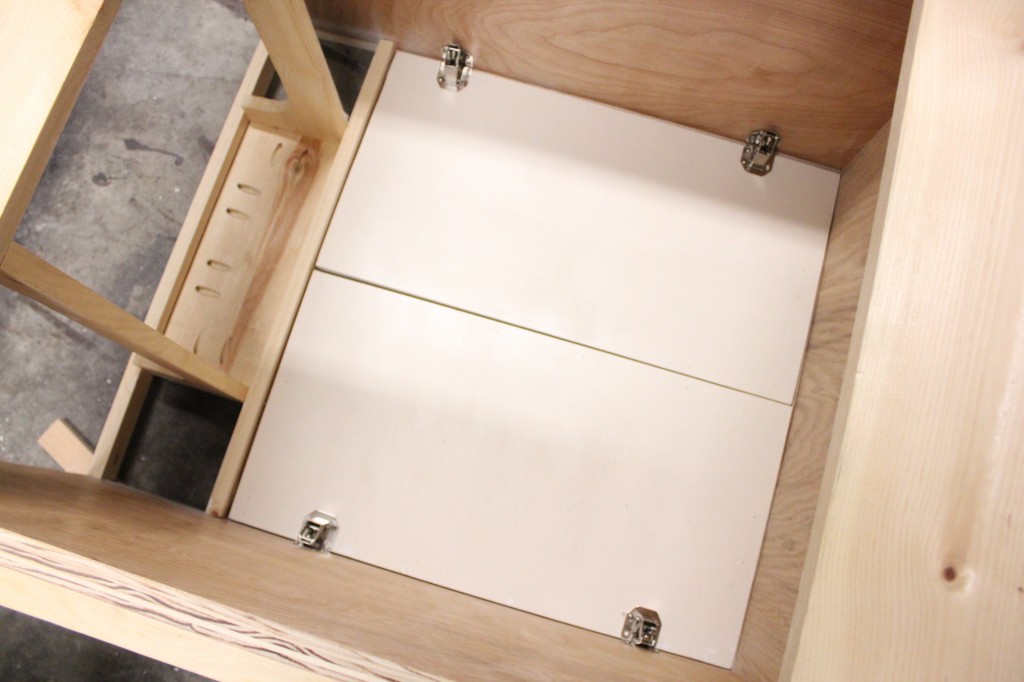
Step 5:
Before cutting the drawer boxes, make sure the p-trap or any other plumbing will not interfere with the upper drawer. The drawer can be shortened, or a notch cut in the back of the drawer box to accommodate the plumbing.
Cut the pieces for the drawer boxes. Drill pocket holes in all four edges of the bottom as well as each end of the sides. Assemble the drawer boxes as shown using glue and 1-1/4” pocket hole screws. Install the drawer slides according to the manufacturer’s installation instructions, locating them ¾” back from the front edge of the sides. Make any necessary adjustments.

Step 6:
Cut the pieces for the drawer fronts as well as the moulding for the trim. Position the moulding on the front face of the drawer fronts and secure in place using glue. Clamp until dry.
Mark the position for the drawer pulls and drill the holes. Shim the drawer front in the opening – there will be a 1/8” gap around all sides – then drive screws through the holes for the drawer pulls into the drawer box. Open the drawer, and secure the drawer front using countersunk 1-1/4” screws from the inside. Remove the screws from the holes for the drawer pull then finish drilling the holes. Install the drawer pull.


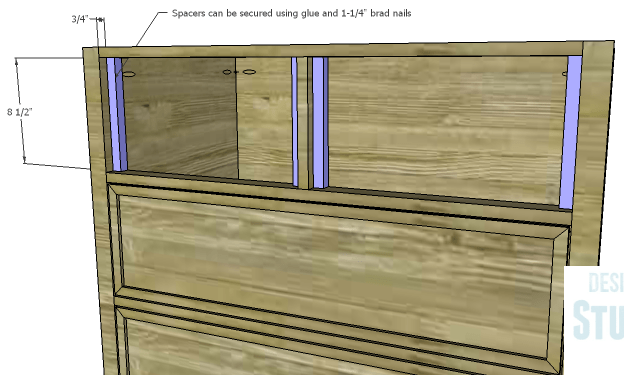
Step 7:
Cut the pieces for the false drawer front spacers. Secure the spacers in place using glue and 1-1/4″ brad nails through the spacers into the legs and drawer divider. The spacers will be positioned 3/4″ back from the front edge of the stretchers making them flush with the back edge.
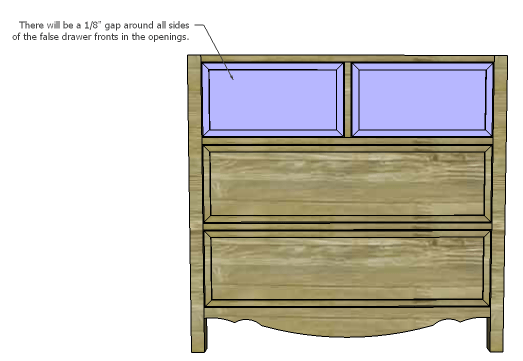
Step 8:
Cut the pieces for the false drawer fronts. Apply the moulding in the same manner as the drawer fronts. There will be a 1/8″ gap around each of the false fronts in the openings. Shim the false fronts in place, then secure them to the spacers using glue and 1-1/4″ brad nails.

Finish as desired
The original plan can be found at http://designsbystudioc.com
![]() [email_link]
[email_link]
The vanity is constructed almost entirely out of plywood with edge banding applied. This was to keep the cost down as we were using oak plywood.
Lumber:

Step 1:
Edge banding will be applied before assembly! Cut the pieces for the sides. Cut the notch for the kickplate using a jigsaw. Drill the holes for the shelf pins (only on the side piece that will be on the left!) but only go about halfway through the plywood!

Step 2:
Cut the piece for the bottom and drill pocket holes at each end. Attach to the sides just above the horizontal line for the kickplate using glue and 1-1/4″ pocket hole screws.

Step 3:
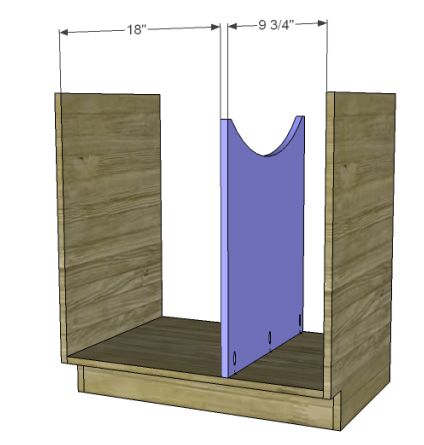
Cut the piece for the kickplate and drill pocket holes at each end. Secure as shown using glue and 1-1/4″ pocket hole screws.

Step 4:
Cut the piece for the divider. Cut the arc as shown using a jigsaw and leaving 3/4″ square at each end of this edge. Drill pocket holes in the lower edge (opposite the side that is shown in the drawing). On the opposite side, drill holes for the shelf pins as shown. Secure the divider to the bottom as shown using glue and 1-1/4″ pocket hole screws.

Step 5:
Cut the piece for the divider support and drill pocket holes in each end. Position at the center of the divider and attach using glue and 1-1/4″ pocket hole screws.

Step 6:
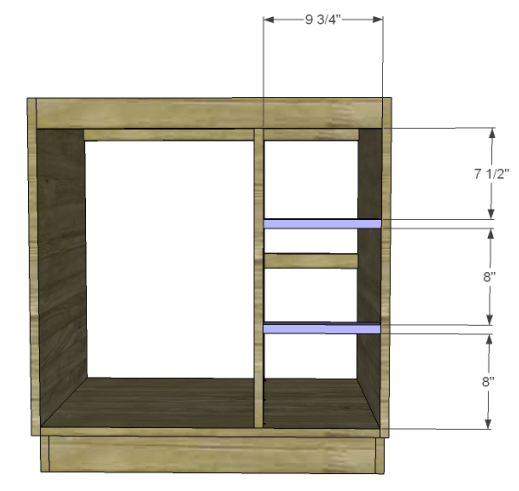
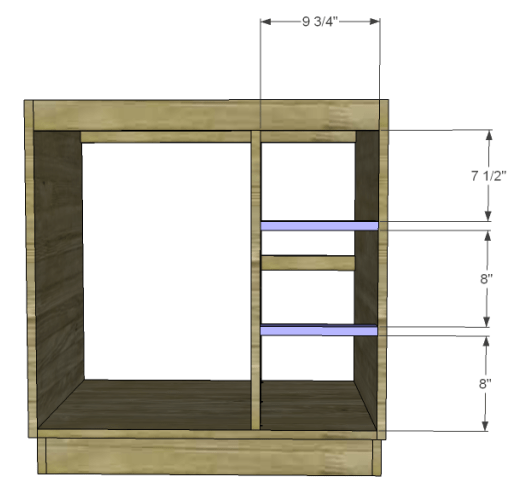
Cut the pieces for the upper stretchers. Drill pocket holes in each end as well as one pocket hole as shown to secure the divider. (Drill the pocket hole on the piece as shown in the drawing, then reverse the dimensions to drill the pocket hole in the other piece.) Position as shown, then secure to the sides and the divider using glue and 1-1/4″ pocket hole screws.

Step 7:
Cut the pieces for the drawer stretchers and drill holes in each end. Position as shown then secure using glue and 1-1/4″ pocket hole screws.
Step 8:
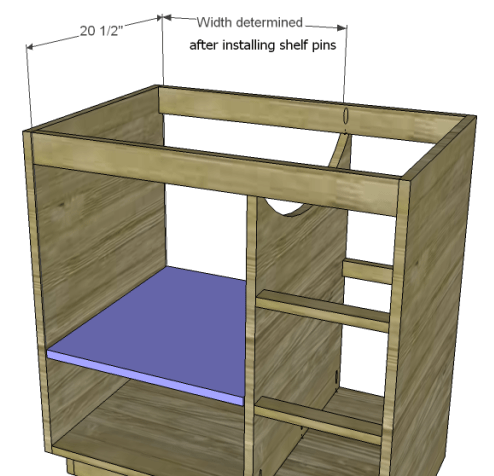
Install the shelf pins to determine the width of the shelf, then cut the piece for the shelf and position it inside.. In our case, the shelf would measure 17-3/4″ wide.
Step 9:
Cut the pieces for the drawers. Drill pocket holes in each end of the side pieces as well as all four edges of the bottom. Assemble as shown using glue and 1-1/4″ pocket hole screws. Install the drawer slides according to the manufacturer’s instructions. Make any necessary adjustments, then install the drawer boxes.


Step 10:
Cut the pieces for the drawer fronts. Drill pocket holes as shown. Attach the rails to the center panels using glue and 1″ pocket hole screws. The back face of the panel will be flush with the back face of the rails. Attach the stiles to the assembly using glue and 1-1/4″ pocket hole screws through the rails and 1″ pocket hole screws through the panel. Locate and drill holes for the cabinet pull. The drawer fronts will overlap the opening by 1/4″ on all sides. Drive screws through the holes drilled for the cabinet pull into the drawer box. Open the drawer, then secure the front from the inside of the box.

Step 11:
Cut the pieces for the door and assemble in the same manner as the drawer fronts. Attach the hinges according to the manufacturer’s instructions.

Finish as desired.
The original plan can be found at http://designsbystudioc.com/
![]() [email_link]
[email_link]


Wood:
Hardware and Supplies:
Make sure to re-measure and check for square after every step. Sometimes when building your measurements can be off very slightly, and it’s important for this plan that your numbers are exact. (Especially when working with doors and drawers!) Measure your available space and purchase your sink before building this plan to make sure that it will fit.
Step 1:

Cut plywood as shown above. My mock-up is based on a full 4′x8′ sheet, but this project is much more ideal if you are able to use up some plywood scrap for the 1/4″ piece.
Step 2:

Attach 1×3 trim along the outside edge of of your plywood with 1 1/4″ finishing nails and glue, leaving a 1 3/4″ gap between the base and the bottom of your lowest piece of horizontal trim.
Step 3:

Attach your side trim (front) to the side of your base with 1 1/4″ finishing nails and glue. Repeat steps 2-3 to create the other side, remembering to put the side trim (front) on the opposite side of the other panel. (The side with the trim will be the front of your vanity.)
Step 4:

Attach 1×6 and 1×2 back and top supports with your Kreg Jig using 1 1/4″ screws and wood glue. For the top of the back section, add the 1×2 first to get the positioning of your 1×6 right underneath it. Attach these two pieces together with 1 1/4″ screws, remembering to countersink your holes. In addition to the kreg screws, I also attached the 1x2s from the outside with 2″ finishing nails to prevent the board from rotating.
Step 5:

Attach the bottom shelf with your Kreg Jig and 1 1/4″ pocket hole screws, making sure that it’s level. The back of the plywood should fit underneath your base support 1×6.
Step 6:

Join the fake drawer front to your drawer side supports using your Kreg Jig before attaching it to the inside of the console. There should be a 5 1/2″ gap on either side of the side supports when placed inside the vanity. Kreg Jig the drawer side supports to the 1×6 back support of the vanity using 1 1/4″ pocket hole screws. Attach the top of the fake drawer front to the 1×2 top support using your Kreg Jig. Depending on the size of your sink, you may have to notch out your 1x6s to make room for it. Since my vanity had to be smaller to fit the space, I had to do this. I used my jigsaw to cut out large, rounded rectangles to make room for the sink, making sure to keep the bottom at least 2″ high at all times to allow for future drawer slides. If you need this step, make sure to do it first, before attaching them to your fake drawer front. Since this step is a bit complicated, here are a few additional pictures to help.

Side view of the notched out 1×6 drawer supports to make room for the sink.
Front-ish view of the vanity, showing the notched boards and kreg screws into the back 1×6 support

View from behind the vanity showing the kreg screws on fake drawer front to the 1×2 top.
Step 7:

Attach 1×2 front trim underneath your fake drawer to the sides of your vanity using your Kreg Jig. Use 2″ finishing nails to give it some extra support on either side and 1 1/4″ finishing nails to attach it to your fake drawer. Attach base trim to the bottom shelf using 1 1/4″ finishing nails and wood glue.
Step 8:

Build your drawer as shown above using your Kreg Jig and 1 1/4″ finishing nails. (My drill wasn’t big enough to get into the small spaces, so I Kreg Jig-ed one drawer front/back piece to each side and then used 1 1/4″ finishing nails to attach the two pieces like a puzzle. Attach the 1/4″ plywood base to the bottom of each drawer using 1 1/4″ finishing nails and glue.
Step 9:

Attach your drawer slides as shown above to both the drawer and the inside of both the right and left sides of the vanity.
Step 10:

Center the fronts of your drawers into the opening, leaving 1/8″ around all sides. When it’s in place, attach with 1 1/4″ finishing nails.
Step 11:

Attach 1×3 door trim to the your plywood from the back with 5/8″ finishing nails and glue. There should be a 4 3/8″ space on either side of your center door trim between that and the insides of your side trim. (For a stronger hold, you could kreg jig your 1x3s together from the back prior to attaching them to the plywood.) Attach each door to the inside of the vanity using your inset hinges, making sure to leave a 1/8″ gap on all sides.
Step 12:
Attach doors to the vanity using your inset hinges. Put your vanity face down and place your doors where you would like them to go, leaving 1/8″ along all sides.

Align hinges along the edges and screw in a few of the screws. (I do two screws per hinge on the door side and two on the frame.)
Stand your console back up and test how the hinges work. If they’re lining up where you want them to, screw in the other half of the screws.
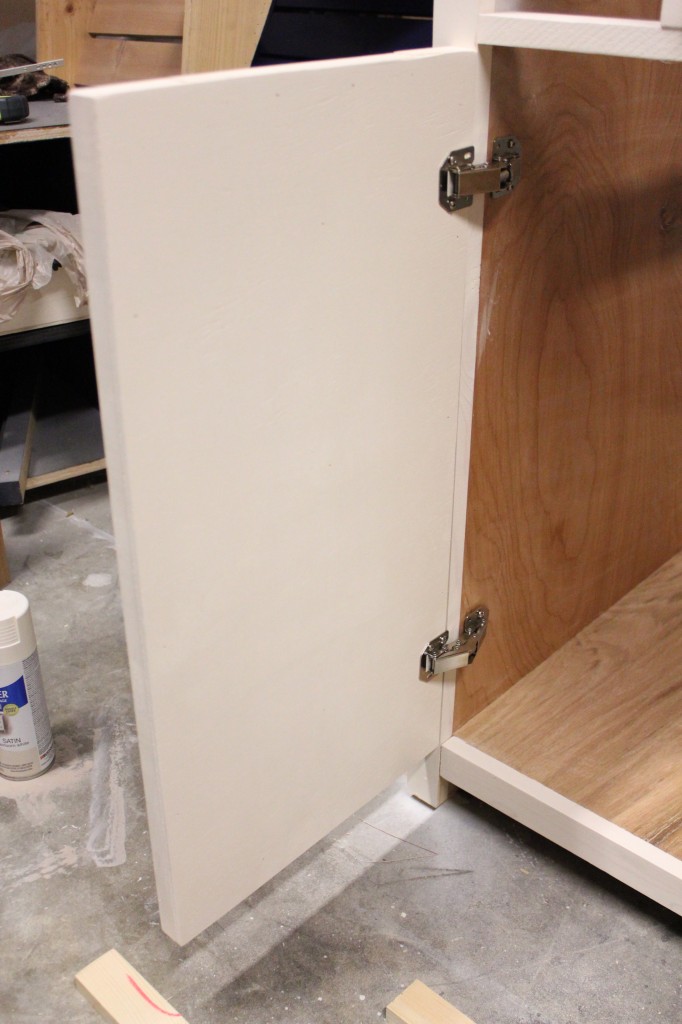
Close your doors and enjoy your new hinges!

Step 13:

Attach base molding as shown, mitering your corners. I’ve attached rough measurements, but make sure to measure your base prior to cutting – every handmade project is just a little different, and those 1/8″s count!
The original plan can be found at http://www.oldpaintdesign.com
![]() [email_link]
[email_link]

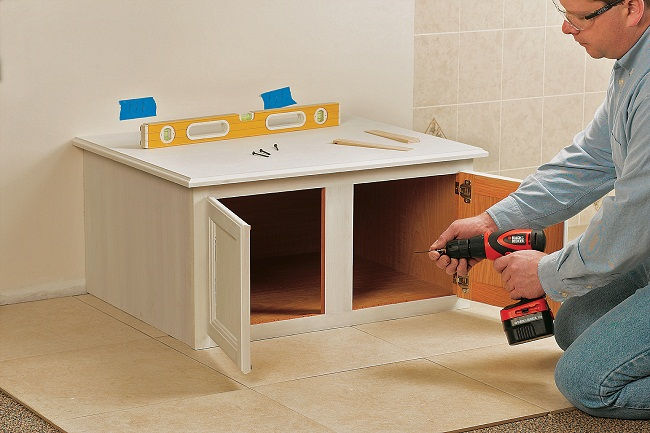
If there’s one place in the house that collects everybody’s stuff, it’s the bathroom. Towels, clothes, cleaning supplies, even laundry. But some fancy design work using a refrigerator wall cabinet and some cool carpentry create a niche spot that can provide a central location for all kinds of different items. Suitable even for small bathrooms, this towel tower also adds texture and color to the space. Another added benefit to this project is the seating provided by the seatboard top on the cabinet. The beadboard backing for this project is made with painted 3⁄8″-thick tongue-and-groove pine, sometimes called carsiding. more advanced carpenters may prefer to make their own custom beadboard from hardwood and give it a custom wood finish.
The base for this project is an over-the-fridge-size wall cabinet (sometimes called a bridge cabinet). At 15″ high, it is within the range of comfortable seating heights. But if you prefer a slightly higher seat (and many people do), build a 2 × 4 curb for the cabinet to rest on. To conceal the seam where the towel tower meets the floor, we trimmed around the base with base shoe trim, mitering the corners. We used the same trim stock to conceal the gap where the seatboard meets the tongue-and-groove paneling. here, however, we added small miter returns to the ends of the base shoe.

Step 1:
Rout a profile, such as an ogee or roundover, into the sides and front of the seatboard. Use a router table if you have one, otherwise hand-machine it with a piloted profiling bit.
Step 2:
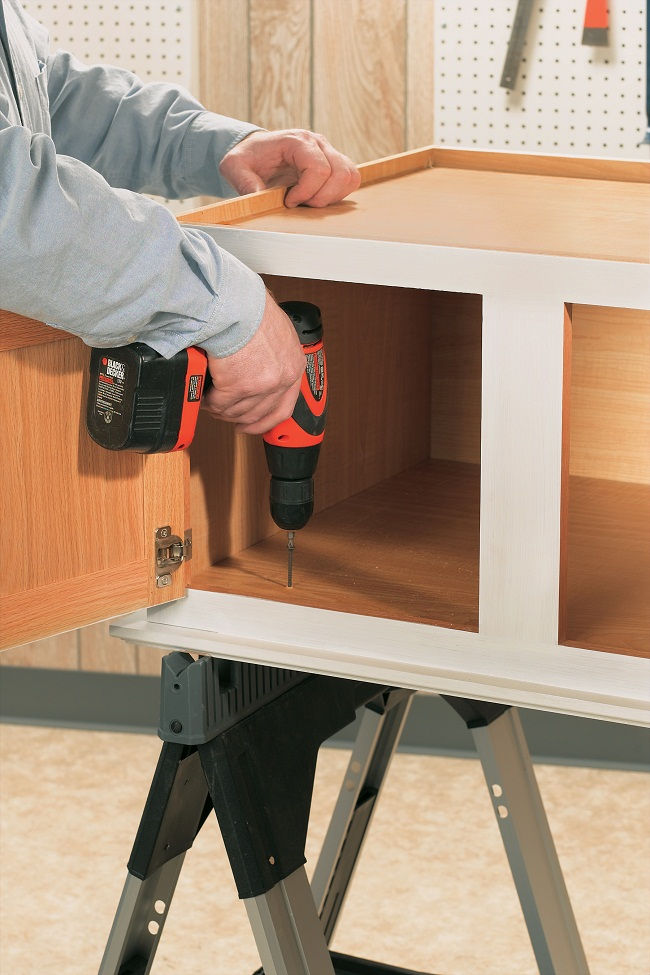
Flip the cabinet upside-down so you can more easily attach the seatboard with screws.
Step 3:
Drive screws through the back of the cabinet at the marked wall stud locations.
Step 4:

Lay out the tongue-and-groove carsiding boards in a row, with the tongues fitted into grooves. Measure out in one direction (half the width of base cabinet) from a midpoint line in the center board.
Step 5:

Clamp a straightedge over a tongue-and-groove board, placing a piece of scrap plywood underneath as a backer. Ripcut the board to the correct thickness for the filler piece.
Step 6:
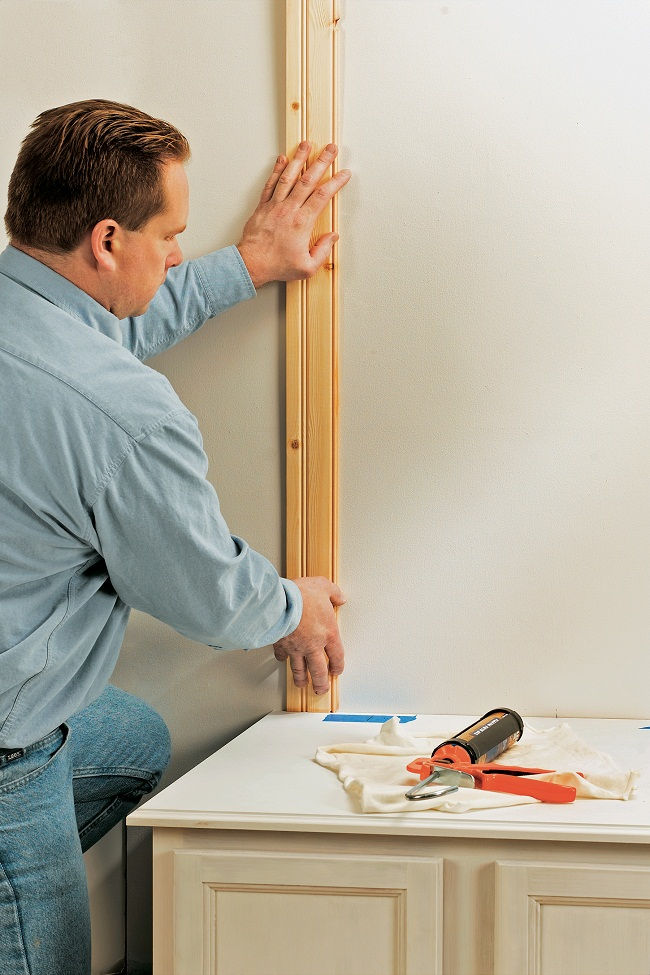
Press the trimmed filler board to the wall, seating it in construction adhesive, at the left edge of the panel area.
Step 7:

Drive a pneumatic brad through the tongue of one of the far-right boards, and into a marked wall stud.
Step 8:

Install quarter-round or base shoe molding at the top edge of the seatboard where it meets the carsiding. Tie the molding back to the wall with mitered returns.
Step 9:
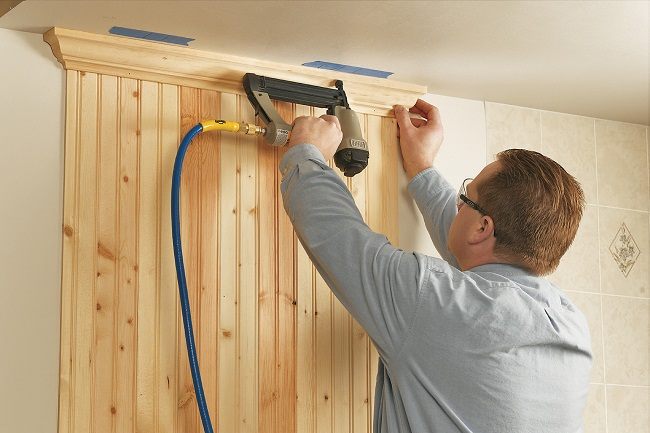
Attach crown molding at the top of the project, creating mitered returns at the ends. Mark the ceiling joists with tape.
Attach towel hooks where desired and finish it with either paint or stain.
The original plan can be found at https://www.blackanddecker.com
![]() [email_link]
[email_link]

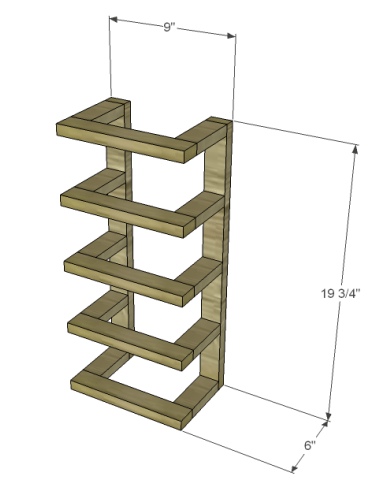
Lumber:
Notes:
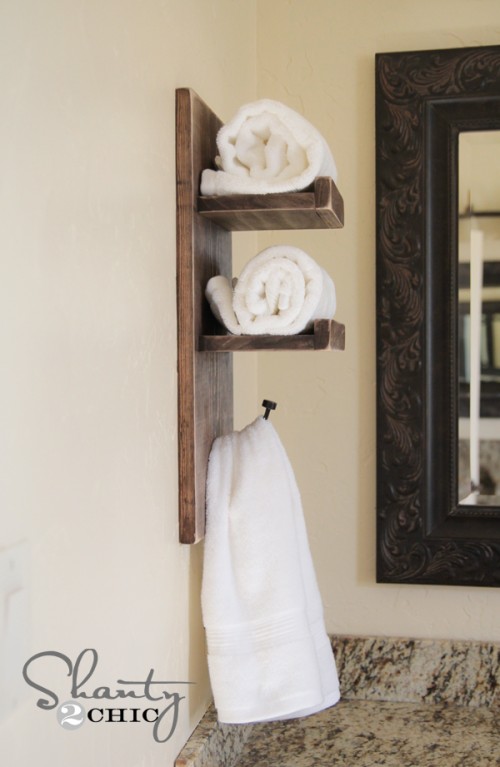
I recommend sealing the towel rack with spar urethane if it will be located in an area where a lot of moisture is present.
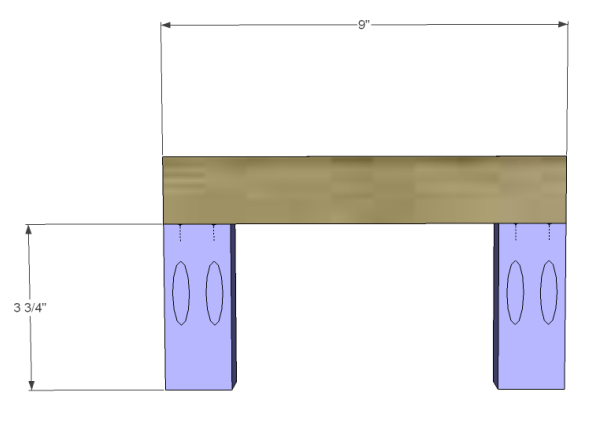
Cut the pieces for the shelves. With the pocket hole jig set for 3/4″ material, drill pocket holes in one end only of each shorter shelf piece. Secure to the longer shelf pieces using glue and 1-1/4″ pocket hole screws.
Mark the position for the shelves on the back and front of the longer rack pieces.


Drill countersunk holes in the back of each back frame piece.


Attach the shelves using glue and 2-1/2″ screws from the back. I started with the bottom shelf on mine… Make sure to check for square before adding the remaining shelves!


Finish as desired. Drill countersunk holes in the back frame pieces. Mount the rack to the wall with 2-1/2″ screws into at least one wall stud. If there are no studs in the area where the rack will be mounted, use auger anchors in the drywall then secure using screws.
The original plan can be found at http://designsbystudioc.com
![]() [email_link]
[email_link]
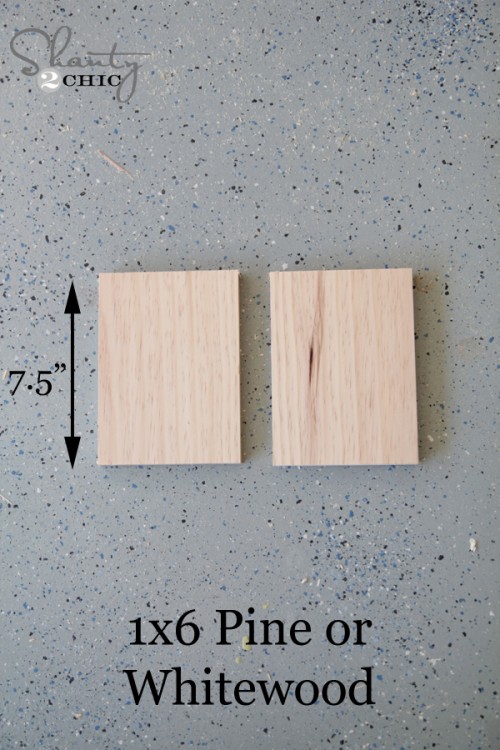
Supply List:
Step 1:
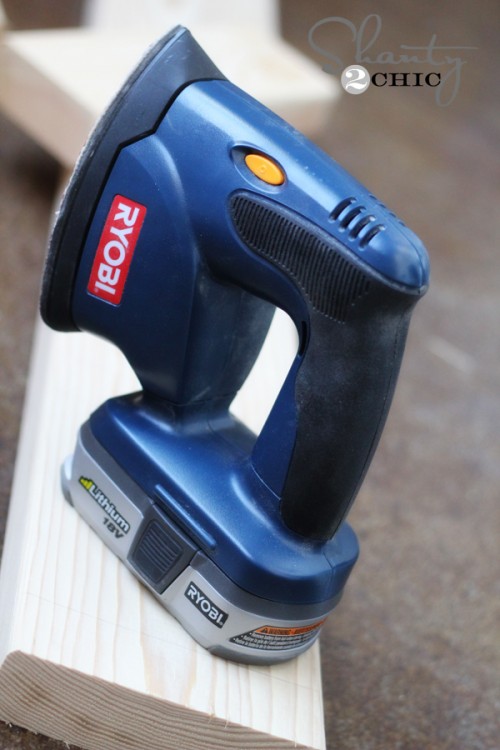
My first step was making my cuts. I used my Ridgid miter saw to make all my cuts. You can also use a cheap hand saw. It requires a bit more elbow grease, but totally gets the job done.

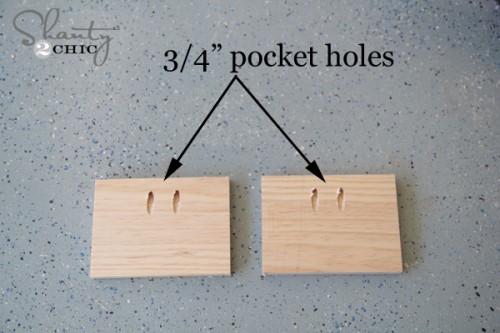
Step 2:
After making all my cuts, I used my Kreg Jig to put two 3/4″ pocket holes in each of my 1×6 pieces. I put one at each of the arrows.

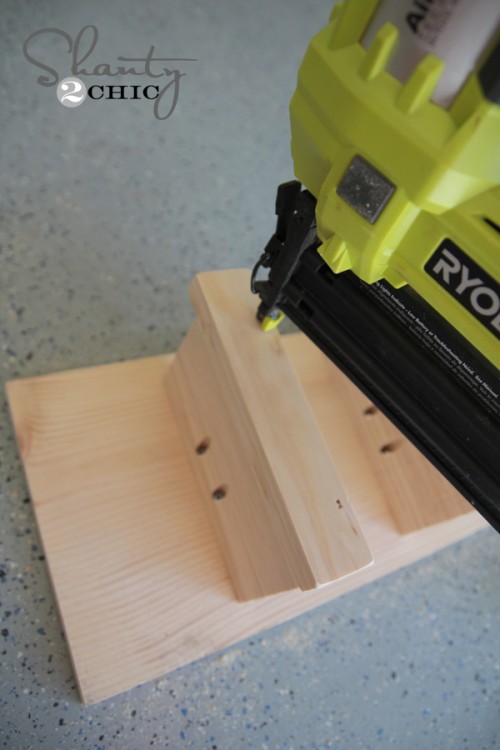
Step 3:
Attach both shelves with pocket screws

 Step 4:
Add the front 1×2″ trim piece, glue and nail it on.

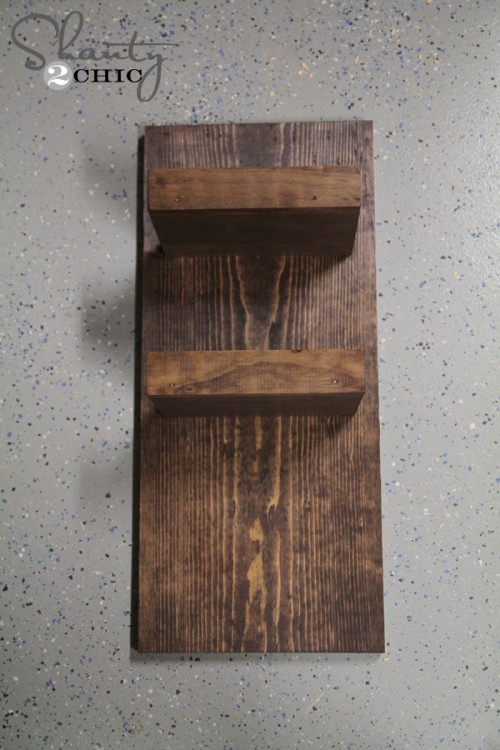
Step 5:
Now its time for stain. I applied a dark walnut stain, when dry I roughed it up with a sander on the edges to create a distressed look.


The original plan can be found at https://www.shanty-2-chic.com
![]() [email_link]
[email_link]


The plans follow, but I do want to warn you, this is NOT a beginner project, so please don’t tackle as a first project. But it’s not difficult, just alot of pieces and a need for precision when cutting and assembling.
Shopping List:

Cut List:
Cut list is per ONE bath vanity
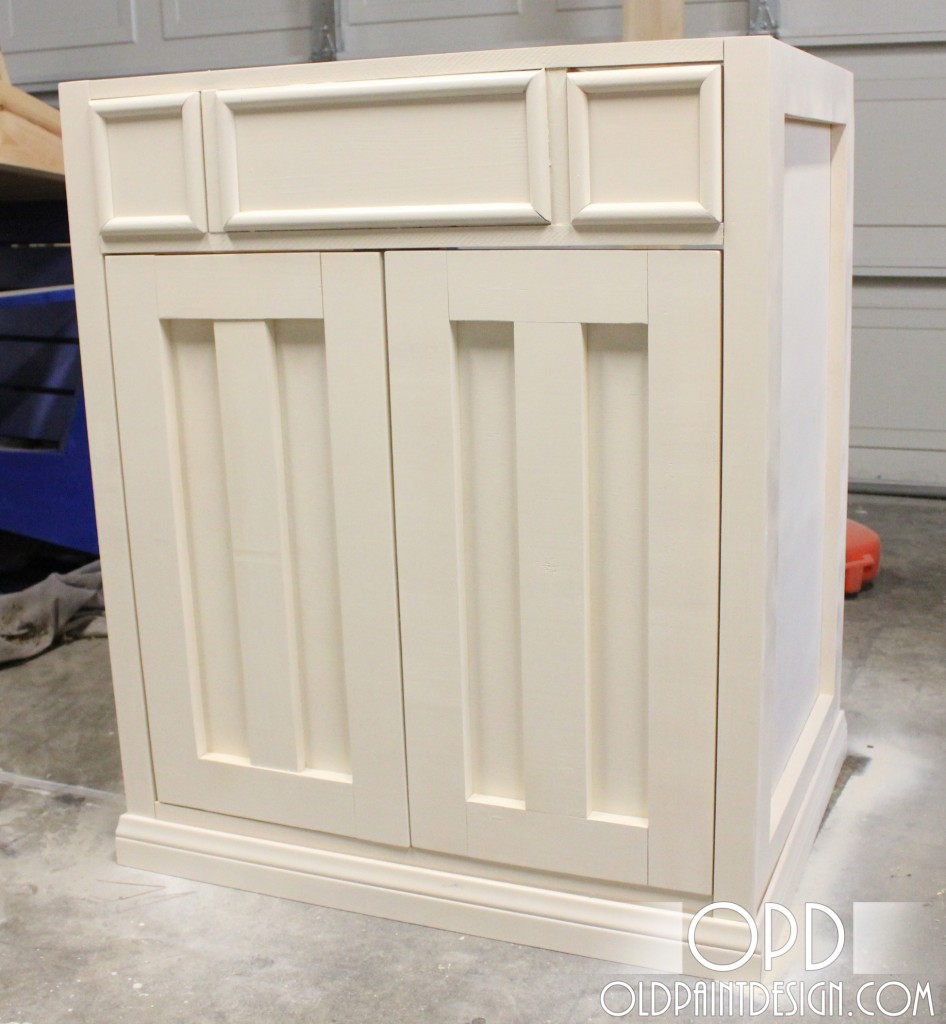
Drawers
Step 1:

Build the two side panels by laying three 1x6s down on a flat level surface, ensuring tops and bottoms are even. TIP: I glue each 1×6 together, edge to edge and let dry to hold in place. Attach the 1×2 trim on top of panels, overhanging ends by 3/4″. There is a 2-1/2″ space under the bottom trim (see diagram in step 3).
Step 2:

Drill two pocket holes on each end of the back 1×3 support boards. Attach with pocket hole screws, pocket holes exposed on back of cabinet.
Step 3:

Build the front face frame on a flat level surface with 3/4″ pocket holes and 1-1/4″ pocket hole screws. Once complete, nail and glue to front of cabinet.
Take a second to ensure your cabinet is square – you can do this by taking diagonal measurements from opposite outside corners of the top of the cabinet, and adjusting until the diagonals match.
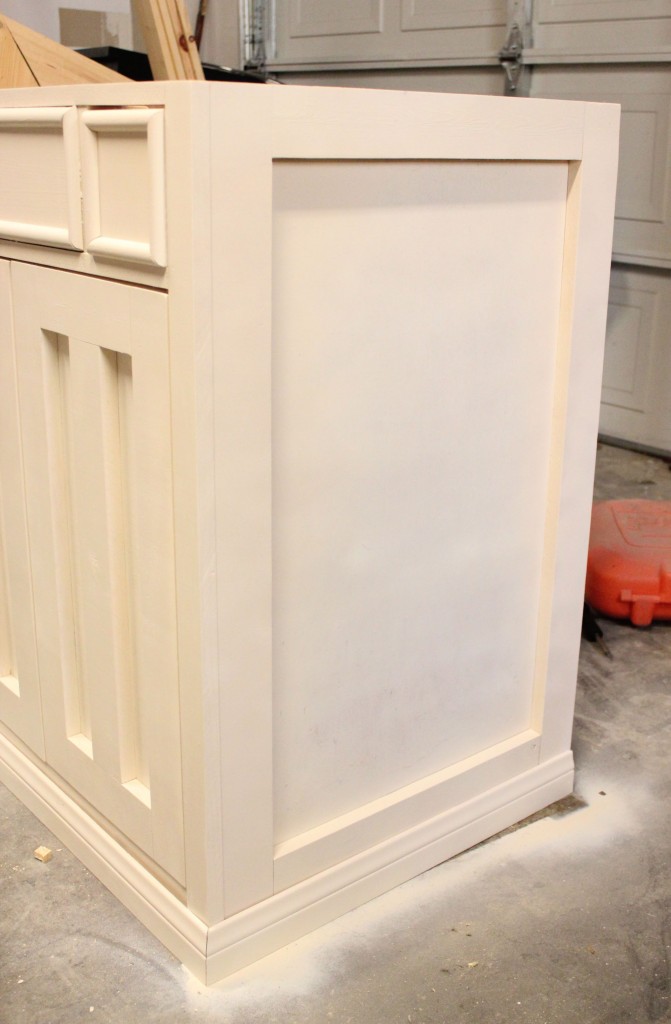
Step 4:

Nail and glue back pieces to the sides and top/bottom supports. The purpose of these guys is to give you something to attach the drawer slides too, while still providing a finished edge (no plywood edges exposed on the back.
Step 5:

Nail and glue the 1×2 inside cleats to the face frame. The purpose of these guys is to give you something to attach the drawer slides to on the front.
Step 6:

Finish the front trim – measure and cut to fit and nail and glue in place.
Step 7:

For full size drawers that don’t need to be cut around plumbing, construct as shown here with pocket holes. Nail and glue bottom plywood on.
Step 8:

If you have to build drawers around plumbing, keep the same basic cuts, just install the back where it passes the plumbing and box out corners as needed.
Step 9:

The drawer slides are installed attached to the 1×2 cleat at front, and with a end socket on the back.
Step 10:

For the top, I used 1x boards and pocket holed them together, leaving an opening for my sink. For my sink, I used 1x4s on front and back, and 1×12 pieces on the sides.
The original plan can be found at http://www.ana-white.com/
![]() [email_link]
[email_link]
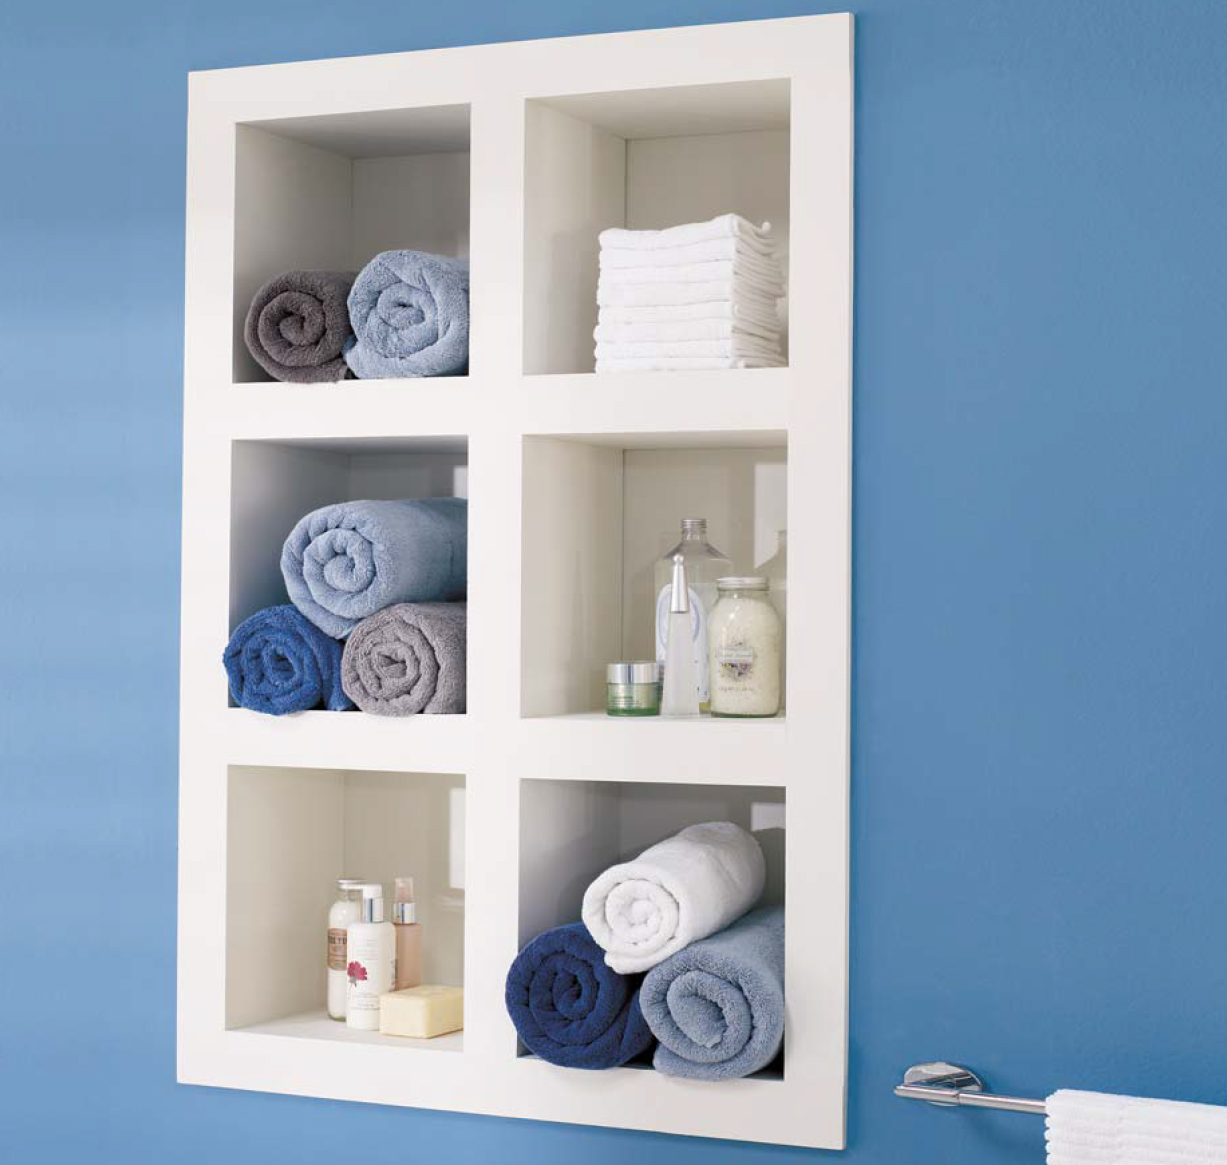
Built into the wall just like a window, this shelf unit offers additional storage without taking up any extra space, helping to keep the bathroom looking spacious and clutter free. Made of MDF, the unit measures 26 1/2″ wide by 42″ high (30 1/2″ by 46″ with its frame). It is assembled in part using wood biscuits.
The shelves shown in the photo have been built into a wall that opens into a closet on the other side, which means that they are actually deeper than the wall is thick. The measurements given in this guide are for shelves 4″ deep, which can thus be fitted into a regular interior wall. The back of the shelf unit is closed off with a sheet of Masonite.
Cut List:

Click to Enlargen
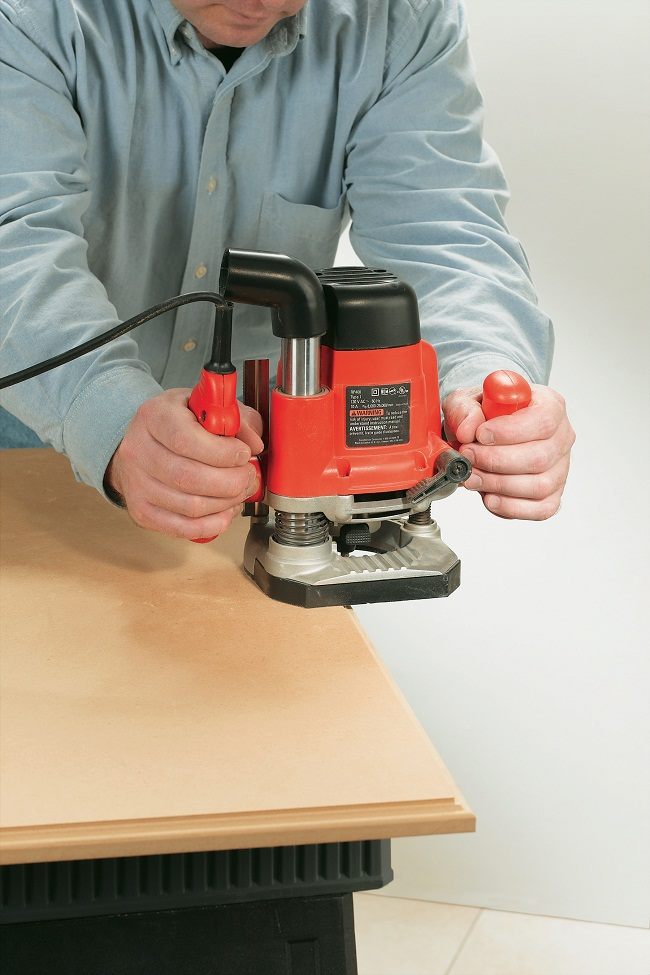
ASSEMBLING FURNITURE WITH WOOD BISCUITS
This sturdy method of assembly involves inserting thin slices of compressed wood (“biscuits”) into slots made with a plate (or biscuit) joiner. When the biscuits come into contact with glue applied in the slots, they swell and stay wedged in place, holding the construction together. Once you have taken the time to learn how to use a biscuit joiner, the specialized tool required for this type of assembly,
you will find it a quick and easy technique.

Preparation

Vertical sides (A): Make the slots for the biscuits 13 1/4″
from each end of A, on one side only.
Spacers (F): Make the slots for the biscuits
in the very centre of the parts, i.e. 3/4″ from the edge.
Top / Bottom (G): Make the slots for the biscuits
in the very centre, i.e. 13 1/4″ from one of the ends.
Assembly
The shelf cubbies are formed by building individual “boxes” which are assembled with nails
and then fastened to each other using wood biscuits. Always apply glue to the inside of the slots before inserting the biscuits. Glue must also be applied to all the surfaces to be joined.
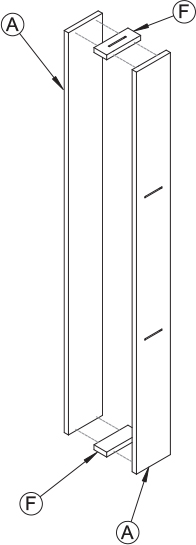
Assemble a vertical module by gluing and nailing two spacers F between two vertical sides A, one spacer at each end. All surfaces with slots should be facing outwards.
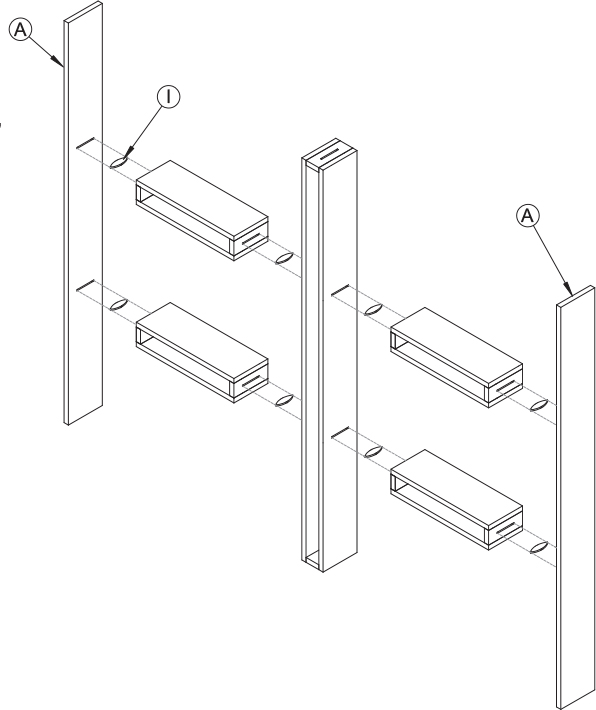
 Assemble each of the four horizontal modules by gluing and nailing two spacers F between two horizontal sides C, one spacer at each end. All surfaces with slots should be facing outwards.
 Fasten two horizontal modules between a side A and the vertical module, then do the same on the other side. Insert more spacers into the vertical module as needed, to prevent its sides from bending inwards. Hold in place with clamps and go straight on to the next step.
 Apply glue to the slots in top / bottom G and to the ends of sides A. Insert the biscuits into the slots, then nail top / bottom G to sides A.
 Glue and nail panel E to the back of the shelves.
 Glue and nail one vertical facade B to the front of the vertical module and fasten short horizontal facades D to the horizontal modules in the same way.
 Insert the shelf unit into the wall opening, resting it on the bottom girt. Check for level, then screw into the studs.
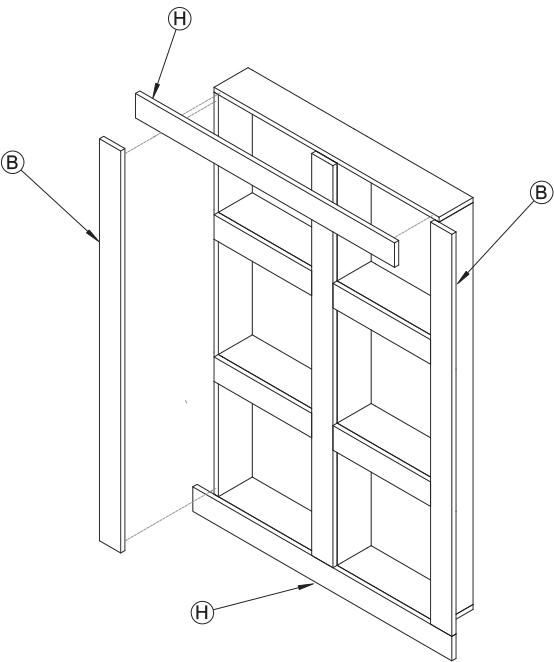 Glue and nail the two remaining vertical facades B and the two long horizontal facades H to the edges of the shelf unit in order to form a frame to conceal the cuts in the drywall. Fill the holes and apply a coat of primer. Paint.
The original plan can be found at https://www.rona.ca
![]() [email_link]
[email_link]


