BBQ Tool Cabinet

PARTS

  • A side frame pieces – (2) 5/4 X 6 X 28″
  • B bottom frame piece – (1) 5/4 X 4 3/4″ X 19″
  • C top frame piece – (1) 5/4 X 6 X 23″
  • D front strip – (1) 1″ X 23″ (cut from 5/4 X 6 cedar)
  • E back pieces – (4) (cut to fit from 1 x 6 T & G cedar)
  • F feet – (2) (see drawing) (cut from 5/4 X 6 cedar)
  • G door pieces – (2) 1 X 4 3/4″ X 23 7/8″
  • H door pieces – (2) 1 X 4 1/2″ X 23 7/8″
  • I door cleats – (4) 1 X 2″ X 8″
  • J door strip – (1) 1/4″ X 1″ X 23 7/8″

Pre-drill all screw locations with a #8 countersink bit and  sand the pieces before assembly.

  1. Referring to the diagram, cut the two side pieces,  the top and bottom pieces, and the feet to size. Glue and nail the front strip  to the top piece.
  2. Using a bench saw or router, cut a 1/2″ x 1/2″  rabbet along the back edges of the side, top and bottom pieces of the frame.  (Note that the rabbet on the side pieces only extends to the base of the bottom  frame piece.)
  3. Assemble the frame using 2-1/2″ deck screws and  exterior wood glue. Make all the pieces flush at the back and centre the top  piece on the sides of the frame. Using clamps will help in the assembly  process. Check to ensure that the frame is square. A temporary wood strap  fastened diagonally to the front of the frame will keep the unit square until  the back is installed.
  4. Cut and assemble 1 x 6 cedar boards for the back,  using 2″ galvanized finishing nails and glue. The temporary wood strap (step 3)  may now be removed.


Build the Doors

  1. Referring to the schematic diagram, cut the four  door pieces to size from 1 x 6 tongue and groove cedar.  Cut off the  tongue and groove from the inner and outer edges of each door.
  2. Fasten the two cleats to the back of each door,  using glue and 1″ #8 brass screws.
  3. With the cabinet on its back, install the two  doors, using two hinges per door.  Install  the cedar strip to the right side door, using  1″ finishing nails and glue.
  4. Install the barrel bolt, drilling a 1/4″ diameter  hole half an inch into the top frame piece to line up with the bolt.
  5. Attach the two wooden feet, using glue and 2″ deck  screws.  Initially insert one screw into each foot, set the cabinet on a  level surface, and using a level or carpenter’s square check to make sure the  unit is vertical.  Then secure with three more screws in each foot.
  6. Install the hooks and handle as shown.
  7. Finish with a natural UV resistant wood finish.

The original plan can be found at  http://www.homeathome.homehardware.ca

 
[email_link]
 

BBQ Shelter


PARTS:

  • A side panels – posts – (4) 4 X 4 X 6′ 11 1/2″ (see dwg)
  • B side panels – rails – (4) 2 X 4 X 33″ (cut shorter if using rail connectors)
  • C side panels – fence boards – (6) 1 X 6 X 2′ 7″ (cut from 6′ fence boards)
  • D side panels – top rail & shelf – (2) 2 x 6 x 3′ 4″ (see dwg)
  • E back panel – frame – (5) 2 x 4 x 5′
  • F back panel – filler pieces – (8) two 1 x 6 x 5′ fence boards ripped to 1 1/4″ wide strips
  • G back panel – shutter boards – (12) 1 x 6 x 5′ (cut lengths to accommodate louvre brackets & rails)
  • H roof – ridge boards – (2) 2 X 6 X 3′ (see dwg)
  • I roof – rafters – (4) 2 X 4 X 3′ 4 1/2″ (see dwg)
  • J roof – shutter boards – (18) 1 X 6 X cut length to fit (6′ fence boards cut in half)
  • K roof – peak – (2) 2 x 4 x 1′ 8″ (see dwg)
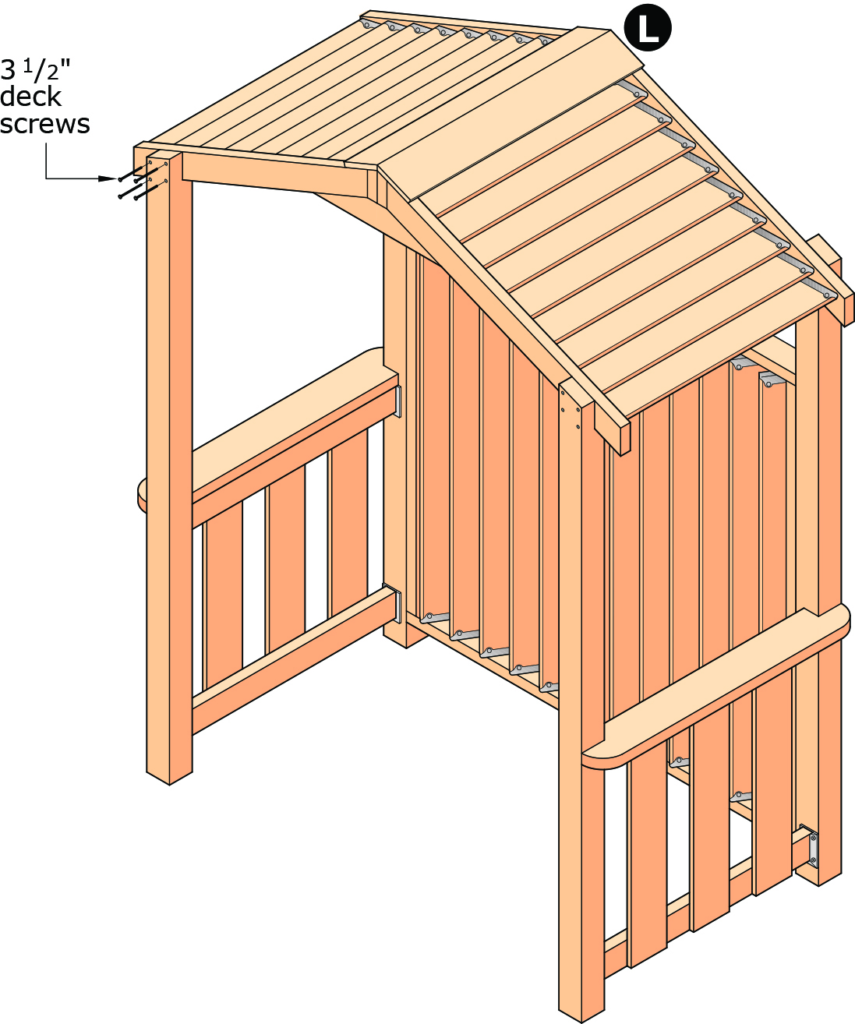
  • L roof – cap – (2) 1 x 6 x 3′ (see dwg)

ROOF – ASSEMBLY
Fasten the louvre brackets and misc parts to the shutter boards and install the boards according to the manufacturer’s instructions.

Fasten the roof cap to the ridge boards and the rafters. Lift the roof structure onto the four posts. Set the rafters into the post notches. Fasten the rafters to each post with four 3 1/2″ deck screws.

ROOF – PARTS


ROOF – STRUCTURE
Fasten 2 rafters to each ridge board using 3 1/2″ deck screws. Install louvre rails on the insides of the 4 rafters.

Screw or bolt the two ridge boards together. Fasten the two roof peak pieces “K” to the bottoms of the rafters.

BACK PANEL
Install the louvre rail sections to the insides of the frame (top and bottom) according to the manufacturer’s instructions. Screw vertical filler pieces “F” to the insides of the frame to fill in the gaps at the ends of the louvre rails. Fasten the louvre brackets and misc parts to the shutter boards and install the boards according to the manufacturer’s instructions.

ASSEMBLY – BACK & SIDE PANELS
Fasten the back panel to the side panel posts with 3 1/2″ deck screws.

SIDE PANELS
Fasten the top rails “D” to the side panels with 3 1/2″ deck screws.

BACK PANEL
Assemble the back panel frame using 3″ deck screws.

POSTS
In two posts, slope the notches in one direction and in the other two posts, slope the notches in the opposite direction.

SIDE PANELS
Construct two side panel assemblies:

  • Fasten the rails to the posts using rail connectors.
  • Make certain that the post notches in
    each panel face inward.
  • Also, make certain that the post notches
    slope in the correct direction for the
    roof structure


The original plan can be found at  http://www.homeathome.homehardware.ca

 
[email_link]

Spring Rose Dresser

Materials:

  • 1-1/4″ pocket hole screws
  • 1-1/4″ brad nails
  • Edge banding, optional
  • 6 sets of 14″ Drawer slides
  • Cabinet pulls
  • Wood glue
  • Sandpaper (100, 150, 220 grits)
  • Finishing supplies (primer & paint, or stain, sealer)

Lumber:

  • (5) 1×2 at 8′
  • (2) 1×6 at 8′
  • (4) 1×8 at 8′
  • (1) 1×12 at 4′
  • (1) 4′ x 4′ sheet of 3/4″ plywood
  • (2) 4′ x 8′ sheets of 3/4″ plywood

Cut List:

  • (1) 3/4″ plywood at 15″ x 51-1/2″ – Bottom
  • (2) 3/4″ plywood at 14-3/4″ x 31-1/4″ – Sides
  • (1) 3/4″ plywood at 5-1/4″ x 51-1/2″ – Lower Back Support
  • (1) 3/4″ plywood at 25-1/4″ x 51-1/2″ – Back Panel
  • (1) 3/4″ plywood at 14″ x 25-1/4″ – Divider
  • (1) 1×2 at 51-1/2″ – Upper Front Stretcher
  • (2) 1×2 at 25-3/8″ – Lower Front Stretchers
  • (2) 1×2 at 21-1/4″ – Mid-Front Stretchers
  • (2) 1×2 at 31-1/4″ – Outer Side Framing
  • (1) 1×2 at 24-1/2″ – Center Framing
  • (12) 1×2 at 14″ – Drawer Spacers
  • (1) 3/4″ plywood at 16-1/4″ x 54″ – Top
  • (1) 3/4″ plywood at 5-1/4″ x 53″ – Lower Front Trim
  • (4) 3/4″ plywood at 12-1/2″ x 21-3/4″ – Upper Drawer Box Bottom
  • (8) 1×8 at 12-1/2″ – Upper Drawer Box Sides
  • (8) 1×8 at 23-1/4″ – Upper Drawer Box Front & Back
  • (2) 3/4″ plywood at 12-1/2″ x 21-3/4″ – Lower Drawer Box Bottoms
  • (4) 1×6 at 12-1/2″ – Lower Drawer Box Sides
  • (4) 1×6 at 23-1/4″ – Lower Drawer Box Front & Back
  • (4) 1×8 at 25-1/4″ – Lower Drawer Fronts
  • (2) 1×12 (ripped to 9-5/8″ wide) at 25-1/4″ – Upper Drawer Fronts

Step 1:

Cut the piece for the bottom, cutting the notches with a jigsaw. With the pocket hole jig set for 3/4″ material, drill pocket holes in each end of the bottom. Secure the bottom to the sides using glue and 1-1/4″ pocket hole screws. The back edge of the bottom will be flush with the back edge of the sides which will make the notched edge extend 3/4″ past the sides.

Step 2:

Cut the pieces for the back and the lower back support. Position the lower back support under the bottom securing the piece to the bottom and sides using glue and 1-1/4″ brad nails. Drill pocket holes in the sides and lower edge of the back. Position on top of the bottom and secure in place using glue and 1-1/4″ pocket hole screws.

Step 3:

Cut the piece for the divider and cut the notch using a jigsaw. Drill pocket holes in the bottom and back edge. Position the divider as shown, then secure to the bottom and back using glue and 1-1/4″ pocket hole screws.

Step 4:

Cut the pieces for the stretchers and the framing. Cut notches in the framing pieces as shown (pay special attention to the dimensions of the pieces to make sure the correct ones are cut) using a jigsaw. Drill pocket holes in each end of the mid-front stretchers.

Secure the outer side framing to the sides using glue and 1-1/4″ brad nails. The outside edges will be flush with the outside faces of the sides. Secure the center divider framing piece to the divider using glue and 1-1/4″ brad nails, making sure the piece is centered. Attach the notched stretchers to the outer side framing and center divider framing using glue and 1-1/4″ brad nails. Attach the mid-front stretchers to the outer side framing and center divider framing as shown using glue and 1-1/4″ pocket hole screws.

Step 5:

Cut the pieces for the drawer spacers, securing to the sides and dividers using glue and 1-1/4″ brad nails.

Step 6:

Cut the piece for the top. Position the piece so that the sides overhang by 1/2″ and the front overhangs by 3/4″. Secure in place using glue and 1-1/4″ brad nails.

Step 7:

Cut the piece for the lower front trim. Draw lines for the curves as desired, maintaining the overall dimensions of the piece. Secure to the bottom and outer side framing using glue and 1-1/4″ brad nails.

Step 8:

Cut the pieces for the drawer boxes. Drill pocket holes in all four edges of the bottom as well as each end of the sides. Assemble the drawer boxes as shown using glue and 1-1/4” pocket hole screws. Install the drawer slides according to the manufacturer’s installation instructions, locating them flush with the front edge of the side framing and center divider framing. Make any necessary adjustments. The smaller drawer boxes are the lower drawers – the larger drawer boxes are the upper drawers!

Step 9:

Cut the pieces for the upper drawer fronts. Using a router and a 3/8″ straight bit, cut a dado across each drawer front approximately 1/4″ deep. This will make it look as if there are two drawer fronts instead of one.

Step 10:

Cut the pieces for the remaining drawer fronts. Mark the position for the drawer pulls and drill the holes. The sides of each drawer front will overlap the opening by 1/2″. Starting with the lower drawer fronts, position the pieces so they are 1/2″ above the lower trim. Drive screws through the holes for the drawer pulls into the drawer box to temporarily hold the drawer front in place. Open the drawer, and secure the drawer front using countersunk 1-1/4” screws from the inside. Remove the screws from the holes for the drawer pull then finish drilling the holes. Install the drawer pull.

The middle drawer fronts will be positioned 1/4″ above the lower drawer fronts, and the upper drawer fronts will be positioned 1/4″ above the middle drawer fronts.

Finish as desired.


The original plan can be found at http://designsbystudioc.com/diy-plans-build-spring-rose-dresser/

 
[email_link]
 

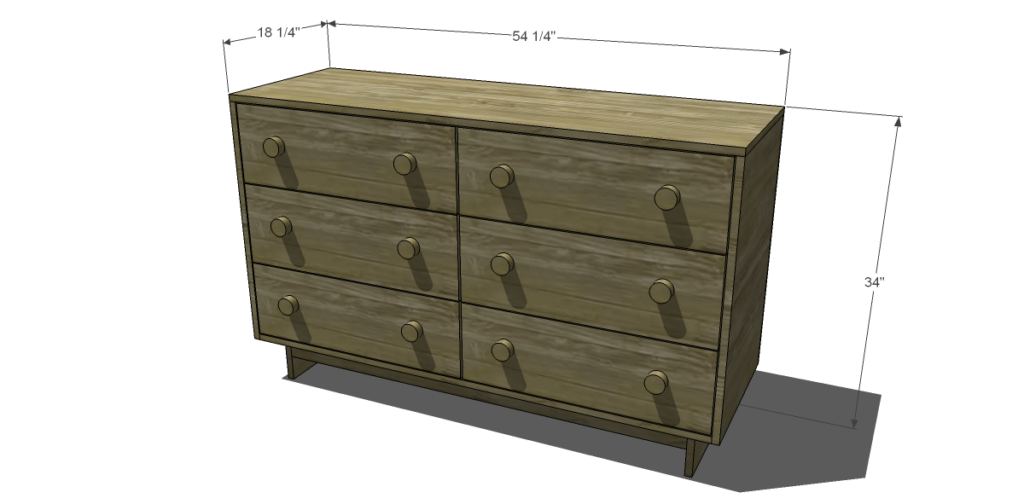
6 Drawer Dresser

Materials:

  • Two sheets of ¾” plywood
  • (1) 1×3 at 8’
  • (1) 1×6 at 3’
  • (6) 1×8 at 8’
  • One sheet of ¼” plywood
  • 1 ¼” Pocket Hole Screws
  • 1-1/4” Brad Nails
  • (6) sets of 16” Drawer Slides (side mount with 1/2″ clearance)
  • (6) Cabinet/Drawer pulls

Cut List:

  • (2) 1×6 at 14” –Base
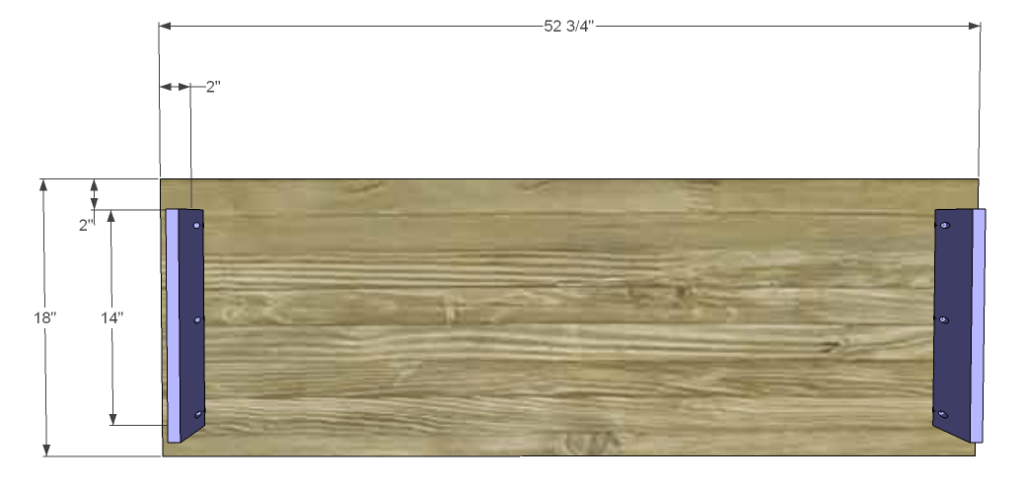
  • (1) ¾” plywood at 18” x 52-3/4” – Bottom
  • (2) 1×3 at 47-1/4” – Base Stretchers
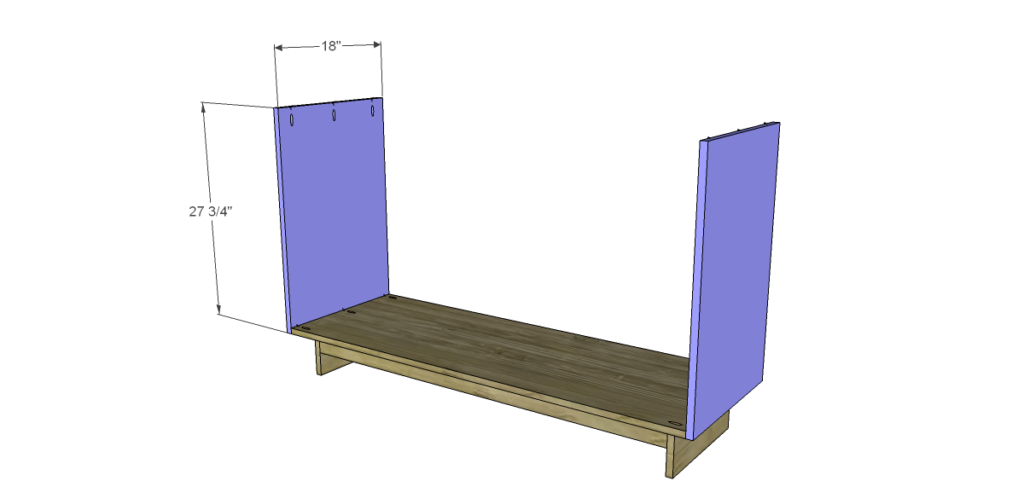
  • (2) ¾” plywood at 18” x 27-3/4” – Sides
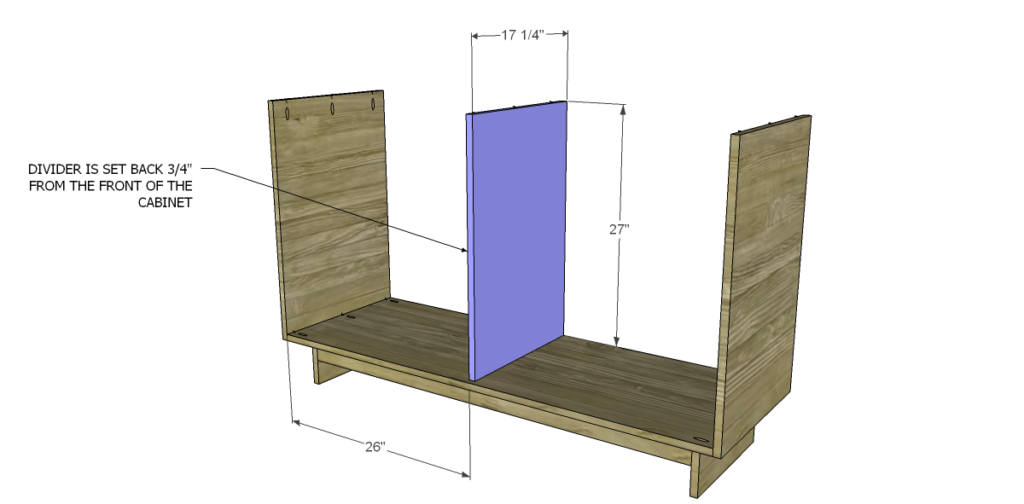
  • (1) ¾” plywood at 17-1/4” x 27” – Divider
  • (4) ¾” plywood at 17-1/4” x 26” – Shelves
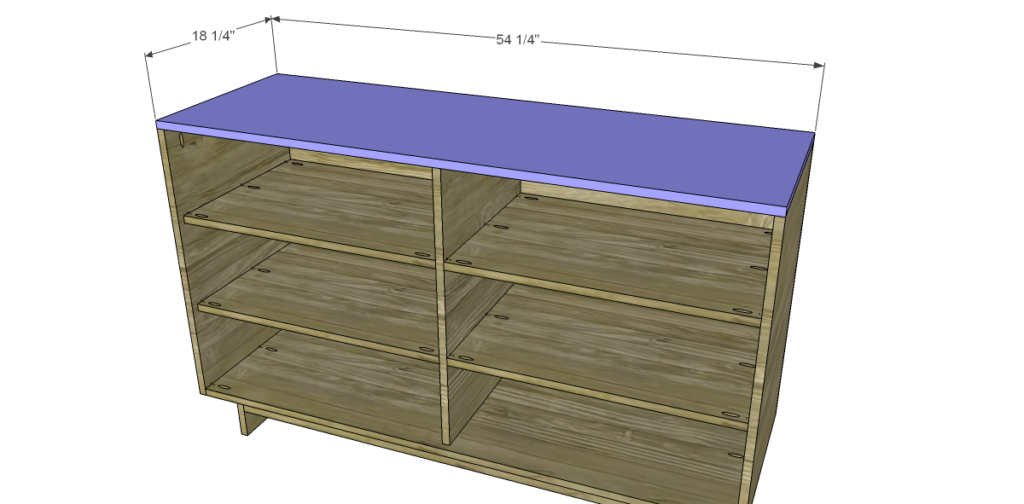
  • (1) ¼” plywood at 27-3/4” x 54-1/4”” – Back
  • (1) ¾” plywood at 18-1/4” x 54-1/4”” – Top
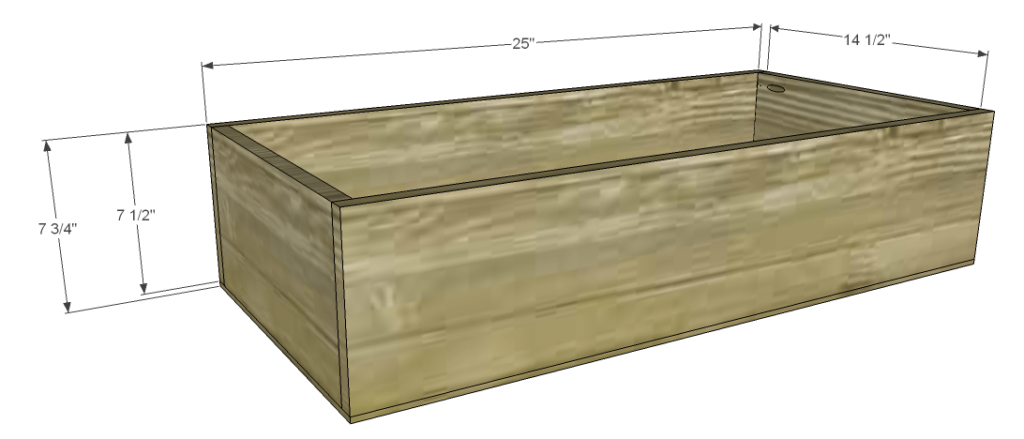
  • (12) 1×8 at 14-1/2” – Drawer Box
  • (12) 1×8 at 25” – Drawer Box
  • (6) ¼” plywood at 16” x 25” – Drawer Bottom
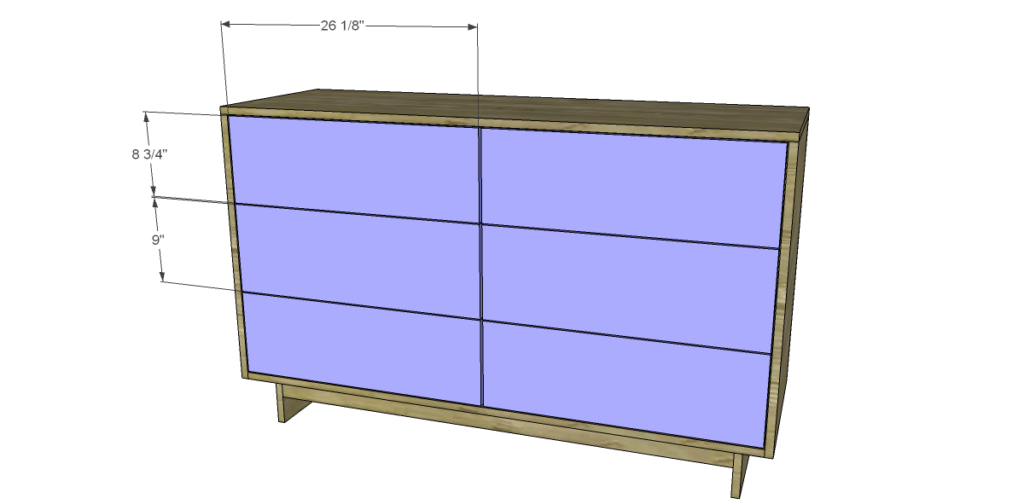
  • (4) ¾” plywood at 8-3/4” x 26-1/8” – Drawer Fronts
  • (2) ¾” plywood at 9” x 26-1/8” – Middle Drawer Front

Step 1:

Apply optional edge banding to exposed edges of plywood before assembly. Cut the pieces for the base and bottom. Set the Kreg jig for ¾” material and drill pocket holes in one long edge of each base piece. Also drill pocket holes in each end of the bottom to attach the sides. Position the base pieces on the bottom as shown and attach using glue and 1-1/4” pocket hole screws.

Cut the pieces for the base stretchers. Drill pocket holes in each end as well as one long edge of each piece. Attach to the bottom and existing base pieces using glue and 1-1/4” pocket hole screws.

Step 2:

Cut the pieces for the sides. Drill pocket holes in the top edge of each piece to attach the top. Attach to the bottom using glue and 1-1/4” pocket hole screws.

Step 3:

Cut the piece for the divider. Drill pocket holes in each of the shorter ends. Attach to the bottom as shown using glue and 1-1/4” pocket hole screws.

Step 4:

Cut the piece for the shelves. Drill pocket holes in each edge. Secure to the sides as shown using glue and 1-1/4” pocket hole screws. The shelves will be set ¾” back from the front edge of the sides.

Step 5:

Cut the piece for the back and attach using glue and 1-1/4” brad nails.

Step 6:

Cut the piece for the top. Attach to the sides using glue and 1-1/4” pocket hole screws.

Step 7:

Cut the pieces for the drawer boxes. Assemble as shown using glue and 1-1/4” pocket hole screws. Cut the pieces for the drawer bottoms. Attach to the drawer boxes using glue and 1-1/4” brad nails. Attach the drawer slide hardware according to the manufacturer’s instructions.

Step 8:

Cut the pieces for the drawer fronts. There will be a 1/8” gap all the way around. Align, use shims to hold in place if needed. Fasten using 1 1/4″ Brad Nails and glue from the front. Once the glue has set up, attach from the inside if you prefer using 1 1/4″ screws then attach the drawer pulls according to the manufacter instructions.

Fill any Screw, Nail or Pocket Holes, Sand and Finish as Desired.


The original plan can be found at http://www.thedesignconfidential.com/2013/08/free-diy-furniture-plans-build-emmerson-6-drawer-dresser/

 
[email_link]

6 Drawer Dresser

Materials:

  • Full sheet of ¾” plywood
  • Quarter sheet of ¾” plywood
  • Full sheet of ¼” plywood
  • Half sheet of ¼” plywood
  • Full sheet of ½” plywood
  • (2) 1×3 at 8’
  • (6) 1×8 at 8’
  • 1-1/2” pocket hole screws
  • 1” brad nails
  • 6 sets of 18” drawer slides

Cut List:

  • (2) ¾” plywood at 19-3/4” x 31” – Sides
  • (1) ¾” plywood at 19-3/4” x 54-1/2” – Bottom
  • (1) ¾” plywood at 19-3/4” x 30-1/4” – Divider
  • (1) ¾” plywood at 20-” x 56” – Top
  • (1) ¼” plywood at 31-3/4” x 56” – Back
  • (3) 1×3 (ripped to 2” wide) x 16-3/4” – Pedestal
  • (2) 1×3 (ripped to 2” wide) x 54-1/2” – Pedestal
  • (12) 1×8 at 16-1/2” – Drawer Boxes
  • (12) 1×8 at 25-7/8” – Drawer Boxes
  • (6) ¼” plywood at 18” x 25-7/8” – Drawer Bottoms
  • (6) ½” plywood at 10-1/2” x 27-15/16” – Drawer Fronts
  • (30) ¼” plywood at 1-1/2” x 27-15/16” – Trim Slats

Step 1:

Edge banding should be applied to all exposed edges of plywood before assembly. Cut the pieces for the sides and bottom. Set the Kreg jig for ¾” material and drill pocket holes in each end of the bottom piece as well as the top of the side pieces. Attach using glue and 1-1/2” pocket hole screws. Cut the piece for the divider. Drill pocket holes in each end. Attach to the bottom using glue and 1-1/2” pocket hole screws.

Step 2:

Cut the piece for the top. Attach to the sides and divider using glue and 1-1/2” pocket hole screws through the holes in the sides into the top. Check for square.

Step 3:

Cut the piece for the back then attach using glue and 1” brad nails.

Step 4:

Cut the pieces for the pedestal. Drill pocket holes in each end of the shorter pieces, as well as one long end of each piece. Assemble the frame using glue and 1-1/2” pocket hole screws, then attach to the bottom of the cabinet. There will be a ¾” border around the pedestal.

Step 5:

Cut the pieces for the drawer boxes. Assemble as shown using glue and 1-1/2” pocket hole screws. Cut the pieces for the drawer box bottoms and attach using glue and 1” brad nails. Attach the drawer slide hardware according to the manufacturer’s instructions.

Step 6:

Cut the pieces for the drawer fronts. Attach to the drawer boxes with glue and a few 1” brad nails. Place the brad nails where they will be covered by the trim slats.

Step 7:

Cut the pieces for the trim slats. There will be ½” spacing between slats. Attach to the drawer fronts using glue and 1” brad nails.

Fill any Screw, Nail or Pocket Holes, Sand and Finish as Desired.


The original plan can be found at http://www.thedesignconfidential.com/2012/09/free-diy-furniture-plans-build-west-elm-inspired-stria-6-drawer-dresser/

 
[email_link]

Laguna Dresser

Material:

  • (1) 1×2 at 6’
  • (3) 1×2 at 8’ <b>OR</b>
  • Cut all of the 1×2 strips from the plywood so that the species of the wood matches
  • (3) sheets of ¾” plywood
  • 1-1/4″ Pocket Hole Screws
  • 1-1/4″ Brad Nails
  • 6 sets of 16” Drawer Slides (side mount with 1/2″ clearance)
  • Drawer/Cabinet Pull
  • Anti-Tip Kit

Cut List:

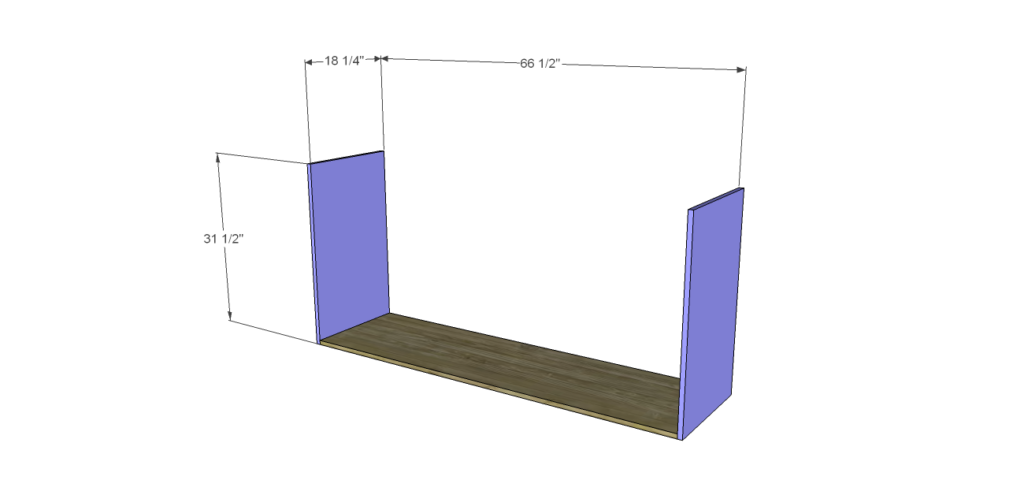
  • (1) ¾” plywood at 18-1/4” x 66-1/2” – Bottom
  • (2) ¾” plywood at 18-1/4” x 31-1/2” – Sides
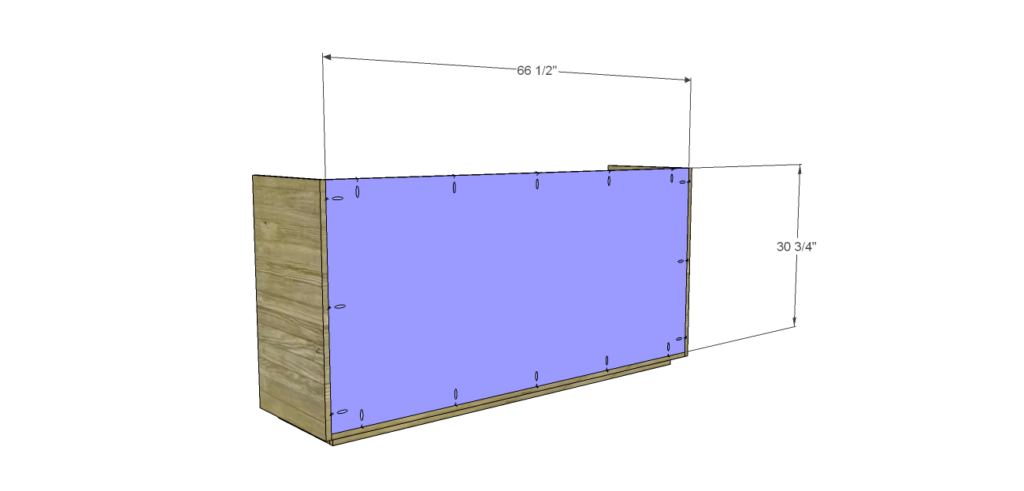
  • (1) ¾” plywood at 30-3/4” x 66-1/2” – Back
  • (1) ¾” plywood at 17-1/2” x 30-3/4” – Divider
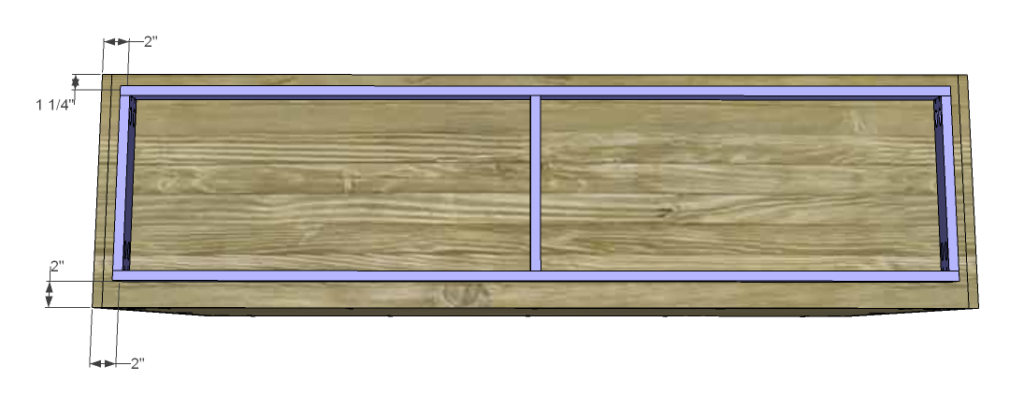
  • (2) 1×2 at 64” – Base
  • (3) 1×2 at 13-1/2” – Base
  • (4) 1×2 at 32-7/8” – Stretchers
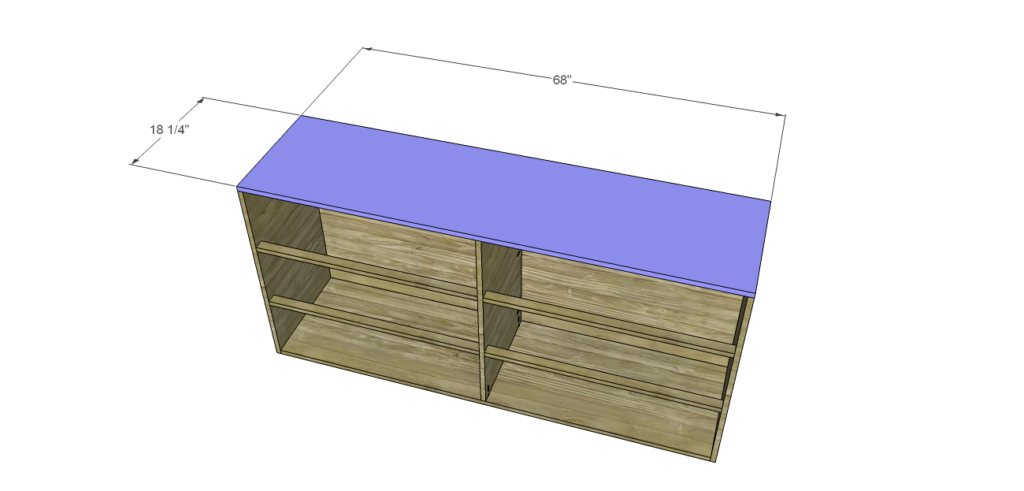
  • (1) ¾” plywood at 18-1/4” x 68” – Top
  • (6) ¾” plywood at 14-1/2” x 30-3/8” – Drawer Box Bottom
  • (12) ¾” plywood at 8” x 14-1/2” – Drawer Box Sides
  • (12) ¾” plywood at 8” x 31-7/8” – Drawer Box Front & Back
  • (8) ¾” plywood at 5-3/16” x 33-15/16” – Drawer Front Slats
  • (4) ¾” plywood at 5-7/16” x 33-15/16” – Drawer Front Slats

Step 1:

Edge banding will be applied to the exposed edges of the plywood prior to assembly. Cut the pieces for the bottom and the side panels. Set the Kreg jig for ¾” material and drill pocket holes in each end of the bottom. Secure the sides and bottom using glue and 1-1/4” pocket hole screws.

Step 2:


Cut the piece for the back and drill pocket holes in all four edges. Position the back inside the sides, resting on the bottom, and secure using glue and 1-1/4” pocket hole screws.

Step 3:

Cut the piece for the divider and drill pocket holes in the back and bottom edges. Secure to the back and bottom of the cabinet using glue and 1-1/4” pocket hole screws.

Step 4:

Cut the pieces for the base. Drill pocket holes in each end of the shorter pieces. Also drill pocket holes along the long edges of each piece. Assemble the frame as shown using glue and 1-1/4” pocket hole screws. Position the base frame on the bottom as indicated in the drawing. Secure to the base using glue and 1-1/4” pocket hole screws.

Step 5:

Cut the pieces for the stretchers and drill pocket holes in each end. Secure to the sides and divider as shown using glue and 1-1/4” pocket hole screws.

Step 6:

Cut the piece for the top. Secure to the cabinet using 1-1/4” pocket hole screws at the back, and 1-1/4” brad nails through the top into the sides and divider.

Step 7:

Cut the pieces for the drawer boxes. Drill pocket holes in all four edges of the bottom as well as each end of the sides. Assemble the drawer box as shown using glue and 1-1/4” pocket hole screws. Install the drawer slides according to the manufacturer’s installation instructions, locating them flush with the front of the sides and divider. Make any necessary adjustments.

Step 8:

Cut the pieces for the drawer fronts. The top and bottom slat pieces are wider than the center slat pieces (see the drawing). The top slats will be flush with the top edge of the dresser, all slats will be flush with the sides. There will be a 1/8” gap between the slats as well as at the center. Starting with the top slats, secure to the drawer box using glue and 1-1/4” brad nails. Space the remaining slats, then secure with glue and 1-1/4” brad nails working your way down. Fill any Screw, Nail or Pocket Holes, Sand and Finish as Desired.


The original plan can be found at http://www.thedesignconfidential.com/2014/04/free-diy-furniture-plans-how-to-build-laguna-dresser/

 
[email_link]

5 Drawer Dresser

Materials:

  • 1-1/4″ pocket hole screws
  • 1/2″ brad nails
  • 1-1/4″ brad nails
  • Edge banding for the exposed edges of the plywood, optional
  • Four furniture legs or bun feet at least 4″ tall plus hardware
  • Five sets of 14″ drawer slides
  • Five drawer pulls

Lumber:

  • 1 – 1×6 at 8′
  • 1 – 1×6 at 4′
  • 3 – 1×10 at 8′
  • One 4′ x 4′ sheet of 3/4″ plywood
  • Two sheets of 3/4″ plywood
  • One half sheet of 1/2″ plywood
  • One quarter sheet of 1/4″ plywood

Cut List:

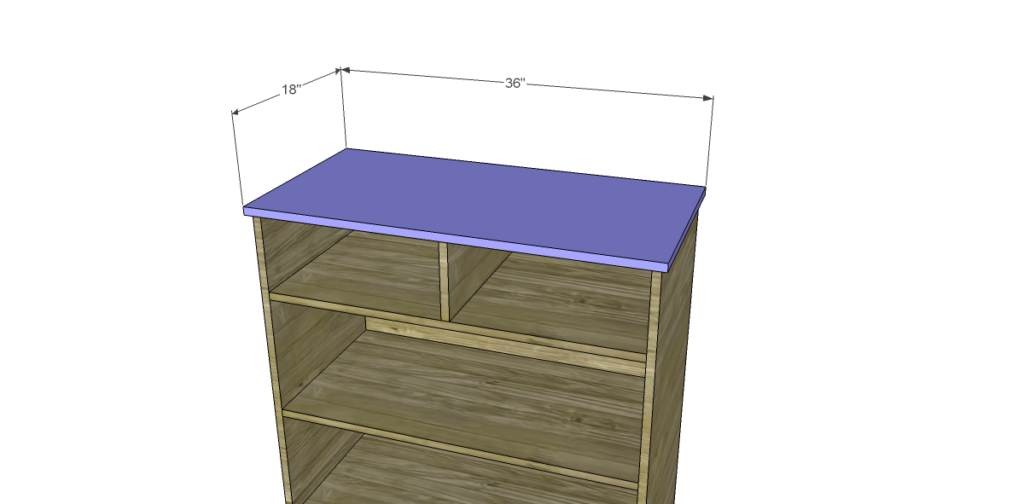
  • 2- 3/4″ plywood at 18″ x 36″ – Bottom & Top
  • 2 – 3/4″ plywood at 17-1/2″ x 44″ – Sides
  • 1 – 3/4″ plywood at 33-1/2″ x 44″ – Back
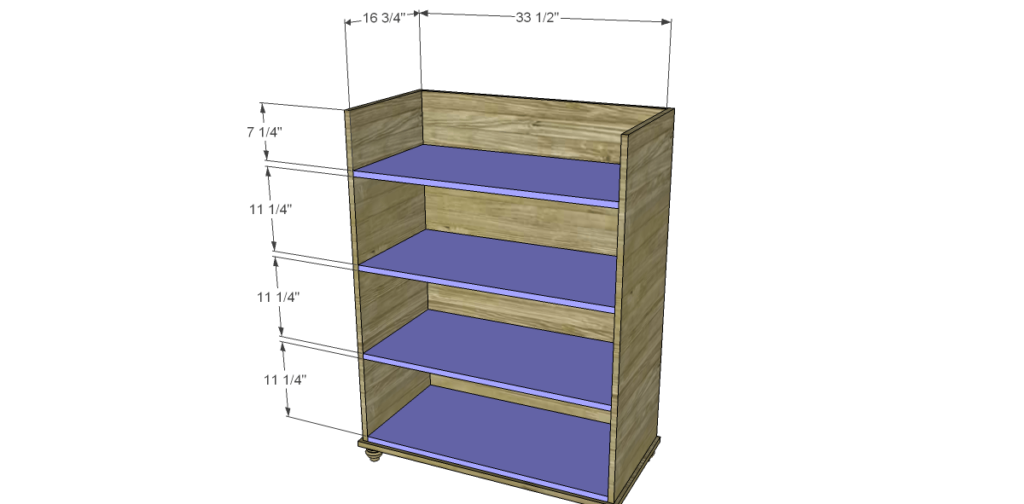
  • 4 – 3/4″ plywood at 16-3/4″ x 33-1/2″ – Shelves
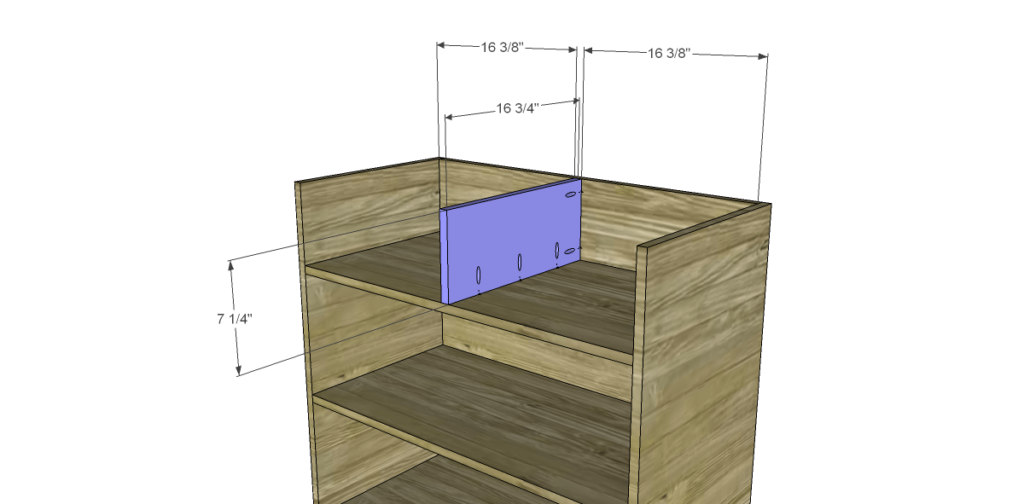
  • 1 – 3/4″ plywood at 7-1/4″ x 16-3/4″ – Divider
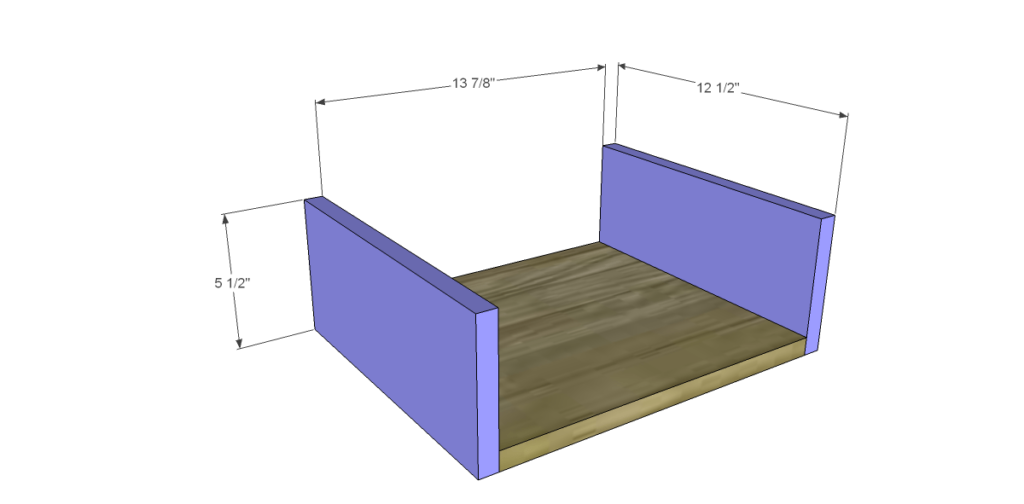
  • 2 – 3/4″ plywood at 12-1/2″ x 13-7/8″ – Small Drawer Bottom
  • 4 – 1×6 at 12-1/2″ – Small Drawer Sides
  • 4 – 1×6 at 15-3/8″ – Small Drawer Front & Back
  • 3 – 3/4″ plywood at 12-1/2″ x 31″ – Large Drawer Bottom
  • 6 – 1×10 at 12-1/2″ – Large Drawer Sides
  • 6 – 1×10 at 32-1/2″ – Large Drawer Front & Back
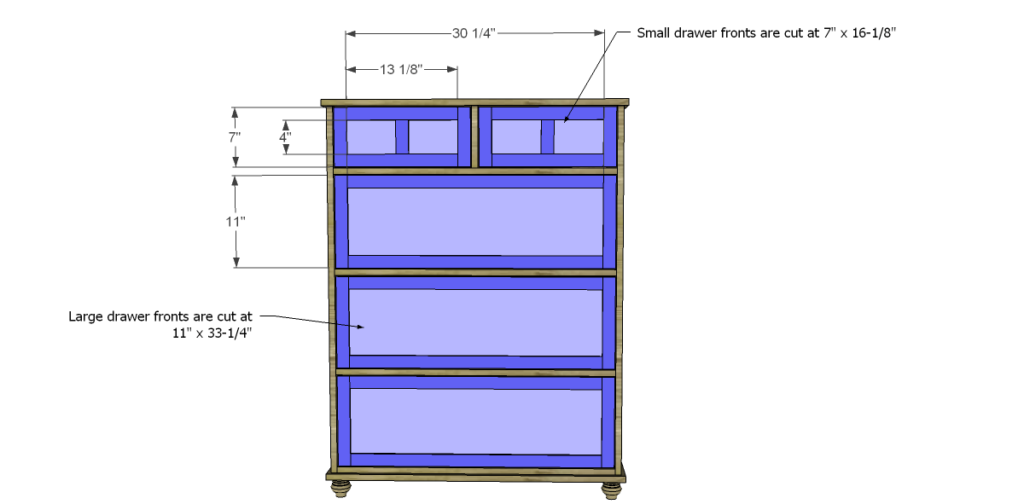
  • 2 – 1/2″ plywood at 7″ x 13-1/8″ – Small Drawer Front Base
  • 3 – 1/2″ plywood at 11″ x 33-1/4″ – Large Drawer Front Base
  • 4 – 1/4″ plywood at 1-1/2″ x 7″ – Small Drawer Trim
  • 4 – 1/4″ plywood at 1-1/2″ x 13-1/8″ – Small Drawer Trim
  • 2 – 1/4″ plywood at 1-1/2″ x 4″ – Small Drawer Trim
  • 6 – 1/4″ plywood at 1-1/2″ x 11″ – Large Drawer Trim
  • 6 – 1/4″ plywood at 1-1/2″ x 30-1/4″ – Large Drawer Trim

Step 1:

Edge banding should be applied to all exposed edges of plywood before assembly. Cut the pieces for the bottom. Attach the hardware for the legs to the bottom positioning the legs so they are at least 1″ from each edge.

Step 2:

Cut the pieces for the sides and drill pocket holes at the bottom edge. Position the sides so they are set back 1/2″ from the front edge, and 1/2″ from the sides. Secure using glue and pocket hole screws.

Step 3:

Cut the piece for the back and drill pocket holes in the side edges as well as the bottom edge. Attach to the sides and bottom using glue and pocket hole screws.

Step 4:

Cut the pieces for the shelves. Drill pocket holes in the sides and back edge of three shelves. Position the fourth shelf on the bottom as shown in the drawing. Secure with glue and brad nails. Attach the other shelves as shown using glue and pocket hole screws.

Step 5:

Cut the piece for the divider and drill pocket holes as shown. Position the divider on the top shelf and secure with glue and pocket hole screws.

Step 6:

Cut the piece for the top. The front and sides will overhang by 1/2″. Secure with glue and brad nails through the top into the sides and back.

Step 7:

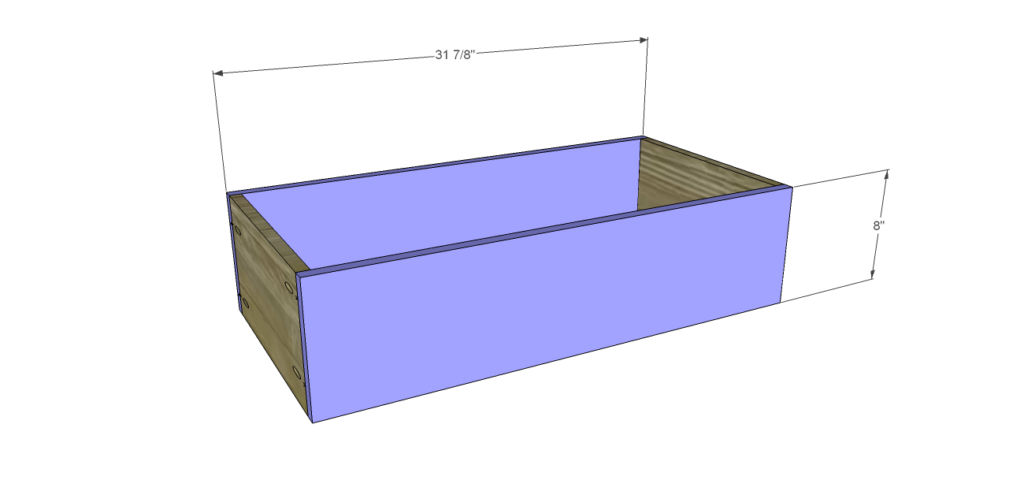
Cut the pieces for the drawer boxes. Drill pocket holes in all four edges of the bottom pieces as well as each end of the side pieces. Attach the sides to the bottom using glue and pocket hole screws, then attach the front and back in the same manner. Install the drawer slides according to the manufacturer’s instructions.

Step 8:

Cut the pieces for the drawer front bases as well as the trim pieces. Position the trim pieces and secure using glue and 1/2″ brad nails. Clamp until dry. There will be a 1/8″ gap around all sides of the drawer fronts. Install the drawer pulls.

Finish as desired.

The original plan can be found at http://designsbystudioc.com/free-plans-to-build-a-pier-one-inspired-ashworth-5-drawer-dresser/

 
[email_link]
 

4 Drawer Dresser

Materials:

  • 1 – 2×2 at 3’
  • 2 – 1×2 at 8’
  • 4 – 1×6 at 8’
  • 1 sheet of ¾” plywood
  • 1-1/4” pocket hole screws
  • 1-1/4” screws
  • 1-1/4” brad nails
  • Edge banding, if desired
  • 4 cabinet pulls
  • 4 sets of 16” drawer slides
  • 4 – 3” x 3” Flat Angle Plates
  • 6 – 3” x 3” Flat T Plates

Cut List:

  • 4 – 2×2 at 6-1/4” – Legs
  • 8 – 1×2 at 5-1/2” – Leg Braces
  • 2 – ¾” plywood at 18” x 36” – Top & Bottom
  • 2 – ¾” plywood at 18” x 18-3/4”- Sides
  • 1 – ¾” plywood at 18-3/4” x 34-1/2”- Back
  • 2 – 1×2 at 34-1/2” – Stretchers
  • 1 – 1×2 at 5-3/4” – Divider
  • 1 – 1×2 at 15-3/4” – Drawer Slide Support
  • 2 – ¾” plywood at 14-3/8” x 14-1/2” – Small Drawer Bottoms
  • 4 – 1×6 at 14-1/2” – Small Drawer Sides
  • 4 – 1×6 at 15-7/8” – Small Drawer Front & Back
  • 1 – ¾” plywood at 14-1/2” x 32” – Large Drawer Bottoms
  • 4 – 1×6 at 14-1/2” – Large Drawer Sides
  • 4 – 1×6 at 33-1/2” – Large Drawer Front & Back
  • 2 – ¾” plywood at 5-1/2” x 16-5/8” – Small Drawer Fronts
  • 2 – ¾” plywood at 5-1/2” x 34-1/4” – Large Drawer Fronts

Step 1:

Edge banding will be applied to the exposed edges of the plywood before assembly. Cut the pieces for the legs and the leg braces. Set the Kreg jig for ¾” material and drill pocket holes in one end of each of the leg braces. Attach to the leg using glue and 1-1/4” pocket hole screws. Cut the piece for the bottom. Attach the legs to each corner using glue and countersunk 1-1/4” screws.

Step 2:

Cut the pieces for the sides and drill pocket holes in each end. Attach to the bottom using glue and 1-1/4” pocket hole screws.

Step 3:

Cut the piece for the back and drill pocket holes in all four edges. Secure to the sides and back using glue and 1-1/4” pocket hole screws.

Step 4:

Cut the piece for the top. Secure with glue and 1-1/4” pocket hole screws through the sides and back.

Step 5:

Cut the pieces for the stretchers and drill pocket holes at each end. Position as shown then secure using glue and 1-1/4” pocket hole screws.

Cut the pieces for the divider and drawer slide support. Drill holes at each end of the drawer slide support. Position the divider as shown then secure using glue and 1-1/4” brad nails. Position the drawer slide support then secure using glue and 1-1/4” pocket hole screws.

Step 6:

Cut the pieces for the drawer boxes. Drill pocket holes in each end of the sides as well as all four edges of the bottoms. Assemble the drawers as shown using glue and 1-1/4” pocket hole screws. Install the drawer slides according to the manufacturer’s installation instructions. Make any necessary adjustments.

Step 7:

Cut the pieces for the drawer fronts. Mark the position for the drawer pull and drill the holes. Install the drawer box, then shim the drawer front in place. Finish drilling the holes for the drawer pulls, then install.

Paint the angle and bracket hardware as desired, then install. Fill any Screw, Nail or Pocket Holes, Sand and Finish as Desired.


The original plan can be found at http://www.thedesignconfidential.com/2013/08/free-diy-furniture-plans-build-four-drawer-campaign-side-table-dresser/
 
[email_link]

Brecken Dresser

Materials:

  • 1-1/4” pocket hole screws
  • 2-1/2” pocket hole screws
  • 1-1/4” brad nails
  • 1-3/4” brad nails
  • Edge banding
  • 3 sets of 16” Drawer slides
  • Cabinet pulls
  • Wood glue
  • Sandpaper (100, 150, 220 grits)
  • Finishing supplies (primer & paint, or stain, sealer)

Lumber:

  • 8 – ¼” x 2 craft boards at 3’
  • 3 – 1×6 at 8’
  • 2 – 2×2 at 8’
  • 1 – 4’ x 8’ sheet of ¼” plywood
  • 1 – 2’ x 4’ sheet of ½” plywood
  • 1 – 4’ x 8’ sheet of ¾” plywood

Cut List:

  • 4 – 2×2 at 29-1/8” – Legs
  • 4 – 2×2 at 15” – Side Framing
  • 2 – ¾” plywood at 15” x 21-3/4” – Side Panels
  • 6 – 2×2 at 32” – Front & Back Stretchers
  • 1 – ¼” plywood at 24-3/4” x 33-1/2” – Back
  • 1 – ¾” plywood at 18-1/4” x 35” – Top
  • 6 – 1×6 at 16” – Drawer Box Sides
  • 6 – 1×6 at 31” – Drawer Box Front & Back
  • 3 – ¼” plywood at 15” x 31-1/2” – Drawer Bottom
  • 3 – ½” plywood at 6” x 31-3/4” – Drawer Front Base
  • 12 – ¼” x 2” craft board at 6” – Drawer Front Trim
  • 12 – ¼” x 2” craft board at 15-7/8” – Drawer Front Trim

Step 1:

Cut the pieces for the legs and the side framing. With the pocket hole jig set for 1-1/2” material, drill pocket holes in each end. Secure the framing pieces to the legs using glue and 2-1/2” pocket hole screws.

Cut the pieces for the side panels. Set the pocket hole jig for ¾” material and drill pocket holes in all four edges. Secure the panels to the side frames using glue and 1-1/4” pocket hole screws. The back face of the panel will be flush with the back face of the frame.

Step 2:

Cut the pieces for the stretchers. Set the pocket hole jig for 1-1/2” material and drill pocket holes in each end. Secure the stretchers as indicated in the drawings using glue and 2-1/2” pocket hole screws.

Step 3:

Cut the piece for the back panel. Position the back panel so the top is flush with the top of the back legs securing in place using glue and 1-1/4” brad nails.

Step 4:

Cut the piece for the top. If using edge banding, it will be applied to the exposed edges of the top prior to attaching the top to the cabinet. Position the top on the cabinet so that the sides and front are flush with the legs, framing, and front stretchers (the top will overhang the back panel) securing in place using glue and 1-3/4” brad nails.

Step 5:

Cut the pieces for the drawer box sides, front, and back. Cut the groove in the bottom edge of each piece at 1/4″ wide by 1/4″ deep using a table saw or a router and a straight bit. Set the pocket hole jig for 3/4″ material and drill pocket holes in each end of the drawer box front and back pieces on the opposite side as the groove. Make sure that the pocket holes will not interfere with the groove. Secure the sides to the back using glue and 1-1/4″ pocket hole screws.

Step 6:

Cut the piece for the drawer bottom. Slide the bottom into the grooves in the sides and back. The piece should fit snugly but not too tight.

Step 7:

Insert the front edge of the drawer box bottom into the groove on the drawer box front. Secure the drawer box front to the drawer box sides using glue and 1-1/4″ pocket hole screws. Install the drawer slides according to the manufacturer’s installation instructions locating them ¾” back from the front edge of the sides.

Step 8:

Cut the pieces for the drawer fronts. Cut the ¼” detail pieces with 45° miters at each end. Evenly spread glue on the back side of each piece and clamp the pieces in place until dry. Mark the position for the drawer pulls and drill the holes. Shim the drawer front in the opening – there will be a 1/8” gap around all sides – then drive screws through the holes for the drawer pulls into the drawer box. Open the drawer, and secure the drawer front using countersunk 1-1/4” screws from the inside. Remove the screws from the holes for the drawer pull then finish drilling the holes. Install the drawer pull.

Finish as desired


The original plan can be found at http://designsbystudioc.com/diy-plans-build-brecken-dresser/

[email_link]

3 Drawer Dresser

Materials:

  • 3 – 1×2 at 6’
  • 3 – 1×10 at 6’
  • 2 – 1×10 at 8’
  • 1 – 2×2 at 4’
  • 2 sheets of ¾” plywood
  • 1-1/4” pocket hole screws
  • 2-1/2” screws
  • 1-1/4” brad nails
  • 3 sets of 16” drawer slides


Cut List:

  • 1 – ¾” plywood at 17” x 34-1/2” – Bottom
  • 2 – 1×2 at 17” – Bottom Frame
  • 2 – 1×2 at 36” – Bottom Frame
  • 4 – 2×2 at 4-3/4” – Legs
  • 2 – ¾” plywood at 17-3/4” x 34-1/4” – Sides
  • 1 – ¾” plywood at 34-1/4” x 34-1/2” – Back
  • 2 – 1×2 at 34-1/2” – Stretchers
  • 1 – ¾” plywood at 18-1/2” x 36” – Top
  • 3 – ¾” plywood at 14-1/2” x 32” – Drawer Bottoms
  • 6 – 1×10 at 14-1/2” – Drawer Box Sides
  • 6 – 1×10 at 33-1/2” – Drawer Box Front & Back
  • 3 – ¾” plywood at 11-1/4” x 36” – Drawer Fronts

Step 1:

Cut the pieces for the bottom panel and the bottom frame. Set the Kreg jig for ¾” material and drill pocket hole in each end of the shorter 1×2 frame pieces as well as all four edges of the bottom panel. Assemble the panel as shown using glue and 1-1/4” pocket hole screws. Insert the panel then secure using glue and 1-1/4” pocket hole screws. The top face of the panel will be flush with the top edge of the frame.

Step 2:

Cut the pieces for the legs. Position them on the underside of the bottom snug against the frame in each corner. Secure using glue and countersunk 2-1/2” screws through the bottom into the legs.

Step 3:

Cut the pieces for the sides and drill pocket holes in the top and bottom edges. Secure to the bottom frame locating them ¾” back from the front edge of the bottom frame.

Step 4:

Cut the piece for the back and drill pocket holes in all four edges of the panel. Secure to the sides and bottom using glue and 1-1/4” pocket hole screws.

Step 5:

Cut the pieces for the stretchers and drill pocket holes in each end. Secure to the sides as shown using glue and 1-1/4” pocket hole screws.

Step 6:

Cut the piece for the top. The front and sides will overhang by ½”. Secure using glue and 1-1/4” pocket hole screws through the sides and back.

Step 7:

Cut the pieces for the drawer boxes. Drill pocket holes in all four edges of the bottom as well as each end of the sides. Assemble the drawer box as shown using glue and 1-1/4” pocket hole screws. Install the drawer slides according to the manufacturer’s installation instructions, locating them ¾” back from the front edge of the sides. Make any necessary adjustments.

Step 8:

Cut the pieces for the drawer fronts. Mark the position for the drawer pulls and drill the holes. Starting with the bottom drawer front, position it with a 1/8” gap at the bottom then drive screws through the holes for the drawer pulls into the drawer box. Open the drawer, and secure the drawer front using countersunk 1-1/4” screws from the inside. Position the next drawer fronts in the same manner with a 1/8” gap between them and secure the same way. Remove the screws from the holes for the drawer pull then finish drilling the holes. Install the drawer pull.

Fill any Screw, Nail or Pocket Holes, Sand and Finish as Desired.


The original plan can be found at http://www.thedesignconfidential.com/2014/01/free-diy-furniture-plans-how-to-build-oslo-3-drawer-dresser/
 
[email_link]

1 6 7 8 9 10 13